


目录
Easy Excel 写入
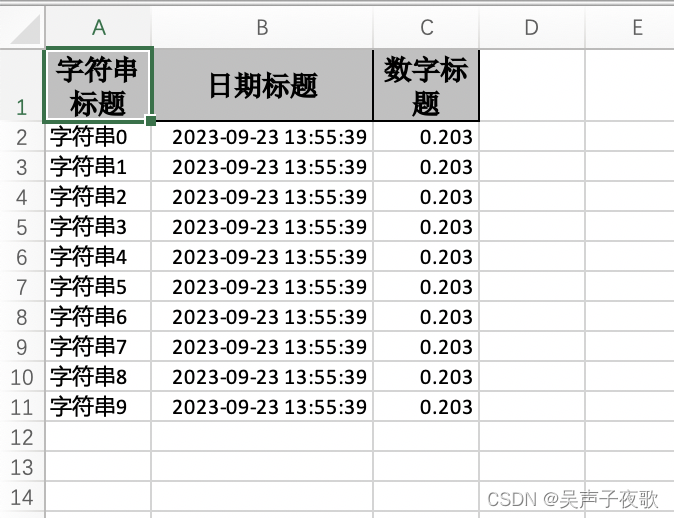
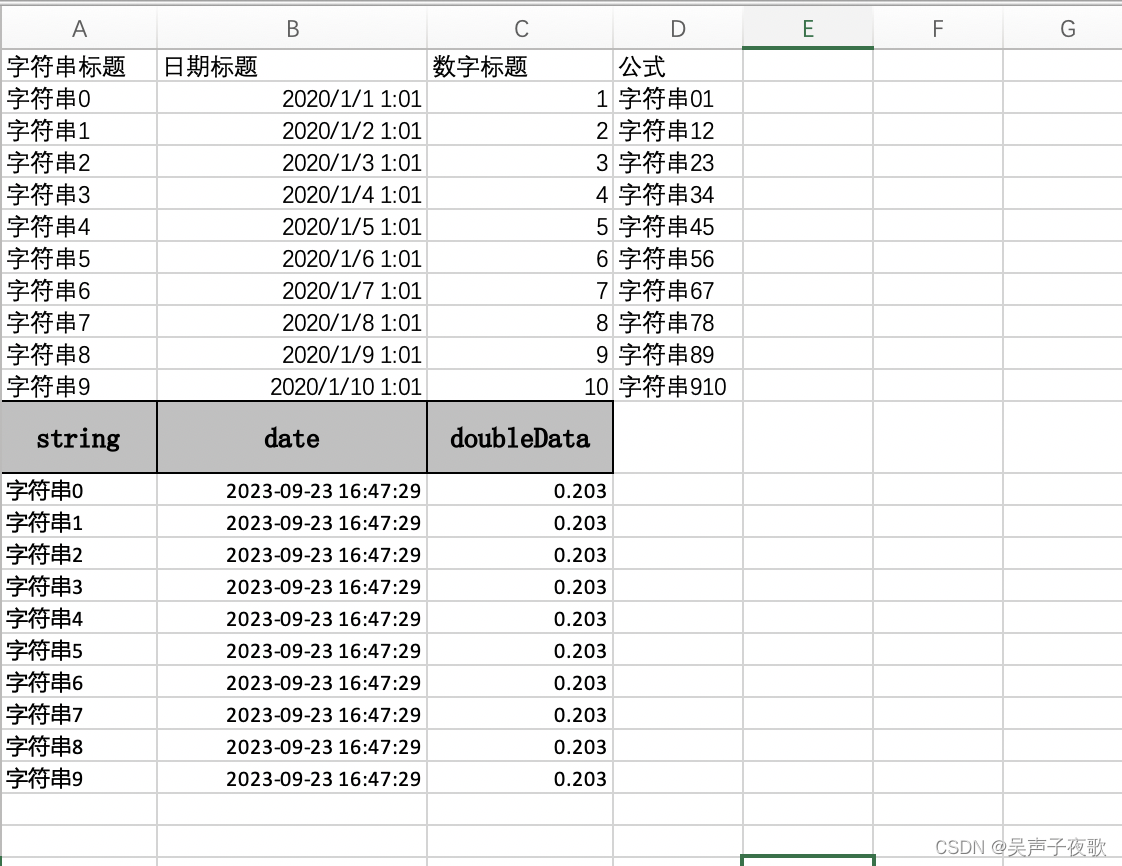
1、简单写入
1.1、方式一
@Data
public class WriteData {
    @ExcelProperty("字符串标题")
    private String string;

    @ExcelProperty("日期标题")
    private Date date;

    @ExcelProperty("数字标题")
    private Double doubleData;

    //忽略该字段
    @ExcelIgnore
    private String ignore;
}
/**
 * 生成数据
 * @return
 */
private List<WriteData> data() {
    List<WriteData> list = ListUtils.newArrayList();
    for (int i = 0; i < 10; i++) {
        WriteData data = new WriteData();
        data.setString("字符串" + i);
        data.setDate(new Date());
        data.setDoubleData(0.203);
        data.setIgnore("XXXX");
        list.add(data);
    }
    return list;
}


/**
 * 简单写入:方式一
 */
@Test
public void simpleWrite1() {
    // 注意 simpleWrite在数据量不大的情况下可以使用(5000以内,具体也要看实际情况),
    // 如果数据量大,可以参照 重复多次写入
    String fileName = "./src/main/resources/write.xlsx";
    // 这里 需要指定写用哪个class去写,然后写到第一个sheet,名字为模板 然后文件流会自动关闭
    EasyExcel.write(fileName, WriteData.class)
            .sheet("模板")
            .doWrite(() -> {
                // 分页查询数据
                return data();
            });
}
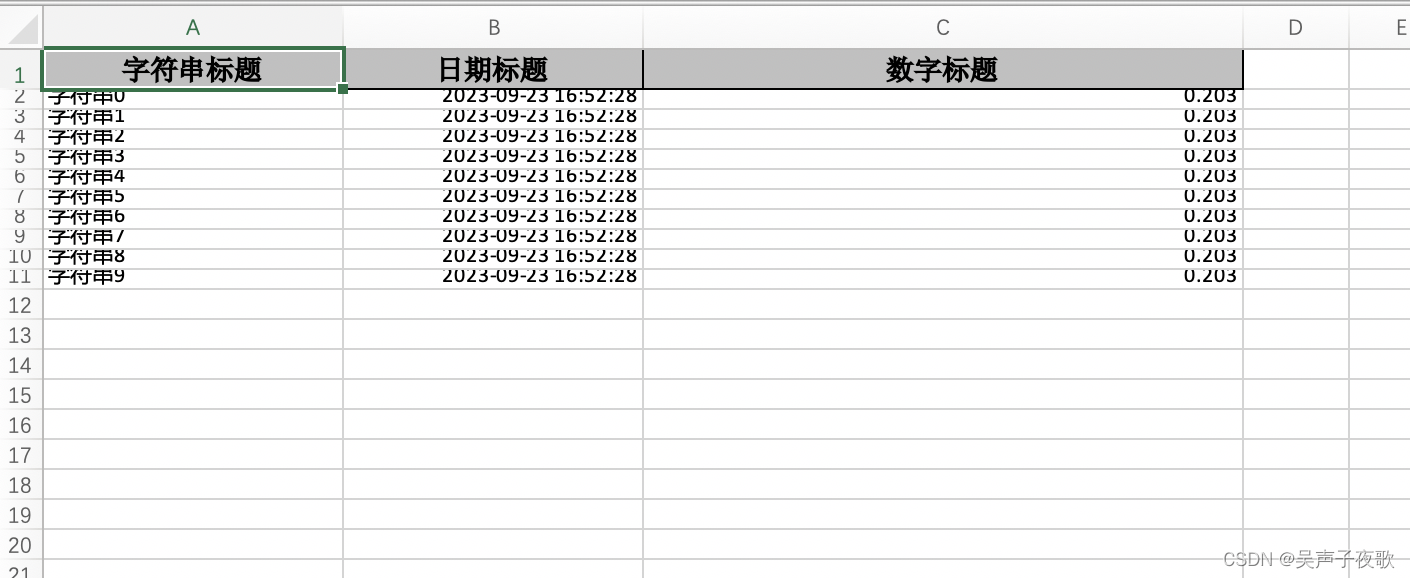
1.2、方式二
/**
 * 简单写入:方式二
 */
@Test
public void simpleWrite2() {
    String fileName = "./src/main/resources/write2.xlsx";
    // 这里 需要指定写用哪个class去写,然后写到第一个sheet,名字为模板 然后文件流会自动关闭
    EasyExcel.write(fileName, WriteData.class).sheet("模板").doWrite(data());
}
1.3、方式三
try (ExcelWriter excelWriter = EasyExcel.write(fileName, DemoData.class).build()) {
            WriteSheet writeSheet = EasyExcel.writerSheet("模板").build();
            excelWriter.write(data(), writeSheet);
        }
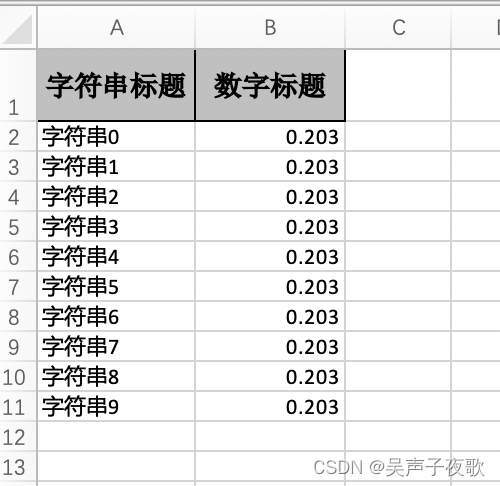
2、根据参数只导出指定列
2.1、忽略部分列
/**
 * 忽略部分列
  */
@Test
public void excludeOrIncludeWrite() {
    String fileName = "./src/main/resources/write4.xlsx";
    // 这里需要注意 在使用ExcelProperty注解的使用,如果想不空列则需要加入order字段,
    // 而不是index,order会忽略空列,然后继续往后,而index,不会忽略空列,在第几列就是第几列。

    // 根据用户传入字段 假设我们要忽略 date
    Set<String> excludeColumnFiledNames = new HashSet<>();
    excludeColumnFiledNames.add("date");
    EasyExcel.write(fileName, WriteData.class).excludeColumnFieldNames(excludeColumnFiledNames)
            .sheet("模板").doWrite(data());

}
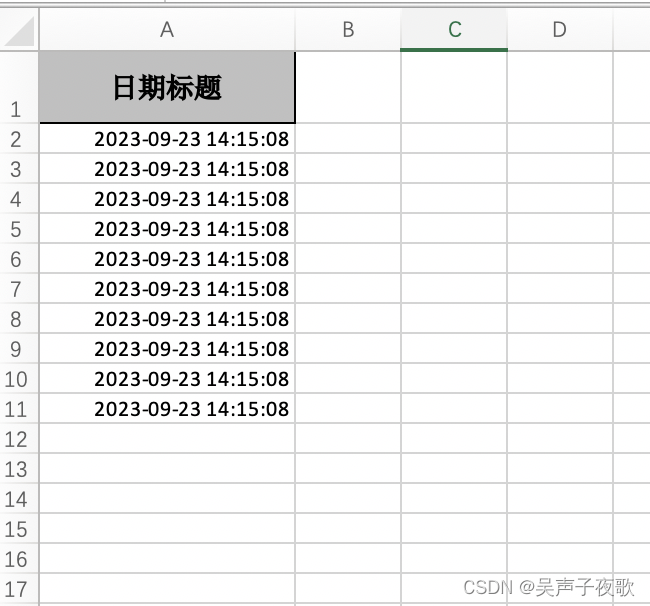
2.2、导出指定列
/**
 * 导出指定列
 */
@Test
public void excludeOrIncludeWrite2() {
    String fileName = "./src/main/resources/write5.xlsx";
    // 这里需要注意 在使用ExcelProperty注解的使用,如果想不空列则需要加入order字段,
    // 而不是index,order会忽略空列,然后继续往后,而index,不会忽略空列,在第几列就是第几列。

    // 根据用户传入字段 假设我们要忽略 date
    Set<String> includeColumnFiledNames = new HashSet<>();
    includeColumnFiledNames.add("date");
    EasyExcel.write(fileName, WriteData.class).includeColumnFieldNames(includeColumnFiledNames)
            .sheet("模板").doWrite(data());
}
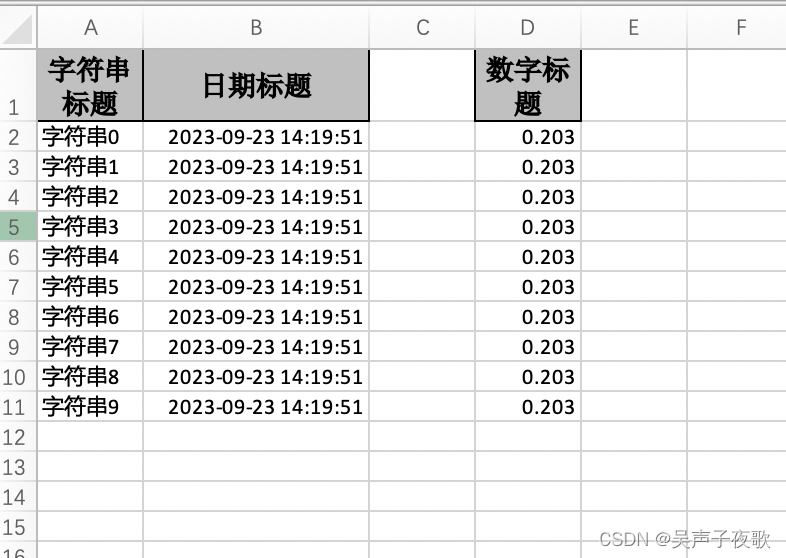
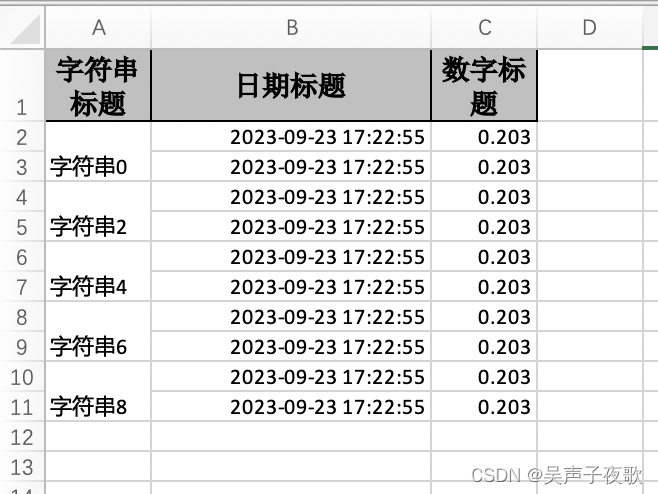
3、指定写入的列
@Data
public class IndexData {
    @ExcelProperty(value = "字符串标题", index = 0)
    private String string;
    @ExcelProperty(value = "日期标题", index = 1)
    private Date date;
    /**
     * 这里设置3 会导致第二列空的
     */
    @ExcelProperty(value = "数字标题", index = 3)
    private Double doubleData;
}
@Test
public void indexWrite() {
    String fileName = "./src/main/resources/index.xlsx";
    EasyExcel.write(fileName, IndexData.class).sheet("模板")
            .doWrite(data());
}
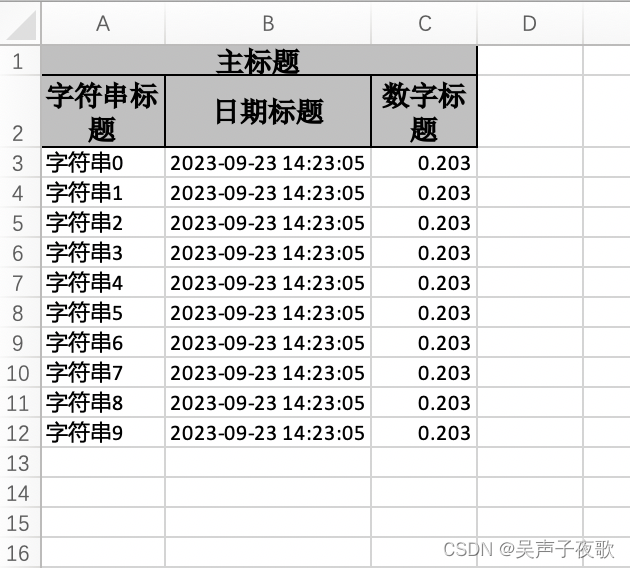
4、复杂头写入
@Data
public class ComplexHeadData {
    @ExcelProperty({"主标题", "字符串标题"})
    private String string;
    @ExcelProperty({"主标题", "日期标题"})
    private Date date;
    @ExcelProperty({"主标题", "数字标题"})
    private Double doubleData;
}
@Test
public void complexHeadWrite() {
    String fileName = "./src/main/resources/head.xlsx";
    EasyExcel.write(fileName, ComplexHeadData.class).sheet("模板")
            .doWrite(data());
}
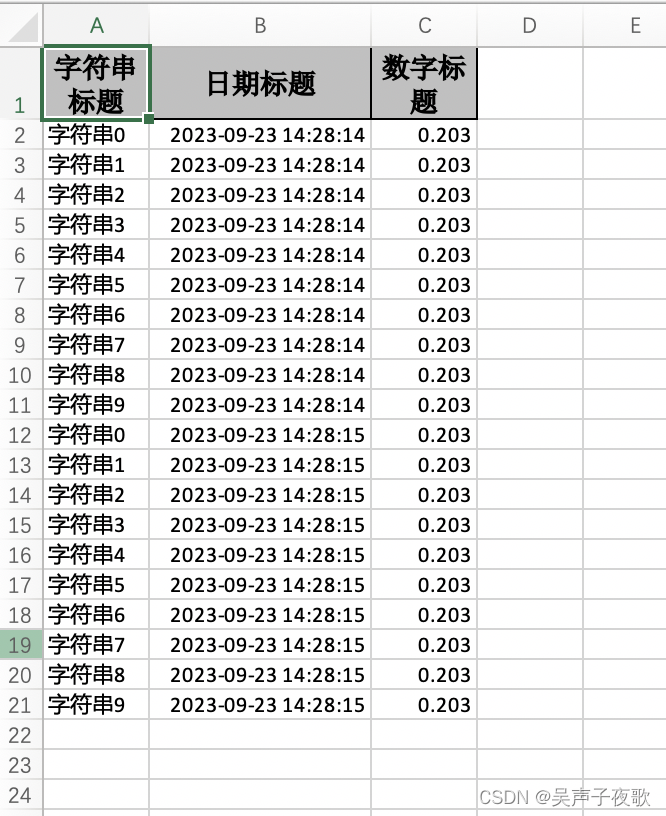
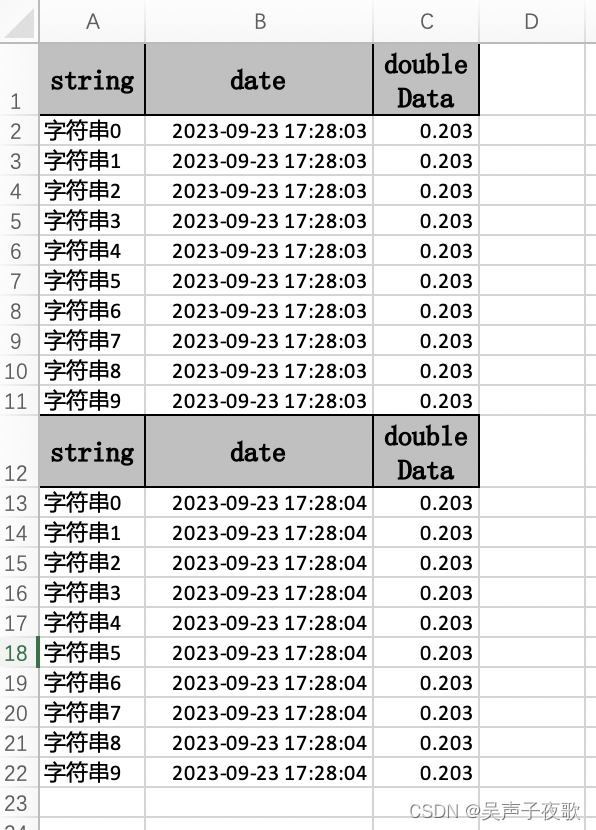
5、重复多次写入(写到单个或者多个Sheet)
5.1、同一个Sheet多次写入
/**
 * 同一个sheet,重复写
 */
@Test
public void repeatedWrite1() {
    String fileName = "./src/main/resources/repeated.xlsx";
    try (ExcelWriter excelWriter = EasyExcel.write(fileName, WriteData.class).build()) {
        // 这里注意 如果同一个sheet只要创建一次
        WriteSheet writeSheet = EasyExcel.writerSheet("模板").build();
        // 去调用写入,这里我调用了五次,实际使用时根据数据库分页的总的页数来
        for (int i = 0; i < 2; i++) {
            // 分页去数据库查询数据 这里可以去数据库查询每一页的数据
            List<WriteData> data = data();
            excelWriter.write(data, writeSheet);
        }
    }
}
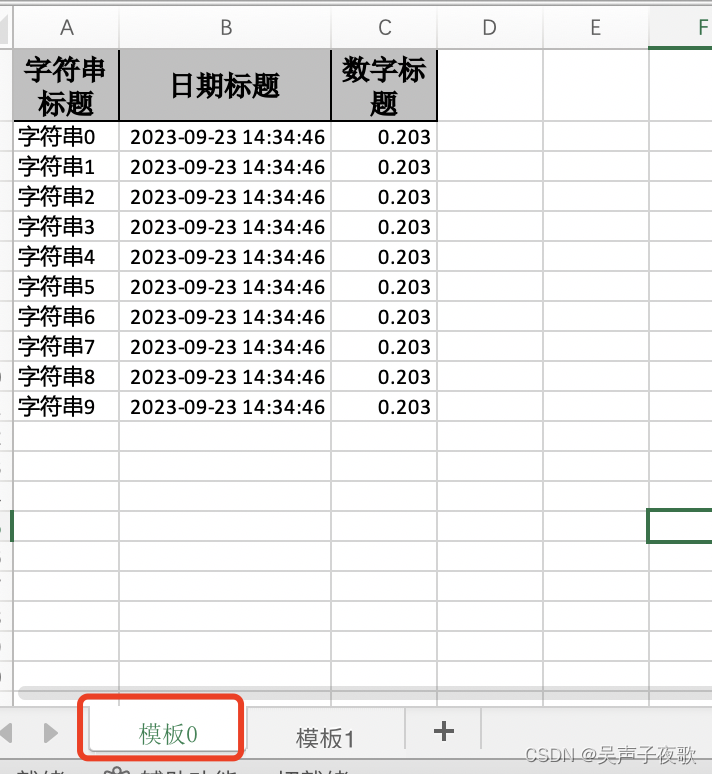
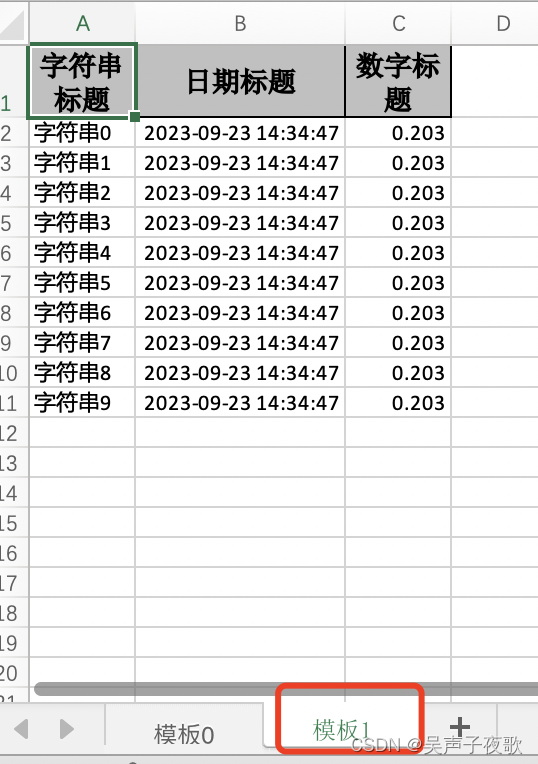
5.2、同一个对象,写入到不同的Sheet
/**
 * 同一个对象,写入到不同的Sheet
 */
@Test
public void repeatedWrite2() {
    String fileName = "./src/main/resources/repeated.xlsx";
    try (ExcelWriter excelWriter = EasyExcel.write(fileName, WriteData.class).build()) {
        // 去调用写入,这里我调用了2次,实际使用时根据数据库分页的总的页数来。这里最终会写到5个sheet里面
        for (int i = 0; i < 2; i++) {
            // 每次都要创建writeSheet 这里注意必须指定sheetNo 而且sheetName必须不一样
            WriteSheet writeSheet = EasyExcel.writerSheet(i, "模板" + i).build();
            // 分页去数据库查询数据 这里可以去数据库查询每一页的数据
            List<WriteData> data = data();
            excelWriter.write(data, writeSheet);
        }
    }
}
5.3、不同对象、写入到不同的Sheet
@Test
public void repeatedWrite3() {
    String fileName = "./src/main/resources/repeated.xlsx";
    try (ExcelWriter excelWriter = EasyExcel.write(fileName).build()) {
        // 去调用写入,这里我调用了2次,实际使用时根据数据库分页的总的页数来。这里最终会写到2个sheet里面
        for (int i = 0; i < 2; i++) {
            // 每次都要创建writeSheet 这里注意必须指定sheetNo 而且sheetName必须不一样。这里注意DemoData.class 可以每次都变,我这里为了方便 所以用的同一个class
            // 实际上可以一直变
            WriteSheet writeSheet = EasyExcel.writerSheet(i, "模板" + i).head(WriteData.class).build();
            // 分页去数据库查询数据 这里可以去数据库查询每一页的数据
            List<WriteData> data = data();
            excelWriter.write(data, writeSheet);
        }
    }
}
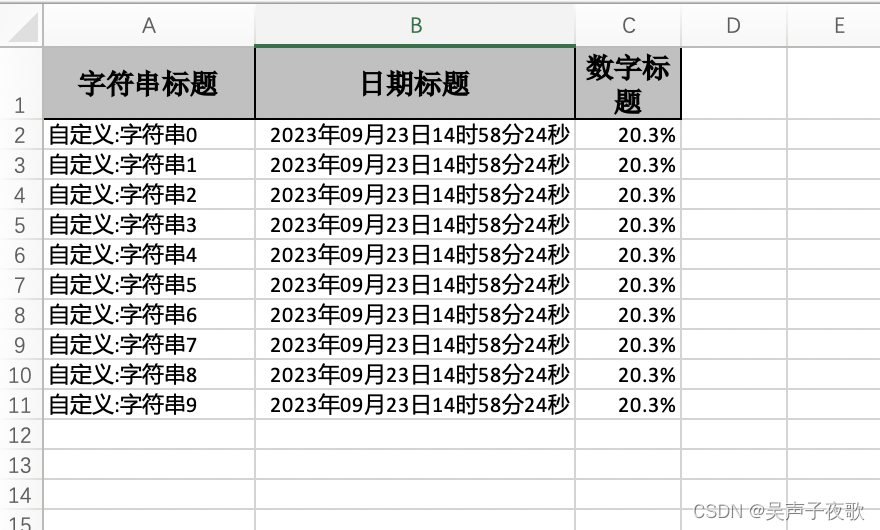
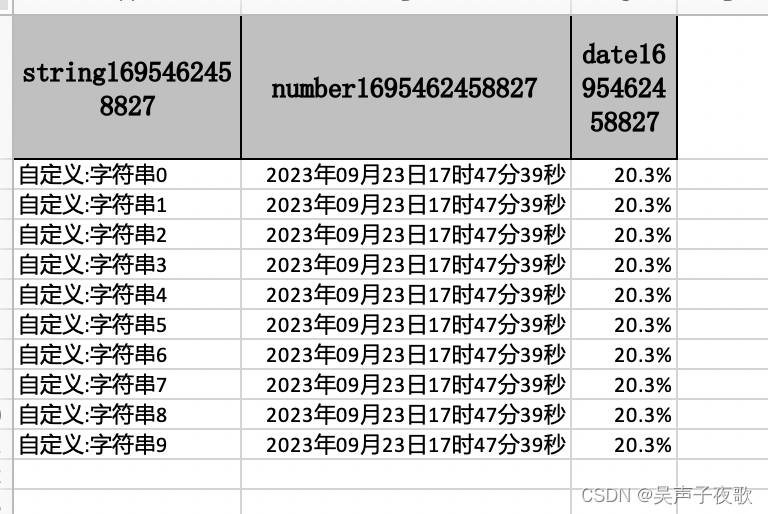
6、日期、数字或者自定义格式转换
@Data
public class WriteConverData {
    /**
     * 所有的 字符串起前面加上"自定义:"三个字
     */
    @ExcelProperty(value = "字符串标题", converter = CustomStringStringConverter.class)
    private String string;
    /**
     * 我想写到excel 用年月日的格式
     */
    @DateTimeFormat("yyyy年MM月dd日HH时mm分ss秒")
    @ExcelProperty("日期标题")
    private Date date;
    /**
     * 我想写到excel 用百分比表示
     */
    @NumberFormat("#.##%")
    @ExcelProperty(value = "数字标题")
    private Double doubleData;
}
/**
 * 日期、数字或者自定义格式转换
 */
@Test
public void converterWrite() {
    String fileName = "./src/main/resources/converter.xlsx";
    EasyExcel.write(fileName, WriteConverData.class).sheet("模板").doWrite(data());

}
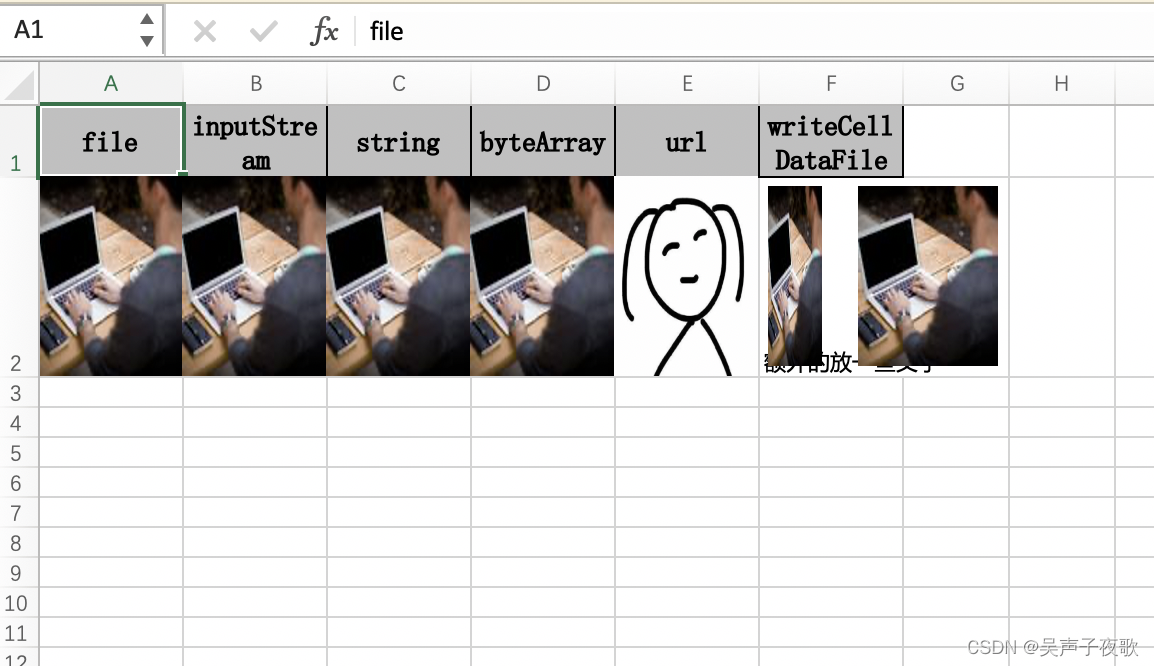
7、图片导出
@Data
@ContentRowHeight(100)
@ColumnWidth(100 / 8)
public class ImageDemoData {
    private File file;
    private InputStream inputStream;
    /**
     * 如果string类型 必须指定转换器,string默认转换成string
     */
    @ExcelProperty(converter = StringImageConverter.class)
    private String string;
    private byte[] byteArray;
    /**
     * 根据url导出
     */
    private URL url;

    /**
     * 根据文件导出 并设置导出的位置。
     */
    private WriteCellData<Void> writeCellDataFile;
}
@Test
public void iageWrite() throws Exception {
    String fileName = "./src/main/resources/image.xlsx";

    // 这里注意下 所有的图片都会放到内存 暂时没有很好的解法,大量图片的情况下建议 2选1:
    // 1. 将图片上传到oss 或者其他存储网站: https://www.aliyun.com/product/oss ,然后直接放链接
    // 2. 使用: https://github.com/coobird/thumbnailator 或者其他工具压缩图片

    String imagePath = "./src/main/resources/1.jpg";
    try (InputStream inputStream = FileUtils.openInputStream(new File(imagePath))) {
        List<ImageDemoData> list = ListUtils.newArrayList();
        ImageDemoData imageDemoData = new ImageDemoData();
        list.add(imageDemoData);
        // 放入五种类型的图片 实际使用只要选一种即可
        imageDemoData.setByteArray(FileUtils.readFileToByteArray(new File(imagePath)));
        imageDemoData.setFile(new File(imagePath));
        imageDemoData.setString(imagePath);
        imageDemoData.setInputStream(inputStream);
        imageDemoData.setUrl(new URL(
                "https://gimg2.baidu.com/image_search/src=http%3A%2F%2Fc-ssl.duitang.com%2Fuploads%2Fitem%2F202005%2F07%2F20200507210520_F5tkB.thumb.1000_0.jpeg&refer=http%3A%2F%2Fc-ssl.duitang.com&app=2002&size=f9999,10000&q=a80&n=0&g=0n&fmt=auto?sec=1698045670&t=2d4c1feea01af7e6311a34a5de180930"));

        // 这里演示
        // 需要额外放入文字
        // 而且需要放入2个图片
        // 第一个图片靠左
        // 第二个靠右 而且要额外的占用他后面的单元格
        WriteCellData<Void> writeCellData = new WriteCellData<>();
        imageDemoData.setWriteCellDataFile(writeCellData);
        // 这里可以设置为 EMPTY 则代表不需要其他数据了
        writeCellData.setType(CellDataTypeEnum.STRING);
        writeCellData.setStringValue("额外的放一些文字");

        // 可以放入多个图片
        List<ImageData> imageDataList = new ArrayList<>();
        ImageData imageData = new ImageData();
        imageDataList.add(imageData);
        writeCellData.setImageDataList(imageDataList);
        // 放入2进制图片
        imageData.setImage(FileUtils.readFileToByteArray(new File(imagePath)));
        // 图片类型
        imageData.setImageType(ImageData.ImageType.PICTURE_TYPE_PNG);
        // 上 右 下 左 需要留空
        // 这个类似于 css 的 margin
        // 这里实测 不能设置太大 超过单元格原始大小后 打开会提示修复。暂时未找到很好的解法。
        imageData.setTop(5);
        imageData.setRight(40);
        imageData.setBottom(5);
        imageData.setLeft(5);

        // 放入第二个图片
        imageData = new ImageData();
        imageDataList.add(imageData);
        writeCellData.setImageDataList(imageDataList);
        imageData.setImage(FileUtils.readFileToByteArray(new File(imagePath)));
        imageData.setImageType(ImageData.ImageType.PICTURE_TYPE_PNG);
        imageData.setTop(5);
        imageData.setRight(5);
        imageData.setBottom(5);
        imageData.setLeft(50);
        // 设置图片的位置 假设 现在目标 是 覆盖 当前单元格 和当前单元格右边的单元格
        // 起点相对于当前单元格为0 当然可以不写
        imageData.setRelativeFirstRowIndex(0);
        imageData.setRelativeFirstColumnIndex(0);
        imageData.setRelativeLastRowIndex(0);
        // 前面3个可以不写  下面这个需要写 也就是 结尾 需要相对当前单元格 往右移动一格
        // 也就是说 这个图片会覆盖当前单元格和 后面的那一格
        imageData.setRelativeLastColumnIndex(1);

        // 写入数据
        EasyExcel.write(fileName, ImageDemoData.class).sheet().doWrite(list);
    }
}
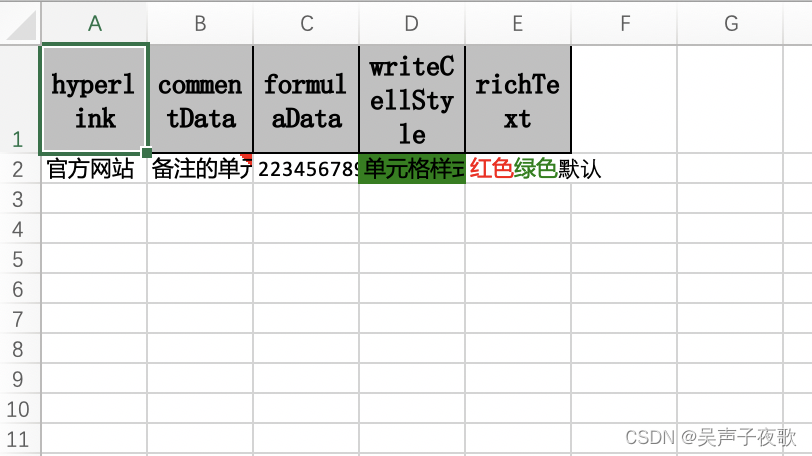
8、超链接、备注、公式、指定单个单元格的样式、单个单元格多种样式
@Data
public class WriteCellDemoData {
    /**
     * 超链接
     */
    private WriteCellData<String> hyperlink;

    /**
     * 备注
     */
    private WriteCellData<String> commentData;

    /**
     * 公式
     */
    private WriteCellData<String> formulaData;

    /**
     * 指定单元格的样式。当然样式 也可以用注解等方式。
     */
    private WriteCellData<String> writeCellStyle;

    /**
     * 指定一个单元格有多个样式
     */
    private WriteCellData<String> richText;
}
@Test
public void writeCellDataWrite() {
    String fileName = "./src/main/resources/style.xlsx";
    WriteCellDemoData writeCellDemoData = new WriteCellDemoData();

    // 设置超链接
    WriteCellData<String> hyperlink = new WriteCellData<>("官方网站");
    writeCellDemoData.setHyperlink(hyperlink);
    HyperlinkData hyperlinkData = new HyperlinkData();
    hyperlink.setHyperlinkData(hyperlinkData);
    hyperlinkData.setAddress("https://github.com/alibaba/easyexcel");
    hyperlinkData.setHyperlinkType(HyperlinkData.HyperlinkType.URL);

    // 设置备注
    WriteCellData<String> comment = new WriteCellData<>("备注的单元格信息");
    writeCellDemoData.setCommentData(comment);
    CommentData commentData = new CommentData();
    comment.setCommentData(commentData);
    commentData.setAuthor("Jiaju Zhuang");
    commentData.setRichTextStringData(new RichTextStringData("这是一个备注"));
    // 备注的默认大小是按照单元格的大小 这里想调整到4个单元格那么大 所以向后 向下 各额外占用了一个单元格
    commentData.setRelativeLastColumnIndex(1);
    commentData.setRelativeLastRowIndex(1);

    // 设置公式
    WriteCellData<String> formula = new WriteCellData<>();
    writeCellDemoData.setFormulaData(formula);
    FormulaData formulaData = new FormulaData();
    formula.setFormulaData(formulaData);
    // 将 123456789 中的第一个数字替换成 2
    // 这里只是例子 如果真的涉及到公式 能内存算好尽量内存算好 公式能不用尽量不用
    formulaData.setFormulaValue("REPLACE(123456789,1,1,2)");

    // 设置单个单元格的样式 当然样式 很多的话 也可以用注解等方式。
    WriteCellData<String> writeCellStyle = new WriteCellData<>("单元格样式");
    writeCellStyle.setType(CellDataTypeEnum.STRING);
    writeCellDemoData.setWriteCellStyle(writeCellStyle);
    WriteCellStyle writeCellStyleData = new WriteCellStyle();
    writeCellStyle.setWriteCellStyle(writeCellStyleData);
    // 这里需要指定 FillPatternType 为FillPatternType.SOLID_FOREGROUND 不然无法显示背景颜色.
    writeCellStyleData.setFillPatternType(FillPatternType.SOLID_FOREGROUND);
    // 背景绿色
    writeCellStyleData.setFillForegroundColor(IndexedColors.GREEN.getIndex());

    // 设置单个单元格多种样式
    // 这里需要设置 inMomery=true 不然会导致无法展示单个单元格多种样式,所以慎用
    WriteCellData<String> richTest = new WriteCellData<>();
    richTest.setType(CellDataTypeEnum.RICH_TEXT_STRING);
    writeCellDemoData.setRichText(richTest);
    RichTextStringData richTextStringData = new RichTextStringData();
    richTest.setRichTextStringDataValue(richTextStringData);
    richTextStringData.setTextString("红色绿色默认");
    // 前2个字红色
    WriteFont writeFont = new WriteFont();
    writeFont.setColor(IndexedColors.RED.getIndex());
    richTextStringData.applyFont(0, 2, writeFont);
    // 接下来2个字绿色
    writeFont = new WriteFont();
    writeFont.setColor(IndexedColors.GREEN.getIndex());
    richTextStringData.applyFont(2, 4, writeFont);

    List<WriteCellDemoData> data = new ArrayList<>();
    data.add(writeCellDemoData);
    EasyExcel.write(fileName, WriteCellDemoData.class).inMemory(true).sheet("模板").doWrite(data);
}
9、根据模板写入
模板内容:
@Test
public void templateWrite() {
    String templateName = "./src/main/resources/demo.xlsx";
    String fileName = "./src/main/resources/template.xlsx";
    // 这里要注意 withTemplate 的模板文件会全量存储在内存里面,所以尽量不要用于追加文件,如果文件模板文件过大会OOM
    // 如果要再文件中追加(无法在一个线程里面处理,可以在一个线程的建议参照多次写入的demo) 建议临时存储到数据库 或者 磁盘缓存(ehcache) 然后再一次性写入
    EasyExcel.write(fileName, DemoData.class).withTemplate(templateName).sheet().doWrite(data());
}
10、列高、行高
@Data
@ContentRowHeight(10)
@HeadRowHeight(20)
@ColumnWidth(25)
public class WidthAndHghtData {
    @ExcelProperty("字符串标题")
    private String string;
    @ExcelProperty("日期标题")
    private Date date;
    /**
     * 宽度为50
     */
    @ColumnWidth(50)
    @ExcelProperty("数字标题")
    private Double doubleData;
}
@Test
public void widthAndHeightWrite() {
    String fileName = "./src/main/resources/xxx.xlsx";
    EasyExcel.write(fileName, WidthAndHghtData.class).sheet("模板").doWrite(data());
}
11、注解形式自定义样式
@Data
// 头背景设置成红色 IndexedColors.RED.getIndex()
@HeadStyle(fillPatternType = FillPatternTypeEnum.SOLID_FOREGROUND, fillForegroundColor = 10)
// 头字体设置成20
@HeadFontStyle(fontHeightInPoints = 20)
// 内容的背景设置成绿色 IndexedColors.GREEN.getIndex()
@ContentStyle(fillPatternType = FillPatternTypeEnum.SOLID_FOREGROUND, fillForegroundColor = 17)
// 内容字体设置成20
@ContentFontStyle(fontHeightInPoints = 20)
public class DemoStyleData {
    // 字符串的头背景设置成粉红 IndexedColors.PINK.getIndex()
    @HeadStyle(fillPatternType = FillPatternTypeEnum.SOLID_FOREGROUND, fillForegroundColor = 14)
    // 字符串的头字体设置成20
    @HeadFontStyle(fontHeightInPoints = 30)
    // 字符串的内容的背景设置成天蓝 IndexedColors.SKY_BLUE.getIndex()
    @ContentStyle(fillPatternType = FillPatternTypeEnum.SOLID_FOREGROUND, fillForegroundColor = 40)
    // 字符串的内容字体设置成20
    @ContentFontStyle(fontHeightInPoints = 30)
    @ExcelProperty("字符串标题")
    private String string;
    @ExcelProperty("日期标题")
    private Date date;
    @ExcelProperty("数字标题")
    private Double doubleData;
}
@Test
public void annotationSyleWrite() {
    String fileName = "./src/main/resources/annotation.xlsx";
    EasyExcel.write(fileName, DemoStyleData.class).sheet("模板").doWrite(data());
}

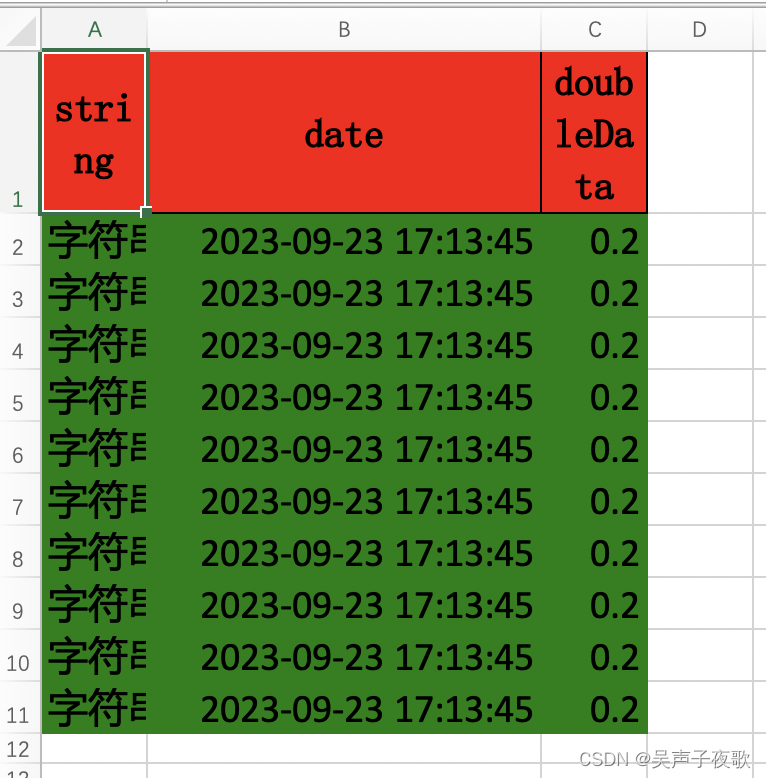
12、自定义样式
12.1、方式一:使用已有的策略
/**
 * 方式一:使用已有的策略 推荐
 * HorizontalCellStyleStrategy 每一行的样式都一样 或者隔行一样
 * AbstractVerticalCellStyleStrategy 每一列的样式都一样 需要自己回调每一页
 */
@Test
public void handlerStyleWrite1() {
    String fileName = "./src/main/resources/aaa.xlsx";
    // 头的策略
    WriteCellStyle headWriteCellStyle = new WriteCellStyle();
    // 背景设置为红色
    headWriteCellStyle.setFillForegroundColor(IndexedColors.RED.getIndex());
    WriteFont headWriteFont = new WriteFont();
    headWriteFont.setFontHeightInPoints((short)20);
    headWriteCellStyle.setWriteFont(headWriteFont);
    // 内容的策略
    WriteCellStyle contentWriteCellStyle = new WriteCellStyle();
    // 这里需要指定 FillPatternType 为FillPatternType.SOLID_FOREGROUND 不然无法显示背景颜色.头默认了 FillPatternType所以可以不指定
    contentWriteCellStyle.setFillPatternType(FillPatternType.SOLID_FOREGROUND);
    // 背景绿色
    contentWriteCellStyle.setFillForegroundColor(IndexedColors.GREEN.getIndex());
    WriteFont contentWriteFont = new WriteFont();
    // 字体大小
    contentWriteFont.setFontHeightInPoints((short)20);
    contentWriteCellStyle.setWriteFont(contentWriteFont);
    // 这个策略是 头是头的样式 内容是内容的样式 其他的策略可以自己实现
    HorizontalCellStyleStrategy horizontalCellStyleStrategy =
            new HorizontalCellStyleStrategy(headWriteCellStyle, contentWriteCellStyle);

    EasyExcel.write(fileName, DemoData.class)
            .registerWriteHandler(horizontalCellStyleStrategy)
            .sheet("模板")
            .doWrite(data());
}
12.2、方式二:使用easyexcel的方式完全自己写
/**
 * 方式二:使用easyexcel的方式完全自己写 不太推荐 尽量使用已有策略
 */
@Test
public void handlerStyleWrite2() {
    String fileName = "./src/main/resources/aaa.xlsx";
    EasyExcel.write(fileName, DemoData.class)
            .registerWriteHandler(new CellWriteHandler() {
                @Override
                public void afterCellDispose(CellWriteHandlerContext context) {
                    // 当前事件会在 数据设置到poi的cell里面才会回调
                    // 判断不是头的情况 如果是fill 的情况 这里会==null 所以用not true
                    if (BooleanUtils.isNotTrue(context.getHead())) {
                        // 第一个单元格
                        // 只要不是头 一定会有数据 当然fill的情况 可能要context.getCellDataList() ,这个需要看模板,因为一个单元格会有多个 WriteCellData
                        WriteCellData<?> cellData = context.getFirstCellData();
                        // 这里需要去cellData 获取样式
                        // 很重要的一个原因是 WriteCellStyle 和 dataFormatData绑定的 简单的说 比如你加了 DateTimeFormat
                        // ,已经将writeCellStyle里面的dataFormatData 改了 如果你自己new了一个WriteCellStyle,可能注解的样式就失效了
                        // 然后 getOrCreateStyle 用于返回一个样式,如果为空,则创建一个后返回
                        WriteCellStyle writeCellStyle = cellData.getOrCreateStyle();
                        writeCellStyle.setFillForegroundColor(IndexedColors.RED.getIndex());
                        // 这里需要指定 FillPatternType 为FillPatternType.SOLID_FOREGROUND
                        writeCellStyle.setFillPatternType(FillPatternType.SOLID_FOREGROUND);
                        // 这样样式就设置好了 后面有个FillStyleCellWriteHandler 默认会将 WriteCellStyle 设置到 cell里面去 所以可以不用管了
                    }
                }
            }).sheet("模板")
            .doWrite(data());
}

12.3、方式三:使用poi的样式完全自己写
/**
 * 方式三:使用poi的样式完全自己写 不推荐
 * 坑1:style里面有dataformat 用来格式化数据的 所以自己设置可能导致格式化注解不生效
 * 坑2:不要一直去创建style 记得缓存起来 最多创建6W个就挂了
 */
@Test
public void handlerStyleWrite3() {
    String fileName = "./src/main/resources/aaa.xlsx";
    EasyExcel.write(fileName, DemoData.class)
            .registerWriteHandler(new CellWriteHandler() {
                @Override
                public void afterCellDispose(CellWriteHandlerContext context) {
                    // 当前事件会在 数据设置到poi的cell里面才会回调
                    // 判断不是头的情况 如果是fill 的情况 这里会==null 所以用not true
                    if (BooleanUtils.isNotTrue(context.getHead())) {
                        Cell cell = context.getCell();
                        // 拿到poi的workbook
                        Workbook workbook = context.getWriteWorkbookHolder().getWorkbook();
                        // 这里千万记住 想办法能复用的地方把他缓存起来 一个表格最多创建6W个样式
                        // 不同单元格尽量传同一个 cellStyle
                        CellStyle cellStyle = workbook.createCellStyle();
                        cellStyle.setFillForegroundColor(IndexedColors.RED.getIndex());
                        // 这里需要指定 FillPatternType 为FillPatternType.SOLID_FOREGROUND
                        cellStyle.setFillPattern(FillPatternType.SOLID_FOREGROUND);
                        cell.setCellStyle(cellStyle);

                        // 由于这里没有指定dataformat 最后展示的数据 格式可能会不太正确

                        // 这里要把 WriteCellData的样式清空, 不然后面还有一个拦截器 FillStyleCellWriteHandler 默认会将 WriteCellStyle 设置到
                        // cell里面去 会导致自己设置的不一样
                        context.getFirstCellData().setWriteCellStyle(null);
                    }
                }
            }).sheet("模板")
            .doWrite(data());
}
13、合并单元格
13.1、方式一:注解
@Data
// 将第6-7行的2-3列合并成一个单元格
//@OnceAbsoluteMerge(firstRowIndex = 5, lastRowIndex = 6, firstColumnIndex = 1, lastColumnIndex = 2)
public class DemoMergeData {
    // 这一列 每隔2行 合并单元格
    @ContentLoopMerge(eachRow = 2)
    @ExcelProperty("字符串标题")
    private String string;
    @ExcelProperty("日期标题")
    private Date date;
    @ExcelProperty("数字标题")
    private Double doubleData;
}
/**
 * 方式一:使用注解
 */
@Test
public void mergeWrite1() {
    String fileName = "./src/main/resources/merge.xlsx";
    // 在DemoStyleData里面加上ContentLoopMerge注解
    EasyExcel.write(fileName, DemoMergeData.class).sheet("模板").doWrite(data());
}
13.2、方式二:自定义合并单元格策略
/**
 * 方式一:自定义合并单元格策略
 */
@Test
public void mergeWrite2() {
    String fileName = "./src/main/resources/merge.xlsx";
    // 每隔2行会合并 把eachColumn 设置成 3 也就是我们数据的长度,所以就第一列会合并。当然其他合并策略也可以自己写
    LoopMergeStrategy loopMergeStrategy = new LoopMergeStrategy(2, 0);
    // 这里 需要指定写用哪个class去写,然后写到第一个sheet,名字为模板 然后文件流会自动关闭
    EasyExcel.write(fileName, DemoData.class).registerWriteHandler(loopMergeStrategy).sheet("模板").doWrite(data());
}

14、使用table去写入
/**
 * 使用table去写入
 */
@Test
public void tableWrite() {
    String fileName = "./src/main/resources/table.xlsx";
    // 这里直接写多个table的案例了,如果只有一个 也可以直一行代码搞定,参照其他案
    // 这里 需要指定写用哪个class去写
    try (ExcelWriter excelWriter = EasyExcel.write(fileName, DemoData.class).build()) {
        // 把sheet设置为不需要头 不然会输出sheet的头 这样看起来第一个table 就有2个头了
        WriteSheet writeSheet = EasyExcel.writerSheet("模板").needHead(Boolean.FALSE).build();
        // 这里必须指定需要头,table 会继承sheet的配置,sheet配置了不需要,table 默认也是不需要
        WriteTable writeTable0 = EasyExcel.writerTable(0).needHead(Boolean.TRUE).build();
        WriteTable writeTable1 = EasyExcel.writerTable(1).needHead(Boolean.TRUE).build();
        // 第一次写入会创建头
        excelWriter.write(data(), writeSheet, writeTable0);
        // 第二次写如也会创建头,然后在第一次的后面写入数据
        excelWriter.write(data(), writeSheet, writeTable1);
    }
}
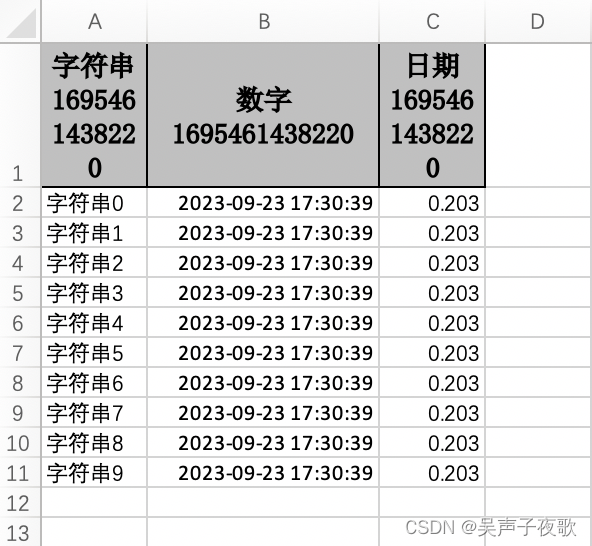
15、动态头,实时生成头写入
/**
 * 动态头,实时生成头写入
 * 思路是这样子的,先创建List<String>头格式的sheet仅仅写入头,
 * 然后通过table 不写入头的方式 去写入数据
 */
@Test
public void dynamicHeadWrite() {
    String fileName = "./src/main/resources/dynamic.xlsx";
    EasyExcel.write(fileName)
            // 这里放入动态头
            .head(head()).sheet("模板")
            // 当然这里数据也可以用 List<List<String>> 去传入
            .doWrite(data());
}

private List<List<String>> head() {
    List<List<String>> list = new ArrayList<List<String>>();
    List<String> head0 = new ArrayList<String>();
    head0.add("字符串" + System.currentTimeMillis());
    List<String> head1 = new ArrayList<String>();
    head1.add("数字" + System.currentTimeMillis());
    List<String> head2 = new ArrayList<String>();
    head2.add("日期" + System.currentTimeMillis());
    list.add(head0);
    list.add(head1);
    list.add(head2);
    return list;
}
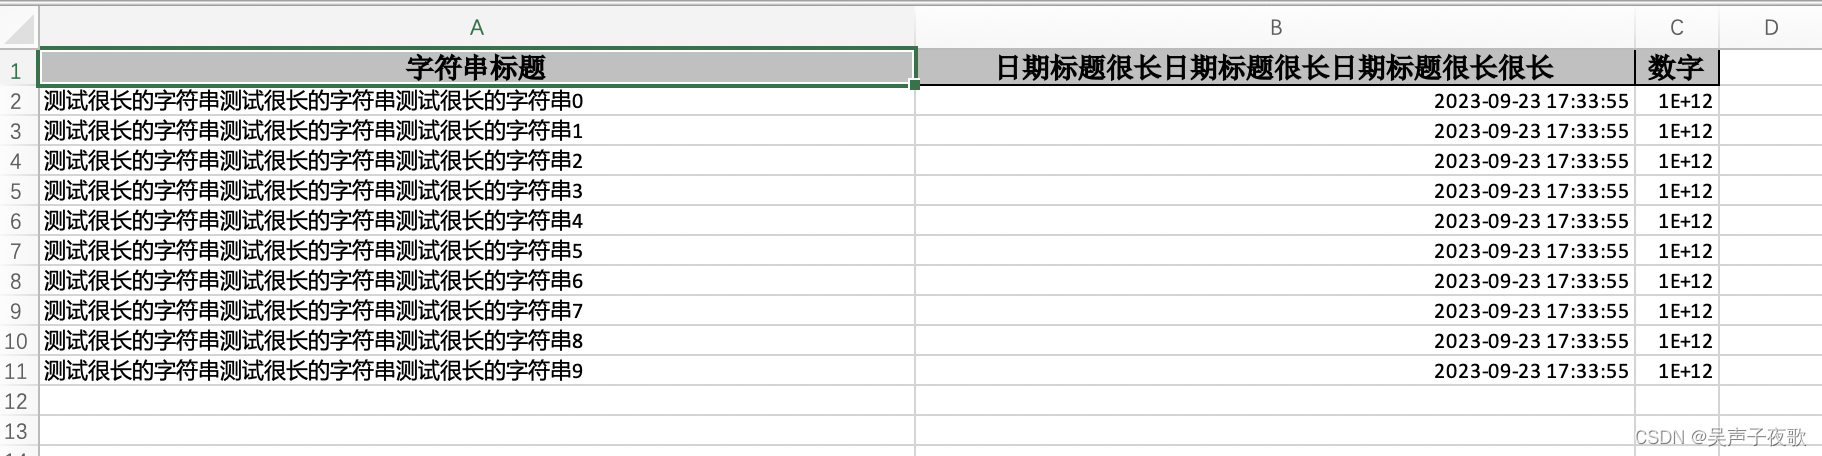
16、自动列宽(不太精确)
@Data
public class LongestMatchColumnWidthData {
    @ExcelProperty("字符串标题")
    private String string;
    @ExcelProperty("日期标题很长日期标题很长日期标题很长很长")
    private Date date;
    @ExcelProperty("数字")
    private Double doubleData;
}
/**
 * 自动列宽(不太精确)
 * 这个目前不是很好用,比如有数字就会导致换行。而且长度也不是刚好和实际长度一致。
 * 所以需要精确到刚好列宽的慎用。
 */
@Test
public void longestMatchColumnWidthWrite() {
    String fileName = "./src/main/resources/width.xlsx";
    EasyExcel.write(fileName, LongestMatchColumnWidthData.class)
            .registerWriteHandler(new LongestMatchColumnWidthStyleStrategy()).sheet("模板").doWrite(dataLong());
}

private List<LongestMatchColumnWidthData> dataLong() {
    List<LongestMatchColumnWidthData> list = new ArrayList<LongestMatchColumnWidthData>();
    for (int i = 0; i < 10; i++) {
        LongestMatchColumnWidthData data = new LongestMatchColumnWidthData();
        data.setString("测试很长的字符串测试很长的字符串测试很长的字符串" + i);
        data.setDate(new Date());
        data.setDoubleData(1000000000000.0);
        list.add(data);
    }
    return list;
}
17、自定义拦截器
@Slf4j
public class CustomCellWriteHandler implements CellWriteHandler {
    @Override
    public void afterCellDispose(CellWriteHandlerContext context) {
        Cell cell = context.getCell();
        // 这里可以对cell进行任何操作
        log.info("第{}行,第{}列写入完成。", cell.getRowIndex(), cell.getColumnIndex());
        if (BooleanUtils.isTrue(context.getHead()) && cell.getColumnIndex() == 0) {
            CreationHelper createHelper = context.getWriteSheetHolder().getSheet().getWorkbook().getCreationHelper();
            Hyperlink hyperlink = createHelper.createHyperlink(HyperlinkType.URL);
            hyperlink.setAddress("https://github.com/alibaba/easyexcel");
            cell.setHyperlink(hyperlink);
        }
    }
}
@Slf4j
public class CustomSheetWriteHandler implements SheetWriteHandler {
    @Override
    public void afterSheetCreate(SheetWriteHandlerContext context) {
        log.info("第{}个Sheet写入成功。", context.getWriteSheetHolder().getSheetNo());

        // 区间设置 第一列第一行和第二行的数据。由于第一行是头,所以第一、二行的数据实际上是第二三行
        CellRangeAddressList cellRangeAddressList = new CellRangeAddressList(1, 2, 0, 0);
        DataValidationHelper helper = context.getWriteSheetHolder().getSheet().getDataValidationHelper();
        DataValidationConstraint constraint = helper.createExplicitListConstraint(new String[] {"测试1", "测试2"});
        DataValidation dataValidation = helper.createValidation(constraint, cellRangeAddressList);
        context.getWriteSheetHolder().getSheet().addValidationData(dataValidation);
    }
}
/**
 * 下拉,超链接等自定义拦截器(
 * demo这里实现2点。
 * 1. 对第一行第一列的头超链接到:https://github.com/alibaba/easyexcel
 * 2. 对第一列第一行和第二行的数据新增下拉框,显示 测试1 测试2
 */
@Test
public void customHandlerWrite() {
    String fileName = "./src/main/resources/listener.xlsx";
    EasyExcel.write(fileName, DemoData.class).registerWriteHandler(new CustomSheetWriteHandler())
            .registerWriteHandler(new CustomCellWriteHandler()).sheet("模板").doWrite(data());
}

18、插入批注
/**
 * 自定义拦截器.新增注释,第一行头加批注
 */
@Slf4j
public class CommentWriteHandler implements RowWriteHandler {

    @Override
    public void afterRowDispose(RowWriteHandlerContext context) {
        if (BooleanUtils.isTrue(context.getHead())) {
            Sheet sheet = context.getWriteSheetHolder().getSheet();
            Drawing<?> drawingPatriarch = sheet.createDrawingPatriarch();
            // 在第一行 第二列创建一个批注
            Comment comment =
                drawingPatriarch.createCellComment(new XSSFClientAnchor(0, 0, 0, 0, (short)1, 0, (short)2, 1));
            // 输入批注信息
            comment.setString(new XSSFRichTextString("创建批注!"));
            // 将批注添加到单元格对象中
            sheet.getRow(0).getCell(1).setCellComment(comment);
        }
    }

}
@Test
public void commentWrite() {
    String fileName = TestFileUtil.getPath() + "commentWrite" + System.currentTimeMillis() + ".xlsx";
    // 这里 需要指定写用哪个class去写,然后写到第一个sheet,名字为模板 然后文件流会自动关闭
    // 这里要注意inMemory 要设置为true,才能支持批注。目前没有好的办法解决 不在内存处理批注。这个需要自己选择。
    EasyExcel.write(fileName, DemoData.class).inMemory(Boolean.TRUE).registerWriteHandler(new CommentWriteHandler())
        .sheet("模板").doWrite(data());
}
19、可变标题处理(包括标题国际化等)
@Data
public class ConverterData {
    /**
     * 自定义转换器,不管数据库传过来什么。给他加上“自定义:”
     */
    @ExcelProperty(value = "字符串标题", converter = CustomStringStringConverter.class)
    private String string;
    /**
     * 这里用string 去接日期才能格式化。
     */
    @DateTimeFormat("yyyy年MM月dd日HH时mm分ss秒")
    @ExcelProperty("日期标题")
    private Date date;
    /**
     * 我想接收百分比的数字
     */
    @NumberFormat("#.##%")
    @ExcelProperty("数字标题")
    private Double doubleData;
}
@Test
public void variableTitleWrite() {
    String fileName = "./src/main/resources/title.xlsx";
    EasyExcel.write(fileName, ConverterData.class).head(variableTitleHead())
            .sheet("模板").doWrite(data());
}

private List<List<String>> variableTitleHead() {
    List<List<String>> list = ListUtils.newArrayList();
    List<String> head0 = ListUtils.newArrayList();
    head0.add("string" + System.currentTimeMillis());
    List<String> head1 = ListUtils.newArrayList();
    head1.add("number" + System.currentTimeMillis());
    List<String> head2 = ListUtils.newArrayList();
    head2.add("date" + System.currentTimeMillis());
    list.add(head0);
    list.add(head1);
    list.add(head2);
    return list;
}
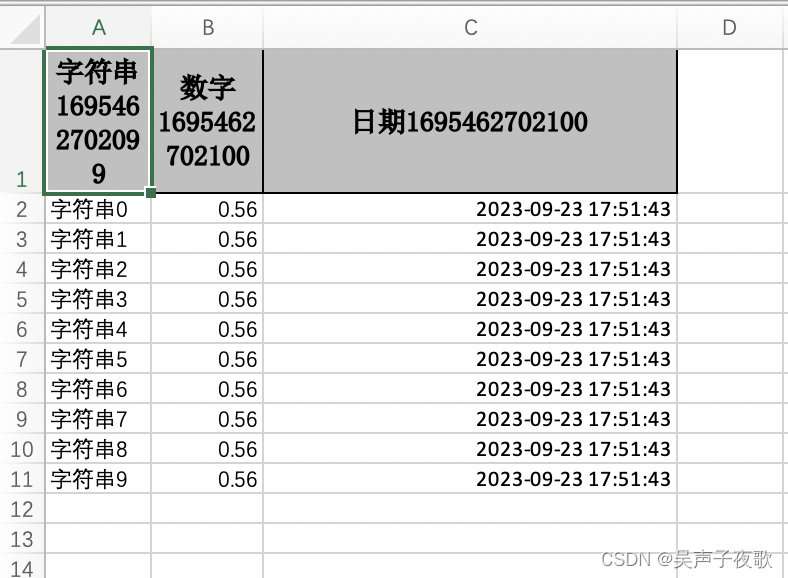
20、不创建对象的写
/**
 * 不创建对象的写
 */
@Test
public void noModelWrite() {
    String fileName = "./src/main/resources/noobject.xlsx";
    EasyExcel.write(fileName).head(head2()).sheet("模板").doWrite(dataList());
}

private List<List<String>> head2() {
    List<List<String>> list = ListUtils.newArrayList();
    List<String> head0 = ListUtils.newArrayList();
    head0.add("字符串" + System.currentTimeMillis());
    List<String> head1 = ListUtils.newArrayList();
    head1.add("数字" + System.currentTimeMillis());
    List<String> head2 = ListUtils.newArrayList();
    head2.add("日期" + System.currentTimeMillis());
    list.add(head0);
    list.add(head1);
    list.add(head2);
    return list;
}

private List<List<Object>> dataList() {
    List<List<Object>> list = ListUtils.newArrayList();
    for (int i = 0; i < 10; i++) {
        List<Object> data = ListUtils.newArrayList();
        data.add("字符串" + i);
        data.add(0.56);
        data.add(new Date());
        list.add(data);
    }
    return list;
}
21、web中的写
    /**
     * 文件下载(失败了会返回一个有部分数据的Excel)
     * <p>
     * 1. 创建excel对应的实体对象 参照{@link DownloadData}
     * <p>
     * 2. 设置返回的 参数
     * <p>
     * 3. 直接写,这里注意,finish的时候会自动关闭OutputStream,当然你外面再关闭流问题不大
     */
    @GetMapping("download")
    public void download(HttpServletResponse response) throws IOException {
        // 这里注意 有同学反应使用swagger 会导致各种问题,请直接用浏览器或者用postman
        response.setContentType("application/vnd.openxmlformats-officedocument.spreadsheetml.sheet");
        response.setCharacterEncoding("utf-8");
        // 这里URLEncoder.encode可以防止中文乱码 当然和easyexcel没有关系
        String fileName = URLEncoder.encode("测试", "UTF-8").replaceAll("\\+", "%20");
        response.setHeader("Content-disposition", "attachment;filename*=utf-8''" + fileName + ".xlsx");
        EasyExcel.write(response.getOutputStream(), DownloadData.class).sheet("模板").doWrite(data());
    }
22、web中的写并且失败的时候返回json
    /**
     * 文件下载并且失败的时候返回json(默认失败了会返回一个有部分数据的Excel)
     *
     * @since 2.1.1
     */
    @GetMapping("downloadFailedUsingJson")
    public void downloadFailedUsingJson(HttpServletResponse response) throws IOException {
        // 这里注意 有同学反应使用swagger 会导致各种问题,请直接用浏览器或者用postman
        try {
            response.setContentType("application/vnd.openxmlformats-officedocument.spreadsheetml.sheet");
            response.setCharacterEncoding("utf-8");
            // 这里URLEncoder.encode可以防止中文乱码 当然和easyexcel没有关系
            String fileName = URLEncoder.encode("测试", "UTF-8").replaceAll("\\+", "%20");
            response.setHeader("Content-disposition", "attachment;filename*=utf-8''" + fileName + ".xlsx");
            // 这里需要设置不关闭流
            EasyExcel.write(response.getOutputStream(), DownloadData.class).autoCloseStream(Boolean.FALSE).sheet("模板")
                .doWrite(data());
        } catch (Exception e) {
            // 重置response
            response.reset();
            response.setContentType("application/json");
            response.setCharacterEncoding("utf-8");
            Map<String, String> map = MapUtils.newHashMap();
            map.put("status", "failure");
            map.put("message", "下载文件失败" + e.getMessage());
            response.getWriter().println(JSON.toJSONString(map));
        }
    }


 2万+
2万+


 被折叠的 条评论
为什么被折叠?
被折叠的 条评论
为什么被折叠?
 到【灌水乐园】发言


