


目录
SpringBoot WebService
1、概述
WebService服务端是以远程接口为主的,在Java实现的WebService技术里主要依靠CXF开发框架,而这个CXF开发框架可以直接将接口发布成WebService。
CXF又分为JAX-WS和JAX-RS:
JAX-WS是基于xml协议JAX-RS是基于Restful风格- RS比WS传输的数据更少,效率更高。WS只能传输XML数据,RS可以传输XML,也可以传输JSON
本文以JAX-WS为例
maven依赖:
<!--WebService-->
<dependency>
    <groupId>org.springframework.boot</groupId>
    <artifactId>spring-boot-starter-web-services</artifactId>
</dependency>

<!-- CXF webservice -->
<dependency>
    <groupId>org.apache.cxf</groupId>
    <artifactId>cxf-spring-boot-starter-jaxws</artifactId>
    <version>3.4.5</version>
</dependency>
2、服务端
实体类:
public class UserInfo implements Serializable {

    private Long id;
    private String username;
    private String password;

    public UserInfo(Long id, String username, String password) {
        this.id = id;
        this.username = username;
        this.password = password;
    }

    public UserInfo() {
    }

    public Long getId() {
        return id;
    }

    public void setId(Long id) {
        this.id = id;
    }

    public String getUsername() {
        return username;
    }

    public void setUsername(String username) {
        this.username = username;
    }

    public String getPassword() {
        return password;
    }

    public void setPassword(String password) {
        this.password = password;
    }

    @Override
    public String toString() {
        return "UserInfo{" +
                "id=" + id +
                ", username='" + username + '\'' +
                ", password='" + password + '\'' +
                '}';
    }
}
WebService接口:
/**
 * @WebService 注解表明是一个webservice服务。
 *      name:对外发布的服务名, 对应于<wsdl:portType name="ServerServiceDemo"></wsdl:portType>
 *      targetNamespace:命名空间,一般是接口的包名倒序, 实现类与接口类的这个配置一定要一致这种错误
 *              Exception in thread "main" org.apache.cxf.common.i18n.UncheckedException: No operation was found with the name xxxx
 *              对应于targetNamespace="http://server.webservice.example.com"
 *      endpointInterface:服务接口全路径(如果是没有接口,直接写实现类的,该属性不用配置), 指定做SEI(Service EndPoint Interface)服务端点接口
 *      serviceName:对应于<wsdl:service name="ServerServiceDemoImplService"></wsdl:service>
 *      portName:对应于<wsdl:port binding="tns:ServerServiceDemoImplServiceSoapBinding" name="ServerServiceDemoPort"></wsdl:port>
 *
 * @WebMethod 表示暴露的服务方法, 这里有接口ServerServiceDemo存在,在接口方法已加上@WebMethod, 所以在实现类中不用再加上,否则就要加上
 *      operationName: 接口的方法名
 *      action: 没发现又什么用处
 *      exclude: 默认是false, 用于阻止将某一继承方法公开为web服务
 *
 * @WebResult 表示方法的返回值
 *      name:返回值的名称
 *      partName:
 *      targetNamespace:
 *      header: 默认是false, 是否将参数放到头信息中,用于保护参数,默认在body中
 *
 * @WebParam
 *       name:接口的参数
 *       partName:
 *       targetNamespace:
 *       header: 默认是false, 是否将参数放到头信息中,用于保护参数,默认在body中
 *       model:WebParam.Mode.IN/OUT/INOUT
 */
@WebService(name = "userInfoService", targetNamespace = "http://server.spring.zhang.pers/")
public interface UserInfoService {

    @WebMethod(operationName = "saveUserInfo")
    void saveUserInfo(@WebParam(name = "userInfo") UserInfo userInfo);

    @WebMethod(operationName = "getUserInfoById")
    @WebResult(name = "userInfo") UserInfo getUserInfoById(@WebParam(name = "id") Long id);
}
接口实现类:
@Service
@WebService(name = "userInfoService", targetNamespace = "http://server.spring.zhang.pers/")
public class UserInfoServiceImpl implements UserInfoService {

    private Map<Long, UserInfo> map = new HashMap<>();

    @Override
    public void saveUserInfo(UserInfo userInfo) {
        map.put(userInfo.getId(), userInfo);
        System.out.println("保存用户信息成功!");
    }

    @Override
    public UserInfo getUserInfoById(Long id) {
        return map.get(id);
    }
}
认证拦截器(如有需要):
import org.apache.cxf.binding.soap.SoapMessage;
import org.apache.cxf.binding.soap.saaj.SAAJInInterceptor;
import org.apache.cxf.interceptor.Fault;
import org.apache.cxf.phase.AbstractPhaseInterceptor;
import org.apache.cxf.phase.Phase;
import org.springframework.stereotype.Component;
import org.w3c.dom.NodeList;

import javax.xml.soap.SOAPException;
import javax.xml.soap.SOAPHeader;
import javax.xml.soap.SOAPMessage;

/**
 * @Author: acton_zhang
 * @Date: 2023/12/21 9:37 下午
 * @Version 1.0
 */
@Component
public class WebServiceAuthInterceptor extends AbstractPhaseInterceptor<SoapMessage> {

    /**
     * 用户名
     */
    private static final String USER_NAME = "tom";
    /**
     * 密码
     */
    private static final String USER_PASSWORD = "123456";
    private static final String NAME_SPACE_URI = "http://server.spring.zhang.pers/";
    /**
     * 创建拦截器
     */
    private SAAJInInterceptor interceptor = new SAAJInInterceptor();

    public WebServiceAuthInterceptor() {
        super(Phase.PRE_PROTOCOL);
        //添加拦截
        super.getAfter().add(SAAJInInterceptor.class.getName());
    }

    @Override
    public void handleMessage(SoapMessage message) throws Fault {
        //获取指定消息
        SOAPMessage soapMessage = message.getContent(SOAPMessage.class);
        if (null == soapMessage) {
            this.interceptor.handleMessage(message);
            soapMessage = message.getContent(SOAPMessage.class);
        }
        //SOAP头信息
        SOAPHeader header = null;
        try {
            header = soapMessage.getSOAPHeader();
        } catch (SOAPException e) {
            e.printStackTrace();
        }
        if (null == header) {
            throw new Fault(new IllegalAccessException("没有Header信息,无法实现用户认证处理!"));
        }
        //SOAP是基于XML文件结构进行传输的,所以如果要想获取认证信息就必须进行相关的结构约定
        NodeList usernameNodeList = header.getElementsByTagNameNS(NAME_SPACE_URI, "username");
        NodeList passwordNodeList = header.getElementsByTagNameNS(NAME_SPACE_URI, "password");
        if (usernameNodeList.getLength() < 1) {
            throw new Fault(new IllegalAccessException("没有用户信息,无法实现用户认证处理!"));
        }
        if (passwordNodeList.getLength() < 1) {
            throw new Fault(new IllegalAccessException("没有密码信息,无法实现用户认证处理!"));
        }
        String username = usernameNodeList.item(0).getTextContent().trim();
        String password = passwordNodeList.item(0).getTextContent().trim();
        if (USER_NAME.equals(username) && USER_PASSWORD.equals(password)) {
            System.out.println("用户访问认证成功!");
        } else {
            SOAPException soapException = new SOAPException("用户认证失败!");
            System.out.println("用户认证失败!");
            throw new Fault(soapException);
        }
    }
}
配置类:
@Configuration
public class WebServiceConfig {

    @Autowired
    private UserInfoService userInfoService;

    @Autowired
    private WebServiceAuthInterceptor interceptor;

    /**
     * Apache CXF 核心架构是以BUS为核心,整合其他组件。
     * Bus是CXF的主干, 为共享资源提供一个可配置的场所,作用类似于Spring的ApplicationContext,这些共享资源包括
     * WSDl管理器、绑定工厂等。通过对BUS进行扩展,可以方便地容纳自己的资源,或者替换现有的资源。默认Bus实现基于Spring架构,
     * 通过依赖注入,在运行时将组件串联起来。BusFactory负责Bus的创建。默认的BusFactory是SpringBusFactory,对应于默认
     * 的Bus实现。在构造过程中,SpringBusFactory会搜索META-INF/cxf(包含在 CXF 的jar中)下的所有bean配置文件。
     * 根据这些配置文件构建一个ApplicationContext。开发者也可以提供自己的配置文件来定制Bus。
     */
    @Bean(name = Bus.DEFAULT_BUS_ID)
    public SpringBus springBus() {
        return new SpringBus();
    }

    /**
     * 设置WebService访问父路径
     * <p>
     * 此方法作用是改变项目中服务名的前缀名,此处127.0.0.1或者localhost不能访问时,请使用ipconfig查看本机ip来访问
     * 此方法被注释后, 即不改变前缀名(默认是services), wsdl访问地址为 http://127.0.0.1:8080/services/ws/api?wsdl
     * 去掉注释后wsdl访问地址为:http://127.0.0.1:8080/webServices/ws/api?wsdl
     * http://127.0.0.1:8080/soap/列出服务列表 或 http://127.0.0.1:8080/soap/ws/api?wsdl 查看实际的服务
     * 新建Servlet记得需要在启动类添加注解:@ServletComponentScan
     * 如果启动时出现错误:not loaded because DispatcherServlet Registration found non dispatcher servlet dispatcherServlet
     * 可能是springboot与cfx版本不兼容。
     * 同时在spring boot2.0.6之后的版本与xcf集成,不需要在定义以下方法,直接在application.properties配置文件中添加:
     * cxf.path=/service(默认是services)
     */
    @Bean
    public ServletRegistrationBean getRegistrationBean() {
        return new ServletRegistrationBean(new CXFServlet(), "/webServices/*");
    }

    /**
     * 发布WebService,如果要发布多个,就配置多个Bean
     * @return
     */
    @Bean
    public Endpoint messageEndPoint() {
        EndpointImpl endpoint = new EndpointImpl(springBus(), this.userInfoService);
        endpoint.publish("/userInfoService");
        //添加拦截器
       endpoint.getInInterceptors().add(this.interceptor);
        return endpoint;
    }
}
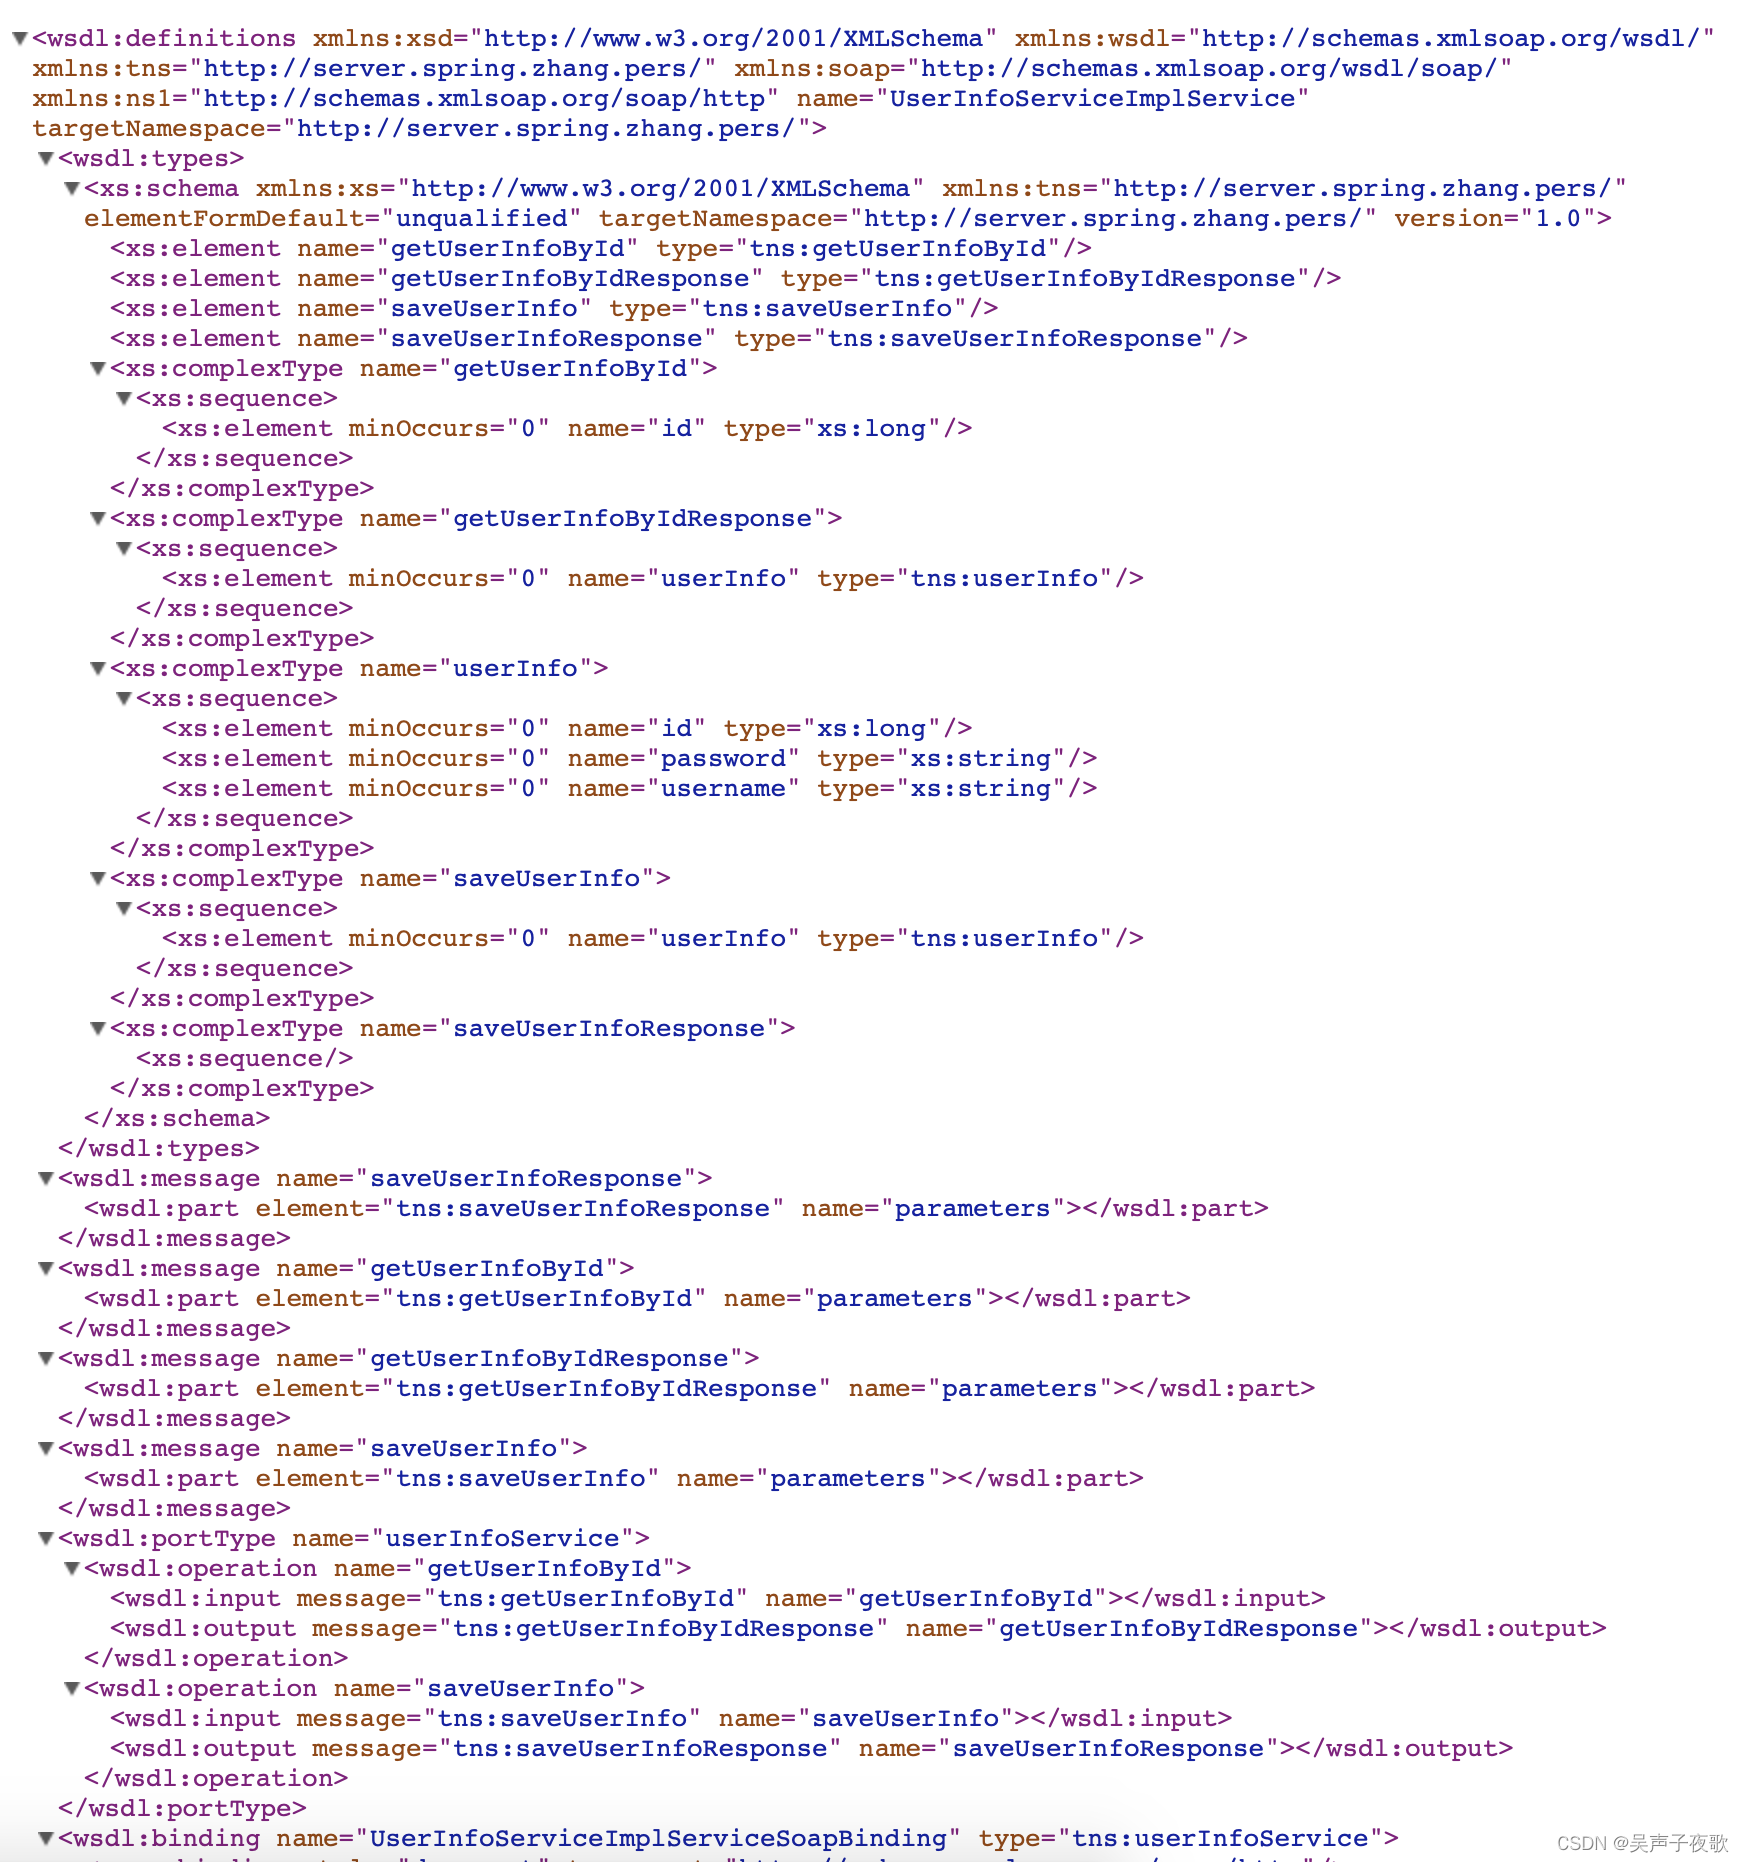
启动服务,访问http://localhost:8080/webServices/

点击链接可以查看具体的WSDL信息:
3、客户端
3.1、使用CXF框架
拦截器(如有需要):
public class ClientLoginInterceptor extends AbstractPhaseInterceptor<SoapMessage> {

    private String username;
    private String password;
    private static final String NAME_SPACE_URI = "http://server.spring.zhang.pers/";

    public ClientLoginInterceptor(String username, String password) {
        super(Phase.PREPARE_SEND);
        this.username = username;
        this.password = password;
    }

    @Override
    public void handleMessage(SoapMessage soapMessage) throws Fault {
        List<Header> headers = soapMessage.getHeaders();
        Document document = DOMUtils.createDocument();
        Element authority = document.createElementNS(NAME_SPACE_URI, "authority");
        Element username = document.createElementNS(NAME_SPACE_URI, "username");
        Element password = document.createElementNS(NAME_SPACE_URI, "password");
        username.setTextContent(this.username);
        password.setTextContent(this.password);
        authority.appendChild(username);
        authority.appendChild(password);
        headers.add(0, new Header(new QName("authority"), authority));
    }
}
客户端:
@Component
public class UserInfoApiClient {
    private static final String USERNAME = "tom";
    private static final String PASSWORD = "123456";
    private static final String ADDRESS = "http://localhost:8080/webServices/userInfoService?wsdl";

    /**
     * 使用代理方法(推荐)
     * @param userInfo
     */
    public void saveUserInfoWithProxy(UserInfo userInfo) {
        JaxWsProxyFactoryBean jaxWsProxyFactoryBean = new JaxWsProxyFactoryBean();
        jaxWsProxyFactoryBean.setAddress(ADDRESS);
        jaxWsProxyFactoryBean.setServiceClass(UserInfoService.class);
        jaxWsProxyFactoryBean.getOutInterceptors().add(
                new ClientLoginInterceptor(USERNAME, PASSWORD)
        );
        UserInfoService userInfoService = (UserInfoService) jaxWsProxyFactoryBean.create();
        userInfoService.saveUserInfo(userInfo);
    }

    /**
     * 使用动态代理
     * @param id
     * @throws Exception
     */
    public void getUserInfoByIdWithDynamic(Long id) throws Exception {
        JaxWsDynamicClientFactory clientFactory = JaxWsDynamicClientFactory.newInstance();
        Client client = clientFactory.createClient(ADDRESS);
        client.getOutInterceptors().add(new ClientLoginInterceptor(USERNAME, PASSWORD));
        Object[] userInfos = client.invoke("getUserInfoById", id);
        System.out.println(userInfos[0]);
    }


    public static void main(String[] args) throws Exception {
        UserInfoApiClient client = new UserInfoApiClient();

        UserInfo userInfo = new UserInfo();
        userInfo.setId(1l);
        userInfo.setUsername("tom");
        userInfo.setPassword("123456");
        client.saveUserInfoWithProxy(userInfo);

        client.getUserInfoByIdWithDynamic(1l);
    }
}
3.2、postman调用
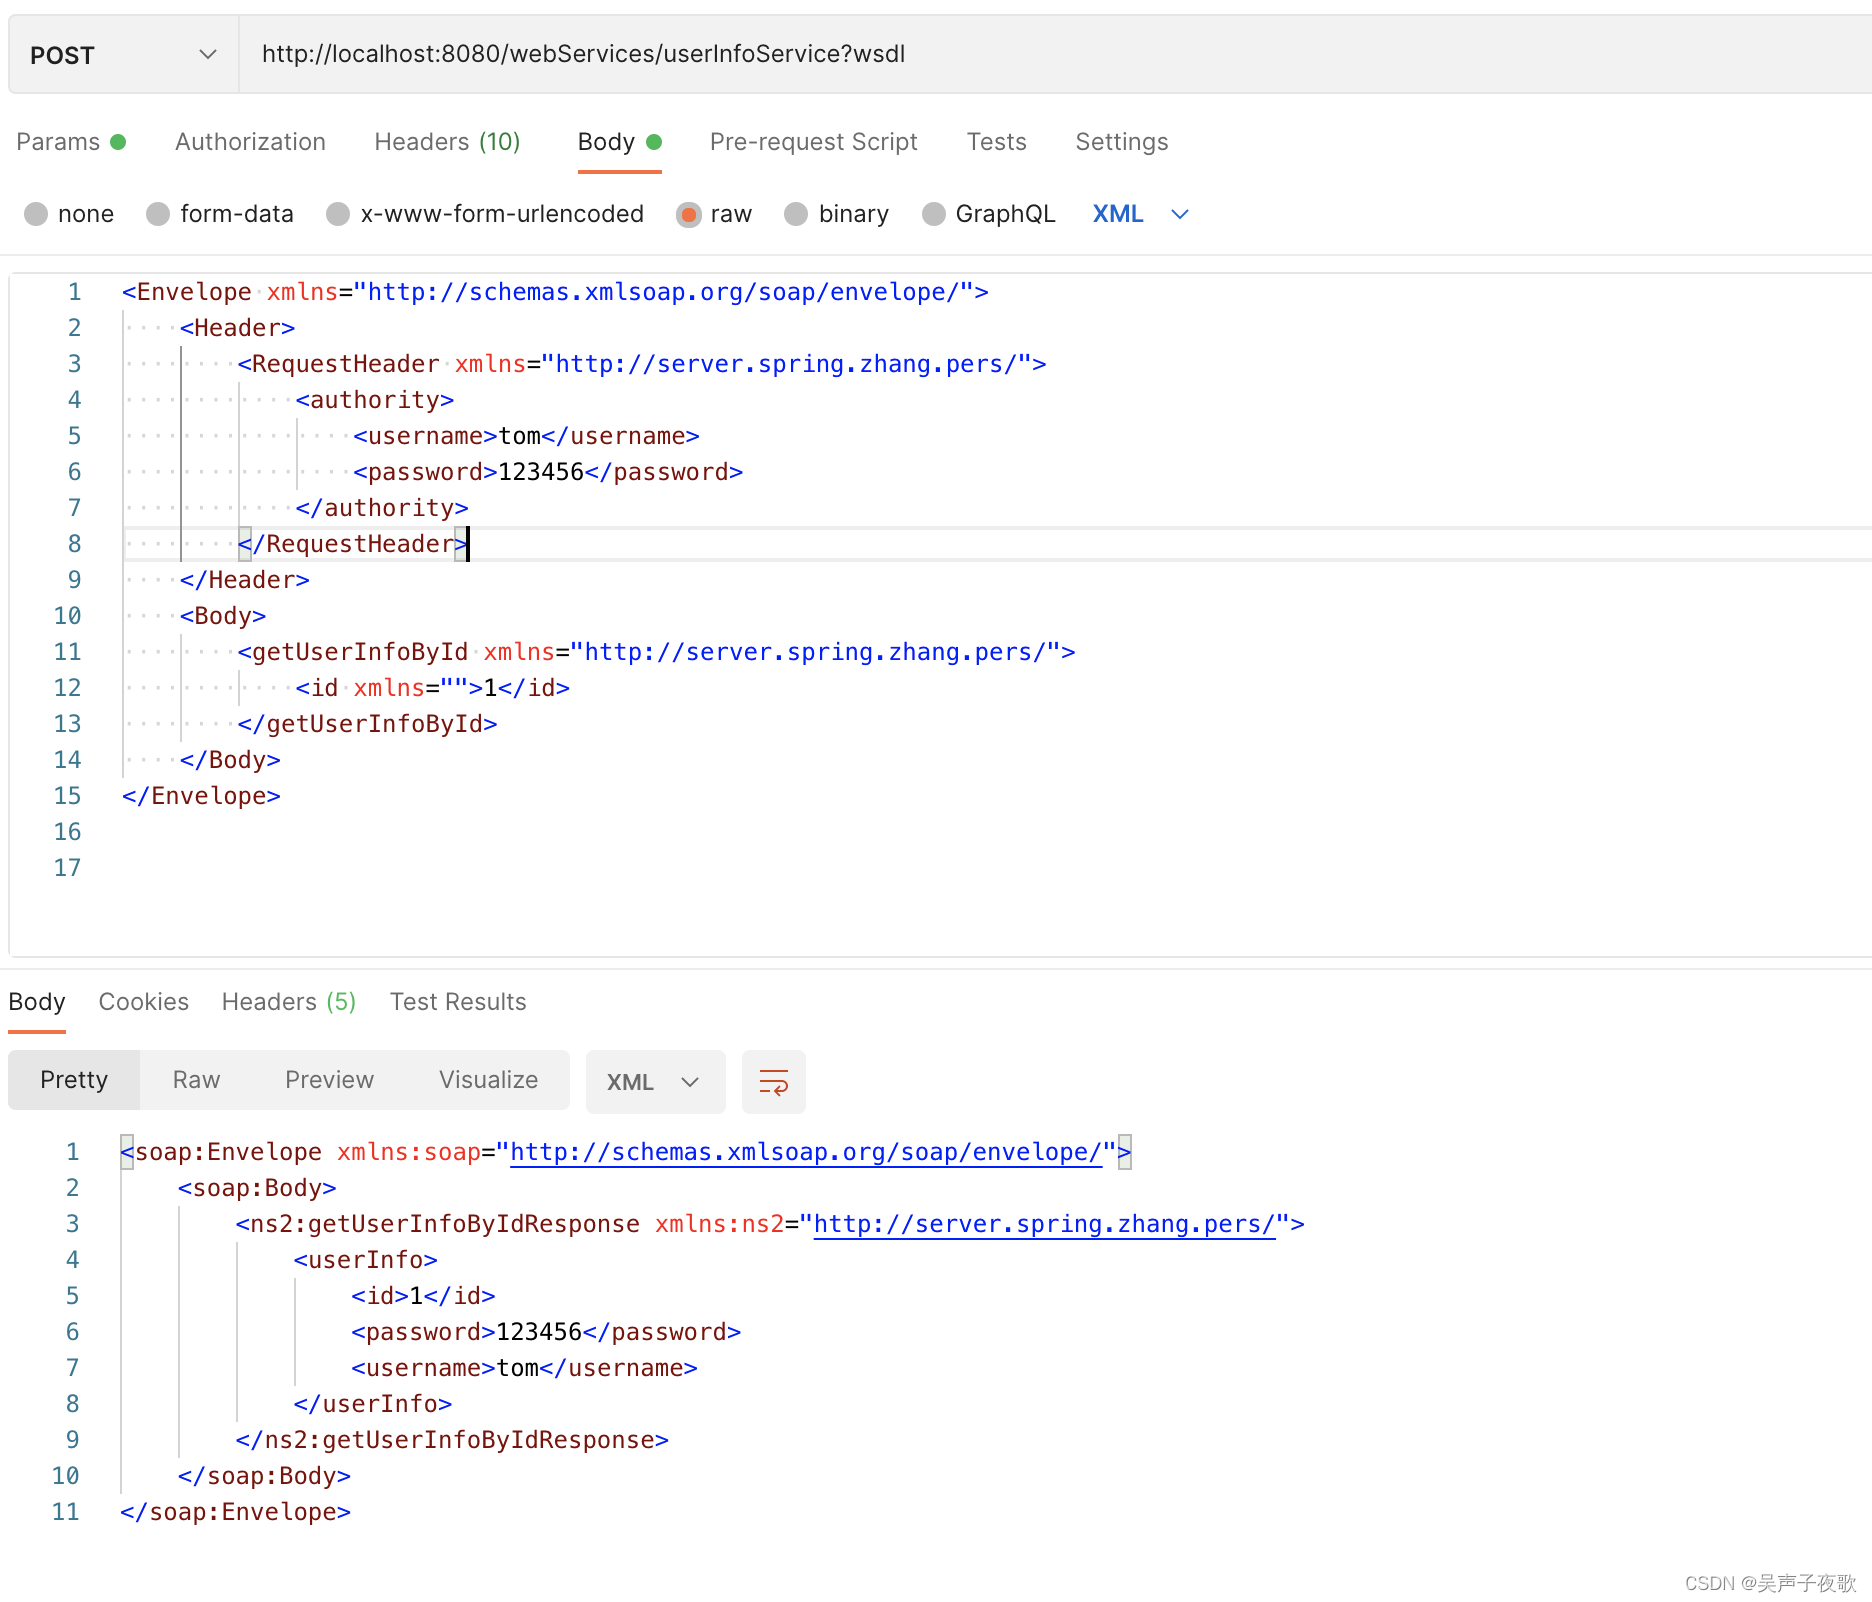
请求:
<Envelope xmlns="http://schemas.xmlsoap.org/soap/envelope/">
    <Header>
        <RequestHeader xmlns="http://server.spring.zhang.pers/">
            <authority>
                <username>tom</username>
                <password>123456</password>
            </authority>
        </RequestHeader>
    </Header>
    <Body>
        <getUserInfoById xmlns="http://server.spring.zhang.pers/">
            <id xmlns="">1</id>
        </getUserInfoById>
    </Body>
</Envelope>
响应:
<soap:Envelope xmlns:soap="http://schemas.xmlsoap.org/soap/envelope/">
    <soap:Body>
        <ns2:getUserInfoByIdResponse xmlns:ns2="http://server.spring.zhang.pers/">
            <userInfo>
                <id>1</id>
                <password>123456</password>
                <username>tom</username>
            </userInfo>
        </ns2:getUserInfoByIdResponse>
    </soap:Body>
</soap:Envelope>
3.3、RestTemplate调用
测试所需依赖:
<dependency>
    <groupId>org.springframework.boot</groupId>
    <artifactId>spring-boot-starter-test</artifactId>
</dependency>
<dependency>
    <groupId>junit</groupId>
    <artifactId>junit</artifactId>
    <version>4.12</version>
    <scope>test</scope>
</dependency>
配置RestTemplate:
@Configuration
public class RestTemplateConfig {
    @Bean
    public RestTemplate restTemplate() {
        HttpComponentsClientHttpRequestFactory factory = new HttpComponentsClientHttpRequestFactory();
        // 超时
        factory.setConnectionRequestTimeout(5000);
        factory.setConnectTimeout(5000);
        factory.setReadTimeout(5000);
        SSLConnectionSocketFactory sslsf = new SSLConnectionSocketFactory(createIgnoreVerifySSL(),
                // 指定TLS版本
                null,
                // 指定算法
                null,
                // 取消域名验证
                new HostnameVerifier() {
                    @Override
                    public boolean verify(String string, SSLSession ssls) {
                        return true;
                    }
                });
        CloseableHttpClient httpClient = HttpClients.custom().setSSLSocketFactory(sslsf).build();
        factory.setHttpClient(httpClient);
        RestTemplate restTemplate = new RestTemplate(factory);
        // 解决中文乱码问题
        restTemplate.getMessageConverters().set(1, new StringHttpMessageConverter(StandardCharsets.UTF_8));
        return restTemplate;
    }


    public static HttpHeaders getWSHeaders() {
        HttpHeaders headers = new HttpHeaders();
        headers.setContentType(MediaType.TEXT_XML);
        List<MediaType> acceptableMediaTypes = new ArrayList<MediaType>();
        acceptableMediaTypes.add(MediaType.TEXT_XML);
        headers.setAccept(acceptableMediaTypes);
        return headers;
    }

    /**
     * 跳过证书效验的sslcontext
     *
     * @return
     * @throws Exception
     */
    private SSLContext createIgnoreVerifySSL() {
        try {
            SSLContext sc = SSLContext.getInstance("TLS");

            // 实现一个X509TrustManager接口,用于绕过验证,不用修改里面的方法
            X509TrustManager trustManager = new X509TrustManager() {
                @Override
                public void checkClientTrusted(java.security.cert.X509Certificate[] paramArrayOfX509Certificate,
                                               String paramString) throws CertificateException {
                }

                @Override
                public void checkServerTrusted(java.security.cert.X509Certificate[] paramArrayOfX509Certificate,
                                               String paramString) throws CertificateException {
                }

                @Override
                public java.security.cert.X509Certificate[] getAcceptedIssuers() {
                    return null;
                }
            };
            sc.init(null, new TrustManager[]{trustManager}, null);
            return sc;
        } catch (Exception e) {
            e.printStackTrace();
        }
        return null;
    }
}
调用:
@SpringBootTest
@RunWith(SpringJUnit4ClassRunner.class)
public class AppTest {

    @Autowired
    private RestTemplate restTemplate;

    @Test
    public void test() {
        String url = "http://localhost:8080/webServices/userInfoService?wsdl";
        UserInfo userInfo = new UserInfo();
        userInfo.setId(1001l);
        userInfo.setUsername("jerry");
        userInfo.setPassword("111");
        String xml1 = getContent1(userInfo);

        //调用saveUserInfo
        HttpEntity<Object> entity = new HttpEntity<Object>(xml1, RestTemplateConfig.getWSHeaders());
        restTemplate.exchange(url, HttpMethod.POST, entity, Void.class);


        //调用getUserInfoById
        String xml2 = getContent2(1001l);
        HttpEntity<Object> entity2 = new HttpEntity<Object>(xml2, RestTemplateConfig.getWSHeaders());
        ResponseEntity<String> responseEntity = restTemplate.exchange(url, HttpMethod.POST, entity2, String.class);
        System.out.println(responseEntity.getBody());


    }

    public String getContent1(UserInfo userInfo) {
        String xml = "<Envelope xmlns=\"http://schemas.xmlsoap.org/soap/envelope/\">"
                        + "<Header>"
                        + "<RequestHeader xmlns=\"http://server.spring.zhang.pers/\">"
                        + "<authority>"
                        + "<username>tom</username>"
                        + "<password>123456</password>"
                        + "</authority>"
                        + "</RequestHeader>"
                        + "</Header>"
                        + "<Body>"
                        + "<saveUserInfo xmlns=\"http://server.spring.zhang.pers/\">"
                        + "<userInfo xmlns=\"\">"
                        + "<id>" + userInfo.getId() + "</id>"
                        + "<password>" + userInfo.getPassword() + "</password>"
                        + "<username>" + userInfo.getUsername() + "</username>"
                        + "</userInfo>"
                        + "</saveUserInfo>"
                        + "</Body>"
                        + "</Envelope>";
        return xml;
    }

    public String getContent2(Long id) {
        String xml = "<Envelope xmlns=\"http://schemas.xmlsoap.org/soap/envelope/\">"
                + "<Header>"
                + "<RequestHeader xmlns=\"http://server.spring.zhang.pers/\">"
                + "<authority>"
                + "<username>tom</username>"
                + "<password>123456</password>"
                + "</authority>"
                + "</RequestHeader>"
                + "</Header>"
                + "<Body>"
                + "<getUserInfoById xmlns=\"http://server.spring.zhang.pers/\">"
                + "<id xmlns=\"\">" + id + "</id>"
                + "</getUserInfoById>"
                + "</Body>"
                + "</Envelope>";
        return xml;
    }
}
输出:
<soap:Envelope xmlns:soap="http://schemas.xmlsoap.org/soap/envelope/"><soap:Body><ns2:getUserInfoByIdResponse xmlns:ns2="http://server.spring.zhang.pers/"><userInfo><id>1001</id><password>111</password><username>jerry</username></userInfo></ns2:getUserInfoByIdResponse></soap:Body></soap:Envelope>
3.4、axis1.4调用
<dependency>
    <groupId>org.apache.axis</groupId>
    <artifactId>axis</artifactId>
    <version>1.4</version>
</dependency>
<dependency>
    <groupId>commons-discovery</groupId>
    <artifactId>commons-discovery</artifactId>
    <version>0.2</version>
</dependency>
<dependency>
    <groupId>org.apache.axis</groupId>
    <artifactId>axis-jaxrpc</artifactId>
    <version>1.4</version>
</dependency>
<dependency>
    <groupId>org.apache.axis</groupId>
    <artifactId>axis-saaj</artifactId>
    <version>1.4</version>
</dependency>
public class Client {
    public static void main(String[] args) throws Exception {
        try {
            String endpoint = "http://localhost:8080/webServices/userInfoService?wsdl";

            //直接引用远程的wsdl文件
            //以下都是套路
            Service service = new Service();
            Call call = (Call) service.createCall();
            call.setTargetEndpointAddress(endpoint);

            // //根据wsdl文件,注册复杂类型映射
            QName qnPerson = new QName("http://server.spring.zhang.pers/", "person");
            call.registerTypeMapping(Person.class, qnPerson,
                    new BeanSerializerFactory(Person.class, qnPerson),
                    new BeanDeserializerFactory(Person.class, qnPerson));

            QName qnSavePerson = new QName("http://server.spring.zhang.pers/", "savePerson");

            call.setOperationName(qnSavePerson);//WSDL里面描述的接口名称
            call.addParameter("person",  XMLType.XSD_ANYTYPE, javax.xml.rpc.ParameterMode.IN);//接口的参数

            call.setReturnType(XMLType.AXIS_VOID);//设置返回类型
            //设置SOAP请求头
            SOAPHeaderElement headerElement = new SOAPHeaderElement("http://server.spring.zhang.pers/", "authority");
            headerElement.addChildElement(new SOAPHeaderElement("http://server.spring.zhang.pers/", "username", "tom"));
            headerElement.addChildElement(new SOAPHeaderElement("http://server.spring.zhang.pers/","password", "123456"));
            call.addHeader(headerElement);

            Person person = new Person();
            person.setName("tom");
            person.setAge(111);

            String result = (String) call.invoke(new Object[]{person});//给方法传递参数,并且调用方法
            System.out.println("result is " + result);
        } catch (Exception e) {
            System.err.println(e.toString());
        }
    }
}
4、Tomcat发布WebService
相关依赖:
<dependencies>
   <dependency>
       <groupId>com.sun.xml.ws</groupId>
       <artifactId>jaxws-rt</artifactId>
       <version>2.2.10</version>
   </dependency>

   <dependency>
       <groupId>javax.servlet</groupId>
       <artifactId>javax.servlet-api</artifactId>
       <version>3.1.0</version>
   </dependency>

</dependencies>

<build>
   <plugins>
       <plugin>
           <groupId>org.apache.maven.plugins</groupId>
           <artifactId>maven-compiler-plugin</artifactId>
           <configuration>
               <source>1.8</source>
               <target>1.8</target>
           </configuration>
       </plugin>
   </plugins>
</build>
服务接口:
public interface UserService {

    public String sayHi(String name);

    public String work(String work);

    public User getUser(User user);

}
实现类:
/**
 * 标注了该@WebService注解的类的方法就变为webservice方法
 */
@WebService
public class UserServiceImpl implements UserService {

    @Override
    public String sayHi(String name) {
        return "Hi, " + name;
    }

    @Override
    public String work (String work) {
        return "He is working " + work;
    }

    @Override
    public User getUser (User user) {
        user.setName(user.getName() + "-service");
        return user;
    }
}
在web项目的WEB-INF目录下,创建sun-jaxws.xml配置文件,添加内容如下:相关类名及引用,根据自己项目的名称进行修改
<?xml version="1.0" encoding="UTF-8"?>
<endpoints xmlns="http://java.sun.com/xml/ns/jax-ws/ri/runtime" version="2.0">

    <!-- 服务路径http://网站路径/ws/userService -->
    <endpoint name="userService"
              implementation="com.ws.service.impl.UserServiceImpl"
              url-pattern="/ws/userService" />

</endpoints>
在web.xml中添加WSServlet,servlet3.0也可以不添加如下配置
<?xml version="1.0" encoding="UTF-8"?>
<web-app xmlns:xsi="http://www.w3.org/2001/XMLSchema-instance"
         xmlns="http://java.sun.com/xml/ns/javaee"
         xsi:schemaLocation="http://java.sun.com/xml/ns/javaee http://java.sun.com/xml/ns/javaee/web-app_3_0.xsd"
         id="WebApp_ID" version="3.0">

    <!-- Servlet 3.0或者以上不需要配置 -->
    <servlet>
        <servlet-name>jaxws</servlet-name>
        <servlet-class>com.sun.xml.ws.transport.http.servlet.WSServlet</servlet-class>
        <load-on-startup>1</load-on-startup>
    </servlet>
    <servlet-mapping>
        <servlet-name>jaxws</servlet-name>
        <url-pattern>/ws/*</url-pattern>
    </servlet-mapping>

</web-app>


 506
506


 被折叠的 条评论
为什么被折叠?
被折叠的 条评论
为什么被折叠?
 到【灌水乐园】发言


