


VPP的插件编写, 首先要把VPP 工程下载下来, 编译通过。
然后按照example程序的套中来编写插件。
还有一个前提, 就是测试机上已经具备了DPDK 已经可用版本。
1. 下载VPP。
可以从github上下载VPP的指定版本的zip包,

也可以用git clone的方式直接clone到linux虚拟机上。
git clone -b stable/1801 https://github.com/FDio/vpp.git
2. 编译VPP 。
电脑好的话, 半小时能build出来。 内存小可能要一晚上。
cd ./vpp
./extras/vagrant/build.sh && make
编译好后会在./vpp/build-root下出现以下.deb文件 。

安装以下几个即可:
$ dpkg –i vpp-lib_18.01.2-1~g9b554f3_amd64.deb
$ dpkg –i vpp_18.01.2-1~g9b554f3_amd64.deb
$ dpkg –i vpp-dev_18.01.2-1~g9b554f3_amd64.deb
$ dpkg –i vpp-plugins_18.01.2-1~g9b554f3_amd64.deb
3. (假设dpdk已经可以用了)
把一个网卡加入到dpdk进行托管。
首先查一下我们有几个网卡。ifconfig

暂时用eth2吧:
lspci |grep -i ethernet
查看对应的pci 号,
root@ubuntu:/home/king/yubo/vpp/build-root# lspci |grep -i ethernet
02:01.0 Ethernet controller: Intel Corporation 82545EM Gigabit Ethernet Controller (Copper) (rev 01)
02:06.0 Ethernet controller: Intel Corporation 82545EM Gigabit Ethernet Controller (Copper) (rev 01)
03:00.0 Ethernet controller: VMware VMXNET3 Ethernet Controller (rev 01)
0b:00.0 Ethernet controller: VMware VMXNET3 Ethernet Controller (rev 01)
目前还不知道 哪个是eth2
我们先把eth2 down掉, 这样dpdk才能托管。
ifconfig eth2 down.
进入dpdk的设置:
export RTE_SDK=/home/bo/dpdk_learnd/dpdk-stable-19.08.2
export RTE_TARGET=x86_64-native-linux-gcc
cd $RTE_SDK
cd usertools
ifconfig eth2 down
./dpdk-setup.sh
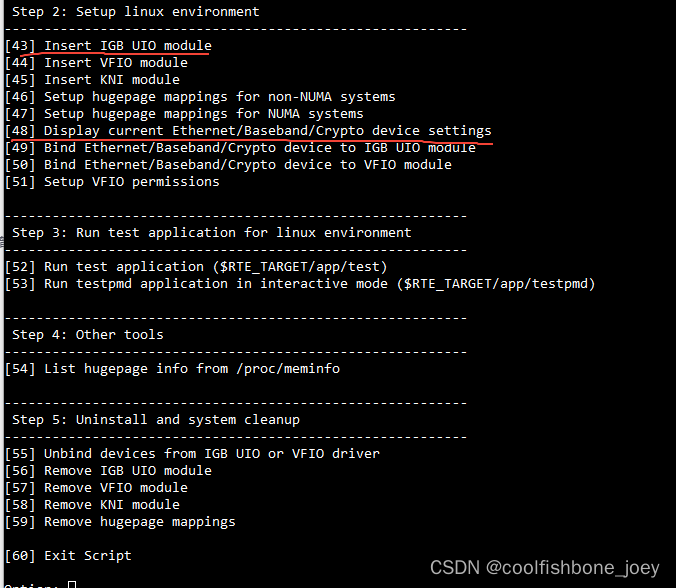
先选 [43] 安装一下IGB_UIO
然后[48]查看目前可用的网口
可以看到 eth2的信息如下:
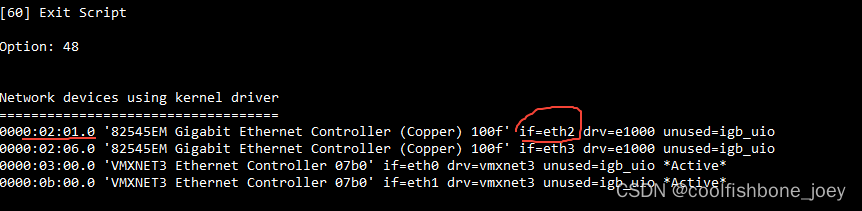
然后按【49 】 把eth2 绑定到igb_uio 驱动。

再按【48】确认已经绑定成功了。
Option: 48
Network devices using DPDK-compatible driver
============================================
0000:02:01.0 '82545EM Gigabit Ethernet Controller (Copper) 100f' drv=igb_uio unused=e1000
Network devices using kernel driver
===================================
0000:02:06.0 '82545EM Gigabit Ethernet Controller (Copper) 100f' if=eth3 drv=e1000 unused=igb_uio
0000:03:00.0 'VMXNET3 Ethernet Controller 07b0' if=eth0 drv=vmxnet3 unused=igb_uio *Active*
0000:0b:00.0 'VMXNET3 Ethernet Controller 07b0' if=eth1 drv=vmxnet3 unused=igb_uio *Active*
按【60】 退出DPDK
[60] Exit Script
Option: 60
4. DPDK 准备好了,现在设置VPP 初始化配置。
vi /etc/vpp/startup.conf
修改为以下:
unix {
interactive cli-listen 127.0.0.1:5002
nodaemon
log /tmp/vpp.log
full-coredump
cli-listen /run/vpp/cli.sock
gid vpp
}
api-trace {
on
}
api-segment {
gid vpp
}
cpu {
main-core 0
}
dpdk {
uio-driver igb_uio
dev 0000:02:01.0
}
然后运行VPP 确认VPP 目前工具正常了。
modprobe uio
modprobe igb_uio
echo 4 > /sys/devices/system/node/node0/hugepages/hugepages-1048576kB/nr_hugepages
echo 1024 > /sys/devices/system/node/node0/hugepages/hugepages-2048kB/nr_hugepages
vpp -c /etc/vpp/startup.conf
启动vpp , 结果启动失败, 报以下错误 :
## Change UIO driver used by VPP, Options are: igb_uio, vfio-pci,114,2-968%:qroot@ubuntu:/home/king/yubo/dpdk_learnd/dpdk-stable-19.08.2/usertools# vpp -c /etc/vpp/startup.conf
vlib_plugin_early_init:356: plugin path /usr/lib/vpp_plugins
load_one_plugin:184: Loaded plugin: acl_plugin.so (Access Control Lists)
load_one_plugin:184: Loaded plugin: dpdk_plugin.so (Data Plane Development Kit (DPDK))
load_one_plugin:184: Loaded plugin: flowprobe_plugin.so (Flow per Packet)
load_one_plugin:184: Loaded plugin: gtpu_plugin.so (GTPv1-U)
load_one_plugin:184: Loaded plugin: ila_plugin.so (Identifier-locator addressing for IPv6)
load_one_plugin:184: Loaded plugin: ioam_plugin.so (Inbound OAM)
load_one_plugin:114: Plugin disabled (default): ixge_plugin.so
load_one_plugin:184: Loaded plugin: kubeproxy_plugin.so (kube-proxy data plane)
load_one_plugin:184: Loaded plugin: l2e_plugin.so (L2 Emulation)
load_one_plugin:184: Loaded plugin: lb_plugin.so (Load Balancer)
load_one_plugin:184: Loaded plugin: libsixrd_plugin.so (IPv6 Rapid Deployment on IPv4 Infrastructure (RFC5969))
load_one_plugin:184: Loaded plugin: memif_plugin.so (Packet Memory Interface (experimetal))
load_one_plugin:184: Loaded plugin: nat_plugin.so (Network Address Translation)
load_one_plugin:184: Loaded plugin: pppoe_plugin.so (PPPoE)
load_one_plugin:184: Loaded plugin: stn_plugin.so (VPP Steals the NIC for Container integration)
load_one_plugin:63: Loaded plugin: /usr/lib/vpp_api_test_plugins/pppoe_test_plugin.so
load_one_plugin:63: Loaded plugin: /usr/lib/vpp_api_test_plugins/gtpu_test_plugin.so
load_one_plugin:63: Loaded plugin: /usr/lib/vpp_api_test_plugins/ioam_vxlan_gpe_test_plugin.so
load_one_plugin:63: Loaded plugin: /usr/lib/vpp_api_test_plugins/nat_test_plugin.so
load_one_plugin:63: Loaded plugin: /usr/lib/vpp_api_test_plugins/lb_test_plugin.so
load_one_plugin:63: Loaded plugin: /usr/lib/vpp_api_test_plugins/flowprobe_test_plugin.so
load_one_plugin:63: Loaded plugin: /usr/lib/vpp_api_test_plugins/acl_test_plugin.so
load_one_plugin:63: Loaded plugin: /usr/lib/vpp_api_test_plugins/udp_ping_test_plugin.so
load_one_plugin:63: Loaded plugin: /usr/lib/vpp_api_test_plugins/stn_test_plugin.so
load_one_plugin:63: Loaded plugin: /usr/lib/vpp_api_test_plugins/vxlan_gpe_ioam_export_test_plugin.so
load_one_plugin:63: Loaded plugin: /usr/lib/vpp_api_test_plugins/dpdk_test_plugin.so
load_one_plugin:63: Loaded plugin: /usr/lib/vpp_api_test_plugins/memif_test_plugin.so
load_one_plugin:63: Loaded plugin: /usr/lib/vpp_api_test_plugins/kubeproxy_test_plugin.so
load_one_plugin:63: Loaded plugin: /usr/lib/vpp_api_test_plugins/ioam_pot_test_plugin.so
load_one_plugin:63: Loaded plugin: /usr/lib/vpp_api_test_plugins/ioam_export_test_plugin.so
load_one_plugin:63: Loaded plugin: /usr/lib/vpp_api_test_plugins/ioam_trace_test_plugin.so
dpdk_config:1240: EAL init args: -c 1 -n 4 --huge-dir /run/vpp/hugepages --file-prefix vpp -w 0000:02:06.0 -w 0000:02:01.0 --master-lcore 0 --socket-mem 64
EAL: 1 hugepages of size 1073741824 reserved, but no mounted hugetlbfs found for that size
EAL: VFIO support initialized
EAL: Invalid NUMA socket, default to 0
EAL: Error reading from file descriptor 15: Input/output error
EAL: Error reading from file descriptor 15: Input/output error
这是因为dpdk 在绑定对应 网卡后, 初始化时中断功能不支持导致的,
用lspci可以看下对应的网卡驱动。

正常显示为VMXNET3 的网卡是直接 可用于DPDK的。
上边两个82545EM的就不支持。
现在把对应的网卡改成VMXNET3的驱动试下。
把虚拟机的 xx.vmx 配置文件 从左改成右边的配置:

(把e1000都 改成vmxnet3)中间可能要重启下虚拟机和物理机。
再查询发现,已经全部变成vmxnet3的网卡了。
root@ubuntu:/home/# lspci|grep -i ethernet
03:00.0 Ethernet controller: VMware VMXNET3 Ethernet Controller (rev 01)
0b:00.0 Ethernet controller: VMware VMXNET3 Ethernet Controller (rev 01)
13:00.0 Ethernet controller: VMware VMXNET3 Ethernet Controller (rev 01)
1b:00.0 Ethernet controller: VMware VMXNET3 Ethernet Controller (rev 01)
现在再重新把VPP的流程走一下。 从DPDK 绑定开始到启动VPP。
我去, 这下就起来了撒:

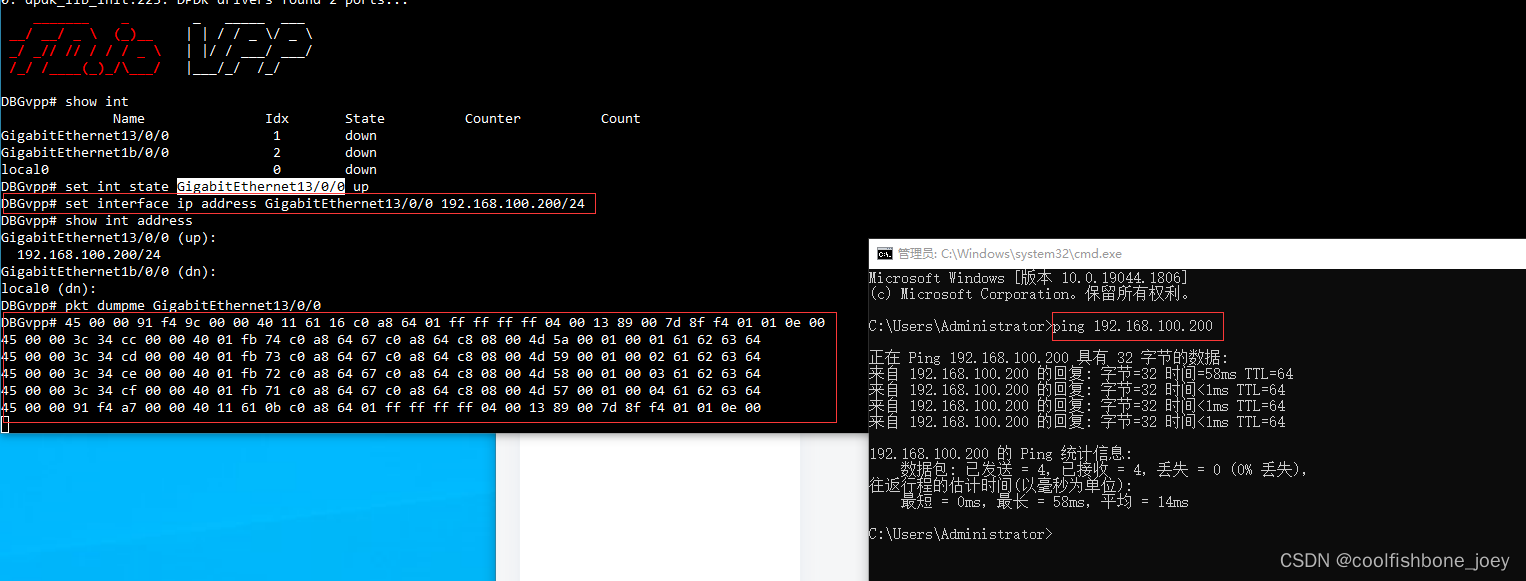
查看对应网口。
show int
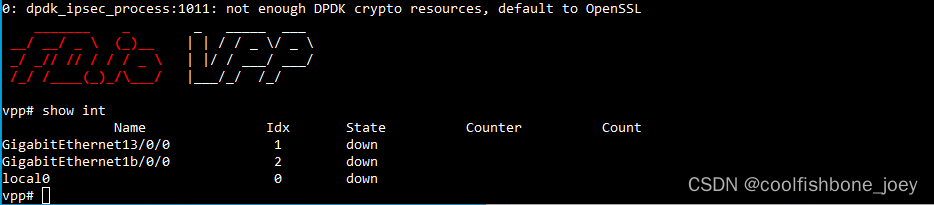
这样就相当于VPP 可以工作了。quit 命令可以退出VPP。
5. 准备VPP 插件文件。
在vpp/src/plugins/目录新建一个文件 夹: pktdumpme
把pktdumpme.c pktdumpme.h pktdumpme_node.c 放到这个目录下。
修改vpp/src下的文件configure.ac , 增加以下这行:

修改plugins 文件 夹下的文件 Makefile.am为以下:

在plugins文件夹下新增pktdumpme.am
# Copyright (c) 2015 Cisco and/or its affiliates.
# Licensed under the Apache License, Version 2.0 (the "License");
# you may not use this file except in compliance with the License.
# You may obtain a copy of the License at:
#
#     http://www.apache.org/licenses/LICENSE-2.0
#
# Unless required by applicable law or agreed to in writing, software
# distributed under the License is distributed on an "AS IS" BASIS,
# WITHOUT WARRANTIES OR CONDITIONS OF ANY KIND, either express or implied.
# See the License for the specific language governing permissions and
# limitations under the License.

libpktdumpme_plugin_la_SOURCES =                        \
        pktdumpme/pktdumpme.c                   \
        pktdumpme/pktdumpme_node.c

noinst_HEADERS +=                               \
        pktdumpme/pktdumpme.h

vppplugins_LTLIBRARIES += libpktdumpme_plugin.la

# vi:syntax=automake
然后回到vpp 根目录下执行:
make wipe
make build #编译新插件
make run #deubg 模式启动VPP
这个时候可以看到,VPP 已经把我们新写的插件启动起来了。

我们现在可以看下能不能配置一个网口, 使能Pkt dumpme功能:
现在看, VPP 已经可以把192.168.100.200 这个口收到的报文打印出来了。
6. DEMO 已经成功了, 现在分享一下代码 。
pktdumpme.h 暂时不管内容, 先这么套吧
#ifndef __included_yb_sample_h
#define __included_yb_sample_h

#include <vnet/vnet.h>
#include <vnet/ip/ip.h>

#include <vppinfra/hash.h>
#include <vppinfra/error.h>
#include <vppinfra/elog.h>

typedef struct {
	u16 msg_id_base; // ???, 这玩意儿也没有用啊
	vnet_main_t * vnet_main; // ???
} yb_sameple_main_t;

extern yb_sameple_main_t yb_sameple_main;
extern vlib_node_registration_t yb_sample_node;


#define YB_SAMPLE_PLUGIN_BUILD_VER "1.0"

#endif
pktdumpme.c
这个文件 主要是注册插件功能,主要涉及4 层信息:
VLIB, VNET, PLUGIN, CLI_command.
#include <vnet/plugin/plugin.h>
#include <pktdumpme/pktdumpme.h>

yb_sameple_main_t yb_sameple_main;

static clib_error_t * yb_sample_command_ena_disa_fn(vlib_main_t *vm,
															unformat_input_t * input,
															vlib_cli_command_t * cmd) // not use
{
	// need parse 2 argument, interface index and enable flag
	int interfaceIdx = -1;
	int enableFlag = 1; // default on

	// traverse all input strings
	while(unformat_check_input(input) != UNFORMAT_END_OF_INPUT)
	{
		if(unformat(input, "disable"))
		{
			enableFlag = 0;
		}
		else if(unformat(input, "%U", unformat_vnet_sw_interface, yb_sameple_main.vnet_main, &interfaceIdx)) // 应该是看这个输入是某一个网口, 是的话把Index存到 变量中。 后边再看下。
		{
			;
		}
		else
			break;


	}

	if(-1 == interfaceIdx)
		return clib_error_return(0, "please specify a right interface name.\n");

	//开始对相应接口进行设置。
	if(pool_is_free_index(yb_sameple_main.vnet_main->interface_main.sw_interfaces, interfaceIdx))
		return 0;

	// 调用库函数操作这个node
	vnet_feature_enable_disable("ip4-unicast", "yb_sample", interfaceIdx, enableFlag, 0, 0);

	return 0;

}


// 命令行注册
VLIB_CLI_COMMAND(yb_sample_command, static)=
{
	.path = "pkt dumpme",
	.short_help = "pkt dumpme <interface-name> [disable]",
	.function = yb_sample_command_ena_disa_fn,
};


// plugin注册
VLIB_PLUGIN_REGISTER() =
{
	.version = YB_SAMPLE_PLUGIN_BUILD_VER,
	.description = "yb sample hello world",
};


// 设置VLIB 初始化函数
static clib_error_t * yb_sample_init(vlib_main_t* vm)
{
	yb_sameple_main.vnet_main = vnet_get_main();
	return 0;
}

VLIB_INIT_FUNCTION(yb_sample_init);


// pktdump功能要用到网络相关的功能 , 所以要配置一下当前plugin要在nvet的指定位置运行。
// 指定yb_sample node的初始化参数, 应该是在arc "ip4-unicast" 下, node名字为 yb-sample,
// 运行在ip4-lookup node之前。后边会指定ip4-lookup为next node中的[0]
VNET_FEATURE_INIT(yb_sample, static) =
{
	.arc_name = "ip4-unicast",
	.node_name = "yb_sample",
	.runs_before = VNET_FEATURES("ip4-lookup"),
};
pktdumpme_node.c
这个就是实现报文回显的主要代码: 从frame中取出所有的packet vectore, 然后进行打印, 然后再push到下一frame中的buffer中。 这里ip4_lookup 就是下一个Node. 这个是VPP 自带的Node, 以后慢慢会熟悉。 另外关于push到下一个node还是下一个frame, 我觉得应该是一个意思, 以后学习深入了应该能确认。 注释有可能不准备, 读者自行消化,彼人也是第一次弄。
#include <vlib/vlib.h>
#include <vnet/vnet.h>
#include <vnet/pg/pg.h>
#include <vnet/ethernet/ethernet.h>
#include <vppinfra/error.h>
#include <pktdumpme/pktdumpme.h>


typedef enum
{
  CK_SAMPLE_NEXT_IP4,
  CK_SAMPLE_DROP,
  CK_SAMPLE_NEXT_N,
} yb_sample_next_t;

typedef struct
{
  u32 next_index;
  u32 sw_if_index;
  u8 new_src_mac[6];
  u8 new_dst_mac[6];
} yb_sample_trace_t;

#define foreach_yb_sample_error \
_(SHOWED, "show packets processed")

typedef enum
{
#define _(sym,str) SAMPLE_ERROR_##sym,
  foreach_yb_sample_error
#undef _
    SAMPLE_N_ERROR,
} yb_ssample_error_t;


static char *yb_sample_error_strings[] = {
#define _(sym, str) str,
        foreach_yb_sample_error
#undef _
};

// extern vlib_node_registration_t yb_sample_node; // 不打开 能编译过
static u8 *
format_yb_sample_trace (u8 * s, va_list * args)
{
        s = format(s, "To Do!\n");
        return s;
}


// 定义打印报文的主函数
static uword yb_sample_node_fn (vlib_main_t * vm, vlib_node_runtime_t * node, vlib_frame_t * frame)
{
	u32 n_left_in_frame, *thisDataStart, *nextNodeDataStart;
	u16 nextNodeIndex = 0;
	// 取出当前node 的数据的位置(在from中), 有多少个数据。
	thisDataStart = vlib_frame_vector_args(frame);
	n_left_in_frame = frame->n_vectors;
	nextNodeIndex   = node->cached_next_index;

	// 取出默认下一node index.

	// 解析所有的数据, 并push到下一个Node[0]中。
	while(n_left_in_frame > 0)
	{
		u32 n_left_in_next;
		//先获取下一NODE 可以存数的信息, start, N

		vlib_get_next_frame(vm, node, nextNodeIndex, nextNodeDataStart, n_left_in_next);
		while(n_left_in_frame > 0 && n_left_in_next > 0)
		{
			// 把index指向的buffer, 转为m_buff, 然后解析, 再Push给下一node。
			vlib_buffer_t *bp0;
			u32 bi0, nextNode = 0;
            bi0 = thisDataStart[0];
			nextNodeDataStart[0] = thisDataStart[0];

			n_left_in_frame -= 1;
			n_left_in_next  -= 1;

			thisDataStart     += 1;
			nextNodeDataStart += 1;

			bp0 = vlib_get_buffer(vm, bi0);

			void* data = vlib_buffer_get_current(bp0);
			{   int i;
				for(i = 0; i <32; i++)
				{
					printf("%02x ", *((u8*)data + i));
				}
				printf("\n");

			}
			vlib_validate_buffer_enqueue_x1(vm, node, nextNodeIndex, nextNodeDataStart, n_left_in_next, bi0, nextNode);

		}
		vlib_put_next_frame(vm, node, nextNodeIndex, n_left_in_next); // 应该是理解为next frame 不是next node.或者说node和frame是一对一的。
	}

	// 返回处理了多少个数据。
	return frame->n_vectors;  // 一定要返回这个吗?
}


// 注册node.
VLIB_REGISTER_NODE(yb_sample_node) =
{
	.name = "yb_sample",
	.function = yb_sample_node_fn,
	.vector_size = sizeof(u32),
	.format_trace = format_yb_sample_trace,
	.type = VLIB_NODE_TYPE_INTERNAL,
	.n_errors = ARRAY_LEN(yb_sample_error_strings),
	.error_strings = yb_sample_error_strings,
	.n_next_nodes = 2,
	.next_nodes = {
		[0] = "ip4-lookup",
		[1] = "error-drop",
	},
};
至此, 第一个demo 插件就完成了。


 964
964


 被折叠的 条评论
为什么被折叠?
被折叠的 条评论
为什么被折叠?
 到【灌水乐园】发言


