


说到虚线,大家肯定想到shape,比如:
<?xml version="1.0" encoding="utf-8"?>
<shape xmlns:android="http://schemas.android.com/apk/res/android"
    android:shape="line" >
    <stroke
        android:dashGap="3dp"
        android:dashWidth="6dp"
        android:width="1dp"
        android:color="#63a219" />
    <!-- 虚线的高度 -->
    <size android:height="1dp" />
</shape>
<View
        android:layout_width="150dp"
        android:layout_height="15dp"
        android:background="@drawable/shape_line_dash" />
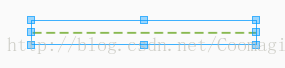
效果:
(如果运行后显示实线,在xml中对应的view中加上如下代码:
android:layerType="software"目的是去除硬件加速,这样就可以显示了)
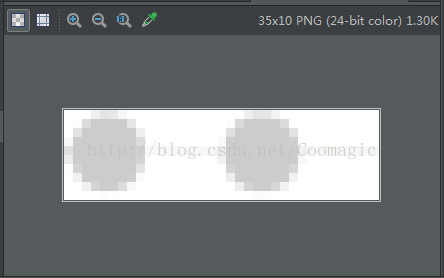
但是今天美工给了个图是这样的:

对,是圆点,因为Android都要自适应屏幕宽度,所以不肯能直接叫美工切图,这种情况也不能使用点九图,因为点九图是纯拉伸的,那怎么办呢?
我想到了Bitmap可以有平铺的效果(就是重复铺放),所以我的方法如下:
先让美工切了个小图:
然后代码是这么写的:
drawable文件:bg_pointss_line.xml
<?xml version="1.0" encoding="utf-8"?>
<bitmap xmlns:android="http://schemas.android.com/apk/res/android"
    android:src="@mipmap/bg_points_line"
    android:tileMode="repeat"/>
layout中的代码:
<View
android:id="@+id/points_line"
android:layout_width="match_parent"
android:layout_height="wrap_content"
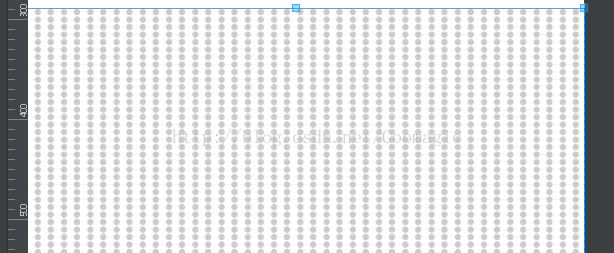
android:background="@drawable/bg_points_line" />但是你会发现效果是这样的:
可以在layout中直接设置它的高度,但是为了准确,我在Activity中设置它的高度:
//虚线(控制高度)
Bitmap bitmap = BitmapFactory.decodeResource(this.getResources(), R.mipmap.bg_points_line);
ViewGroup.LayoutParams lp = points_line.getLayoutParams();
lp.height = bitmap.getHeight();
points_line.setLayoutParams(lp);
最后就能获得准确适配宽度的虚线了,跟美工给的图一模一样~~


 2002
2002


 被折叠的 条评论
为什么被折叠?
被折叠的 条评论
为什么被折叠?
 到【灌水乐园】发言


