


本文内容大部分都有官方文档,最好结合官方文档使用,本文只是将用到的配置进行整理和版本对应,记录在配置时遇到的版本问题,进行回顾和学习。
0.springboot开发环境热部署
这个功能是当修改项目的代码,无需重启项目,直接保存并将结果进行反馈。
先在pom.xml文件中导入以下依赖。
<!--自动重启项目的依赖-->
<dependency>
    <groupId>org.springframework.boot</groupId>
    <artifactId>spring-boot-devtools</artifactId>
    <optional>true</optional>
</dependency>
在application文件中进行以下配置
# 设置默认重启项目
spring.devtools.restart.enabled=true
spring.devtools.restart.additional-paths=src/main/java # 监听的文件夹
除此之外还需要在编辑器中加入以下配置,才算完成。
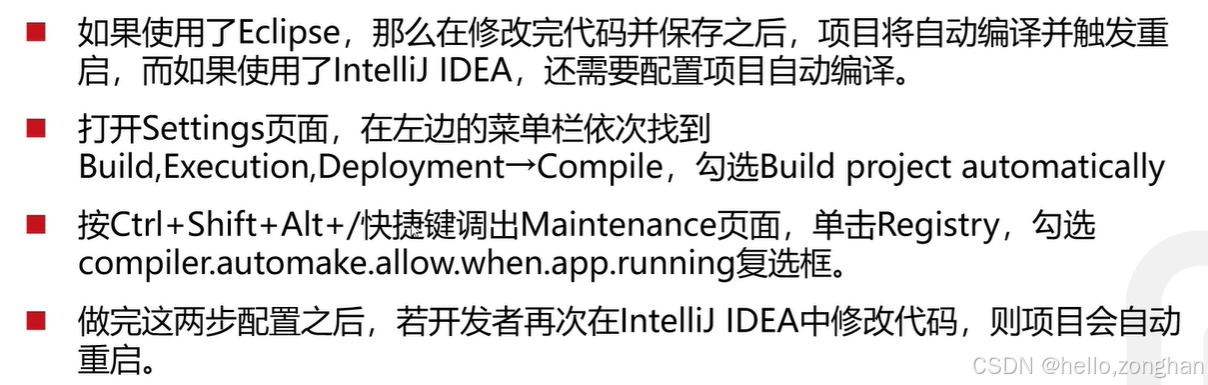
如果是新版本的idea,那么第三项的配置转移到了setting里的高级设置里。

1.maven的导入
直接下载,在idea中指定maven的文件夹即可。
2.mybatis-plus的导入
在pom.xml导入以下依赖,这里在springboot3和springboot2中使用mybatis-plus的配置有所区别,不然会报错。
<dependency>
    <groupId>com.baomidou</groupId>
    <artifactId>mybatis-plus-spring-boot3-starter</artifactId>
    <version>3.5.5</version> <!-- 使用最新稳定版 -->
</dependency>

<!--  数据库驱动   -->
<dependency>
    <groupId>com.mysql</groupId>
    <artifactId>mysql-connector-j</artifactId>
    <version>8.0.33</version>
</dependency>

<!-- 数据库连接池 -->
<dependency>
    <groupId>com.alibaba</groupId>
    <artifactId>druid-spring-boot-starter</artifactId>
    <version>1.2.21</version>
</dependency>
在application中导入以下配置,新版本的mysql驱动要加上cj,不然也会出错。
# 配置数据库相关信息
spring.datasource.type=com.alibaba.druid.pool.DruidDataSource
spring.datasource.driver-class-name=com.mysql.cj.jdbc.Driver
spring.datasource.url=jdbc:mysql://localhost:3306/spring-db?useSSL=false
spring.datasource.username=root
spring.datasource.password=123456
mybatis-plus.configuration.log-impl=org.apache.ibatis.logging.stdout.StdOutImpl
如果想要使用mybatis-plus的分页查询的功能,需要加入下面这个全局配置。
package com.example.demo.config;

import com.baomidou.mybatisplus.annotation.DbType;
import com.baomidou.mybatisplus.extension.plugins.MybatisPlusInterceptor;
import com.baomidou.mybatisplus.extension.plugins.inner.PaginationInnerInterceptor;
import org.springframework.context.annotation.Bean;
import org.springframework.context.annotation.Configuration;

// 启用 MyBatis-Plus 的分页功能
@Configuration
public class MyBatisPlusConfig {
    @Bean
    public MybatisPlusInterceptor mybatisPlusInterceptor() {
        MybatisPlusInterceptor interceptor = new MybatisPlusInterceptor();
        // 添加分页插件(适配不同数据库类型)
        interceptor.addInnerInterceptor(new PaginationInnerInterceptor(DbType.MYSQL));
        return interceptor;
    }
}
3.swagger3(openAPI3)的导入
swagger3是用于导出接口信息的一个自动化文档,可以快速导出该项目中的各个接口信息。
在pom.xml里导入以下配置。
<!-- swagger3的配置 -->
<dependency>
    <groupId>org.springdoc</groupId>
    <artifactId>springdoc-openapi-starter-webmvc-ui</artifactId>
    <version>2.1.0</version>
</dependency>
4.vue框架的快速构建
4.1 vue脚手架下载
在使用vue之前需要先安装npm,这是一个类似于maven的包管理工具。先去官网下载node.js,因为npm是基于node.js的,安装完node.js就可以使用npm命令了。
在你放置项目的目录下使用以下命令。
npm create vue@latest然后安装Vue CLI,这个可以快速帮你创建一个vue3的模板。现在很多项目用vite了。
npm install -g @vue/cli此时就可以通过下面的命令快速构建一个vue3的模板了。
vue create my-vue3-app4.2 vueRouter的配置
vueRouter用于切换vue的组件,vue3和vue-router4结合使用,vue2和vue-router3结合使用。具体使用方法查看官方文档。
npm install vue-router@44.3 vueX
vueX用于管理分散在各个组件之间的数据,解决兄弟组件无法传输数据和多层嵌套传数据麻烦的问题。vue3和vueX4匹配,vue2和vueX3匹配。
npm install vuex@next --save5.element-plus和fontawesome的导入
5.1 elements-plus
如果使用vue3,第三方UI需要用element-plus,安装命令如下,二选一即可。
npm install element-plus --save

npm config set registry https://registry.npmmirror.com
在main.js文件中加入下述代码。然后在用到组件的文件中进行导入。
import ElementPlus from 'element-plus'
import 'element-plus/dist/index.css'

const app = createApp(App)
app.use(ElementPlus)
app.mount('#app')
5.2 fontawesome
fontawesome是一个直接在项目中运行的图标库,依次使用以下命令。具体了解查看该官方文档https://docs.fontawesome.com/web/use-with/vue。
npm i --save @fortawesome/fontawesome-svg-core

npm i --save @fortawesome/kit-KIT_CODE@latest

npm i --save @fortawesome/vue-fontawesome@latest-3
6.axios网络配置
6.1 axios框架的配置
axios是一个用于前后端交互数据的框架,基于ajax。
npm install axios6.2 spring boot配置cors解决跨域问题
springboot可以通过一个配置类解决跨域问题,这种方法可以更精细化的操作跨域问题,例如是否允许传cookie等(全局配置)。
import org.springframework.context.annotation.Configuration;
import org.springframework.web.servlet.config.annotation.CorsRegistry;
import org.springframework.web.servlet.config.annotation.WebMvcConfigurer;

@Configuration
public class CorsConfig implements WebMvcConfigurer {

    @Override
    public void addCorsMappings(CorsRegistry registry) {
        registry.addMapping("/**")    // 对所有接口生效
                .allowedOriginPatterns("*")  // 允许所有来源(生产环境建议替换为具体域名)
                .allowedMethods("GET", "POST", "PUT", "DELETE", "OPTIONS") // 允许的 HTTP 方法
                .allowedHeaders("*")          // 允许所有请求头
                .allowCredentials(true)       // 允许携带 Cookie
                .maxAge(3600);                // 预检请求缓存时间(秒)
    }
}
也可以对单个控制器加注解解决该问题。
import org.springframework.web.bind.annotation.CrossOrigin;
import org.springframework.web.bind.annotation.GetMapping;
import org.springframework.web.bind.annotation.RestController;

@RestController
@CrossOrigin()  //该注解可以解决该控制器的跨域问题
public class MyController {
    @GetMapping("/api/data")
    public String getData() {
        return "Hello CORS!";
    }
}
7.mockjs
用于拦截前端发出的ajax请求,模拟后端向前端发出数据。
# 安装
npm install mockjs
8.JWT验证
session认证和token认证是两种常见的用户身份认证机制,JWT(Json Web Token)验证是token认证的一种实现方案。
在pom.xml里导入以下配置。
<!-- JJWT API -->
<dependency>
    <groupId>io.jsonwebtoken</groupId>
    <artifactId>jjwt-api</artifactId>
    <version>0.11.5</version>
</dependency>
<!-- 运行时依赖(根据JSON库选择其一) -->
<dependency>
    <groupId>io.jsonwebtoken</groupId>
    <artifactId>jjwt-jackson</artifactId> <!-- 使用Jackson -->
    <version>0.11.5</version>
    <scope>runtime</scope>
</dependency>
<!-- 或 -->
<dependency>
    <groupId>io.jsonwebtoken</groupId>
    <artifactId>jjwt-gson</artifactId> <!-- 使用Gson -->
    <version>0.11.5</version>
    <scope>runtime</scope>
</dependency>
然后就可以在代码里使用了。
import io.jsonwebtoken.Jwts;
import io.jsonwebtoken.security.Keys;
import java.security.Key;
import java.util.Date;

// 生成密钥
Key key = Keys.secretKeyFor(io.jsonwebtoken.SignatureAlgorithm.HS256);

// 生成Token
String token = Jwts.builder()
    .setSubject("user123")
    .setExpiration(new Date(System.currentTimeMillis() + 3600000))
    .signWith(key)
    .compact();

// 解析Token
var claims = Jwts.parserBuilder()
    .setSigningKey(key)
    .build()
    .parseClaimsJws(token)
    .getBody();
9.一套整合方案
如果想要使用现成的前端vue3项目,进行二次开发,我使用的是这个项目,这里有完整版和mini版,可以根据需求使用。
https://github.com/kailong321200875/vue-element-plus-admin
10.将项目部署到云服务器
10.1 云服务器
需要购买一个阿里云、华为云等服务器,如果只是学习可以按量购买。
10.2 云端环境部署
需要在云服务器中下载需要使用到的软件环境,这里的话需要下载mysql、jdk和nginx。可以使用xshell将相应的安装程序上传到云服务器上,然后安装下载就可以使用了。
10.3 云端项目部署
- 将vue项目进行打包,使用命令npm run build:pro打包,打包完后将dist文件夹上传到云服务器即可。这里需要注意的是要将请求的ip地址更改为你的云服务器的ip地址。
- 在部署完前端代码后,需要配置一下nginx,在这里你可以部署前端监听的端口和域名,域名需要购买,同时在这里需要标明dist的目录和index.html文件。
- 将Java项目通过maven打包为jar包,上传到云服务器。需要注意的是这里的对数据库的操作地址可以写localhost,因为mysql数据库和Java后端的代码是在同一个云服务器上。


 1万+
1万+

 被折叠的 条评论
为什么被折叠?
被折叠的 条评论
为什么被折叠?
 到【灌水乐园】发言


