


目录
1.3.1 内嵌的Tomcat、Jetty (无需部署WAR文件)
1.3.3 不需要XML配置(properties/yml)
2.2 导入Spring-boot-start-web起步依赖
3.3.3 手动生成application.properies 等
2.1.1 @Bean方法一:启动类创建一个方法(不建议使用)
前言:通过SpringBoot3+Vue3学习,我们可以学会单体前后端当中的常用技术,独立完成后端接口和页面的开发,大大提升编码能力.本课程需要jdk17+、idea2021+、maven3.5+,Spring3+Vue3
一、Spring Boot概述
Spring Boot是Spring提供的一个子项目,用于快速构建Spring应用程序
1、Spring Boot 特性
1.1 起步依赖
本质上就是一个Maven坐标,整合了完成一个功能需要的所有坐标
1.2 自动配置
遵循约定大约配置的原则,在boot程序启动后,一些bean对象会自动注入到ioc容器,不需要手动声明,简化开发。
1.3 其他特性
1.3.1 内嵌的Tomcat、Jetty (无需部署WAR文件)
1.3.2 外部化配置
1.3.3 不需要XML配置(properties/yml)
二、Spring Boot入门
1、一个入门程序需求
需求:使用SpringBoot开发一个web应用,浏览器发起请求/hello后,给浏览器返回字符串“hello world ~".
2、步骤
2.1 创建Maven工程
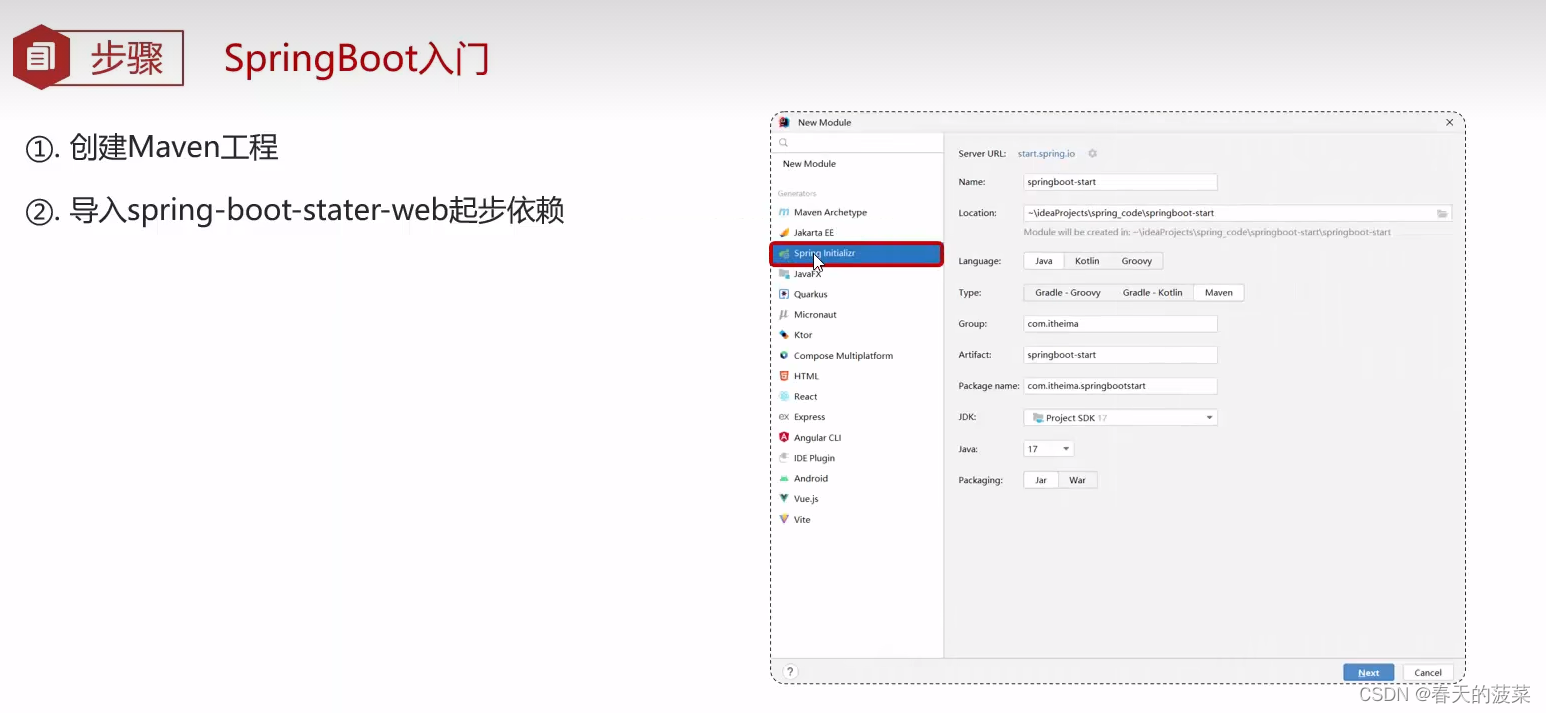
2.2 导入Spring-boot-start-web起步依赖

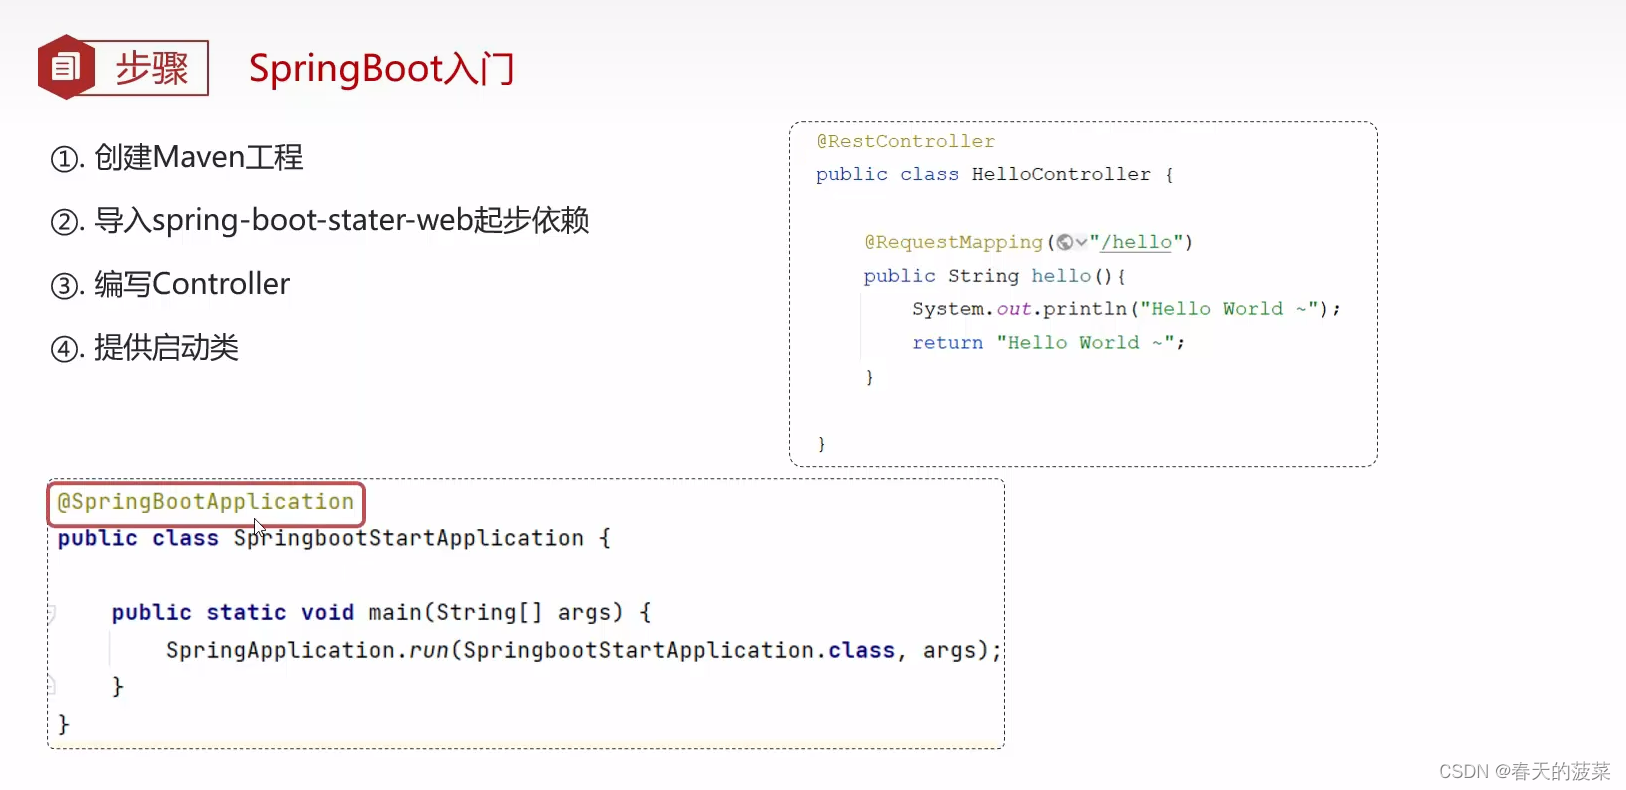
2.3 编写Controller
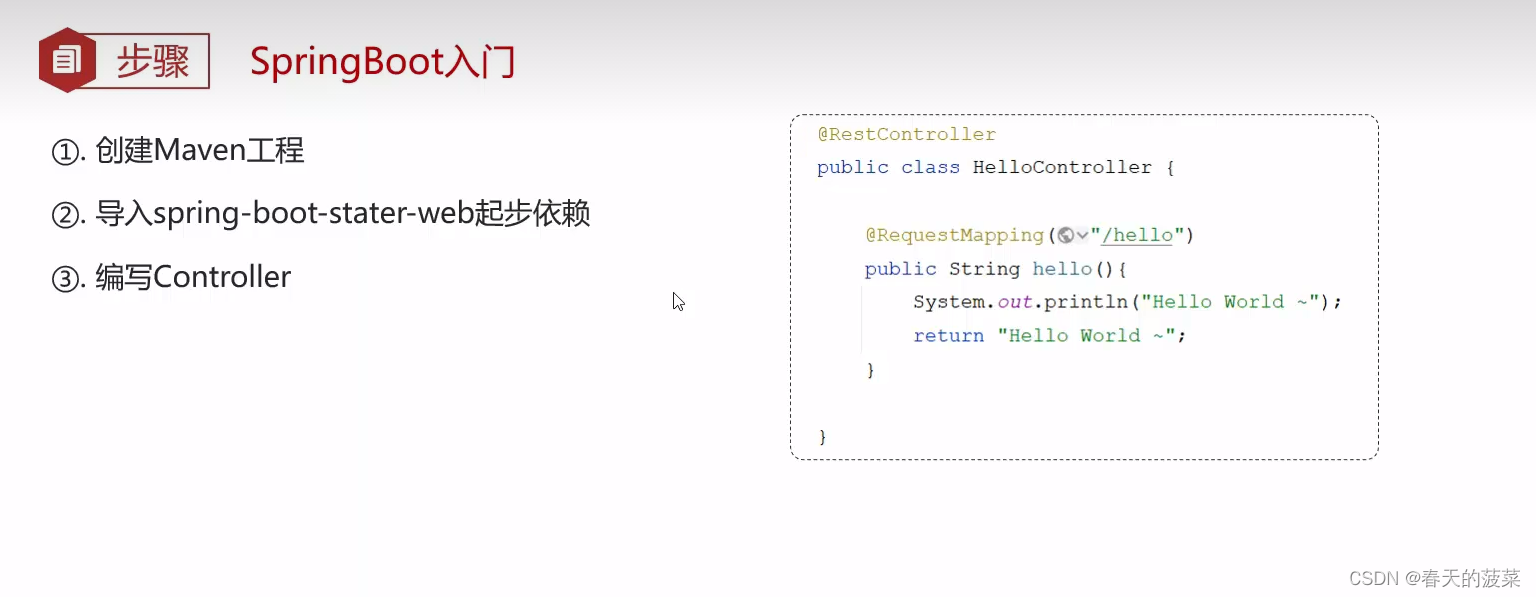
package com.bocai.controller;

import org.springframework.web.bind.annotation.RequestMapping;
import org.springframework.web.bind.annotation.RestController;

@RestController
public class HelloController {

    @RequestMapping("/hello")
    public String hello(){
        return "Hello World!";
    }
}
2.4 提供启动类
 启动服务访问:http://localhost:8080/hello
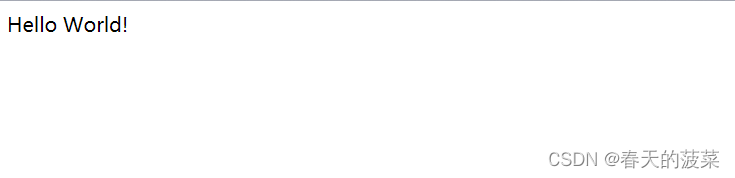
3、手动创建SpringBoot工程(不重要)
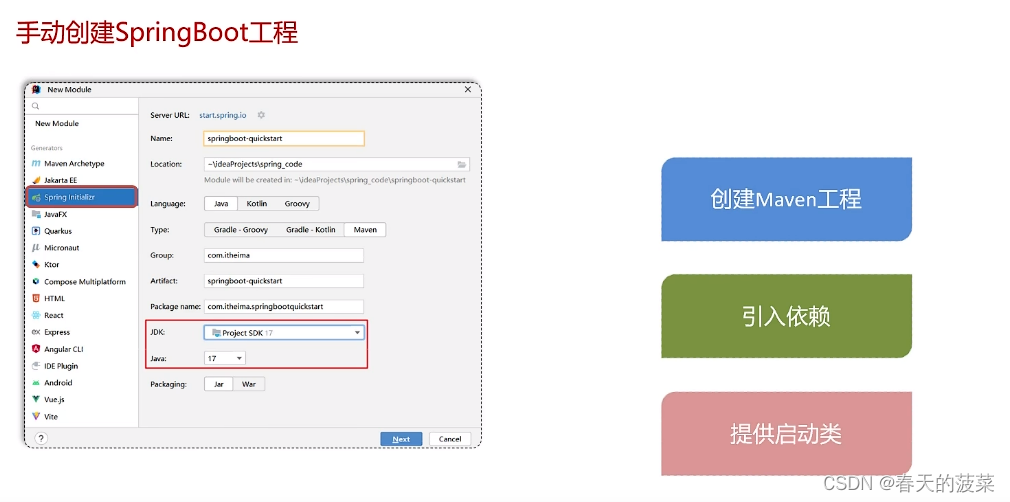
3.1 创建Maven工程
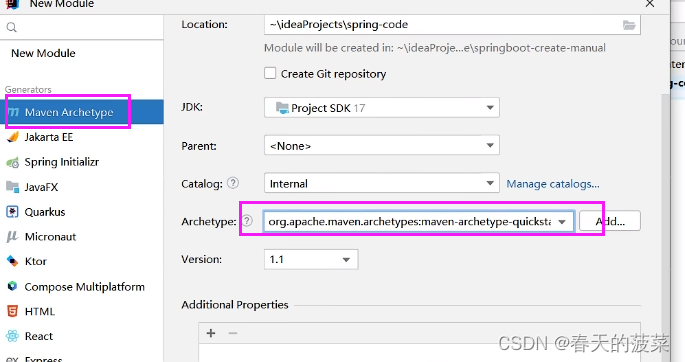
3.2 引入依赖
   <parent>
        <groupId>org.springframework.boot</groupId>
        <artifactId>spring-boot-starter-parent</artifactId>
        <version>3.1.5</version>
        <relativePath/> <!-- lookup parent from repository -->
    </parent>
<dependency>
<groupId>org.springframework.boot</groupId>
<artifactId>spring-boot-starter-web</artifactId>
</dependency>3.3 提供启动类
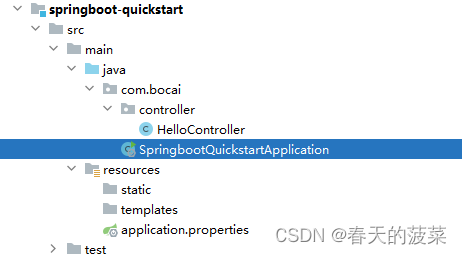
3.3.1 修改App文件名为启动类名
一般为项目名+Application
package com.bocai;

import org.springframework.boot.SpringApplication;
import org.springframework.boot.autoconfigure.SpringBootApplication;

@SpringBootApplication
public class SpringbootQuickstartApplication {

    public static void main(String[] args) {
        SpringApplication.run(SpringbootQuickstartApplication.class, args);
    }

}
3.3.2 手动生成resources文件夹

3.3.3 手动生成application.properies 等
三、SpringBoot配置文件
1、properties配置文件
server.port=9090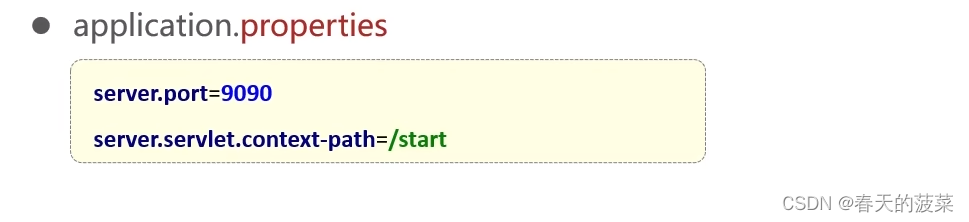
2、yaml配置文件(推荐)
server:
  port: 9091
  servlet:
    context-path: /start2
3、yml配置信息书写与获取
2.1 第三方技术配置信息
2.2 自定义配置信息
发送邮件为例
2.2.1 引入发送邮件依赖
   <!-- 发送邮件 -->
        <dependency>
            <groupId>org.eclipse.angus</groupId>
            <artifactId>jakarta.mail</artifactId>
        </dependency>
2.2.2 工具类MailUtil
package com.bocai.utils;

import com.bocai.pojo.EmailProperties;
import jakarta.mail.*;
import jakarta.mail.internet.InternetAddress;
import jakarta.mail.internet.MimeMessage;

import java.util.Properties;

public class MailUtil {

    /**
     * 发送邮件
     * @param emailProperties 发件人信息(发件人邮箱,发件人授权码)及邮件服务器信息(邮件服务器域名,身份验证开关)
     * @param to 收件人邮箱
     * @param title 邮件标题
     * @param content 邮件正文
     * @return
     */
    public static boolean sendMail(EmailProperties emailProperties, String to, String title, String content){
        MimeMessage message = null;
        try {
            Properties properties = new Properties();
            properties.put("mail.smtp.host", emailProperties.getHost());
            properties.put("mail.smtp.auth",emailProperties.isAuth());
            properties.put("mail.user", emailProperties.getUser());
            properties.put("mail.password", emailProperties.getCode());

            // 构建授权信息,用于进行SMTP进行身份验证
            Authenticator authenticator = new Authenticator() {
                @Override
                protected PasswordAuthentication getPasswordAuthentication() {
                    return new PasswordAuthentication(emailProperties.getUser(), emailProperties.getCode());
                }
            };
            // 使用环境属性和授权信息,创建邮件会话
            Session mailSession = Session.getInstance(properties, authenticator);
            // 创建邮件消息
            message = new MimeMessage(mailSession);

        }catch (Exception e){
            e.printStackTrace();
        }

        //如果邮件创建失败,直接返回
        if (message==null){
            return false;
        }

        try {
            // 设置发件人
            InternetAddress form = new InternetAddress(emailProperties.getUser());
            message.setFrom(form);

            // 设置收件人
            InternetAddress toAddress = new InternetAddress(to);
            message.setRecipient(Message.RecipientType.TO, toAddress);

            // 设置邮件标题
            message.setSubject(title);

            // 设置邮件的内容体
            message.setCo
最低0.47元/天 解锁文章


 2191
2191

 被折叠的 条评论
为什么被折叠?
被折叠的 条评论
为什么被折叠?
 到【灌水乐园】发言


