


1.总体概览
spring关于事务的配置就是由三个部分组成:
(1)数据源DataSource
(2)事务管理器TransactionManager
(3)事务代理机制
无论哪种配置方式,一般变化的只是代理机制这部分。
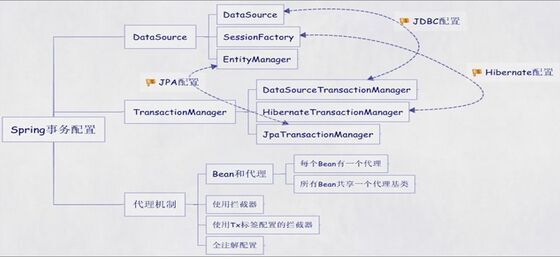
2.DataSource和TransactionManager
DataSource和TransactionManager这两部分只会根据数据访问方式有所变化,比如使用ibatis或者jdbc进行数据访问时,使用DataSource;使用hibernate的时候,使用SessionFactory
此处以ibatis配置为例
    <bean id="dataSource" class="org.apache.commons.dbcp.BasicDataSource" destroy-method="close">
        <property name="driverClassName" value="com.mysql.jdbc.Driver"/>
        <property name="url" value="jdbc:mysql://localhost:3306/test"/>
        <property name="username" value="root"/>
        <property name="password" value="123"/>
    </bean>

  <bean id="txManager" class="org.springframework.jdbc.datasource.DataSourceTransactionManager">
    <property name="dataSource" ref="dataSource"/>
  </bean>
2.代理机制
(1)使用tx配置的拦截器
<tx:advice id="txAdvice" transaction-manager="transactionManager">
<tx:attributes>
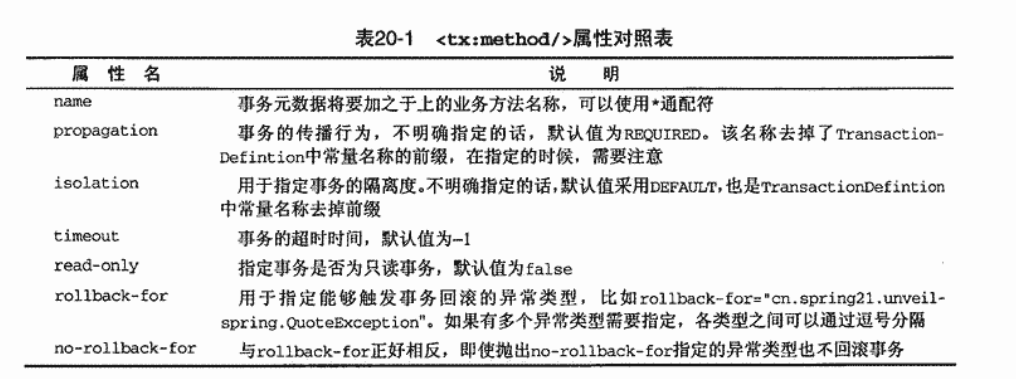
<tx:method name="save*" propagation="REQUIRED" />
<tx:method name="delete*" propagation="REQUIRED" />
<tx:method name="update*" propagation="REQUIRED" />
<tx:method name="select*" propagation="REQUIRED" />
<tx:method name="*" propagation="REQUIRES_NEW"
rollback-for="Exception" />
</tx:attributes>
</tx:advice>
<aop:config proxy-target-class="false">
<aop:advisor
pointcut="execution(* cn.com.bsfit.frms.mgr.service.imp.merchant.*ServerResource.*(..))"
advice-ref="txAdvice" />
</aop:config><tx:advice>是专门为声明事务Advice而设置的配置元素,底层当然还是我们的TransactionInterceptor。
<tx:advice>的transaction-manager指定了他要使用的事务管理器是哪一个。
<tx:method>指定特定的方法作为一个事务
通过<tx:advice>指定的事务信息,需要aop的支持才能织入到具体的业务对象,所以,剩下的就是aop的配置了
	<aop:config proxy-target-class="false">
		<aop:advisor
			pointcut="execution(* cn.com.bsfit.frms.mgr.service.imp.merchant.*ServerResource.*(..))"
			advice-ref="txAdvice" />
	</aop:config>
(2)基于注解
通过Transactional注解,可以指定与<tx:method>几乎相同的信息,但是现在不需要指定方法名了,因为已经直接标注到方法上了。
Transactional的定义如下:
@Target({ElementType.METHOD, ElementType.TYPE})
@Retention(RetentionPolicy.RUNTIME)
@Inherited
@Documented
public @interface Transactional {

	String value() default "";

	Propagation propagation() default Propagation.REQUIRED;

	Isolation isolation() default Isolation.DEFAULT;

	int timeout() default TransactionDefinition.TIMEOUT_DEFAULT;

	boolean readOnly() default false;

	Class<? extends Throwable>[] rollbackFor() default {};

	String[] rollbackForClassName() default {};

	Class<? extends Throwable>[] noRollbackFor() default {};

	String[] noRollbackForClassName() default {};

} @Transactional
public class QuoteService implements IQuoteService
{
private JdbcTemplate jdbcTemplate;
@Transactional(propagation = Propagation.SUPPORTS, readOnly = true, timeout = 20)
public Quote getQuate()
{
return (Quote) getJdbcTemplate().queryForObject("SELECT * FROM fx_quote where quote_id=2",//
new RowMapper()
{
public Object mapRow(ResultSet rs, int row)throws SQLException
{
Quote quote = new Quote();
// ...
return quote;
}
});
}
@Transactional(propagation = Propagation.SUPPORTS, readOnly = true, timeout = 20)
public Quote getQuateByDateTime(DateTime dateTime)
{
throw new NotImplementedException();
}
public void deleteQuote(Quote quote) {
throw new NotImplementedException();
}
public JdbcTemplate getJdbcTemplate() {
return jdbcTemplate;
}
public void setJdbcTemplate(JdbcTemplate jdbcTemplate) {
this.jdbcTemplate = jdbcTemplate;
}
}
所以,使用注解生命只用两个步骤:
1)使用@Transactional标注类或者方法
2)在容器的配置文件下添加:
<tx:annotation-driven transaction-manager="transactionManager" /><?xml version="1.0" encoding="UTF-8"?>
<!-- <beans xmlns:xsi="http://www.w3.org/2001/XMLSchema-instance"
xmlns="http://www.springframework.org/schema/beans"
xsi:schemaLocation="http://www.springframework.org/schema/beans
http://www.springframework.org/schema/beans/spring-beans-3.0.xsd"> -->
<beans xmlns="http://www.springframework.org/schema/beans"
xmlns:xsi="http://www.w3.org/2001/XMLSchema-instance"
xmlns:context="http://www.springframework.org/schema/context"
xmlns:tx="http://www.springframework.org/schema/tx"
xmlns:aop="http://www.springframework.org/schema/aop"
xsi:schemaLocation="
http://www.springframework.org/schema/beans
http://www.springframework.org/schema/beans/spring-beans-3.0.xsd
http://www.springframework.org/schema/context
http://www.springframework.org/schema/context/spring-context-3.0.xsd
http://www.springframework.org/schema/tx
http://www.springframework.org/schema/tx/spring-tx.xsd
http://www.springframework.org/schema/aop
http://www.springframework.org/schema/aop/spring-aop-3.0.xsd"
default-autowire="byName">
<bean id="dataSource" class="org.apache.commons.dbcp.BasicDataSource">
<property name="driverClassName" value="com.mysql.jdbc.Driver"/>
<property name="url" value="jdbc:mysql://localhost:3306/test"/>
<property name="username" value="root"/>
<property name="password" value="123"/>
</bean>
<bean id="txManager" class="org.springframework.jdbc.datasource.DataSourceTransactionManager">
<property name="dataSource" ref="dataSource"/>
</bean>
<tx:annotation-driven transaction-manager="txManager"/>
</beans>


 1718
1718

 被折叠的 条评论
为什么被折叠?
被折叠的 条评论
为什么被折叠?
 到【灌水乐园】发言


