


前言
一个app的程序是怎么启动的?入口在哪里?
听说ActivityManagerServices很吊,Why?
Activity生命周期到底是谁调用的?
Application又是在哪里初始化的?onCreate又是如何被调用的?
面试官常常会问:为什么主线程使用looper.loop不会卡死界面?
等等..
是不是一直有这样的疑问?很懵逼对不对 - - ,那我们就站在巨人的丁丁上来解决一下这些问题,如果文中出现一些错误,还望指正,互相学习
主要流程
大家都知道 Android是基于Linux系统的,而在Linux中,所有的进程都是由init进程直接或者是间接fork出来的,当我开机的时候init进程就会fork出一个Android的第一个新的进程
Zygote,中文翻译过来要”受精卵”,一个很有意识的名字。为什么这么说呢,当我们Zygote进程跑起来后,Android为了实现实现资源共用和更快的启动速度,通过Zygote进程直接去fork出一些子进程,这就是为什么要”受精卵”的原因,也就是我们的app全部都是基于Zygote上的 ,没有Zygote就没有我们,当Zygote初始化完成之后,首先会fork它的第一个子进程SystemServer,这个类非常的重要,为什么这么说呢?因为系统里面重要的服务都是在这个进程里面开启的,比如ActivityManagerService、PackageManagerService、WindowManagerService等等,有木有觉得似曾相识
当SystemServer跑起来后,这些重要的服务也会随之创建,系统初始化完成之后我们就会进到系统桌面->Launcher,其实Launcher也是一个app,它继承自Activity,当我们点击桌面上的app后,系统就会为我们的app创建一个进程,然后启动我们App的第一个类ActivityThread,其实说到底我们的app就是一个main函数,也就是启动了ActivityThread.main()。我们重点来看下这个类
App的程序入口
都说主线程更新ui,主线程不能有耗时操作,主线程是在哪里创建的呢?我们来看下ActivityThread.main()。
public static void main(String[] args) {
....
final File configDir = Environment.getUserConfigDirectory(UserHandle.myUserId());
TrustedCertificateStore.setDefaultUserDirectory(configDir);
Process.setArgV0("<pre-initialized>");
//创建主线程Looper
Looper.prepareMainLooper();
ActivityThread thread = new ActivityThread();
thread.attach(false);
if (sMainThreadHandler == null) {
sMainThreadHandler = thread.getHandler();
}
if (false) {
Looper.myLooper().setMessageLogging(new
LogPrinter(Log.DEBUG, "ActivityThread"));
}
// End of event ActivityThreadMain.
Trace.traceEnd(Trace.TRACE_TAG_ACTIVITY_MANAGER);
//主线程消息循环
Looper.loop();
throw new RuntimeException("Main thread loop unexpectedly exited");
}
为什么主线程使用Looper.loop()不会卡死界面
首先我们要明白一点,主线程也是一个线程,也是有他的生命周期的,当我们new Thread()后执行完里面的代码也就意味着这个线程的结束,刚说了主线程也是线程,如果我们的代码一下就执行完了,那么我们这个app的功能还能执行吗? 我还没开始呢,你咋就结束了?这样多不持久,Android为了解决这个问题,使用的Looper循环,了解Handler的机制的童鞋,会知道在处理消息的时候使用了Looper.loop()方法,并且在该方法中进入了一个死循环
同时Looper.loop()方法是在主线程中调用的,那么为什么没有卡死界面呢?
线程的生命周期
首先我们要明白线程它也是有生命周期的,它的生命周期在于这个线程里面所要执行的代码执行完成,这个线程的使命也就完成了
主线程如何与子线程通信
其次我们要明白我们主线程是如何跟子线程通信(发消息)的
public class MainActivity extends AppCompatActivity {
Handler mHandler;
@Override
protected void onCreate(Bundle savedInstanceState) {
super.onCreate(savedInstanceState);
setContentView(R.layout.activity_main);
new Thread(new Runnable() {
@Override
public void run() {
//初始化Looper对象 一个线程对应一个looper
Looper.prepare();
mHandler = new Handler() {
@Override
public void handleMessage(Message msg) {
super.handleMessage(msg);
Log.i("test", "do somethings");
}
};
//开启消息循环
Looper.loop();
}
}).start();
findViewById(R.id.btn).setOnClickListener(new View.OnClickListener() {
@Override
public void onClick(View v) {
mHandler.sendEmptyMessage(1);
}
});
}
}
我们主线程跟子线程就是这样通信的,可是为什么要 先Looper.prepare(),然后执行处理逻辑,最后Looper.loop();
我们先来看看Looper.prepare()
public static void prepare() {
prepare(true);
}
private static void prepare(boolean quitAllowed) {
if (sThreadLocal.get() != null) {
throw new RuntimeException("Only one Looper may be created per thread");
}
sThreadLocal.set(new Looper(quitAllowed));
}
sThreadLocal你可以理解成一个hashmap键值对,key就是我们当前的Thread线程,value就是new Lopper出来的对象,sThreadLocal.get()如果不等于空的话 表示直接调用了prepare已经set进去了,就会抛出一个异常。也就是说一个线程只能对应一个looper,人家可是很专一的~,在来看看
/**
* Run the message queue in this thread. Be sure to call
* {@link #quit()} to end the loop.
*/
public static void loop() {
//获取当前线程对应的Looper对象
final Looper me = myLooper();
if (me == null) {
//没有调用Looper.prepare()
throw new RuntimeException("No Looper; Looper.prepare() wasn't called on this thread.");
}
final MessageQueue queue = me.mQueue;
// Make sure the identity of this thread is that of the local process,
// and keep track of what that identity token actually is.
Binder.clearCallingIdentity();
final long ident = Binder.clearCallingIdentity();
//死循环,不断从消息队列取消息,有消息就直接处理消息
for (;;) {
//取出下一个消息
Message msg = queue.next(); // might block
if (msg == null) {
// No message indicates that the message queue is quitting.
//当前没有消息,直接返回
return;
}
// This must be in a local variable, in case a UI event sets the logger
final Printer logging = me.mLogging;
if (logging != null) {
logging.println(">>>>> Dispatching to " + msg.target + " " +
msg.callback + ": " + msg.what);
}
final long traceTag = me.mTraceTag;
if (traceTag != 0) {
Trace.traceBegin(traceTag, msg.target.getTraceName(msg));
}
try {
//能走到这里,表示msg不为空,有消息要处理
//调用handler.dispatchMessage()处理消息
msg.target.dispatchMessage(msg);
} finally {
if (traceTag != 0) {
Trace.traceEnd(traceTag);
}
}
if (logging != null) {
logging.println("<<<<< Finished to " + msg.target + " " + msg.callback);
}
// Make sure that during the course of dispatching the
// identity of the thread wasn't corrupted.
final long newIdent = Binder.clearCallingIdentity();
if (ident != newIdent) {
Log.wtf(TAG, "Thread identity changed from 0x"
+ Long.toHexString(ident) + " to 0x"
+ Long.toHexString(newIdent) + " while dispatching to "
+ msg.target.getClass().getName() + " "
+ msg.callback + " what=" + msg.what);
}
msg.recycleUnchecked();
}
}
代码上注释也写的比较清楚了,我们刚说了线程也是有生命周期的,我们在线程里面创建了looper对象之后,new Handler()然后去处理消息,假如我们Looper.loop()没有这个死循环,这个线程任务就执行完成了,那Handler里面还能收到消息吗?所以我就需要调用Looper.loop()一个死循环,不断去消息队列去取,然后我们主线程发了消息后,Looper取到了消息,子线程里面的Handler也就自然能够处理消息这就是这个调用Looper.loop()的作用
主线程创建Handler的时候为什么不用调用Looper.prepare(),Loop.loop()?
我们在来看看AcivityThread源码
ActivityThread.java
public static void main(String[] args) {
...
Looper.prepareMainLooper();
ActivityThread thread = new ActivityThread();
thread.attach(false);
if (sMainThreadHandler == null) {
sMainThreadHandler = thread.getHandler();
}
if (false) {
Looper.myLooper().setMessageLogging(new
LogPrinter(Log.DEBUG, "ActivityThread"));
}
// End of event ActivityThreadMain.
Trace.traceEnd(Trace.TRACE_TAG_ACTIVITY_MANAGER);
Looper.loop();
...
}
看到木有,在我们app启动的时候,ActivityThread已经帮我们做好了Looper消息循环,所以我们在主线程new Handler()的时候就不用创建Looper,反而你再次调用Looper.prepare()还会报错,因为主线程已经创建了Looper对象了。
为什么主线程不会卡死界面
理解了上面几个问题我们就比较好理解了,首先,主线程也是线程,只不过这个线程是被系统创建的(就好比我们自己创建了子线程一样),其次 Looper是不断的去消息队列里面取,取到消息就去处理消息,只要处理消息的操作不是耗时操作,就不会引起卡顿,其实Android的交互都是基于消息机制的分发,handler 可以发送消息,然后loop 里就分发消息然后就发给handler, 然后就执行到 H(Handler )里的对应代码。所以这些代码就不会卡死~,也就说循环消息并不会使起卡死,而真正会卡死的是我们的处理消息,这也就是我们主线程为什么不能执行耗时操作的原因。
举个栗子
讲到这里你可能还不是很能理解,那我们就来举一个栗子~
我们去做地铁或者做火车的时候都要去过安检,这个安检的机器就好比我们的Looper对象,机器内部检测违禁品就好比是Handler,因为我们要依次排队去放到机器上去检查,我们一个人的行李物品就比作一个Message,多个人所以就组成了一个MessageQueue, 好,有了这些东西我们就可以脑补整个运行过程了,首先如果要运行机器首先你的插插头吧?不然怎么通电->(Looper.prepare),通完点后你得按开关吧?(Looper.loop),因为运行很早,这个时候还没有人来安检,此时消息队列(MessageQueue)是空的,这个时候我过来安检,因为我是出去玩,所以带的东西比较少,这个时候我把我的包包(Message)放到了安检机器的韧带(MessageQueue)上面了,此时MessageQueue消息队列里面就有我的包包了,机器此时正在运转,
然后机器自动检测我的是否有违禁品(Handler.handleMessage),这个时候来了位大叔,带着很大一包东西(Message),放到了MessageQueue里,这个安检机器还在循环(Looper),当循环到这个大叔的大件后,大叔在另一头等待了好久发现怎么都不出来,因为太大,检测需要时间(假设机器比较low),而这个等待的时间就是我们所说的做了耗时操作导致ui卡顿。如果等了很久会导致很多乘客不满(ANR)。这个比喻可能不是很形象,但是话粗理不粗,这个只是我的个人理解
如果大家还是不能理解的话,可以参考Android事件机制详细解读里面有更深入的解读
ActivityThread.attach()
回归上一个话题,执行main函数的时候new ActivityThread(),执行了它的attach方法,我们来看下attach方法
private void attach(boolean system) {
sCurrentActivityThread = this;
mSystemThread = system;
if (!system) {
...
final IActivityManager mgr =ActivityManagerNative.getDefault();
try {
mgr.attachApplication(mAppThread);
} catch (RemoteException ex) {
throw ex.rethrowFromSystemServer();
}
// Watch for getting close to heap limit.
BinderInternal.addGcWatcher(new Runnable() {
@Override public void run() {
if (!mSomeActivitiesChanged) {
return;
}
Runtime runtime = Runtime.getRuntime();
long dalvikMax = runtime.maxMemory();
long dalvikUsed = runtime.totalMemory() - runtime.freeMemory();
if (dalvikUsed > ((3*dalvikMax)/4)) {
if (DEBUG_MEMORY_TRIM) Slog.d(TAG, "Dalvik max=" + (dalvikMax/1024)
+ " total=" + (runtime.totalMemory()/1024)
+ " used=" + (dalvikUsed/1024));
mSomeActivitiesChanged = false;
try {
mgr.releaseSomeActivities(mAppThread);
} catch (RemoteException e) {
throw e.rethrowFromSystemServer();
}
}
}
});
} else {
// Don't set application object here -- if the system crashes,
// we can't display an alert, we just want to die die die.
android.ddm.DdmHandleAppName.setAppName("system_process",
UserHandle.myUserId());
try {
mInstrumentation = new Instrumentation();
ContextImpl context = ContextImpl.createAppContext(
this, getSystemContext().mPackageInfo);
mInitialApplication = context.mPackageInfo.makeApplication(true, null);
mInitialApplication.onCreate();
} catch (Exception e) {
throw new RuntimeException(
"Unable to instantiate Application():" + e.toString(), e);
}
}
}
首先attach方法有一个boolean的变量system,传过来的是false,聪明的你一看就是这个意思,是否是系统应用 ,当然我们不是,然后我们会走到if里面,里面有一行比较关键的代码
final IActivityManager mgr = ActivityManagerNative.getDefault();
我点进去看下getDefault()函数
ActivityManagerNative.java
/**
* Retrieve the system's default/global activity manager.
*/
static public IActivityManager getDefault() {
return gDefault.get();
}
看注释说返回一个系统全局的ActivityManager,调用了gDefault.get(),我们来看下这个gDefault变量看看是在哪里初始化的
private static final Singleton<IActivityManager> gDefault = new Singleton<IActivityManager>() {
protected IActivityManager create() {
IBinder b = ServiceManager.getService("activity");
if (false) {
Log.v("ActivityManager", "default service binder = " + b);
}
IActivityManager am = asInterface(b);
if (false) {
Log.v("ActivityManager", "default service = " + am);
}
return am;
}
};
ServiceManager.getService(“activity”)返回一个IBinder 这个Binder对象是谁呢?既然有getService,那么肯定有addService,并且这个key是“activity”,我们来看下是在哪个类添加的
ActivityManagerService.java
public void setSystemProcess() {
try {
ServiceManager.addService(Context.ACTIVITY_SERVICE, this, true);
ServiceManager.addService(ProcessStats.SERVICE_NAME, mProcessStats);
ServiceManager.addService("meminfo", new MemBinder(this));
ServiceManager.addService("gfxinfo", new GraphicsBinder(this));
ServiceManager.addService("dbinfo", new DbBinder(this));
if (MONITOR_CPU_USAGE) {
ServiceManager.addService("cpuinfo", new CpuBinder(this));
}
ServiceManager.addService("permission", new PermissionController(this));
ServiceManager.addService("processinfo", new ProcessInfoService(this));
ApplicationInfo info = mContext.getPackageManager().getApplicationInfo(
"android", STOCK_PM_FLAGS | MATCH_SYSTEM_ONLY);
mSystemThread.installSystemApplicationInfo(info, getClass().getClassLoader());
synchronized (this) {
ProcessRecord app = newProcessRecordLocked(info, info.processName, false, 0);
app.persistent = true;
app.pid = MY_PID;
app.maxAdj = ProcessList.SYSTEM_ADJ;
app.makeActive(mSystemThread.getApplicationThread(), mProcessStats);
synchronized (mPidsSelfLocked) {
mPidsSelfLocked.put(app.pid, app);
}
updateLruProcessLocked(app, false, null);
updateOomAdjLocked();
}
} catch (PackageManager.NameNotFoundException e) {
throw new RuntimeException(
"Unable to find android system package", e);
}
}
我们看这一行代码
ServiceManager.addService(Context.ACTIVITY_SERVICE, this, true);
看下这个Context这个常量:
public static final String ACTIVITY_SERVICE = “activity”;
正好是刚才ServiceManager.getService()传过去的key, addService()的时候传过去一个this,也就是ActivityManagerService自己,那么getService()的时候返回的毫无疑问就是ActivityManagerService
我们在回来看下ActivityThread.attach()方法
ActivityThread.java
final IActivityManager mgr = ActivityManagerNative.getDefault();
try {
mgr.attachApplication(mAppThread);
} catch (RemoteException ex) {
throw ex.rethrowFromSystemServer();
}
我们搞清楚调用ActivityManagerNative.getDefault()返回了IActivityManager类型的mgr,也就是ActivityManagerService之后 ,它调用了attachApplication,并传入了一个mAppThread我们首先来看下这个变量是什么类型
final ApplicationThread mAppThread = new ApplicationThread();
是ApplicationThread,我们在来看看调用了ActivityManagerService.attachApplication做了什么事情
ActivityManagerService.java
@Override
public final void attachApplication(IApplicationThread thread) {
synchronized (this) {
int callingPid = Binder.getCallingPid();
final long origId = Binder.clearCallingIdentity();
attachApplicationLocked(thread, callingPid);
Binder.restoreCallingIdentity(origId);
}
}
调用了attachApplicationLocked(),继续看下做了啥
这个方法比较长,我就只取关键的部分贴出来
private final boolean attachApplicationLocked(IApplicationThread thread,
int pid) {
....
try {
...
ProfilerInfo profilerInfo = profileFile == null ? null
: new ProfilerInfo(profileFile, profileFd, samplingInterval, profileAutoStop);
thread.bindApplication(processName, appInfo, providers, app.instrumentationClass,
profilerInfo, app.instrumentationArguments, app.instrumentationWatcher,
app.instrumentationUiAutomationConnection, testMode,
mBinderTransactionTrackingEnabled, enableTrackAllocation,
isRestrictedBackupMode || !normalMode, app.persistent,
new Configuration(mConfiguration), app.compat,
getCommonServicesLocked(app.isolated),
mCoreSettingsObserver.getCoreSettingsLocked());
updateLruProcessLocked(app, false, null);
app.lastRequestedGc = app.lastLowMemory = SystemClock.uptimeMillis();
} catch (Exception e) {
// todo: Yikes! What should we do? For now we will try to
// start another process, but that could easily get us in
// an infinite loop of restarting processes...
Slog.wtf(TAG, "Exception thrown during bind of " + app, e);
app.resetPackageList(mProcessStats);
app.unlinkDeathRecipient();
startProcessLocked(app, "bind fail", processName);
return false;
}
Application是在什么时候创建的?onCreate()什么时候调用的?
执行完判断和赋值的操作后最后调用了thread.bindApplication(),刚才看到是ApplicationThread,所以我来看看ApplicationThread.bindApplication
ActivityThread.java
private class ApplicationThread extends ApplicationThreadNative {
private static final String DB_INFO_FORMAT = " %8s %8s %14s %14s %s";
private int mLastProcessState = -1;
...
public final void bindApplication(String processName, ApplicationInfo appInfo,
List<ProviderInfo> providers, ComponentName instrumentationName,
ProfilerInfo profilerInfo, Bundle instrumentationArgs,
IInstrumentationWatcher instrumentationWatcher,
IUiAutomationConnection instrumentationUiConnection, int debugMode,
boolean enableBinderTracking, boolean trackAllocation,
boolean isRestrictedBackupMode, boolean persistent, Configuration config,
CompatibilityInfo compatInfo, Map<String, IBinder> services, Bundle coreSettings) {
if (services != null) {
// Setup the service cache in the ServiceManager
ServiceManager.initServiceCache(services);
}
setCoreSettings(coreSettings);
AppBindData data = new AppBindData();
data.processName = processName;
data.appInfo = appInfo;
data.providers = providers;
data.instrumentationName = instrumentationName;
data.instrumentationArgs = instrumentationArgs;
data.instrumentationWatcher = instrumentationWatcher;
data.instrumentationUiAutomationConnection = instrumentationUiConnection;
data.debugMode = debugMode;
data.enableBinderTracking = enableBinderTracking;
data.trackAllocation = trackAllocation;
data.restrictedBackupMode = isRestrictedBackupMode;
data.persistent = persistent;
data.config = config;
data.compatInfo = compatInfo;
data.initProfilerInfo = profilerInfo;
sendMessage(H.BIND_APPLICATION, data);
...
}
可以看到是ActivityThread的内部类,我去!你在玩我呢?绕了这么半天又绕回来了。
客官别急,我们继续向下看,执行bindApplication的时候发了一个消息
sendMessage(H.BIND_APPLICATION, data);
这个H就是我们前面说的Handler,我们来看下handler做了哪些处理
private class H extends Handler {
.....
public void handleMessage(Message msg) {
if (DEBUG_MESSAGES) Slog.v(TAG, ">>> handling: " + codeToString(msg.what));
switch (msg.what) {
case BIND_APPLICATION:
Trace.traceBegin(Trace.TRACE_TAG_ACTIVITY_MANAGER, "bindApplication");
AppBindData data = (AppBindData)msg.obj;
handleBindApplication(data);
Trace.traceEnd(Trace.TRACE_TAG_ACTIVITY_MANAGER);
break;
}
看到它调用了handleBindApplication(),其主要作用是绑定我的的自定义的application,做一些初始化操作,我们继续看
private void handleBindApplication(AppBindData data) {
...
if (ii != null) {
final ApplicationInfo instrApp = new ApplicationInfo();
ii.copyTo(instrApp);
instrApp.initForUser(UserHandle.myUserId());
final LoadedApk pi = getPackageInfo(instrApp, data.compatInfo,
appContext.getClassLoader(), false, true, false);
final ContextImpl instrContext = ContextImpl.createAppContext(this, pi);
try {
final ClassLoader cl = instrContext.getClassLoader();
mInstrumentation = (Instrumentation)
cl.loadClass(data.instrumentationName.getClassName()).newInstance();
} catch (Exception e) {
throw new RuntimeException(
"Unable to instantiate instrumentation "
+ data.instrumentationName + ": " + e.toString(), e);
}
final ComponentName component = new ComponentName(ii.packageName, ii.name);
mInstrumentation.init(this, instrContext, appContext, component,
data.instrumentationWatcher, data.instrumentationUiAutomationConnection);
if (mProfiler.profileFile != null && !ii.handleProfiling
&& mProfiler.profileFd == null) {
mProfiler.handlingProfiling = true;
final File file = new File(mProfiler.profileFile);
file.getParentFile().mkdirs();
Debug.startMethodTracing(file.toString(), 8 * 1024 * 1024);
}
} else {
mInstrumentation = new Instrumentation();
}
....
try {
// If the app is being launched for full backup or restore, bring it up in
// a restricted environment with the base application class.
Application app = data.info.makeApplication(data.restrictedBackupMode, null);
mInitialApplication = app;
// don't bring up providers in restricted mode; they may depend on the
// app's custom Application class
if (!data.restrictedBackupMode) {
if (!ArrayUtils.isEmpty(data.providers)) {
installContentProviders(app, data.providers);
// For process that contains content providers, we want to
// ensure that the JIT is enabled "at some point".
mH.sendEmptyMessageDelayed(H.ENABLE_JIT, 10*1000);
}
}
// Do this after providers, since instrumentation tests generally start their
// test thread at this point, and we don't want that racing.
try {
mInstrumentation.onCreate(data.instrumentationArgs);
}
catch (Exception e) {
throw new RuntimeException(
"Exception thrown in onCreate() of "
+ data.instrumentationName + ": " + e.toString(), e);
}
try {
mInstrumentation.callApplicationOnCreate(app);
} catch (Exception e) {
if (!mInstrumentation.onException(app, e)) {
throw new RuntimeException(
"Unable to create application " + app.getClass().getName()
+ ": " + e.toString(), e);
}
}
} finally {
StrictMode.setThreadPolicy(savedPolicy);
}
}
这里有个比较重要的类,mInstrumentation 为什么说它特别重要呢,我们先来看看它怎么初始化的
final ClassLoader cl = instrContext.getClassLoader();
mInstrumentation=(Instrumentation)cl.loadClass(data.instrumentationName.getClassName()).newInstance();
通过反射创建mInstrumentation 然后给进行一系列初始化操作,然后执行了
Application app = data.info.makeApplication(data.restrictedBackupMode, null);
data.info是一个LoadeApk对象。
LoadeApk.java
public Application makeApplication(boolean forceDefaultAppClass,
Instrumentation instrumentation) {
if (mApplication != null) {
return mApplication;
}
Trace.traceBegin(Trace.TRACE_TAG_ACTIVITY_MANAGER, "makeApplication");
Application app = null;
String appClass = mApplicationInfo.className;
if (forceDefaultAppClass || (appClass == null)) {
appClass = "android.app.Application";
}
try {
java.lang.ClassLoader cl = getClassLoader();
if (!mPackageName.equals("android")) {
Trace.traceBegin(Trace.TRACE_TAG_ACTIVITY_MANAGER,
"initializeJavaContextClassLoader");
initializeJavaContextClassLoader();
Trace.traceEnd(Trace.TRACE_TAG_ACTIVITY_MANAGER);
}
ContextImpl appContext = ContextImpl.createAppContext(mActivityThread, this);
app = mActivityThread.mInstrumentation.newApplication(
cl, appClass, appContext);
appContext.setOuterContext(app);
} catch (Exception e) {
if (!mActivityThread.mInstrumentation.onException(app, e)) {
Trace.traceEnd(Trace.TRACE_TAG_ACTIVITY_MANAGER);
throw new RuntimeException(
"Unable to instantiate application " + appClass
+ ": " + e.toString(), e);
}
}
mActivityThread.mAllApplications.add(app);
mApplication = app;
if (instrumentation != null) {
try {
//这里不会执行,以为传过来的是null,onCreate在上一层执行的
instrumentation.callApplicationOnCreate(app);
} catch (Exception e) {
if (!instrumentation.onException(app, e)) {
Trace.traceEnd(Trace.TRACE_TAG_ACTIVITY_MANAGER);
throw new RuntimeException(
"Unable to create application " + app.getClass().getName()
+ ": " + e.toString(), e);
}
}
}
}
执行了
app = mActivityThread.mInstrumentation.newApplication(
cl, appClass, appContext);
Instrumentation.java
static public Application newApplication(Class<?> clazz, Context context)
throws InstantiationException, IllegalAccessException,
ClassNotFoundException {
Application app = (Application)clazz.newInstance();
app.attach(context);
return app;
}
同样通过反射出一个application并且 调用其attach(),也就是说我的自定义application的时候attach就是在这里调用的
接着上面ActivityThread.handleBindApplication()中,首先反射出mInstrumentation
和Application然后执行了下面一句代码
try {
mInstrumentation.callApplicationOnCreate(app);
} catch (Exception e) {
if (!mInstrumentation.onException(app, e)) {
throw new RuntimeException(
"Unable to create application " + app.getClass().getName()
+ ": " + e.toString(), e);
}
}
调用了mInstrumentation.callApplicationOnCreate(),我们的Application.oncreate()就是在这里调用的,现在明白为什么Instrumentation为什么那么重要了吧,它就像个管家婆一样,负责家里的大事小事,但是一般不抛头露面,听一家之主ActivityThread的安排。
好,搞清楚Application后我们在来看看activity在哪里被初始化以及调用oncreate()方法的
Activity是怎样启动的
前面说了ActivityThread.attach()调用了ActivityManagerService.attachApplication(),在代码中看到通过调用ApplicationThread.bindApplication()绑定了application,我们在看看bindApplication()之后在干了什么
ActivityManagerService.java
private final boolean attachApplicationLocked(IApplicationThread thread,
int pid) {
...
try {
...
thread.bindApplication(processName, appInfo, providers, app.instrumentationClass,
profilerInfo, app.instrumentationArguments, app.instrumentationWatcher,
app.instrumentationUiAutomationConnection, testMode,
mBinderTransactionTrackingEnabled, enableTrackAllocation,
isRestrictedBackupMode || !normalMode, app.persistent,
new Configuration(mConfiguration), app.compat,
getCommonServicesLocked(app.isolated),
mCoreSettingsObserver.getCoreSettingsLocked());
...
}catch (Exception e) {
...
}
...
if (normalMode) {
try {
if (mStackSupervisor.attachApplicationLocked(app)) {
didSomething = true;
}
} catch (Exception e) {
Slog.wtf(TAG, "Exception thrown launching activities in " + app, e);
badApp = true;
}
}
调用了mStackSupervisor.attachApplicationLocked(app),mStackSupervisor是ActivityStackSupervisor类型,这个类也是非常重要的,它决定着我们app是否能启动成功,我们看看做了什么
ActivityStackSupervisor.java
boolean attachApplicationLocked(ProcessRecord app) throws RemoteException {
final String processName = app.processName;
boolean didSomething = false;
for (int displayNdx = mActivityDisplays.size() - 1; displayNdx >= 0; --displayNdx) {
//当前应用的整个activity堆信息
ArrayList<ActivityStack> stacks = mActivityDisplays.valueAt(displayNdx).mStacks;
for (int stackNdx = stacks.size() - 1; stackNdx >= 0; --stackNdx) {
final ActivityStack stack = stacks.get(stackNdx);
if (!isFocusedStack(stack)) {
continue;
}
ActivityRecord hr = stack.topRunningActivityLocked();
if (hr != null) {
if (hr.app == null && app.uid == hr.info.applicationInfo.uid
&& processName.equals(hr.processName)) {
try {
//启动Activity
if (realStartActivityLocked(hr, app, true, true)) {
didSomething = true;
}
} catch (RemoteException e) {
Slog.w(TAG, "Exception in new application when starting activity "
+ hr.intent.getComponent().flattenToShortString(), e);
throw e;
}
}
}
}
}
if (!didSomething) {
ensureActivitiesVisibleLocked(null, 0, !PRESERVE_WINDOWS);
}
return didSomething;
}
看到调用了realStartActivityLocked(hr, app, true, true)),继续看
final boolean realStartActivityLocked(ActivityRecord r, ProcessRecord app,
boolean andResume, boolean checkConfig) throws RemoteException {
...
if (andResume) {
app.hasShownUi = true;
app.pendingUiClean = true;
}
app.forceProcessStateUpTo(mService.mTopProcessState);
app.thread.scheduleLaunchActivity(new Intent(r.intent), r.appToken,
System.identityHashCode(r), r.info, new Configuration(mService.mConfiguration),
new Configuration(task.mOverrideConfig), r.compat, r.launchedFromPackage,
task.voiceInteractor, app.repProcState, r.icicle, r.persistentState, results,
newIntents, !andResume, mService.isNextTransitionForward(), profilerInfo);
...
}
看到了调用了app.thread.scheduleLaunchActivity(),这个app是上一层传过来的ActivityRecord,它代表的就是要开启的Activity对象里面分装了很多信息,比如所在的ActivityTask等,如果这是首次打开应用,那么这个Activity会被放到ActivityTask的栈顶,那么这个thread就是我们的ApplicationThread,我们回到ActivityThread
看下ApplicationThread.scheduleLaunchActivity()做了什么
ActivityThread.java
private class ApplicationThread extends ApplicationThreadNative {
@Override
public final void scheduleLaunchActivity(Intent intent, IBinder token, int ident,
ActivityInfo info, Configuration curConfig, Configuration overrideConfig,
CompatibilityInfo compatInfo, String referrer, IVoiceInteractor voiceInteractor,
int procState, Bundle state, PersistableBundle persistentState,
List<ResultInfo> pendingResults, List<ReferrerIntent> pendingNewIntents,
boolean notResumed, boolean isForward, ProfilerInfo profilerInfo) {
...
updatePendingConfiguration(curConfig);
sendMessage(H.LAUNCH_ACTIVITY, r);
}
}
又用hanlder发了个消息,我们来看看hanlder怎么处理的
public void handleMessage(Message msg) {
if (DEBUG_MESSAGES) Slog.v(TAG, ">>> handling: " + codeToString(msg.what));
switch (msg.what) {
case LAUNCH_ACTIVITY: {
Trace.traceBegin(Trace.TRACE_TAG_ACTIVITY_MANAGER, "activityStart");
final ActivityClientRecord r = (ActivityClientRecord) msg.obj;
r.packageInfo = getPackageInfoNoCheck(
r.activityInfo.applicationInfo, r.compatInfo);
handleLaunchActivity(r, null, "LAUNCH_ACTIVITY");
Trace.traceEnd(Trace.TRACE_TAG_ACTIVITY_MANAGER);
}
break;
}
Word天,几经周折又回到ActivityThread自己,心好累。。我们继续~
ActivityThread.java
private void handleLaunchActivity(ActivityClientRecord r, Intent customIntent, String reason) {
// If we are getting ready to gc after going to the background, well
// we are back active so skip it.
unscheduleGcIdler();
mSomeActivitiesChanged = true;
if (r.profilerInfo != null) {
mProfiler.setProfiler(r.profilerInfo);
mProfiler.startProfiling();
}
// Make sure we are running with the most recent config.
handleConfigurationChanged(null, null);
if (localLOGV) Slog.v(
TAG, "Handling launch of " + r);
// Initialize before creating the activity
WindowManagerGlobal.initialize();
//反射创建一个Activity
Activity a = performLaunchActivity(r, customIntent);
if (a != null) {
r.createdConfig = new Configuration(mConfiguration);
reportSizeConfigurations(r);
Bundle oldState = r.state;
//调用Activity.onResume
handleResumeActivity(r.token, false, r.isForward,
!r.activity.mFinished && !r.startsNotResumed, r.lastProcessedSeq, reason);
if (!r.activity.mFinished && r.startsNotResumed) {
// The activity manager actually wants this one to start out paused, because it
// needs to be visible but isn't in the foreground. We accomplish this by going
// through the normal startup (because activities expect to go through onResume()
// the first time they run, before their window is displayed), and then pausing it.
// However, in this case we do -not- need to do the full pause cycle (of freezing
// and such) because the activity manager assumes it can just retain the current
// state it has.
performPauseActivityIfNeeded(r, reason);
// We need to keep around the original state, in case we need to be created again.
// But we only do this for pre-Honeycomb apps, which always save their state when
// pausing, so we can not have them save their state when restarting from a paused
// state. For HC and later, we want to (and can) let the state be saved as the
// normal part of stopping the activity.
if (r.isPreHoneycomb()) {
r.state = oldState;
}
}
} else {
// If there was an error, for any reason, tell the activity manager to stop us.
try {
ActivityManagerNative.getDefault()
.finishActivity(r.token, Activity.RESULT_CANCELED, null,
Activity.DONT_FINISH_TASK_WITH_ACTIVITY);
} catch (RemoteException ex) {
throw ex.rethrowFromSystemServer();
}
}
}
看到开头 ,关键代码调用了Activity a = performLaunchActivity(r, customIntent);
返回一个Activity,我们看看performLaunchActivity()
ActivityThread.java
private Activity performLaunchActivity(ActivityClientRecord r, Intent customIntent) {
// System.out.println("##### [" + System.currentTimeMillis() + "] ActivityThread.performLaunchActivity(" + r + ")");
ActivityInfo aInfo = r.activityInfo;
if (r.packageInfo == null) {
r.packageInfo = getPackageInfo(aInfo.applicationInfo, r.compatInfo,
Context.CONTEXT_INCLUDE_CODE);
}
ComponentName component = r.intent.getComponent();
if (component == null) {
component = r.intent.resolveActivity(
mInitialApplication.getPackageManager());
r.intent.setComponent(component);
}
if (r.activityInfo.targetActivity != null) {
component = new ComponentName(r.activityInfo.packageName,
r.activityInfo.targetActivity);
}
Activity activity = null;
try {
java.lang.ClassLoader cl = r.packageInfo.getClassLoader();
//通过反射创建activity实例
activity = mInstrumentation.newActivity(
cl, component.getClassName(), r.intent);
StrictMode.incrementExpectedActivityCount(activity.getClass());
r.intent.setExtrasClassLoader(cl);
r.intent.prepareToEnterProcess();
if (r.state != null) {
r.state.setClassLoader(cl);
}
} catch (Exception e) {
if (!mInstrumentation.onException(activity, e)) {
throw new RuntimeException(
"Unable to instantiate activity " + component
+ ": " + e.toString(), e);
}
}
try {
Application app = r.packageInfo.makeApplication(false, mInstrumentation);
if (localLOGV) Slog.v(TAG, "Performing launch of " + r);
if (localLOGV) Slog.v(
TAG, r + ": app=" + app
+ ", appName=" + app.getPackageName()
+ ", pkg=" + r.packageInfo.getPackageName()
+ ", comp=" + r.intent.getComponent().toShortString()
+ ", dir=" + r.packageInfo.getAppDir());
if (activity != null) {
//创建BaseContext
Context appContext = createBaseContextForActivity(r, activity);
CharSequence title = r.activityInfo.loadLabel(appContext.getPackageManager());
Configuration config = new Configuration(mCompatConfiguration);
if (r.overrideConfig != null) {
config.updateFrom(r.overrideConfig);
}
if (DEBUG_CONFIGURATION) Slog.v(TAG, "Launching activity "
+ r.activityInfo.name + " with config " + config);
Window window = null;
if (r.mPendingRemoveWindow != null && r.mPreserveWindow) {
window = r.mPendingRemoveWindow;
r.mPendingRemoveWindow = null;
r.mPendingRemoveWindowManager = null;
}
//我们的activity.attach就在这里被调用的
activity.attach(appContext, this, getInstrumentation(), r.token,
r.ident, app, r.intent, r.activityInfo, title, r.parent,
r.embeddedID, r.lastNonConfigurationInstances, config,
r.referrer, r.voiceInteractor, window);
if (customIntent != null) {
activity.mIntent = customIntent;
}
r.lastNonConfigurationInstances = null;
activity.mStartedActivity = false;
int theme = r.activityInfo.getThemeResource();
if (theme != 0) {
activity.setTheme(theme);
}
activity.mCalled = false;
if (r.isPersistable()) {
mInstrumentation.callActivityOnCreate(activity, r.state, r.persistentState);
} else {
mInstrumentation.callActivityOnCreate(activity, r.state);
}
if (!activity.mCalled) {
throw new SuperNotCalledException(
"Activity " + r.intent.getComponent().toShortString() +
" did not call through to super.onCreate()");
}
r.activity = activity;
r.stopped = true;
if (!r.activity.mFinished) {
activity.performStart();
r.stopped = false;
}
if (!r.activity.mFinished) {
if (r.isPersistable()) {
if (r.state != null || r.persistentState != null) {
mInstrumentation.callActivityOnRestoreInstanceState(activity, r.state,
r.persistentState);
}
} else if (r.state != null) {
mInstrumentation.callActivityOnRestoreInstanceState(activity, r.state);
}
}
if (!r.activity.mFinished) {
activity.mCalled = false;
if (r.isPersistable()) {
mInstrumentation.callActivityOnPostCreate(activity, r.state,
r.persistentState);
} else {
mInstrumentation.callActivityOnPostCreate(activity, r.state);
}
if (!activity.mCalled) {
throw new SuperNotCalledException(
"Activity " + r.intent.getComponent().toShortString() +
" did not call through to super.onPostCreate()");
}
}
}
r.paused = true;
mActivities.put(r.token, r);
} catch (SuperNotCalledException e) {
throw e;
} catch (Exception e) {
if (!mInstrumentation.onException(activity, e)) {
throw new RuntimeException(
"Unable to start activity " + component
+ ": " + e.toString(), e);
}
}
return activity;
}
我们看到通过调用mInstrumentation.newActivity(
cl, component.getClassName(), r.intent);返回一个Activity,哇~这个管家婆真是厉害!看看做了啥?肯定是反射创建一个Activity嘛。。不信?
Instrumentation.java
public Activity newActivity(ClassLoader cl, String className,
Intent intent)
throws InstantiationException, IllegalAccessException,
ClassNotFoundException {
return (Activity)cl.loadClass(className).newInstance();
}
不得不说Instrumentation真是任劳任怨啊。。
好,接着上面创建Activity之后,判断activity是否不等于空,走进if里面调用了
activity.attach(appContext, this, getInstrumentation(), r.token,
r.ident, app, r.intent, r.activityInfo, title, r.parent,
r.embeddedID, r.lastNonConfigurationInstances, config,
r.referrer, r.voiceInteractor, window);
原来我们Activity的attach在这里调用的啊。。。接着下面走
if (r.isPersistable()) {
mInstrumentation.callActivityOnCreate(activity, r.state, r.persistentState);
} else {
mInstrumentation.callActivityOnCreate(activity, r.state);
}
看到没!看到没!熟悉不,我的application.onCreate也是这样调用的,管家婆666666
Instrumentation.java
public void callActivityOnCreate(Activity activity, Bundle icicle) {
prePerformCreate(activity);
activity.performCreate(icicle);
postPerformCreate(activity);
}
调用了activity.performCreate(icicle);看到这么名字就应该很清楚了吧~,又不信?
Activity.java
final void performCreate(Bundle icicle) {
restoreHasCurrentPermissionRequest(icicle);
onCreate(icicle);
mActivityTransitionState.readState(icicle);
performCreateCommon();
}
看到木有~~~回到上面,当执行handleLaunchActivity的时候,调用performLaunchActivity(r, customIntent);返回了Activity之后
我们接着向下看
ActivityThread.java
Activity a = performLaunchActivity(r, customIntent);
if (a != null) {
r.createdConfig = new Configuration(mConfiguration);
reportSizeConfigurations(r);
Bundle oldState = r.state;
handleResumeActivity(r.token, false, r.isForward,
!r.activity.mFinished && !r.startsNotResumed, r.lastProcessedSeq, reason);
}
调用了handleResumeActivity,不用说 我敢肯定是用mInstrumentation来调用Activity.onResume的,我们来验证一下
final void handleResumeActivity(IBinder token,
boolean clearHide, boolean isForward, boolean reallyResume, int seq, String reason) {
ActivityClientRecord r = mActivities.get(token);
....
// TODO Push resumeArgs into the activity for consideration
r = performResumeActivity(token, clearHide, reason);
....
}
继续看performResumeActivity()
public final ActivityClientRecord performResumeActivity(IBinder token,
boolean clearHide, String reason) {
ActivityClientRecord r = mActivities.get(token);
if (localLOGV) Slog.v(TAG, "Performing resume of " + r
+ " finished=" + r.activity.mFinished);
if (r != null && !r.activity.mFinished) {
if (clearHide) {
r.hideForNow = false;
r.activity.mStartedActivity = false;
}
try {
r.activity.onStateNotSaved();
r.activity.mFragments.noteStateNotSaved();
if (r.pendingIntents != null) {
deliverNewIntents(r, r.pendingIntents);
r.pendingIntents = null;
}
if (r.pendingResults != null) {
deliverResults(r, r.pendingResults);
r.pendingResults = null;
}
r.activity.performResume();
...
} catch (Exception e) {
if (!mInstrumentation.onException(r.activity, e)) {
throw new RuntimeException(
"Unable to resume activity "
+ r.intent.getComponent().toShortString()
+ ": " + e.toString(), e);
}
}
}
看到了调用r.activity.performResume(),我们在继续看看Activity.performResume()
Activity.java
final void performResume() {
performRestart();
mFragments.execPendingActions();
mLastNonConfigurationInstances = null;
mCalled = false;
// mResumed is set by the instrumentation
mInstrumentation.callActivityOnResume(this);
if (!mCalled) {
throw new SuperNotCalledException(
"Activity " + mComponent.toShortString() +
" did not call through to super.onResume()");
}
// invisible activities must be finished before onResume() completes
if (!mVisibleFromClient && !mFinished) {
Log.w(TAG, "An activity without a UI must call finish() before onResume() completes");
if (getApplicationInfo().targetSdkVersion
> android.os.Build.VERSION_CODES.LOLLIPOP_MR1) {
throw new IllegalStateException(
"Activity " + mComponent.toShortString() +
" did not call finish() prior to onResume() completing");
}
}
// Now really resume, and install the current status bar and menu.
mCalled = false;
mFragments.dispatchResume();
mFragments.execPendingActions();
onPostResume();
if (!mCalled) {
throw new SuperNotCalledException(
"Activity " + mComponent.toShortString() +
" did not call through to super.onPostResume()");
}
}
调用了mInstrumentation.callActivityOnResume(this);看来我们的验证是没错的
结语
至此,Activity整个的启动流程也讲完了,大家也看到,调用过程极其复杂
源码中各种条件判断让人眼花缭乱,所以说如果你没记住也没关系,你只要记住这个流程,理解了Android在控制Activity生命周期时是如何操作,以及是通过哪几个关键的类进行操作的就可以了,以后遇到相关的问题之道从哪块下手即可,这些过程我虽然也是撸了一遍,但还是记不清。
时序图
为了大家方便,我整理了下整个的调用过程
以上是本文讲的整个流程图,写的比较水,希望对大家学习有所帮助。。。
Android Studio查看源码的小技巧
不知道大家遇到过没,我们平时做项目的时候,想要查看哪些类使用了这个变量的,或者调用过这个类的方法的时候,都会去按住Ctrl加上鼠标点击那个变量或者方法,但是你只能查看自己的项目使用过
比如你想查看这个方法在哪里使用过你可以按住ctrl再点击这个方法查看它的引用
可是我们查看源码的时候,比如我们查看ActivityThread的源码 想看一下handleResumeActivity在哪里调用了,可是你会发现你按住ctrl在点击会找不到引用。为什么呢?因为默认是搜索你的项目,也就是说只要你的项目调用了这个方法,你才可以搜到,可是这是系统调用的,我想查看到底是谁调用的,怎么办捏?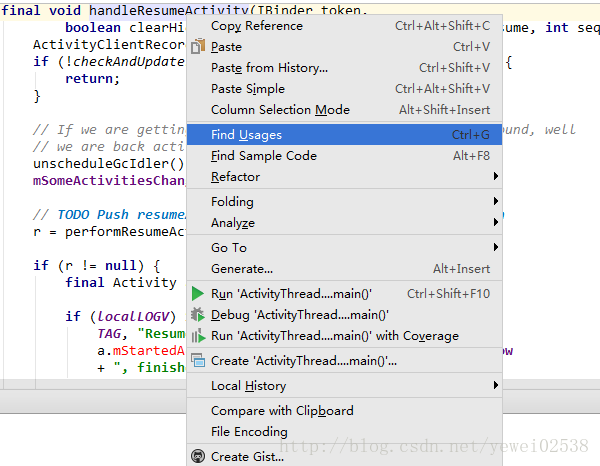
右键单击这个方法弹出菜单,点击Find Usages,快捷是Ctrl+g
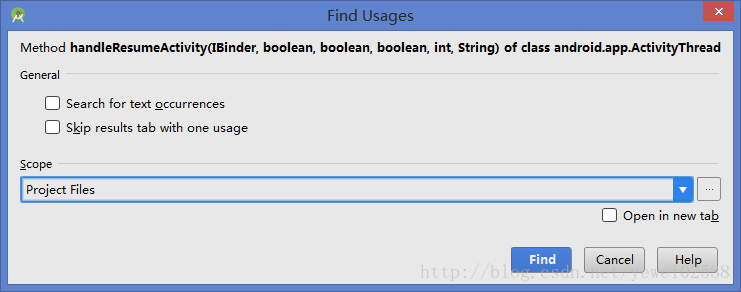
默认是搜索我们的Project引用,我们修改成
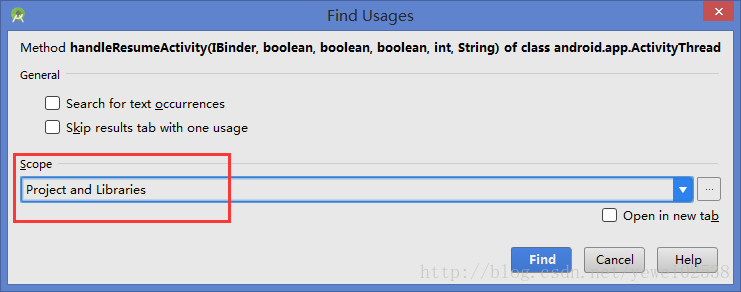
然后点击Find
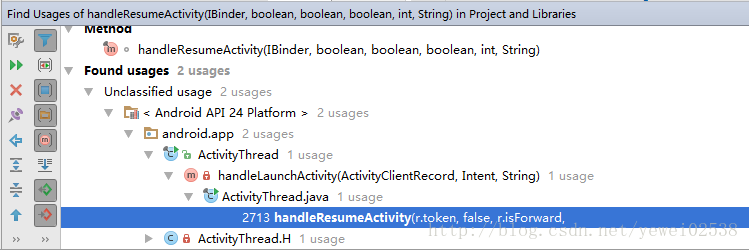
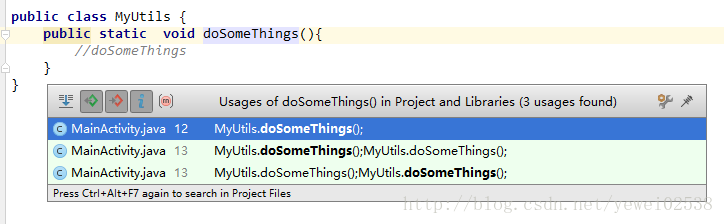
就找了调用的地方,然后我们双击就到了调用的那行代码,下次你在按住ctrl单击那个方法的时候就会弹出来引用的地方

这对于我们查看源码有很大的帮助~


 705
705


 被折叠的 条评论
为什么被折叠?
被折叠的 条评论
为什么被折叠?
 到【灌水乐园】发言


