


 本文详细介绍了Spring框架中的IoC(控制反转)原理,如何通过XML配置或注解实现bean管理,以及AOP(面向切面编程)的应用,包括静态代理和动态代理,以及Spring AOP的配置方法,事务的ACID特性与编程式和声明式事务。
文章目录
简介
Spring是一个轻量级的控制反转(IoC)和面向切面(AOP)的容器框架。spring作为容器去管理你的类,有spring管理的类在整个服务器启动期间在内存中只生成一份。
1、IoC介绍
控制反转 Inverse of Control, 一个xml文件就相当于一个Spring容器,在xml文件中部署所有bean,在类中利用annotation注释插入值
2、关于注解@Xx的使用
ps: 注解需要有aop包的导入,@Autowired 使用较普遍,@Value
![[(img-OJtXRpod-1619186502454)(C:\Users\Razer\AppData\Roaming\Typora\typora-user-images\image-20210309111029964.png)]](https://i-blog.csdnimg.cn/blog_migrate/17e1a96603c0ac2675205d828360ac3b.png)
1.1 @Component 作用及使用方法
当@Component标注在类上时,该类可无需在xml文件中进行bean配置 ,效果等同于如下
<bean id="xx" class="xx"><bean>
在类中配置实例如下:
@Component("User") //注解加在类上
public class User {
    public String name="Jack";

    @Value("strrr")   //可以这样子注入普通值
    public String str;
}
但需要在xml文件中进行配置,使得注解生效 ! !
<?xml version="1.0" encoding="UTF-8"?>
<beans xmlns="http://www.springframework.org/schema/beans"
       xmlns:xsi="http://www.w3.org/2001/XMLSchema-instance"
       xmlns:context="http://www.springframework.org/schema/context"
       xsi:schemaLocation="http://www.springframework.org/schema/beans
        https://www.springframework.org/schema/beans/spring-beans.xsd
        http://www.springframework.org/schema/context
        https://www.springframework.org/schema/context/spring-context.xsd">


    <context:component-scan base-package="com.kuang"></context:component-scan> <!--    指定扫描这个包,此包下注解生效-->
    <context:annotation-config/>
</beans>
1.2 @Component 使用时bean id的命名规则:
- 当类名开头只有一个大写字母时,bean id会生成为类名首字母小写
- 当类名同时有两个及以上大写字母时,bean id为原类名
- 可以使用@Component(“ bean_id") 指定
2、@Component有三个衍生注解 适用于MVC三层架构分开注解,但其实作用都一致
- 1、controller [ @Controller ]
- 2、service 【 @Service 】
- 3、dao 【 @Repository 】
3、@Configuration的使用
在类中进行如此注解,则可在一个类中注解多个bean
@Configuration
public class JackConfig2 {

    @Bean(name = "UserG2")   //相当于这份xml文件里的 bean标签,默认bean idr就是方法名UserGenerato,返回值User就是class
    public User UserGenerator(){
        return new User();  //User()会引用 <bean id="User” class=“com.kuang.pojo.User">,从而返回一个已经注入好的user
    }

    @Bean(name = "Show")
    public void Show(){
        System.out.println("this is show method");
    }
}
4、完全无xml文件的使用方法
前提是需要使用到的bean都使用了@Component 或者是@Configuration来注解声明! ! !
在主函数使用AnnotationConfigApplicationContext来构建context
 public static void main(String[] args) {
        AnnotationConfigApplicationContext context = new AnnotationConfigApplicationContext("com.kuang");
      //路径是包,会扫描这个包及子包内的所有注解

        User user = (User) context.getBean("USER");
        System.out.println(user.getName());
 }
5、小结
- 对于Spring项目, xml文件更加易于维护
- 缺点有:不是自己类使用不了 。注解是Spring Boot常用的,
- 所以最佳实践一般xml文件用来管理bean,注解用来注入值
3、AOP (Aspect Oriented Programming)面向切面编程
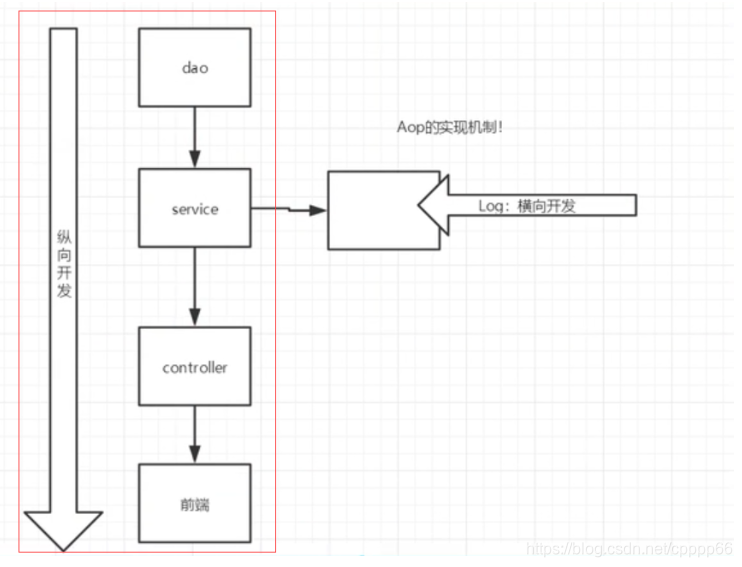
3.1设计的原因
就是为了防止原业务代码被改动,假设纵向开发已然完成,一般不允许代码被改动,而想要在原有代码上面增加功能,则需要设置一代理去代理service,并在代理里做增加
3.2静态代理
- 可参考com.kuang.spring-08-proxy 中的demo2_realProxy中的Proxy.class是如何代理UserServiceImpl.class的
3.3 动态代理
参考com.kuang.spring-08-proxy 中的demo3_dynamic
通过一个自建类去implements 接口InvocationHandler
public class ProxyInvocationHandler implements InvocationHandler {

    private Object target;  //被代理的接口!
    public void setTarget(Object target) {
        this.target = target;
    }

    //几乎固定代码,来生成得到代理类
    public Object getProxy(){
        return Proxy.newProxyInstance(this.getClass().getClassLoader(),
                target.getClass().getInterfaces(),  //此时这里是已被implement的接口实现类
                this);
    }

    //处理代理实类,并返回结果。 (可在此加入想要加入的功能)
    public Object invoke(Object proxy, Method method, Object[] args) throws Throwable { //这是接口InvocationHandler里的方法
        //动态代理的本质就是使用反射机制来实现!
        Object result=method.invoke(target,args);
         log(method.getName());  //可以增加自己想要的功能
        seeHouse(); //可以增加自己想要的功能
        return result;
    }

    public void seeHouse(){
        System.out.println("中介带你看房");
    }
    public void log(String msg){
    System.out.println("这里使用了method: "+msg);
}
在主函数中通过注入任意一个 接口实现类,便能使用此接口实现类中的方法
public static void main(String[] args) {
        //这是一个真实角色
        Landlord landlord = new Landlord();
       //代理角色此时还没有出现
        ProxyInvocationHandler pih = new ProxyInvocationHandler();
        pih.setTarget(landlord); //注入Rent的实现类landlord,


        Rent proxy = (Rent) pih.getProxy();       //代理角色出现了,被动态生成
        proxy.rent(); //可以使用接口实现类里的任何方法
    }
相比之与静态配置的优点:
一个动态代理类 代理的是一个***接口***(一般对应一类业务)
且可以代理所有实现了这个接口的类
4、使用Spring实现AOP
4.1 使用Spring API原生接口
<!--    方法1: 使用原生Spring API接口-->
    <aop:config>
<!--        设置切入点-->
        <aop:pointcut id="pointcut" expression="execution(
* com.kuang.service..*.*(..))"/>

<!--        在切入点前后给出advice-->
        <aop:advisor advice-ref="log" pointcut-ref="pointcut"></aop:advisor>
        <aop:advisor advice-ref="logAfter" pointcut-ref="pointcut"></aop:advisor>

    </aop:config>
4.2 自定义类来实现aspect切入,可理解为类切入
<bean id="diyPointcut" class="com.kuang.diy.DiyPointcut"></bean>

    <!--    方法2: 使用自定义类切入-->
    <aop:config>
        <!--        aspect切入 是类切入-->
       <aop:aspect ref="diyPointcut">

       <!--    pointcut设置切入点-->
            <aop:pointcut id="pointcut" expression="execution(                              * com.kuang.service..*.*(..))"/>

<!--        增加的method-->
           <aop:before method="DiyBefore" pointcut-ref="pointcut"></aop:before>
           <aop:after method="DiyAfter" pointcut-ref="pointcut"></aop:after>
       </aop:aspect>

    </aop:config>
4.3.1 注解使用AOP如何配置
4.3.1.1
方法1:自定义类切入
自定义类DiyPointcut如下
public class DiyPointcut {
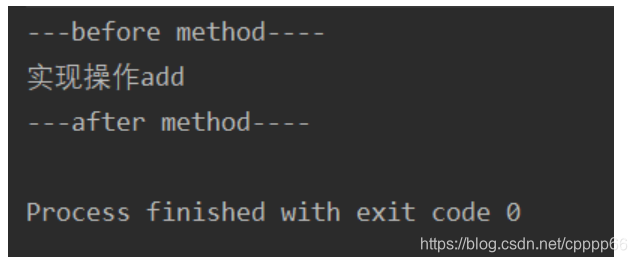
public void DiyAfter(){
System.out.println("---after method----");
}
public void DiyBefore(){
System.out.println("---before method----");
}
}
配置文件applicationContext2.xml如下
<?xml version="1.0" encoding="UTF-8"?>
<beans xmlns="http://www.springframework.org/schema/beans"
       xmlns:xsi="http://www.w3.org/2001/XMLSchema-instance" xmlns:aop="http://www.springframework.org/schema/aop"
       xsi:schemaLocation="http://www.springframework.org/schema/beans http://www.springframework.org/schema/beans/spring-beans.xsd http://www.springframework.org/schema/aop https://www.springframework.org/schema/aop/spring-aop.xsd">

    <bean id="usImpl" class="com.kuang.service.UserServiceImpl"></bean>
   <bean id="diyPointcut" class="com.kuang.diy.DiyPointcut"></bean>

    <!--    方法2: 使用自定义类切入-->
    <aop:config>
        <!--        aspect切入 是类切入,此处切入类是com.kuang.diy.DiyPointcut-->
       <aop:aspect ref="diyPointcut">
       <!--    pointcut设置切入点-->
            <aop:pointcut id="pointcut" expression="execution(* com.kuang.service..*.*(..))"/>

<!--        增加的method-->
           <aop:before method="DiyBefore" pointcut-ref="pointcut"></aop:before>
           <aop:after method="DiyAfter" pointcut-ref="pointcut"></aop:after>
       </aop:aspect>

    </aop:config>
</beans>
在主函数test2调用如下:
public static void main(String[] args) {
    ClassPathXmlApplicationContext context = new ClassPathXmlApplicationContext("applicationContext2.xml");

    //注意!! 动态代理的是接口
    UserService usImpl = (UserService) context.getBean("usImpl");
    usImpl.add();
}
运行截图如下:
4.3.1.2
方法2:利用@Aspect,在切面类中配置。
(且@Aspect需在xml文件中激活)
@Aspect //使用切面的注解
public class AnnotationPointcut {
@After("execution(* com.kuang.service..*.*(..))") //注意要用的是aop的包 ,别用从junit
public void AnnoAfter(){
System.out.println("---after method by Annotation----");
}
@Before("execution(* com.kuang.service..*.*(..))")
public void AnnoBefore(){
System.out.println("---before method by Annotation----");
}
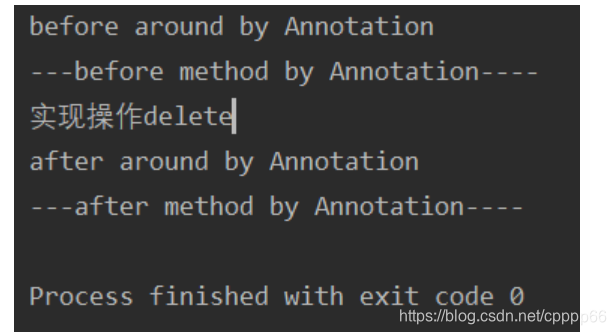
@Around("execution(* com.kuang.service..*.*(..))")
public void around(ProceedingJoinPoint joinPoint) throws Throwable {
System.out.println("before around by Annotation");
Object proceed = joinPoint.proceed(); //接入点
System.out.println("after around by Annotation");
}
}
applicationContext3.xml中激活@Aspect的配置如下:
<beans xmlns="http://www.springframework.org/schema/beans"
       xmlns:xsi="http://www.w3.org/2001/XMLSchema-instance" xmlns:aop="http://www.springframework.org/schema/aop"
       xsi:schemaLocation="http://www.springframework.org/schema/beans http://www.springframework.org/schema/beans/spring-beans.xsd http://www.springframework.org/schema/aop https://www.springframework.org/schema/aop/spring-aop.xsd">

<!--    第三种方法,使用注解AOP-->

<!--    配置自动代理功能    -->
    <aop:aspectj-autoproxy></aop:aspectj-autoproxy>
</beans>

<!-- bean的配置-->
<bean id="annotationPointcut" class="com.kuang.diy.AnnotationPointcut"></bean>
    <bean id="usImpl" class="com.kuang.service.UserServiceImpl"></bean>
在主函数中test3这样调用:
public static void main(String[] args) {
    ClassPathXmlApplicationContext context = new ClassPathXmlApplicationContext("applicationContext3.xml");
    UserService usImpl = (UserService) context.getBean("usImpl");
 usImpl.delete();
运行结果截图如下:
4.3.1.3
方法3:@EnableAspectJAutoProxy 配置在切面类上即可使用(无需xml文件)
切面类AnnotationPointcut如下:
@Aspect  //使用切面的注解
@Component
@EnableAspectJAutoProxy //使用此注解则无需在xml文件中配置自动代理
public class AnnotationPointcut {
    @After("execution(* com.kuang.service..*.*(..))")   //注意要用的是aop的包 ,别用从junit
    public  void AnnoAfter(){
        System.out.println("---after method by Annotation----");
    }
    @Before("execution(* com.kuang.service..*.*(..))")
    public void AnnoBefore(){
        System.out.println("---before method by Annotation----");
    }
    @Around("execution(* com.kuang.service..*.*(..))")
    public void around(ProceedingJoinPoint joinPoint) throws Throwable {
        System.out.println("before around by Annotation");

        Object proceed = joinPoint.proceed();  //接入点

        System.out.println("after around by Annotation");
    }
}
Note: 被切入的类UserServiceImpl需要@Component来注解存在(这样子UserServiceImpl便无需在xml文件中配置bean id。
被切入类UserServiceImpl如下:
@Component("usImpl")
public class UserServiceImpl implements UserService {
    public void add() {
        System.out.println("实现操作add");
    }

    public void delete() {
        System.out.println("实现操作delete");
    }

    public void update() {
        System.out.println("实现操作update");
    }

    public void select() {
        System.out.println("实现操作select");
    }
}
在主函数test4_EnableAspectAutoProxy中使用AnnotationConfigApplicationContext来生成context,
public static void main(String[] args) {
    AnnotationConfigApplicationContext context = new AnnotationConfigApplicationContext("com.kuang");
    UserService usImpl = (UserService) context.getBean("usImpl");
    usImpl.delete();
}
效果与4.3.1.2相同,减少了xml文件的配置
*4.4 execution()表达式
expression="execution(* com.kuang.service..*.*(..))"
- 第一个形参表示返回类型, *号表示所有的类型
- 第二个形参为需要拦截的包名,后面的两个句点表示当前包和当前包的所有子包
- 即com.kuang.service包和其子孙包下所有类的方法。
- 第三个形参表示类名, ( *号表示所有的类 )
- .*(…) 最后这个星号表示方法名,*号表示所有的方法,后面括弧里面表示方法的参数,两个句点表示任何参数
Note: .* 之间不能有空格
5、事务Transaction
事务要满足ACID四大特性
- 原子性(atomicity) 事务是一个不可分割的工作单位,事务中的操作要么全部成功,要么全部失败
- 、一致性(consistency)事务必须使数据库从一个一致性状态变换到另外一个一致性状态。(事务按照预期生效,数据的状态是预期的状态)
- 、隔离性(isolation)事务执行过程中对数据的修改,在事务提交之前对其他事务不可见(多个并发事务之间要相互隔离)
- 持久性(durability)一个事务一旦被提交成功,它对数据库中数据的改变就是永久性的,接下来即使数据库发生故障也不应该对其有任何影响
事务从数据库角度说,就是一组SQL指令,要么全部执行成功,若因为某个原因其中一条指令执行有错误,则撤销先前执行过的所有指令。更简答的说就是:要么全部执行成功,要么撤销不执行
5.1 Spring编程式事务
5.2 Spring声明式事务
*常用配置关系代码
当依赖出错时,在C:\Users\Razer.m2\repository 中找到jar包删除,然后在idea中刷新重新下载导入
在最外层Project的pom.xml 文件中配置
  <dependency>
        <!-- 若无法自动导入jar包则去此网址 https://mvnrepository.com/artifact/org.springframework/spring-webmvc  -->
        <groupId>org.springframework</groupId>
        <artifactId>spring-webmvc</artifactId>
        <version>5.2.0.RELEASE</version>
    </dependency>
        <dependency>
            <groupId>junit</groupId>
            <artifactId>junit</artifactId>
            <version>4.12</version>
        </dependency>
         <dependency>
            <groupId>org.aspectj</groupId>
            <artifactId>aspectjweaver</artifactId>
            <version>1.9.4</version>
        </dependency>
*applicatonContext.xml文件中使用注解注入值及自动装配的代码
<?xml version="1.0" encoding="UTF-8"?>
<beans xmlns="http://www.springframework.org/schema/beans"
       xmlns:xsi="http://www.w3.org/2001/XMLSchema-instance"
       xmlns:context="http://www.springframework.org/schema/context"
       xsi:schemaLocation="http://www.springframework.org/schema/beans
        https://www.springframework.org/schema/beans/spring-beans.xsd
        http://www.springframework.org/schema/context
        https://www.springframework.org/schema/context/spring-context.xsd">


    <context:component-scan base-package="com.kuang"></context:component-scan> <!--    指定扫描这个包,此包下注解生效-->
    <context:annotation-config/>
</beans>


 被折叠的 条评论
为什么被折叠?
被折叠的 条评论
为什么被折叠?
 到【灌水乐园】发言


