


Python自动发送邮件(文本、html、图片、附件)
本文由博主经过查阅网上资料整理总结后编写,如存在错误或不恰当之处请留言以便更正,内容仅供大家参考学习。
Python自动发送邮件
1.开启邮箱SMTP服务
SMTP是发送邮件的协议,Python内置对SMTP的支持,可以发送纯文本邮件、HTML邮件以及带附件的邮件。
2.获得邮箱登录授权码
授权码是QQ邮箱推出的,用于登录第三方客户端的专用密码,在第三方客户端的密码框里面是输入16位授权码而不是邮箱密码。
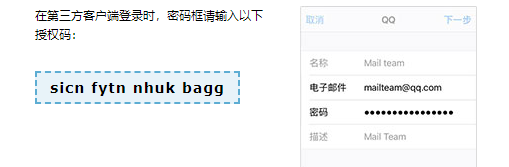 sicnfytnnhukbagg
3.导入使用的模块
smtplib和email,这俩模块是python自带的,只需import即可使用;smtplib模块主要负责发送邮件,email模块主要负责构造邮件
4. 向邮箱发送文字
创建SMTP对象-->连接到SMTP服务器-->登录SMTP服务器-->构建邮件内容-->发送邮件
import smtplib
from email.mime.text import MIMEText
from email.header import Header

def send_email(SMTP_host, from_account, from_password, to_account, subject, content):
    # 1. 实例化SMTP,创建对象
    smtp = smtplib.SMTP()
    # 2. 链接邮件服务器,若为QQ:smtp.qq.com;若为163:smtp.163.com
    smtp.connect(SMTP_host)
    # 3. 配置发送邮箱的用户名和密码(授权码)
    smtp.login(from_account, from_password)
    # 4. 配置发送内容msg
    msg = MIMEText(content, 'plain', 'utf-8')  # 内容
    msg['Subject'] = Header(subject,'utf-8')  # 主题
    msg['From'] = from_account
    msg['To'] = to_account
    # 5. 配置发送邮箱,接受邮箱,以及发送内容
    smtp.sendmail(from_account, to_account, msg.as_string())
    # 6. 关闭邮件服务
    smtp.quit()

if __name__ == '__main__':
    try:
        send_email("smtp.qq.com", "1425434661@qq.com", "sicnfytnnhukbagg", "1425434661@qq.com", "I want to talk to u",
                   "In this semester")
        print("邮件发送成功")
    except smtplib.SMTPException:
        print("Error: 无法发送邮件")
补充解释
①. connect(host,port)--> host:指定连接的邮箱服务器。常用邮箱的smtp服务器地址如下:新浪邮箱:smtp.sina.com,qq邮箱:smtp.qq.com,搜狐邮箱:smtp.sohu.com,126邮箱:smtp.126.com,139邮箱:smtp.139.com,163网易邮箱:smtp.163.com。port:指定连接服务器的端口号,默认为0.
②. login(user,password)-->user:登录邮箱的用户名。password:登录邮箱的授权码
③ sendmail(from_addr,to_addrs,msg,...)-->from_addr:邮件发送者地址。to_addrs:邮件接收者地址。字符串列表['接收地址1','接收地址2','接收地址3',...]或'接收地址'。msg:发送消息:邮件内容。一般是msg.as_string():as_string()是将msg(MIMEText对象或者MIMEMultipart对象)变为str。
④.quit(): 用于结束SMTP会话。
5.向邮箱发送图片
如果构造一个MIMEText对象,就表示一个文本邮件对象
如果构造一个MIMEImage对象,就表示一个作为附件的图片
要把多个对象组合起来,就用MIMEMultipart对象
import smtplib
from email.header import Header
from email.mime.text import MIMEText
from email.mime.image import MIMEImage
from email.mime.multipart import MIMEMultipart

def send_email_imag(SMTP_host, from_account, from_password, to_account, subject, img_data):
    html_content = """
    <html><body>
    <img src="cid:image1" alt="image1" align="center" width=100% >
    </body></html>
    """
    # 1. 实例化SMTP,链接邮件服务器(也可以使用上面的方法)
    smtp = smtplib.SMTP_SSL(SMTP_host, port=465)
    # 2. 登录邮箱,用户名和密码(授权码)
    smtp.login(from_account, from_password)
    print('Login Successful!')
    # 3. 配置发送内容msg
    msg = MIMEMultipart()
    # 3.1 创建超文本对象(用来确定图片布局) ,并将超文本加载到msg
    content = MIMEText(html_content, _subtype='html', _charset='utf8')
    msg.attach(content)
    # 3.2 创建图片对象,并将图片加载到msg
    img = MIMEImage(img_data, _subtype='octet-stream')
    img.add_header('Content-ID', 'image1')
    msg.attach(img)
    # 3.3 加载邮件主题和发送账户
    msg['Subject'] = Header(subject, 'utf-8')  # 主题
    msg['From'] = from_account
    msg['To'] = to_account
    # 4. 配置发送邮箱,接受邮箱,以及发送内容
    smtp.sendmail(from_account, to_account, msg.as_string())
    # 5. 关闭邮件服务
    smtp.quit()


if __name__ == '__main__':
    #  相对路径和绝对路径
    img_file = open("123.png", "rb")
    # img_data2 = open("C:\\Users\\cqfdcw\\Desktop\\456.png","rb").read()
    img_data= img_file.read()
    img_file.close()
    try:
        send_email_imag('smtp.qq.com', '1425434661@qq.com', 'sicnfytnnhukbagg', '1425434661@qq.com', '测试发送图片', img_data)
        print("邮件发送成功")
    except smtplib.SMTPException:
        print("Error: 无法发送邮件")
6.向邮箱发送附件
使用MIMEMultipart来标示这个邮件是多个部分组成的,然后attach各个部分。如果是附件,则add_header加入附件的声明。
不管什么类型的附件,都用MIMEApplication
import smtplib
from email.header import Header
from email.mime.text import MIMEText
from email.mime.image import MIMEImage
from email.mime.multipart import MIMEMultipart
from email.mime.application import MIMEApplication

def send_email_accessory(SMTP_host, from_account, from_password, to_account):
    # 1. 实例化SMTP,链接邮件服务器(也可以使用上面的方法)
    smtp = smtplib.SMTP_SSL(SMTP_host, port=465)
    # 2. 登录邮箱,用户名和密码(授权码)
    smtp.login(from_account, from_password)
    print('Login Successful!')
    # 3. 配置发送内容msg
    msg = MIMEMultipart()
    # 3.1 配置发送文本内容
    content = 'hello, this is email content.'
    textApart = MIMEText(content, 'plain', 'utf-8')
    msg.attach(textApart)
    # 3.2 配置发送图片附件
    imageFile = '123.png'
    imageApart = MIMEImage(open(imageFile, 'rb').read(), imageFile.split('.')[-1])
    imageApart.add_header('Content-Disposition', 'attachment', filename=imageFile)
    msg.attach(imageApart)
    # 3.3 配置发送PDF附件
    pdfFile = 'C:\\Users\\cqfdcw\\Desktop\\789.pdf'
    pdfApart = MIMEApplication(open(pdfFile, 'rb').read())
    pdfApart.add_header('Content-Disposition', 'attachment', filename=pdfFile)
    msg.attach(pdfApart)
    # 3.4 配置发送压缩包附件
    zipFile = 'C:\\Users\\cqfdcw\\Desktop\\456.zip'
    zipApart = MIMEApplication(open(zipFile, 'rb').read())
    zipApart.add_header('Content-Disposition', 'attachment', filename=zipFile)
    msg.attach(zipApart)
    # 3.5 配置发送word附件
    docFile = 'C:\\Users\\cqfdcw\\Desktop\\369.docx'
    docApart = MIMEApplication(open(docFile, 'rb').read())
    docApart.add_header('Content-Disposition', 'attachment', filename=docFile)
    msg.attach(docApart)
    # 3.6 配置邮件主题和发送账户
    subject = '这是一个邮件添加压缩包测试'
    msg['Subject'] = Header(subject, 'utf-8')  # 主题
    msg['From'] = from_account
    # 4. 配置发送内容msg
    smtp.sendmail(from_account, to_account, msg.as_string())
    # 5. 关闭邮件服务
    smtp.quit()


if __name__ == '__main__':
    try:
        send_email_accessory('smtp.qq.com', '1425434661@qq.com', 'sicnfytnnhukbagg', ['1425434661@qq.com', ])
        print('邮件发送成功')
    except smtplib.SMTPException as e:
        print('error:', e)
7.向邮箱发送文本、html、图片、附件等
import smtplib
from email.header import Header
from email.mime.text import MIMEText
from email.mime.image import MIMEImage
from email.mime.multipart import MIMEMultipart
from email.mime.application import MIMEApplication


# 下面的发件人,收件人是用于邮件传输的。
SMTP_host = 'smtp.qq.com'
from_account = '1425434661@qq.com'
from_password = 'sicnfytnnhukbagg'
to_account = ['1425434661@qq.com', ]
subject = 'Python email test'
# 1. 实例化SMTP,链接邮件服务器(也可以使用上面的方法)
smtp = smtplib.SMTP_SSL(SMTP_host, port=465)
# 2. 登录邮箱,用户名和密码(授权码)
smtp.login(from_account, from_password)
print("登录成功")
# 3. 配置发送内容msg
msg = MIMEMultipart()
# 3.1构造文字内容
text = "Hi!\nHow are you?\nHere is the link you wanted:\nhttp://www.baidu.com"
text_plain = MIMEText(text, 'plain', 'utf-8')
msg.attach(text_plain)
# 3.2构造图片链接
sendimagefile = open(r'C:\Users\cqfdcw\Desktop\456.png', 'rb').read()
image = MIMEImage(sendimagefile)
image.add_header('Content-ID', '<image1>')
image["Content-Disposition"] = 'attachment; filename="testimage.png"'
msg.attach(image)
# 3.3构造html
html = """
<html>
  <head></head>
  <body>
    <p>Hi!<br>
       How are you?<br>
       Here is the <a href="http://www.baidu.com">link(http://www.baidu.com)</a> you wanted.<br>
    </p>
  </body>
</html>
"""
text_html = MIMEText(html, 'html', 'utf-8')
text_html["Content-Disposition"] = 'attachment; filename="texthtml.html"'
msg.attach(text_html)
# 3.4构造附件(方式1)
sendfile = open(r'C:\Users\cqfdcw\Desktop\789.txt', 'rb').read()
text_att = MIMEText(sendfile, 'base64', 'utf-8')
msg.attach(text_att)
# 3.4 构造附件(方式2)
zipFile = 'C:\\Users\\cqfdcw\\Desktop\\456.zip'
zipApart = MIMEApplication(open(zipFile, 'rb').read())
zipApart.add_header('Content-Disposition', 'attachment', filename=zipFile)
msg.attach(zipApart)
# 3.5 配置邮件主题和发送账户
msg['Subject'] = Header(subject, 'utf-8')  # 主题
msg['From'] = from_account
# 4 发送邮件
smtp.sendmail(from_account, to_account, msg.as_string())
print("发送成功")
# 5. 关闭邮件服务
smtp.quit()


 638
638


 被折叠的 条评论
为什么被折叠?
被折叠的 条评论
为什么被折叠?
 到【灌水乐园】发言


