


springMVC:https://projects.spring.io/spring-webflow/
mvn中央库:https://mvnrepository.com/
一、SpringMVC是什么?
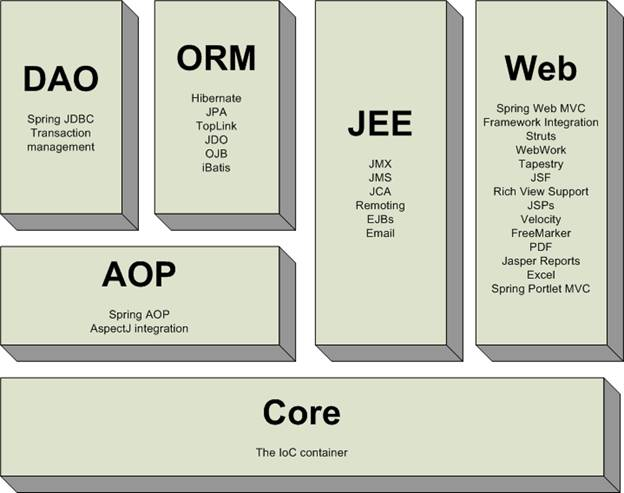
spring mvc是Spring的一个模块
二、回顾MVC模式
MVC 模式代表 Model-View-Controller(模型-视图-控制器) 模式。这种模式用于应用程序的分层开发。
- Model(模型) - 模型代表一个存取数据的对象或 JAVA POJO。它也可以带有逻辑,在数据变化时更新控制器。
- View(视图) - 视图代表模型包含的数据的可视化。
- Controller(控制器) - 控制器作用于模型和视图上。它控制数据流向模型对象,并在数据变化时更新视图。它使视图与模型分离开。
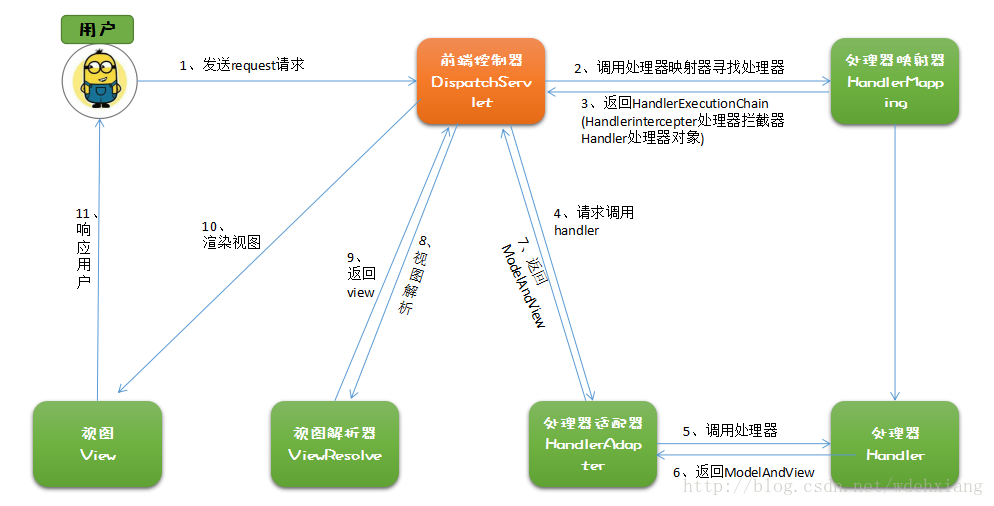
三、springMVC的工作流程
搭建springMVC环境需要的包:beans、context 、core、expression、web、webmvc以及common-logging
步骤一:创建一个web应用
步骤二:导入springIOC Springweb springMVC相关包
步骤三:在web-inf下创建web.xml文件
<servlet>
		<servlet-name>contextConfigLocation</servlet-name>
		<servlet-class>org.springframework.web.servlet.DispatcherServlet</servlet-class>
		<init-param>
			<param-name>contextConfigLocation</param-name>
			<param-value>classpath*:/spring-mvc*.xml</param-value>
		</init-param>
	</servlet>
	<servlet-mapping>
		<servlet-name>contextConfigLocation</servlet-name>
		<url-pattern>/</url-pattern>
	</servlet-mapping>
-----------------------------------------------------
<servlet>
		<servlet-name>contextConfigLocation</servlet-name>
		<servlet-class>org.springframework.web.servlet.DispatcherServlet</servlet-class>
    <!--
        contextConfigLocation配置springmvc加载的配置文件
        如果不配置contextConfigLocation,默认加载/WEB-INF/servlet名称-servlet.xml
-->
<init-param>
			<param-name>contextConfigLocation</param-name>
			<param-value>classpath*:/spring-mvc*.xml</param-value>
		</init-param>
	</servlet>
	<servlet-mapping>
		<servlet-name>contextConfigLocation</servlet-name>
		<url-pattern>/</url-pattern> <!-
            第一种:*.action 以.action结尾由DispatcherServlet解析
            第二种:/ 所有的访问地址都由DispatcherServlet解析
-->
	</servlet-mapping>
步骤四:创建Action核心控制类
public class Hello implements Controller{
	@Override
	public ModelAndView handleRequest(HttpServletRequest request, HttpServletResponse response) throws Exception {
		List list = new ArrayList<>();
		list.add("one");
		list.add("two");
		ModelAndView mv = new ModelAndView();
		mv.addObject("list",list);
		return mv;
	}
}
步骤五:在根目录下创建springmvc.xml文件
<!-- 配置适配器 -->
<bean class="org.springframework.web.servlet.mvc.SimpleControllerHandlerAdapter"></bean>
<!-- 处理器映射器  -->
<bean class="org.springframework.web.servlet.handler.BeanNameUrlHandlerMapping"></bean>

<!-- 配置处理器 -->
<bean name="/hello.action" class="com.mt.controller.Hello"></bean>
<!-- 配置视图解析器 -->
<bean class="org.springframework.web.servlet.view.InternalResourceViewResolver"></bean>
步骤六:在/webRoot/下创建 test.jsp文件
<%@ page language="java" contentType="text/html; charset=UTF-8"
    pageEncoding="UTF-8"%>
<!DOCTYPE html PUBLIC "-//W3C//DTD HTML 4.01 Transitional//EN" "http://www.w3.org/TR/html4/loose.dtd">
<html>
<head>
<meta http-equiv="Content-Type" content="text/html; charset=UTF-8">
<title>Insert title here</title>
</head>
<body>
test----------------
${list }
</body>
</html>
测试结果:
test------------
[one, two]
四、注解的方式
前3步相同
从第四步创建核心类开始:
@Controller
public class Hello {
	@RequestMapping(value = "/test")
    public String dispatchTest(Model model){
        System.out.println("Enter TestController.dispatchTest");
        model.addAttribute("Message","testmessage");
        return "test";
    }
}
第五步:在根目录下创建springmvc.xml文件
<?xml version="1.0" encoding="UTF-8"?>
<beans xmlns:xsi="http://www.w3.org/2001/XMLSchema-instance"
    xmlns="http://www.springframework.org/schema/beans"
    xmlns:mvc="http://www.springframework.org/schema/mvc"
    xmlns:context="http://www.springframework.org/schema/context"
    xmlns:aop="http://www.springframework.org/schema/aop"
    xmlns:tx="http://www.springframework.org/schema/tx"
    xsi:schemaLocation="http://www.springframework.org/schema/beans
http://www.springframework.org/schema/beans/spring-beans-4.2.xsd
http://www.springframework.org/schema/mvc
http://www.springframework.org/schema/mvc/spring-mvc-4.2.xsd
http://www.springframework.org/schema/context
http://www.springframework.org/schema/context/spring-context-4.2.xsd">

    <context:annotation-config />
    <!--
        开启注解扫描
    -->
    <context:component-scan base-package="com.test.controller"/>
    <!--如果要扫描多个类-->
	<!--<context:component-scan base-package="com.test" use-default-filters="false">
     <!-- base-package 如果多个,用“,”分隔 -->
		<context:include-filter type="annotation"
        expression="org.springframework.stereotype.Controller"/>
	</context:component-scan>-->
    <!-- 配置视图解析器 -->
    <bean class="org.springframework.web.servlet.view.InternalResourceViewResolver">
        <!-- 视图前缀 -->
        <property name="prefix" value="/" />
        <!-- 视图名称后缀  -->
        <property name="suffix" value=".jsp" />
    </bean>
</beans>
第六步:在webRoot/下创建 test.jsp
<%@ page language="java" contentType="text/html; charset=UTF-8"
    pageEncoding="UTF-8"%>
<!DOCTYPE html PUBLIC "-//W3C//DTD HTML 4.01 Transitional//EN" "http://www.w3.org/TR/html4/loose.dtd">
<html>
<head>
<meta http-equiv="Content-Type" content="text/html; charset=UTF-8">
<title>Insert title here</title>
</head>
<body>
test----------------
${message }
</body>
</html>
测试结果:
test------------
testmessage


 2063
2063


 被折叠的 条评论
为什么被折叠?
被折叠的 条评论
为什么被折叠?
 到【灌水乐园】发言


