


lvgl配置&移植
-
硬件条件
名称 最低配置 推荐配置 处理器 16,32,64 bit 时钟 >16MHz >48MHz ROM >64KB >180KB 静态RAM >2KB >4KB Stack >2KB >8KB Heap >2KB >8KB 显示缓存 >1*行像素 >10*行像素 编译器 C99及以上 -
准备工作
基于lvgl v7.11.0进行移植,目前已经发布了lvgl8,
注意lvgl 的大版本之间不兼容。一般选取稳定版本,即vx.xx.0 版本。
LVGL开源库下载地址:https://github.com/lvgl/lvgl/releases/tag/v7.11.0
LVGL官方Demo:https://github.com/lvgl/lv_examples/tree/v7.11.0
-
显示移植
下载得到lvgl v7.11.0的目录如下:
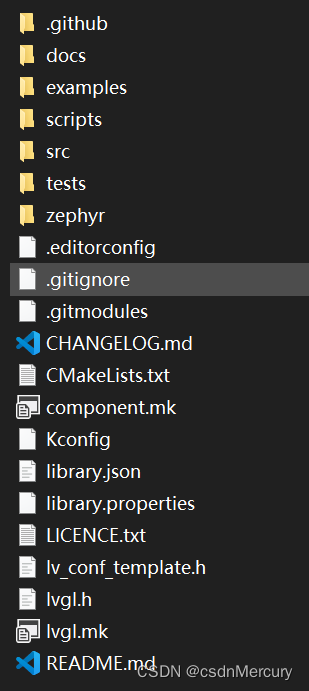
其中,lvgl_conf_template.h是lvgl库的配置,里面有各种宏的定义。
lvgl.h 中包含了lvgl库中的所有头文件。在项目工程文件下创建一个lvgl的文件夹,
将lvgl v7.11.0的目录下的src文件夹、lv_conf_template.h、lvgl.h文件复制到lvgl文件夹,
并将lv_conf_template.h改名为lv_conf.h,变成自己的配置文件,进行个性化的配置。在项目工程文件下再创建一个lvgl_driver的文件夹,存放lvgl的驱动部分。
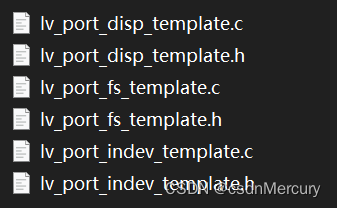
将lvgl v7.11.0的目录下./example/porting中的文件拷贝到lvgl_driver文件夹。
其中disp为显示驱动,indev为交互驱动,fs为文件系统驱动。
将文件名中的_template去掉。
打开每一个上述驱动文件,将其中的条件编译```#if 0``使能,以及修改部分名称。
对于.c文件
/** * @file lv_port_disp_templ.c * */ /*Copy this file as "lv_port_disp.c" and set this value to "1" to enable content*/ #if 0 //**将这里的 0 改成 1*** /********************* * INCLUDES *********************/ #include "lv_port_disp_template.h" //将这里的头文件名称去掉 _template对于.h 文件
    /**
    * @file lv_port_disp_templ.h
    *
    */

    /*Copy this file as "lv_port_disp.h" and set this value to "1" to enable content*/
    #if 0       //将这里的 0 改成 1

    #ifndef LV_PORT_DISP_TEMPL_H   //将这里的_TEMPL去掉,不去问题也不大
    #define LV_PORT_DISP_TEMPL_H   //将这里的_TEMPL去掉

    #ifdef __cplusplus
    extern "C" {
    #endif
回到上述配置文件 lvgl_conf.h,同样需要将其条件编译```#if 0``使能。
在这个文件中,可以根据自己的屏幕配置屏幕的水平像素、垂直像素、颜色色深等(查找 LV_HOR_RES_MAX、LV_VER_RES_MAX、LV_COLOR_DEPTH进行修改)。
还可以配置数据堆的大小(LV_MEM_SIZE),是否使用GPU(LV_USE_GPU,单片机一般没有GPU,所以改为0不使用)、是否使用文件系统(LV_USE_FILESYSTEM)。
可以再仔细查看本配置文件配置了哪些内容,根据自己需求进行修改。
在使用lvgl前,需要对lvgl进行初始化,需要添加
lv_init();#include "lvgl.h" #include "lv_port_indev.h" #include "lv_port_disp.h" int main(void) { lv_init(); //初始化lvgl lv_port_disp_init(); //注册显示设备 lv_port_indev_init(); //注册交互设备,支持键盘、触摸屏、按键、编码器等 //lv_port_fs_init(); //初始化文件系统 //根据需求自行添加 }在进行显示前,需要注册显示设备,即添加
lv_port_disp_init();在
lv_port_disp_init();函数中,会对屏幕进行初始化,
即disp_init();,我们需要根据自己的屏幕在这个函数中添加屏幕的初始化函数,例如ILI9341_Init();对LCD屏幕的显示驱动进行初始化。在下面lvgl提供了三个显示缓冲区的模板,根据需要选择一个模板即可。
实际只需要在disp_drv.buffer = &draw_buf_dsc_1;修改1或2或3。1为10行的一个buffer,2为10行的双buffer,3为所有像素点的双buffer。
3最占用RAM,但显示效果最好。
将
disp_drv.hor_res = 480;disp_drv.ver_res = 320;也修改为对应屏幕大小的像素。
我觉得直接删除这一段话也可,因为在lv_conf.h中我们已经设置过最大像素了。void lv_port_disp_init(void) { /*------------------------- * Initialize your display * -----------------------*/ disp_init(); /*----------------------------- * Create a buffer for drawing *----------------------------*/ /* Example for 1) */ static lv_disp_buf_t draw_buf_dsc_1; static lv_color_t draw_buf_1[LV_HOR_RES_MAX * 10]; /*A buffer for 10 rows*/ lv_disp_buf_init(&draw_buf_dsc_1, draw_buf_1, NULL, LV_HOR_RES_MAX * 10); /*Initialize the display buffer*/ /* Example for 2) */ static lv_disp_buf_t draw_buf_dsc_2; static lv_color_t draw_buf_2_1[LV_HOR_RES_MAX * 10]; /*A buffer for 10 rows*/ static lv_color_t draw_buf_2_2[LV_HOR_RES_MAX * 10]; /*An other buffer for 10 rows*/ lv_disp_buf_init(&draw_buf_dsc_2, draw_buf_2_1, draw_buf_2_2, LV_HOR_RES_MAX * 10); /*Initialize the display buffer*/ /* Example for 3) */ static lv_disp_buf_t draw_buf_dsc_3; static lv_color_t draw_buf_3_1[LV_HOR_RES_MAX * LV_VER_RES_MAX]; /*A screen sized buffer*/ static lv_color_t draw_buf_3_2[LV_HOR_RES_MAX * LV_VER_RES_MAX]; /*An other screen sized buffer*/ lv_disp_buf_init(&draw_buf_dsc_3, draw_buf_3_1, draw_buf_3_2, LV_HOR_RES_MAX * LV_VER_RES_MAX); /*Initialize the display buffer*/ /*----------------------------------- * Register the display in LVGL *----------------------------------*/ lv_disp_drv_t disp_drv; /*Descriptor of a display driver*/ lv_disp_drv_init(&disp_drv); /*Basic initialization*/ /*Set up the functions to access to your display*/ /*Set the resolution of the display*/ disp_drv.hor_res = 480; disp_drv.ver_res = 320; /*Used to copy the buffer's content to the display*/ disp_drv.flush_cb = disp_flush; /*Set a display buffer*/ disp_drv.buffer = &draw_buf_dsc_1; #if LV_USE_GPU /*Optionally add functions to access the GPU. (Only in buffered mode, LV_VDB_SIZE != 0)*/ /*Blend two color array using opacity*/ disp_drv.gpu_blend_cb = gpu_blend; /*Fill a memory array with a color*/ disp_drv.gpu_fill_cb = gpu_fill; #endif /*Finally register the driver*/ lv_disp_drv_register(&disp_drv); }LVGL基于绘制每一个像素点来实现整个UI的绘制,
所以在移植的时候还需要将绘制一个像素点的屏幕驱动函数提供给 lvgl。
例如:
put_px(x, y, *color_p)。改程序需要添加在
static void disp_flush(lv_disp_drv_t * disp_drv, const lv_area_t * area, lv_color_t * color_p)函数中,即前面注册屏幕显示的时候有一个结构体成员
disp_drv.flush_cb = disp_flush;该函数会刷新屏幕显示。
我在移植的时候,显示驱动函数只有绘制像素点,不带有颜色,所以我需要先设置画笔颜色,
再调用绘制函数进行一个点的绘制。cplor_p是一个指针,由于我的设置颜色的函数需要一个u16类型的变量,
所以先将其强制转换成((u16*) color_p)的指针,再通过指针取数据*((u16*) color_p)后强制转换成(u16) *((u16*) color_p)类型的数据(RGB565)。static void disp_flush(lv_disp_drv_t * disp_drv, const lv_area_t * area, lv_color_t * color_p) { /*The most simple case (but also the slowest) to put all pixels to the screen one-by-one*/ int32_t x; int32_t y; for(y = area->y1; y <= area->y2; y++) { for(x = area->x1; x <= area->x2; x++) { /* Put a pixel to the display. For example: */ /* put_px(x, y, *color_p)*/ LCD_SetTextColor( ((uint16_t) *((u16*)color_p)) ); ILI9341_SetPointPixel( (int16_t) x, (int16_t) y ); color_p++; } } /* IMPORTANT!!! * Inform the graphics library that you are ready with the flushing*/ lv_disp_flush_ready(disp_drv); } -
初始化lvgl
注意在"lv_port_disp.h"中声明对应的初始化函数。
在定时器中断中添加lvgl的计时节拍
lv_tick_inc(1);
1ms定时器中断,lvgl计时加1。这样基本上显示的移植就完成了。
-
交互移植
lvgl的交互驱动在"lv_port_indev.h"和"lv_port_indev.c"中,使能这两个文件。
交互系统的注册在lv_port_indev_init();函数
lvgl提供了很多交互输入设备,有Touchpad、Mouse、Keypad、Encoder、Button。
在使用的时候初始化对应的交互设备和结构体即可。
还没实现交互,努力中。
   void lv_port_indev_init(void)
    {
    /* Here you will find example implementation of input devices supported by LittelvGL:
     *  - Touchpad
     *  - Mouse (with cursor support)
     *  - Keypad (supports GUI usage only with key)
     *  - Encoder (supports GUI usage only with: left, right, push)
     *  - Button (external buttons to press points on the screen)
     *
     *  The `..._read()` function are only examples.
     *  You should shape them according to your hardware
     */

    lv_indev_drv_t indev_drv;

    /*------------------
     * Touchpad
     * -----------------*/

    /*Initialize your touchpad if you have*/
    touchpad_init();

    /*Register a touchpad input device*/
    lv_indev_drv_init(&indev_drv);
    indev_drv.type = LV_INDEV_TYPE_POINTER;
    indev_drv.read_cb = touchpad_read;
    indev_touchpad = lv_indev_drv_register(&indev_drv);

   /*------------------
    * Mouse
    * -----------------*/

   /*Initialize your touchpad if you have*/
   mouse_init();

   /*Register a mouse input device*/
   lv_indev_drv_init(&indev_drv);
   indev_drv.type = LV_INDEV_TYPE_POINTER;
   indev_drv.read_cb = mouse_read;
   indev_mouse = lv_indev_drv_register(&indev_drv);

   /*Set cursor. For simplicity set a HOME symbol now.*/
   lv_obj_t * mouse_cursor = lv_img_create(lv_disp_get_scr_act(NULL), NULL);
   lv_img_set_src(mouse_cursor, LV_SYMBOL_HOME);
   lv_indev_set_cursor(indev_mouse, mouse_cursor);

   /*------------------
    * Keypad
    * -----------------*/

   /*Initialize your keypad or keyboard if you have*/
   keypad_init();

   /*Register a keypad input device*/
   lv_indev_drv_init(&indev_drv);
   indev_drv.type = LV_INDEV_TYPE_KEYPAD;
   indev_drv.read_cb = keypad_read;
   indev_keypad = lv_indev_drv_register(&indev_drv);

   /* Later you should create group(s) with `lv_group_t * group = lv_group_create()`,
    * add objects to the group with `lv_group_add_obj(group, obj)`
    * and assign this input device to group to navigate in it:
    * `lv_indev_set_group(indev_keypad, group);` */

   /*------------------
    * Encoder
    * -----------------*/

   /*Initialize your encoder if you have*/
   encoder_init();

   /*Register a encoder input device*/
   lv_indev_drv_init(&indev_drv);
   indev_drv.type = LV_INDEV_TYPE_ENCODER;
   indev_drv.read_cb = encoder_read;
   indev_encoder = lv_indev_drv_register(&indev_drv);

   /* Later you should create group(s) with `lv_group_t * group = lv_group_create()`,
    * add objects to the group with `lv_group_add_obj(group, obj)`
    * and assign this input device to group to navigate in it:
    * `lv_indev_set_group(indev_encoder, group);` */

   /*------------------
    * Button
    * -----------------*/

   /*Initialize your button if you have*/
   button_init();

   /*Register a button input device*/
   lv_indev_drv_init(&indev_drv);
   indev_drv.type = LV_INDEV_TYPE_BUTTON;
   indev_drv.read_cb = button_read;
   indev_button = lv_indev_drv_register(&indev_drv);

   /*Assign buttons to points on the screen*/
   static const lv_point_t btn_points[2] = {
           {10, 10},   /*Button 0 -> x:10; y:10*/
           {40, 100},  /*Button 1 -> x:40; y:100*/
   };
   lv_indev_set_button_points(indev_button, btn_points);
}
-
运行lvgl
#include "lvgl.h"
#include "lv_port_indev.h"
#include "lv_port_disp.h"
//其他所需要的头文件
int main(void)
{
    lv_init();              //初始化lvgl
    lv_port_disp_init();    //注册显示设备
    lv_port_indev_init();   //注册交互设备,支持键盘、触摸屏、按键、编码器等
    //lv_port_fs_init();    //初始化文件系统
    //根据需求自行添加

    while ( 1 )
    {
        lv_task_handler();
        indev_read();//根据自己设备编写,交互设备输入数据读取,例如:触摸屏坐标,按钮,编码器等
    }
}
lvgl输入设备
Encoder
使用Encoder,需要object添加到group


 108
108


 被折叠的 条评论
为什么被折叠?
被折叠的 条评论
为什么被折叠?
 到【灌水乐园】发言


