


1. 取派模块业务分析
已经完成基础设置模块 : 收派标准管理、 取派员管理、 区域管理、分区管理、定区管理
基础设置模块的数据,实际上为后期业务模块提供支持
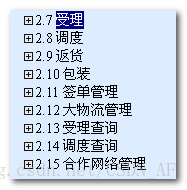
重点开发任务,业务受理模块
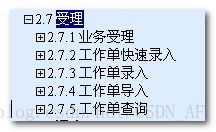
业务受理功能
受理环节,是宅急送业务的开始,作为服务前端,客户通过电话、网络等多种方式进行委托,业务受理员通过与客户交流,获取客户的服务需求和具体委托信息,将服务指令输入我司服务系统。
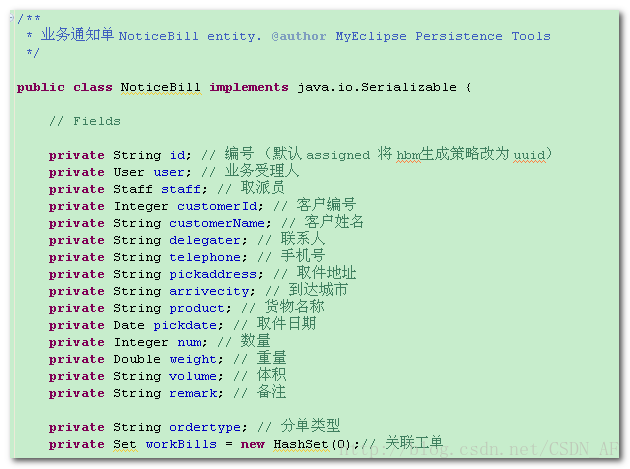
业务受理后,业务人员需要将客户信息,录入为 “业务通知单”(代表客户一份快递需要) ,系统进行自动分单,产生“工单” , 系统自动识别客户对应定区的负责人员, 由指定取派员到客户家取货
工作单功能 “工作单”
工作单基础信息的录入是信息的入口,并且也是本系统中人机交互最多的环节;基础信息录入的及时、准确、完整会直接影响后续的实物的运转配载、小件员交款、财务收入确认、成本垫付分摊,所以对数据的准确性、及时性、完整性要求比较高。
业务通知单: 客户快递申请
工单: 取派员取件任务
工作单 : 面向物流的数据,真实货物信息
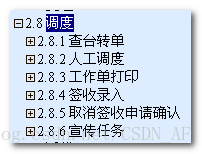
查台转单
当自动下单成功,但是由于基础信息错误,而导致分配的取货人员错误,通过查台转单来解决此类失误。 (分错取派员,更换取派员 )
人工调度
在自动下单的时候,由于取件地址无法匹配取件人员,就转入人工调度。 (业务人员,手动为客户,指定取派员 )
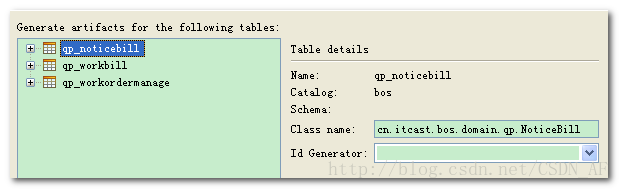
2. 取派业务模块— 数据库设计
根据 “业务受理数据表.xls” 设计PowerDesigner PDM 物理数据模型
参考 “业务受理.pdm”
根据PDM生成SQL 脚本,将脚本导入 数据库

qp_noticebill 业务通知单
qp_workbill 工单
qp_workordermanage 工作单
根据数据表,使用MyEclipse 反转生成PO类和hbm映射
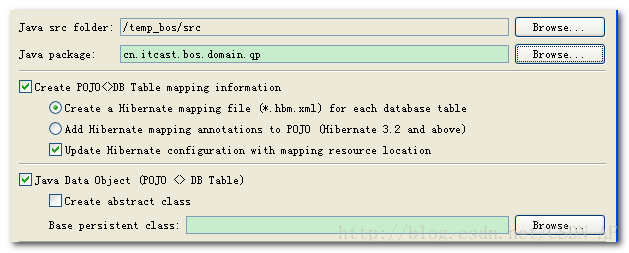
修改生成的类名
3. 业务受理功能
客户提交快递申请 ,业务人员将客户业务信息,录入到系统
3.1. 业务通知单页面编写
业务通知单录入页面 : /WEB-INF/pages/qupai/noticebill_add.jsp
页面存在大form 表单 ,使用EasyUI form 控件
validatebox (验证框) :非空、长度
<input type="text" class="easyui-validatebox" required="true" />

numberbox (数字框) :对validatebox扩展,只允许输入数字
<input type="text" class="easyui-numberbox" required="true" />

combobox (下拉框) : 可以对 <input> 元素,生成下拉列表

datebox (日历控件) : 选择日期
<input type="text" class="easyui-datebox" data-options="required:true,editable:false"/>
检查业务受理form表单,元素name属性和 NoticeBill 实体类是否一致
为form添加 点击提交事件
// 点击新单按钮,将业务通知单 保存
$('#save').click(function(){

    if($("#noticebillForm").form('validate')){
        $('#noticebillForm').submit();
    }else{
        $.messager.alert('警告','表单存在非法数据项!','warning');
    }
});
3.2. 编写业务受理服务器代码
3.2.1. 完成基本代码结构
public class NoticeBillAction extends BaseAction implements ModelDriven<NoticeBill> {

}
public interface NoticeBillService {

}
public class NoticeBillServiceImpl extends BaseService implements NoticeBillService {

}
将DAO 注入Service
将Service 注入 Action
在业务受理时,产生业务通知单的数据,在保存到数据库的时候,需要进行自动分单的操作
1、 用客户取货地址通过远程调用,访问CRM,比较CRM系统中客户地址 ,查找客户对应定区,再通过定区获得 取派员信息
2、 如果不能在CRM中找到客户对应定区,使用当前发件人地址去匹配分区地址 ,就可以通过分区去管理定区,匹配到取派员
如果自动分单成功,需要在数据表 qp_workbill 生成一条工单记录 !
如果自动分单失败,进入人工调度环节
3.2.2. 自动分单 — 去CRM匹配客户的地址

修改CRM业务接口 CustomerService
// 根据 客户地址 查询 定区编码
public String
最低0.47元/天 解锁文章


 957
957


 被折叠的 条评论
为什么被折叠?
被折叠的 条评论
为什么被折叠?
 到【灌水乐园】发言


