


自定义View
1.extends View
2.extends ViewGroup(布局)
3.extends TextView
构造函数
四种.
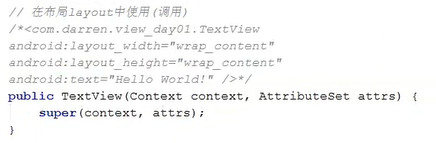
一、在代码中new,时调用

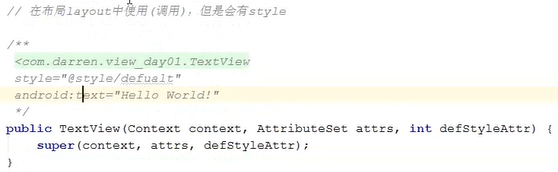
二、在布局文件xml中,时调用
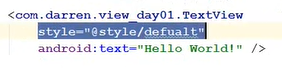
三、在布局文件xml中,并且使用style属性,时调用
style设置属性
在style文件设置属性

onMeasure方法(计算View宽高)

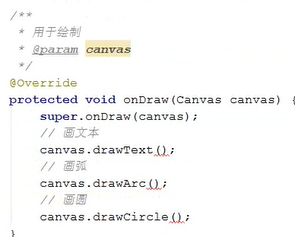
onDraw方法
onTouch方法(难点)

自定义属性
即为:在xml文件中设置的属性
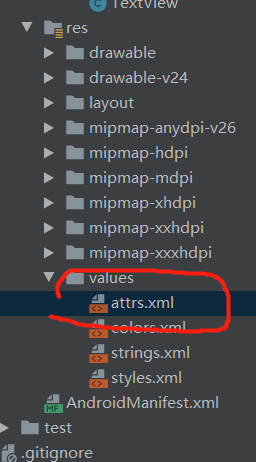
一、创建attrs.xml文件设计属性
注意:系统以及处理的属性是不能自定义的,如图 background

有 background 属性报错,无则可以正常运行

二、使用设计好的属性
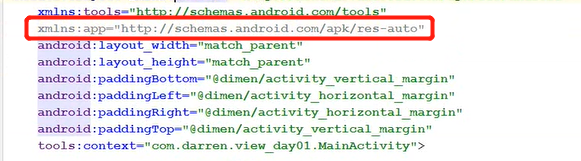
1、声明命名控件,"app"可以修改(?)
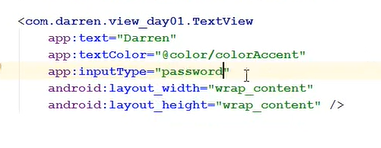
2、在自定义View中,使用自定义属性
3、在自定义View中获取属性(在构造方法中使用)
注意,最后需要回收

实现自定义TextView的
一、继承View

二、设置自定义属性
1、在values文件夹中新建或使用已有的attrs.xml文件
2、设置自定义的属性
<?xml version="1.0" encoding="utf-8"?>
<resources>
    <declare-styleable name="TextView">
        <attr name="text" format="string"/>
        <attr name="textColor" format="color"/>
        <attr name="textSize" format="dimension"/>
        <attr name="maxLength" format="integer"/>
<!--        background自定义View都是继承自View,背景是由View管理的-->
<!--        <attr name="background" format="reference|color"/>-->

        <!--枚举-->
        <attr name="inputType">
            <enum name="number" value="1"/>
            <enum name="text" value="2"/>
            <enum name="password" value="3"/>
        </attr>
    </declare-styleable>
</resources>
三、使用自定义属性
1、声明使用 app
2、用app调用attrs.xml文件定义的属性

四、实现自定义的TextView
public class TextView extends View {
    private String mText = "默认值";
    private int mTextType = 2; //1 number , 2 text ,3 password
    private int mTextSize = 15;
    private int mTextColor = Color.BLACK;

    private Paint mPaint;

    //在代码里面new的时候调用
    public TextView(Context context) {
        this(context,null);
    }

    //在布局xml中使用时调用
    public TextView(Context context, @Nullable AttributeSet attrs) {
        this(context, attrs, 0);
    }

    //在布局layout中使用调用,但是会有style(样式)
    public TextView(Context context, @Nullable AttributeSet attrs, int defStyleAttr) {
        super(context, attrs, defStyleAttr);
        //获取自定义属性
        TypedArray array = context.obtainStyledAttributes(attrs,R.styleable.TextView);

        //String 竟然,不需要默认值
        mText = array.getString(R.styleable.TextView_text);
        mTextColor = array.getColor(R.styleable.TextView_textColor,mTextColor);
        //获取的值是什么单位的呢? sp? dp? px?
        // 答案是 px 像素
        mTextSize = array.getDimensionPixelSize(R.styleable.TextView_textSize,sp2px(mTextSize));
        mTextType = array.getInt(R.styleable.TextView_inputType,mTextType);

        //回收
        array.recycle();

        mPaint = new Paint();
        //抗锯齿
        mPaint.setAntiAlias(true);
        //设置字体的大小和颜色
        mPaint.setTextSize(mTextSize);
        mPaint.setColor(mTextColor);
    }

    //将sp转px
    private int sp2px(int sp) {
        return (int) TypedValue.applyDimension(TypedValue.COMPLEX_UNIT_SP,sp,
                getResources().getDisplayMetrics());
    }

    //不讲?报错了?
//    public TextView(Context context, @Nullable AttributeSet attrs, int defStyleAttr, int defStyleRes) {
//        super(context, attrs, defStyleAttr, defStyleRes);
//    }


    //自定义View的测量方法
    @Override
    protected void onMeasure(int widthMeasureSpec, int heightMeasureSpec) {
        super.onMeasure(widthMeasureSpec, heightMeasureSpec);
        // 布局的宽高都是由这个方法指定
        // 指定控件的宽高,需要测量

        // 获取宽高的模式
        int widthModel = MeasureSpec.getMode(widthMeasureSpec);
        int heighModel = MeasureSpec.getMode(heightMeasureSpec);

        // Model类型
        //MeasureSpec.AT_MOST; 在布局中设置,wrap_content
        //MeasureSpec.EXACTLY; 在不居中指定了确切的值, 100dp match_parent fill_parent
        //MeasureSpec.UNSPECTEIED; 尽可能的大,开发很少用到,系统自己用
        // ListView在ScrollView显示不全原因,在测量子布局的时候会用UNSPECTEIED

        // widthMeasureSpec 会包含两个信息是一个32位的值,第一个信息是模式,2位值

        //画文字
        //1、确认的值,这个时候不需要计算,给的多少就是多少
        int width = MeasureSpec.getSize(widthMeasureSpec);
        //2、给的是wrap_content 需要计算
        if (widthModel == MeasureSpec.AT_MOST){
            // 计算的宽度 与 字体的长度有关 与字体的大小
            // 用画笔来测量
            Rect bounds = new Rect();
            // 获取文本的Rect
            // ?设置文本给 画笔与矩阵 然后再通过矩阵获取长度?
            mPaint.getTextBounds(mText,0,mText.length(),bounds);
            //加上 padding 值
            width = bounds.width() + getPaddingLeft() + getPaddingRight();
        }

        int height = MeasureSpec.getSize(heightMeasureSpec);
        if (heighModel == MeasureSpec.AT_MOST){
            // 计算的高度 与 字体的长度有关 与字体的大小
            // 用画笔来测量
            Rect bounds = new Rect();
            // 获取文本的Rect
            // ?设置文本给 画笔与矩阵 然后再通过矩阵获取长度?
            mPaint.getTextBounds(mText,0,mText.length(),bounds);
            //加上 padding 值
            height = bounds.height() + getPaddingBottom() + getPaddingTop();
        }

        //设置控件宽高
        setMeasuredDimension(width,height);
    }

    //用于绘制
    @Override
    protected void onDraw(Canvas canvas) {
        super.onDraw(canvas);
//        //画文本
//        canvas.drawText();
//        //画弧
//        canvas.drawArc();

        //画文本
        //text x y paint
        //x 开始的位置
        //y 基线 baseLine
        //dy 为高度一半到 baseLine 的距离
        Paint.FontMetricsInt fontMetrics = mPaint.getFontMetricsInt();
        // top 为负数,bottom 为正数
        int dy = (fontMetrics.bottom - fontMetrics.top)/2 - fontMetrics.bottom;
        int baseline = getHeight()/2 + dy;

        //设置padding值
        int x = getPaddingLeft();
        canvas.drawText(mText,x,baseline,mPaint);
    }

    //事件处理
    @Override
    public boolean onTouchEvent(MotionEvent event) {
        switch(event.getAction()){
            case MotionEvent.ACTION_DOWN:
                break;
            case MotionEvent.ACTION_MOVE:
                break;
            case MotionEvent.ACTION_UP:
                break;
            default:
                break;
        }
        return super.onTouchEvent(event);
    }
}
自定义码表计步器
实现步骤
一、需求分析
//1、分析效果

二、设置自定义属性
//2、确定自定义属性,编写attrs.xml
<?xml version="1.0" encoding="utf-8"?>
<resources>
    <declare-styleable name="QQStepView">
        <attr name="outerColor" format="color"/>
        <attr name="innerColor" format="color"/>
        <attr name="stepTextColor" format="color"/>

        <attr name="borderWidth" format="dimension"/>
        <attr name="stepTextSize" format="dimension"/>
    </declare-styleable>
</resources>
三、使用自定义控件
//3、在布局中使用
四、实现自定义控件
//4、在自定义View中获取自定义属性
//5、onMeasuer() 计算View大小
//6、onDraw() 画圆弧
//7、其他处理 动画
public class QQStepView extends View {
//1、分析效果
//2、确定自定义属性,编写attrs.xml
//3、在布局中使用
private int mOuterColor = Color.RED;
private int mInnerColor = Color.BLACK;
private int mBorderWidth = 20; //px
private int mStepTextSize;
private int mStepTextColor = Color.BLACK;
//步数
private int mStepMax = 100; //最大值
private int mCurrentStep = 30; //当前值
private Paint mOutPaint,mInnerPaint,mTextPaint;
public QQStepView(Context context) {
this(context,null);
}
public QQStepView(Context context, @Nullable AttributeSet attrs) {
this(context,attrs,0);
}
public QQStepView(Context context, @Nullable AttributeSet attrs, int defStyleAttr) {
super(context, attrs, defStyleAttr);
//4、在自定义View中获取自定义属性
TypedArray array = context.obtainStyledAttributes(attrs,R.styleable.QQStepView);
mOuterColor = array.getColor(R.styleable.QQStepView_outerColor,mOuterColor);
mInnerColor = array.getColor(R.styleable.QQStepView_innerColor,mInnerColor);
mBorderWidth = (int) array.getDimension(R.styleable.QQStepView_borderWidth,mBorderWidth);
mStepTextSize = array.getDimensionPixelSize(R.styleable.QQStepView_stepTextSize,mStepTextSize);
mStepTextColor = array.getColor(R.styleable.QQStepView_stepTextColor,mStepTextColor);
//回收
array.recycle();
//初始化 外圆弧
mOutPaint = new Paint();
mOutPaint.setAntiAlias(true);
mOutPaint.setStrokeWidth(mBorderWidth);
mOutPaint.setColor(mOuterColor);
mOutPaint.setStrokeCap(Paint.Cap.ROUND); //画笔为圆形?
mOutPaint.setStyle(Paint.Style.STROKE);//画笔空心
//初始化 内圆弧
mInnerPaint = new Paint();
mInnerPaint.setAntiAlias(true);
mInnerPaint.setStrokeWidth(mBorderWidth);
mInnerPaint.setColor(mInnerColor);
mInnerPaint.setStrokeCap(Paint.Cap.ROUND); //画笔为圆形?
mInnerPaint.setStyle(Paint.Style.STROKE);//画笔空心
//初始化 文本
mTextPaint = new Paint();
mTextPaint.setAntiAlias(true);
mTextPaint.setTextSize(mStepTextSize);
mTextPaint.setColor(mStepTextColor);
}
@Override
protected void onMeasure(int widthMeasureSpec, int heightMeasureSpec) {
super.onMeasure(widthMeasureSpec, heightMeasureSpec);
//5、onMeasuer() 计算View大小
int width = MeasureSpec.getSize(widthMeasureSpec);
int height = MeasureSpec.getSize(heightMeasureSpec);
int min = width>height?height:width;
// 宽度高度不一致 取最小值,确保是个正方形
setMeasuredDimension(min,min);
}
@Override
protected void onDraw(Canvas canvas) {
super.onDraw(canvas);
//6、onDraw() 画圆弧
//画外圆弧 left top right bottom 设置矩阵的范围
//因为设置了Paint的宽度,所以直接画会导致超出,需要减去超出部分
RectF rectF = new RectF(mBorderWidth/2,mBorderWidth/2,getWidth() - mBorderWidth/2,getHeight() - mBorderWidth/2);
//范围 开始角度 结束角度 是否连接? 画笔
canvas.drawArc(rectF,135,270,false,mOutPaint);
//画内圆弧
//不能写死,需要数值
// 第一次调用不执行
if (mStepMax == 0) return;
// 圆弧的长度,百分比
float sweepAngle = (float) mCurrentStep/mStepMax;
canvas.drawArc(rectF,135,sweepAngle*270,false,mInnerPaint);
//画文字
String stepText = mCurrentStep + ""; // 文本
Rect textBounds = new Rect();
mTextPaint.getTextBounds(stepText,0,stepText.length(),textBounds); // 获取文本高宽
int dx = getWidth()/2 - textBounds.width()/2; // 文本x轴,位置
Paint.FontMetricsInt fontMetricsInt = mTextPaint.getFontMetricsInt();
int dy = (fontMetricsInt.bottom - fontMetricsInt.top)/2 - fontMetricsInt.bottom;
int baseLine = getHeight()/2 + dy; // 文本y轴,基线位置
canvas.drawText(stepText,dx,baseLine,mTextPaint);
}
//7、其他处理 动画
// 设置最大值
public void setmStepMax(int mStepMax) {
this.mStepMax = mStepMax;
}
// 设置当前值
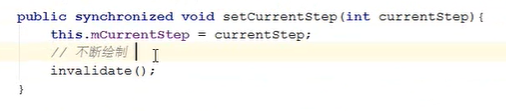
public void setmCurrentStep(int mCurrentStep) {
this.mCurrentStep = mCurrentStep;
// 重绘
invalidate();
}
}
invalidate() 该方法会调用onDraw()方法
五、其他(动画实现)
public class MainActivity extends AppCompatActivity {
    @Override
    protected void onCreate(Bundle savedInstanceState) {
        super.onCreate(savedInstanceState);
        setContentView(R.layout.activity_main);

        final QQStepView qqStepView = findViewById(R.id.stepView);
        qqStepView.setmStepMax(1000); // 最大值
        qqStepView.setmCurrentStep(0); // 当前值

        ValueAnimator valueAnimator = ObjectAnimator.ofInt(0,666); // 设置动画遍历值,从0到30
        valueAnimator.setDuration(1000); // 动画执行的间隔
        valueAnimator.setInterpolator(new DecelerateInterpolator()); // 差值器,先快后慢
        valueAnimator.addUpdateListener(new ValueAnimator.AnimatorUpdateListener() {
            @Override
            public void onAnimationUpdate(ValueAnimator animation) {
                int currentStep = (int) animation.getAnimatedValue();
                qqStepView.setmCurrentStep(currentStep);
            }
        });
        valueAnimator.start();
    }
}
自定义进度条
1、需求分析

2、设置自定义属性
3、实现效果
动画

clipRect()方法
canvas.clipRect()
面试题讲解
一、为什么继承ViewGroup会画不出东西
原因:
View 的构造函数中 dirtyOpaue 来决定的,在ViewGroup中的 initViewGroup 中赋值让 dirtyQpaue 设置为不执行 onDraw()方法。
解决办法:
1、将onDraw方法改为dispatchDraw方法
2、设置背景(透明)
3、调用setWillNotDraw(false) 方法改变 dirtyQpaue的值
二、过度渲染
如何查看自己的界面有没有过度渲染
1、打开开发者选项
2、打开调试GPU过度绘制
1.网上的解决方案
尽量不要嵌套
能不设置背景不要设置背景
2.最好的解决方案
自己画


 499
499


 被折叠的 条评论
为什么被折叠?
被折叠的 条评论
为什么被折叠?
 到【灌水乐园】发言


