


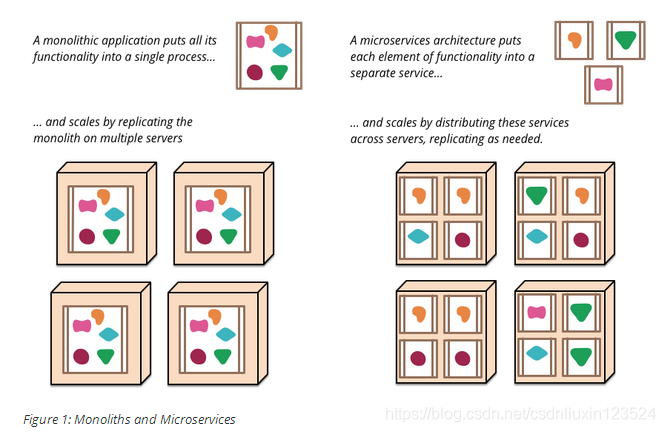
传统“单体”spring缺点:许多应用结合在一起,牵一发而动全身。一个小小的bug修改,或者日益增长的需求变更都需要停止服务重新启动。
传统“单体”spring优点:开发测试简单,只需要把整个应用放到服务器上就行了,不给运维带来麻烦。水平扩展也很简单,当应用的负载过大,既可以把应用负载很多分,通过负载均衡就可以提高并发能力。
springboot是把应用的几个分应用分开(或说是功能 点分块),通过动态组合(包括数量和顺序上的组合)协调工作,其中如果某部分应用的处理业务能力较为复杂就可以多分多加几个应用,提高并发。每个功能点可以独立升级变更,可替换的。
一,开发HelloWorld
1,环境
jdk:1.8
maven:3.3以上版本
maven的setting文件修改部分:
<profiles>
		<profile>
			<id>jdk-1.8</id>

			<activation>
				<activeByDefault>true</activeByDefault>
				<jdk>1.8</jdk>
			</activation>

			<properties>
				<maven.compiler.source>1.8</maven.compiler.source>
				<maven.compiler.target>1.8</maven.compiler.target>
				<maven.compiler.compilerVersion>1.8</maven.compiler.compilerVersion>
			</properties>
		</profile>
	</profiles>
2,创建maven工程。
3,导入spring-boot相关依赖:
依赖的配置就不用手写了,到官网找指导案例,如这个网址:https://spring.io/guides/gs/rest-service/
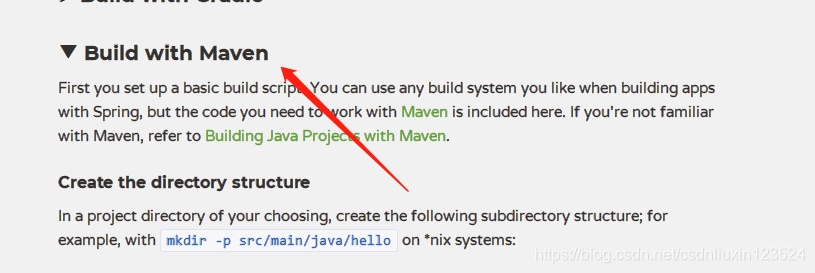
把箭头指的菜单点开就行了。
然后在pom.xml文件中设置以下配置:
<?xml version="1.0" encoding="UTF-8"?>
<project xmlns="http://maven.apache.org/POM/4.0.0"
xmlns:xsi="http://www.w3.org/2001/XMLSchema-instance"
xsi:schemaLocation="http://maven.apache.org/POM/4.0.0 http://maven.apache.org/xsd/maven-4.0.0.xsd">
<modelVersion>4.0.0</modelVersion>
<groupId>com.atguigui</groupId>
<artifactId>spring-boot-01-helloworld</artifactId>
<version>1.0-SNAPSHOT</version>
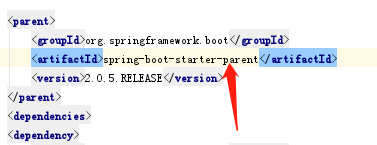
<parent>
<groupId>org.springframework.boot</groupId>
<artifactId>spring-boot-starter-parent</artifactId>
<version>2.0.5.RELEASE</version>
</parent>
<dependencies>
<dependency>
<groupId>org.springframework.boot</groupId>
<artifactId>spring-boot-starter-web</artifactId>
</dependency>
</dependencies>
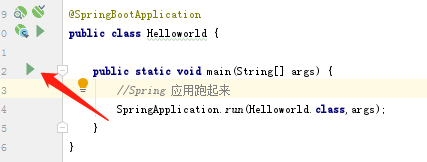
</project>3,编写主程序,启动springBoot应用
主程序代码如下:
package com.liuxin;

import org.springframework.boot.SpringApplication;
import org.springframework.boot.autoconfigure.SpringBootApplication;

/**
 * @SpringBootApplication 标注一个主程序,说明这是个springboot的web程序
 */
@SpringBootApplication
public class Helloworld {

    public static void main(String[] args) {
        //Spring 应用跑起来
        SpringApplication.run(Helloworld.class,args);
    }
}
控制器代码:
package com.liuxin;

import org.springframework.stereotype.Controller;
import org.springframework.web.bind.annotation.RequestMapping;
import org.springframework.web.bind.annotation.ResponseBody;

@Controller
public class HelloController {
    @ResponseBody
    @RequestMapping("/hello")
    public String Hello(){
        return "hello world";
    }
}
文件目录结构:

然后启动,点下面位置就能启动了,控制台会有相应的日志,和端口
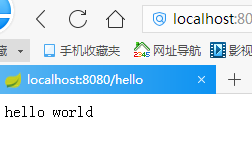
然后页面输入localhost:8080/hello, 就能看到我们的hello world了。
4,部署应用,把程序打包,

找到上图位置,双击package就能开始打包了,完成后会在工程目录中有相应的工程.jar包。
然后复制到桌面上,右键属性找到并复制目录,然后cmd打开dos命令窗口。
执行如下:


最后执行命令:
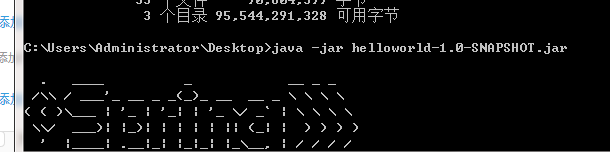
这样同样能够在页面访问我们的项目。(注意先停掉之前在idea启动的服务)
二,简介
1,为什么springboot 可以这么简单的配置?
打开pom.xml文件,按住ctrl键,点进去下面位置,我们看看导入jar包里面有什么东西?
可以看到下图位置,
spring-boot-dependencies是spring-boot-starter-parent的父项目。紧接着继续往下点开,可以看到各种jar包的版本:

2,导入的依赖:
看这里:
<dependency>
        <groupId>org.springframework.boot</groupId>
        <artifactId>spring-boot-starter-web</artifactId>
    </dependency>
点击上面<artifactId>spring-boot-starter-web</artifactId> 可以看到spring-boot-starter-web下面有哪些jar包,这属于web模块的jar包.
starters:在这里的意思是一系列依赖描述的组合,即启动器。
spring boot 将所有的功能场景提取出来,做成一个个的starters(场景启动器),需要时只需要在项目中引入这些starters相关的场景,然后所有的依赖都会导进来。
基本上所有的starter启动器pom配置这个链接中都可以找到:https://docs.spring.io/spring-boot/docs/current/reference/html/using-boot-build-systems.html#using-boot-dependency-management,
或者百度spring boot starters,点这里也可以:
三,使用spring initializer快速创建spring Boot项目
打开idea,创建工程:file-project --》选择下图位置:

下一步,创建项目名,组织id,模块id:

下一步,选择项目类型,或者说是功能模块:

finish,就能够自动创建工程,并能导入相应依赖了。
创建完成后,
(1)我们看新项目中的pom.xml,会有相应的启动器依赖:

(2)并且主程序居然也给我们自动生成了:

下面写个controller来测试下,
注意要和控制器在同一个目录级别创建controller包,如果是在java目录下,这启动后页面上会报404(先这样记,后面再找优化方法,)

controller的 内容如下:
package com.example.springboot.controller;

import org.springframework.web.bind.annotation.RequestMapping;
import org.springframework.web.bind.annotation.RestController;

//@ResponseBody  //加在这里说明这里控制器的所有方法返回的数据直接写给浏览器 (如果是对象,则转为json数据
//@Controller
@RestController  //z这个注解是@Controller和@ResponseBody的合体
public class HelloController {

    @RequestMapping("/helloe")
    public String hello(){
        return "hello world";
    }

}


 1944
1944


 被折叠的 条评论
为什么被折叠?
被折叠的 条评论
为什么被折叠?
 到【灌水乐园】发言


