【缓存篇】Spring Boot 整合 Redis 缓存数据

写在最前

什么是缓存?

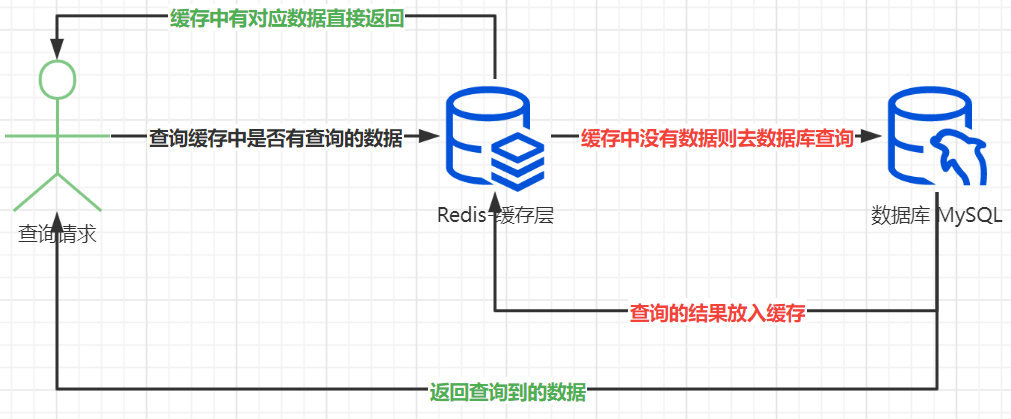
在实际的业务场景中,缓存一般和其他数据库搭配使用,用来减轻后端数据库的压力,比如和关系型数据库 MySQL 配合使用。缓存会把 MySQL 中经常被查询的数据缓存起来,比如热点数据,这样当用户来访问的时候,就不需要到 MySQL 中去查询了,而是直接获取缓存数据,从而降低了后端数据库的读取压力。流程图如下所示:

image-20220421094555876

Spring Boot 整合 Redis

Demo 地址:mingyue-springboot-redis

1.添加依赖

<!-- redis 依赖 -->
<dependency>
  <groupId>org.springframework.boot</groupId>
  <artifactId>spring-boot-starter-data-redis</artifactId>
</dependency>

2.修改 SpringBoot 配置文件

spring:
  redis:
    host: localhost # Redis服务器地址
    database: 0 # Redis数据库索引(默认为0)
    port: 6379 # Redis服务器连接端口
    password: # Redis服务器连接密码(默认为空)
    jedis:
      pool:
        max-active: 8 # 连接池最大连接数(使用负值表示没有限制)
        max-wait: -1ms # 连接池最大阻塞等待时间(使用负值表示没有限制)
        max-idle: 8 # 连接池中的最大空闲连接
        min-idle: 0 # 连接池中的最小空闲连接
    timeout: 3000ms # 连接超时时间(毫秒)

3.添加 RedisService 接口

/**
 * Redis 操作 Service
 *
 * @author Strive
 * @date 2022/4/21 10:02
 * @description
 */
public interface RedisService {
  /** 存储数据 */
  void set(String key, String value);

  /** 获取数据 */
  String get(String key);

  /** 设置超期时间 */
  boolean expire(String key, long expire);

  /** 删除数据 */
  void remove(String key);

  /** 自增操作 */
  Long increment(String key, long delta);
}

4.添加 RedisService 接口实现类

/**
 * Redis 操作 Service 的实现类
 *
 * @author Strive
 * @date 2022/4/21 10:03
 * @description
 */
@Service
@RequiredArgsConstructor
public class RedisServiceImpl implements RedisService {
  private final StringRedisTemplate stringRedisTemplate;

  @Override
  public void set(String key, String value) {
    stringRedisTemplate.opsForValue().set(key, value);
  }

  @Override
  public String get(String key) {
    return stringRedisTemplate.opsForValue().get(key);
  }

  @Override
  public boolean expire(String key, long expire) {
    return Boolean.TRUE.equals(stringRedisTemplate.expire(key, expire, TimeUnit.SECONDS));
  }

  @Override
  public void remove(String key) {
    stringRedisTemplate.delete(key);
  }

  @Override
  public Long increment(String key, long delta) {
    return stringRedisTemplate.opsForValue().increment(key, delta);
  }
}

5.查询结果放入缓存

import cn.hutool.core.util.StrUtil;
import cn.hutool.json.JSONUtil;
import com.csp.mingyue.redis.mapper.SysUserMapper;
import com.csp.mingyue.redis.model.MingYueUser;
import lombok.RequiredArgsConstructor;
import lombok.extern.slf4j.Slf4j;
import org.springframework.stereotype.Service;

/** @author Strive */
@Slf4j
@Service
@RequiredArgsConstructor
public class MingYueUserService {

  private final SysUserMapper sysUserMapper;

  private final RedisService redisService;

  /**
   * 根据用户ID查询用户信息
   *
   * @param userId 用户ID
   * @return 用户信息
   */
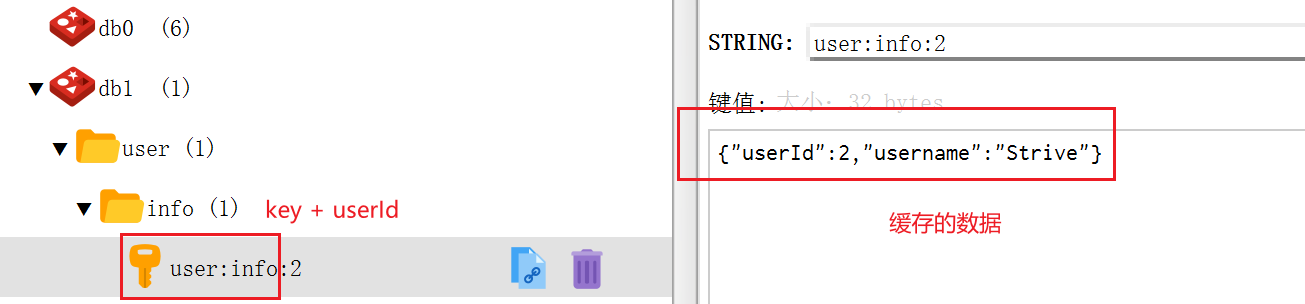
  public MingYueUser queryUserById(Long userId) {
    log.info("根据用户ID查询用户信息");

    // 查询缓存中是否有查询的数据
    String userJson = redisService.get(userId.toString());

    // 缓存中没有数据则去数据库查询
    if (StrUtil.isBlank(userJson)) {
      MingYueUser mingYueUser = sysUserMapper.selectById(userId);

      // 查询的结果放入缓存
      redisService.set(userId.toString(), JSONUtil.toJsonStr(mingYueUser));

      // 返回查询到的数据
      return mingYueUser;
    }

    // 缓存中有对应数据直接返回
    return JSONUtil.toBean(userJson, MingYueUser.class);
  }
}

6.测试接口

启动 Demo 访问 Swagger 直接测试接口:http://localhost:8080/swagger-ui/index.html#/%E7%94%A8%E6%88%B7%E6%A8%A1%E5%9D%97/queryUserByIdUsingGET

第一次测试接口
2022-04-21 10:21:23.426  INFO 34708 --- [nio-8080-exec-1] c.c.m.redis.service.MingYueUserService   : 根据用户ID查询用户信息
2022-04-21 10:21:25.224  INFO 34708 --- [nio-8080-exec-1] c.c.m.redis.service.MingYueUserService   : 缓存中没有数据则去数据库查询
Creating a new SqlSession
SqlSession [org.apache.ibatis.session.defaults.DefaultSqlSession@1b2734ac] was not registered for synchronization because synchronization is not active
2022-04-21 10:21:25.240  INFO 34708 --- [nio-8080-exec-1] com.zaxxer.hikari.HikariDataSource       : HikariPool-1 - Starting...
2022-04-21 10:21:26.112  INFO 34708 --- [nio-8080-exec-1] com.zaxxer.hikari.HikariDataSource       : HikariPool-1 - Start completed.
JDBC Connection [HikariProxyConnection@1753123278 wrapping com.mysql.cj.jdbc.ConnectionImpl@4023b41d] will not be managed by Spring
==>  Preparing: SELECT user_id,username FROM sys_user WHERE user_id=?
==> Parameters: 2(Long)
<==    Columns: user_id, username
<==        Row: 2, Strive
<==      Total: 1
Closing non transactional SqlSession [org.apache.ibatis.session.defaults.DefaultSqlSession@1b2734ac]
第二次测试接口

请求已经没有发到数据库了,直接取了缓存数据

2022-04-21 10:23:15.382  INFO 34708 --- [nio-8080-exec-7] c.c.m.redis.service.MingYueUserService   : 根据用户ID查询用户信息
2022-04-21 10:23:15.394  INFO 34708 --- [nio-8080-exec-7] c.c.m.redis.service.MingYueUserService   : 缓存中有对应数据直接返回
查看 Redis

image-20220421102454056

  • 2
    点赞
  • 1
    收藏
    觉得还不错? 一键收藏
  • 打赏
    打赏
  • 0
    评论
### 回答1: 好的,关于springboot整合redis的问题,我可以回答。SpringBoot是一种基于Spring框架的快速开发框架,可以快速集成各种组件,其中包括Redis。要整合Redis,需要在SpringBoot项目的pom.xml文件中添加Redis的依赖,同时在配置文件中添加Redis的配置信息。具体的步骤可以参考SpringBoot官方文档或者一些在线教程。 ### 回答2: Spring Boot整合Redis可以通过以下步骤实现: 1. 首先,在pom.xml文件中添加Redis相关的依赖项。可以使用Spring Data Redis依赖(spring-boot-starter-data-redis)和Jedis依赖(jedis)。 2. 创建Redis的配置文件,可以在application.properties或application.yml中配置Redis的主机名、端口号、密码等信息。 3. 创建一个配置类,用于配置Redis连接工厂和Redis模板。可以通过使用`@Configuration`注解和`redisConnectionFactory()`方法来配置Redis连接工厂,通过使用`@Bean`注解和`redisTemplate()`方法来配置Redis模板。 4. 创建一个服务类,用于实现对Redis的操作。可以使用Spring Data Redis提供的RedisTemplate类来实现常见的操作,如存储数据、获取数据、删除数据等。 5. 在需要使用Redis的地方,可以通过依赖注入的方式来使用Redis服务。 以下是一个简单的示例代码: 1. pom.xml文件中添加依赖: ```xml <dependency> <groupId>org.springframework.boot</groupId> <artifactId>spring-boot-starter-data-redis</artifactId> </dependency> <dependency> <groupId>redis.clients</groupId> <artifactId>jedis</artifactId> </dependency> ``` 2. application.properties中配置Redis信息: ``` spring.redis.host=127.0.0.1 spring.redis.port=6379 spring.redis.password= ``` 3. 创建Redis的配置类: ```java @Configuration public class RedisConfig { @Bean JedisConnectionFactory redisConnectionFactory() { RedisStandaloneConfiguration redisStandaloneConfiguration = new RedisStandaloneConfiguration(); redisStandaloneConfiguration.setHostName("127.0.0.1"); redisStandaloneConfiguration.setPort(6379); return new JedisConnectionFactory(redisStandaloneConfiguration); } @Bean public RedisTemplate<String, Object> redisTemplate() { RedisTemplate<String, Object> template = new RedisTemplate<>(); template.setConnectionFactory(redisConnectionFactory()); return template; } } ``` 4. 创建Redis的服务类: ```java @Service public class RedisService { @Autowired private RedisTemplate<String, Object> redisTemplate; public void setValue(String key, Object value) { redisTemplate.opsForValue().set(key, value); } public Object getValue(String key) { return redisTemplate.opsForValue().get(key); } public void deleteValue(String key) { redisTemplate.delete(key); } } ``` 5. 在需要使用Redis的地方,可以通过依赖注入RedisService来使用Redis服务: ```java @RestController public class ExampleController { @Autowired private RedisService redisService; @GetMapping("/example") public String example() { redisService.setValue("name", "John"); String name = (String) redisService.getValue("name"); redisService.deleteValue("name"); return name; } } ``` 通过以上步骤,就可以在Spring Boot应用中使用Redis进行数据存储、获取和删除等操作了。 ### 回答3: Spring Boot是一个用于创建和构建Spring应用程序的开源框架。它简化了Spring应用程序的开发过程,并提供了各种开箱即用的功能和集成。Redis是一个流行的用于缓存和存储数据的内存数据库。下面是如何在Spring Boot应用程序中整合Redis的步骤: 1. 添加依赖:在项目的pom.xml文件中添加Redis的依赖项。可以使用Spring Boot提供的spring-boot-starter-data-redis依赖项。在构建工具Maven中,可以通过以下方式添加依赖: ```xml <dependency> <groupId>org.springframework.boot</groupId> <artifactId>spring-boot-starter-data-redis</artifactId> </dependency> ``` 2. 配置Redis连接:在Spring Boot的配置文件中,配置Redis的连接信息,包括主机名、端口号、密码等。可以使用如下配置示例: ```properties spring.redis.host=localhost spring.redis.port=6379 spring.redis.password= ``` 3. 创建RedisTemplate bean:在Spring Boot的配置类中,创建RedisTemplate的bean。RedisTemplate是Spring提供的用于与Redis进行交互的工具类。可以使用如下方式创建bean: ```java @Configuration public class RedisConfig { @Value("${spring.redis.host}") private String host; @Value("${spring.redis.port}") private int port; @Value("${spring.redis.password}") private String password; @Bean public RedisConnectionFactory redisConnectionFactory() { RedisStandaloneConfiguration config = new RedisStandaloneConfiguration(host, port); config.setPassword(RedisPassword.of(password)); return new LettuceConnectionFactory(config); } @Bean public RedisTemplate<String, Object> redisTemplate(RedisConnectionFactory redisConnectionFactory) { RedisTemplate<String, Object> redisTemplate = new RedisTemplate<>(); redisTemplate.setConnectionFactory(redisConnectionFactory); return redisTemplate; } } ``` 4. 使用RedisTemplate:在需要使用Redis的地方,注入RedisTemplate并使用其提供的方法来操作Redis。例如,可以在服务类中使用RedisTemplate进行数据的读取和写入操作: ```java @Service public class UserService { @Autowired private RedisTemplate<String, Object> redisTemplate; public User getUserById(String userId) { String key = "user:" + userId; return (User) redisTemplate.opsForValue().get(key); } public void saveUser(User user) { String key = "user:" + user.getId(); redisTemplate.opsForValue().set(key, user); } } ``` 通过以上步骤,就可以在Spring Boot应用程序中成功地整合Redis,并通过RedisTemplate进行数据的读写操作。这样可以更加方便地利用Redis的优势来提升应用程序的性能和可扩展性。

“相关推荐”对你有帮助么?

  • 非常没帮助
  • 没帮助
  • 一般
  • 有帮助
  • 非常有帮助
提交
评论
添加红包

请填写红包祝福语或标题

红包个数最小为10个

红包金额最低5元

当前余额3.43前往充值 >
需支付:10.00
成就一亿技术人!
领取后你会自动成为博主和红包主的粉丝 规则
hope_wisdom
发出的红包

打赏作者

Strive_MY

你的鼓励将是我创作的最大动力

¥1 ¥2 ¥4 ¥6 ¥10 ¥20
扫码支付:¥1
获取中
扫码支付

您的余额不足,请更换扫码支付或充值

打赏作者

实付
使用余额支付
点击重新获取
扫码支付
钱包余额 0

抵扣说明:

1.余额是钱包充值的虚拟货币,按照1:1的比例进行支付金额的抵扣。
2.余额无法直接购买下载,可以购买VIP、付费专栏及课程。

余额充值