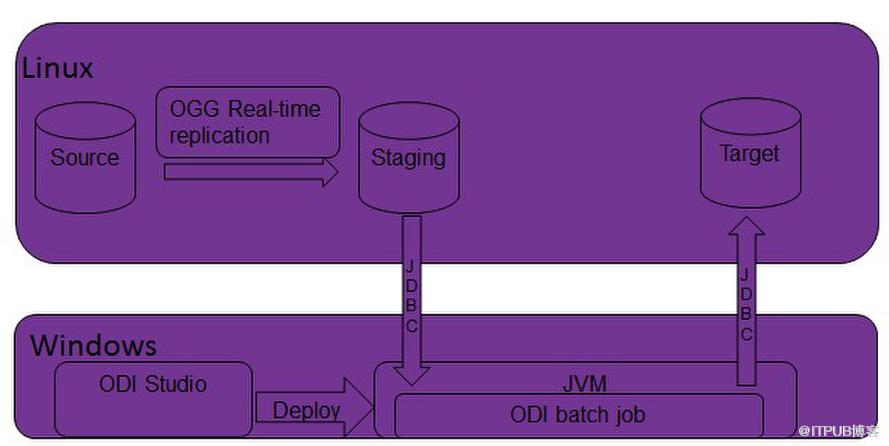
先决条件
1. Oracle database 11g已安装,2. Oracle GoldenGate 11g for Linux已安装
3. Oracle Data Integrator已安装在windows上
环境介绍
Oracle Linux 64 bit 6.4 (IP: 192.168.1.109), hosts both database and GoldenGate.Oracle Database: 11.2.0.3 64 bit
Oracle GoldenGate 11.2.1.0.1 for Linux 64 bit and Oracle 11g
OGG source directory: /home/oracle/ogg_src
OGG staging directory: /home/oracle/ogg
Source table: cust_dw_dev.src_city
Staging table: gg_demo_stage.city
ODI 11g installed on Windows 7 64bit – IP: 192.168.1.154, master and work repository have been created.
数据库环境配置
For demonstration purposes, source, staging, target tables are in the same database.Source Schema and Table
Login 192.168.1.109 as oracle/oracle
sqlplus “/as sysdba”
create user cust_dw_dev identified by a123456;
grant dba to cust_dw_dev;
create user odi_tmp identified by a123456;
grant dba to odi_tmp;
connect cust_dw_dev@orcl;
运行Oracle官网上下载的ODI demo.zip包含的建表语句创建src_city表
Staging and Target Schema and Table
Connect “/as sysdba”;
create user gg_demo_staging identified by a123456;
grant dba to gg_demo_staging;
create user gg_demo_target identified by gg_demo_target;
grant dba to gg_demo_target;
connect gg_demo_staging/a123456@orcl;
create table gg_demo_staging.CITY (
CITY_ID NUMERIC(10) not null,
CITY VARCHAR(50),
REGION_ID NUMERIC(10),
POPULATION NUMERIC(10),
constraint PK_SRC_CITY primary key (CITY_ID)
);
Connect gg_demo_target/a123456@orcl;
create table gg_demo_target.CITY (
CITY_ID NUMERIC(10) not null,
CITY VARCHAR(50),
REGION_ID NUMERIC(10),
POPULATION NUMERIC(10),
constraint PK_SRC_CITY primary key (CITY_ID)
);
ODI配置
Physical Architecture
Start ODI Studio from Windows 7Connect to master and work repository.
Source
Topology tab ? Physical Architecture ? Oracle, right click and select New Data ServerEnter GG_SOURCE for Name
On JDBC tab, Enter:
oracle.jdbc.OracleDriver for JDBC Driver
jdbc:oracle:thin:@192.168.1.109:1521:orcl for JDBC Url
Click save and Test Connection.
Right GG_SOURCE and select New Physical Schema
Enter:
cust_dw_dev for Schema (Schema)
odi_tmp for Schema (Work Schema)
Click save and close.
Staging and Target
Follow the previous steps to create staging Data Server and Physical Schemas. Here, use gg_demo_staging as physical schema, gg_demo_target for target.Logical Architecture
Source
Topology tab ? Logical Architecture ? Oracle, right click and select New Logical Schema.Enter GG_SOURCE for Name
Select GG_ONE for Physical Schema for Global Context.
Staging and Target
Follow the same steps to create staging and target Logical Schema. Use appropriate names for staging and target.Model
Click Designer tab ? Models ? New Model. Enter “GG_SOURCE”, ”GG_STAGING”,”GG_TARGET” for source, staging and target schema, select “Oracle” for Technology, select Logical Schema respectively for source, staging and target.Right click each newly-created models and select Reverse Engineer, tables created from Database Step should show up in the list.
Right click CITY table from GG_STAGING, Changed Data Capture ? Add to CDC, click Yes on the pop-up box.
CDC Configuration
Go to Designer --> Projects --> Knowledge Modules, right click and select Import Knowledge Modules, from the pop-up window, select JKM Oracle to Oracle Consistent (OGG), and click OK.
Double click “GG_STAGING” model, select Journalizing, and select Consistent Set for Journalizing Mode, JKM Oracle to Oracle Consistent(OGG). for Knowledge Module.
Enter the configuration as follows and save.

ODI will generation parameter and obey files for OGG extract, pump and replicat process based on above configuration, user is required to deploy parameter and obey files to OGG server.
Right click “GG_STAGING” --> Changed Data Capture --> Subscriber --> Subscribe, Enter ODI on the popup windows, click add and then save.
Right click “GG_STAGING” --> Changed Data Capture --> Start Journal.
Deploy CDC Infrastructure
Source
Zip d:\ODIS_to_ODIT1 and upload to user oracle’s home directory in 192.168.1.109.Login 192.168.1.109 as oracle.
Unzip ODIS_to_ODIT1.
cp ~/ODIS_to_ODIT1/src/dirprm/* ~/ogg_src/dirprm/
cp ~/ODIS_to_ODIT1/src/diroby/* ~/ogg_src/dirprm/
cd ~/ogg_src/dirdat
mkdir ODISoc
cd ..
./ggsci
obey ODISS.oby
start mgr
info all –Check every process is running
exit
defgen PARAMFILE ./dirprm/ODISD.prm
cp ./dirdef/ODISC.def ~/ogg/dirdef/
Target
cd ~/oggcp ~/ODIS_to_ODIT1/stg/dirprm/* ./dirprm/
cp ~/ODIS_to_ODIT1/stg/diroby/* ./dirprm/
mkdir ./dirdat/ODIT1op
./ggsci
obey ODIT1T.oby
start mgr
info all
exit
Build CDC Interface
From ODI studio --> Designer tab --> --> --> Interfaces, right click and select New Interface, enter a name for your interface.Select Mapping tab, drag the city table from GG_STAGING model and drop it to the source panel.

Drag the city from GG_TARGET model and drop it to Target Database panel.
Select city, the Property Inspector tab shows on the right-down, and select “Journalized Data Only” check box, and save.
Click filter next to city, from Property Inspector tab à Implementation, change it to JRN_SUBSCRIBER=’ODI’, and save your changes.
Run the Interface
Designer tab --> Models --> GG_STAGING --> Changed Data Capture --> Consumption, click Lock Subscriber.
ODI menu --> Execute.
Designer tab --> Models --> GG_STAGING --> Changed Data Capture --> Consumption, click Unlock Subscriber.
Check execution status
Operator tab --> Agent -->
To view data in the target schema, Models --> GG_TARGET --> CITY, right click and select View Data.
来自 “ ITPUB博客 ” ,链接:http://blog.itpub.net/638844/viewspace-1062175/,如需转载,请注明出处,否则将追究法律责任。
转载于:http://blog.itpub.net/638844/viewspace-1062175/


 234
234

 被折叠的 条评论
为什么被折叠?


