


阿波罗简介 (Introduction to Apollo)
In the last few years GraphQL got hugely popular as an alternative approach to building an API over REST.
在过去的几年中, GraphQL作为在REST上构建API的替代方法而广受欢迎。
GraphQL is a great way to let the client decide which data they want to be transmitted over the network, rather than having the server send a fixed set of data.
GraphQL是让客户端决定要通过网络传输哪些数据的好方法,而不是让服务器发送一组固定的数据。
Also, it allows you to specify nested resources, reducing a lot the back and forth sometimes required when dealing with REST APIs.
此外,它还允许您指定嵌套资源,从而减少了处理REST API时有时来回的麻烦。
Apollo is a team and community that builds on top of GraphQL, and provides different tools that help you build your projects.
Apollo是一个基于GraphQL的团队和社区,并提供不同的工具来帮助您构建项目。
The tools provided by Apollo are mainly 3: Client, Server, Engine.
Apollo提供的工具主要有3: Client , Server , Engine 。
Apollo Client helps you consume a GraphQL API, with support for the most popular frontend web technologies including React, Vue, Angular, Ember, Meteor and more, and native development on iOS and Android.
Apollo Client支持最流行的前端Web技术(包括React, Vue ,Angular,Ember,Meteor等)以及在iOS和Android上的本机开发,可帮助您使用GraphQL API。
Apollo Server is the server part of GraphQL, which interfaces with your backend and sends responses back to the client requests.
Apollo服务器是GraphQL的服务器部分,它与您的后端连接并将响应发送回客户端请求。
Apollo Engine is a hosted infrastructure (SAAS) that serves as a middle man between the client and your server, providing caching, performance reporting, load measurement, error tracking, schema field usage statistics, historical stats and many more goodies. It’s currently free up to 1 million requests per month, and it’s the only part of Apollo that’s not open source and free, and provides funding for the open source part of the project.
Apollo Engine是一个托管基础结构(SAAS),充当客户端和服务器之间的中间人,提供缓存,性能报告,负载测量,错误跟踪,架构字段使用情况统计信息,历史统计信息以及许多其他功能。 目前,它每月可以免费释放多达一百万个请求,并且是Apollo唯一不是开源且免费的部分,并且为项目的开源部分提供资金。
It’s worth noting that those 3 tools are not linked together in any way, and you can use just Apollo Client to interface with a 3rd party API, or serve an API using Apollo Server without having a client at all, for example.
值得注意的是,这三个工具没有以任何方式链接在一起,例如,您可以仅使用Apollo客户端与第三方API进行接口,也可以使用Apollo Server来提供API,而根本不需要客户端。
It’s all compatible with the GraphQL standard specification, so there is no proprietary or incompatible tech in Apollo.
它们都与GraphQL标准规范兼容 ,因此Apollo中没有专有或不兼容的技术。
But it’s very convenient to have all those tools together under a single roof, a complete suite for all your GraphQL-related needs.
但是将所有这些工具放在一个屋顶下非常方便,这是一个完整的套件,可以满足您所有与GraphQL相关的需求。
Apollo strives to be easy to use and easy to contribute to.
阿波罗(Apollo)努力做到易于使用和易于贡献。
Apollo is focused on keeping things simple. This is something key to the success of a technology that wants to become popular, as some tech or framework or library might be overkill for 99% of the small or medium companies out there, and just suited for the big companies with very complex needs.
阿波罗致力于保持简单 。 这是一项希望成功普及的技术成功的关键,因为某些技术或框架或库对于99%的中小型公司来说可能是过大的,仅适合于具有非常复杂需求的大公司。
阿波罗客户 (Apollo Client)
Apollo Client is the leading JavaScript client for GraphQL. Community-driven, it’s designed to let you build UI components that interface with GraphQL data, either in displaying data, or in performing mutations when certain actions happen.
Apollo客户端是GraphQL的领先JavaScript客户端。 它是由社区驱动的,旨在让您构建与GraphQL数据交互的UI组件,以显示数据或在某些操作发生时执行突变。
You don’t need to change everything in your application to make use of Apollo Client. You can start with just one tiny layer, one request, and expand from there.
您无需更改应用程序中的任何内容即可使用Apollo Client。 您可以只从一个很小的层开始,一个请求,然后从那里扩展。
Most of all, Apollo Client is built to be simple, small and flexible from the ground up.
最重要的是,Apollo Client的构建从一开始就是简单,小型和灵活的。
In this post I’m going to detail the process of using Apollo Client within a React application.
在这篇文章中,我将详细介绍在React应用程序中使用Apollo Client的过程。
I’ll use the GitHub GraphQL API as a server.
我将使用GitHub GraphQL API作为服务器。
启动一个React应用 (Start a React app)
I use create-react-app to setup the React app, which is very convenient and just adds the bare bones of what we need:
我使用create-react-app设置React应用程序,这非常方便,并且只需添加我们所需的内容即可:
npx create-react-app myapp
npxis a command available in the latest npm versions. Update npm if you do not have this command.
npx是最新npm版本中可用的命令。 如果没有此命令,请更新npm。
and start the app local server with npm:
并使用npm启动应用本地服务器:
npm startThis will fire up an app on localhost:3000.
这将在localhost:3000上启动一个应用程序。
Now open src/index.js:
现在打开src/index.js :
import React from 'react'
import ReactDOM from 'react-dom'
import './index.css'
import App from './App'
import registerServiceWorker from './registerServiceWorker'

ReactDOM.render(<App />, document.getElementById('root'))
registerServiceWorker()
and remove all this content.
并删除所有这些内容。
开始使用Apollo Boost (Get started with Apollo Boost)
Apollo Boost is the easiest way to start using Apollo Client on a new project. We’ll install that in addition to react-apollo and graphql.
Apollo Boost是在新项目上开始使用Apollo Client的最简单方法。 除了react-apollo和graphql之外,我们还将安装它。
In the console, run
在控制台中,运行
npm install apollo-boost react-apollo graphql创建一个ApolloClient对象 (Create an ApolloClient object)
You start by importing ApolloClient from apollo-client in index.js:
首先从index.js apollo-client导入ApolloClient:
import { ApolloClient } from 'apollo-client'

const client = new ApolloClient()
By default Apollo Client uses the /graphql endpoint on the current host, so let’s use an Apollo Link to specify the details of the connection to the GraphQL server by setting the GraphQL endpoint URI.
默认情况下,Apollo Client使用当前主机上的/graphql端点,因此让我们使用Apollo Link通过设置GraphQL端点URI来指定与GraphQL服务器的连接的详细信息。
阿波罗链接 (Apollo Links)
An Apollo Link is represented by an HttpLink object, which we import from apollo-link-http.
Apollo链接由HttpLink对象表示,该对象是我们从apollo-link-http导入的。
Apollo Link provides us a way to describe how we want to get the result of a GraphQL operation, and what we want to do with the response.
Apollo Link提供了一种方法来描述我们如何获取GraphQL操作的结果以及我们如何处理响应。
In short, you create multiple Apollo Link instances that all act on a GraphQL request one after another, providing the final result you want. Some Links can give you the option of retrying a request if not successful, batching and much more.
简而言之,您将创建多个Apollo Link实例,这些实例一个接一个地作用于GraphQL请求,从而提供所需的最终结果。 某些链接可以让您选择重试请求(如果未成功),批处理等等。
We’ll add an Apollo Link to our Apollo Client instance to use the GitHub GraphQL endpoint URI https://api.github.com/graphql
我们将Apollo链接添加到我们的Apollo Client实例,以使用GitHub GraphQL端点URI https://api.github.com/graphql
import { ApolloClient } from 'apollo-client'
import { createHttpLink } from 'apollo-link-http'

const client = new ApolloClient({
  link: createHttpLink({ uri: 'https://api.github.com/graphql' })
})
快取 (Caching)
We’re not done yet. Before having a working example we must also tell ApolloClient which caching strategy to use: InMemoryCache is the default and it’s a good one to start.
我们还没有完成。 在创建一个ApolloClient示例之前,我们还必须告诉ApolloClient哪种缓存策略 : InMemoryCache是默认的,它是一个很好的开始。
import { ApolloClient } from 'apollo-client'
import { createHttpLink } from 'apollo-link-http'
import { InMemoryCache } from 'apollo-cache-inmemory'

const client = new ApolloClient({
  link: createHttpLink({ uri: 'https://api.github.com/graphql' }),
  cache: new InMemoryCache()
}) 使用ApolloProvider (Use ApolloProvider)
Now we need to connect the Apollo Client to our component tree. We do so using ApolloProvider, by wrapping our application component in the main React file:
现在,我们需要将Apollo客户端连接到我们的组件树。 我们通过使用ApolloProvider来实现此ApolloProvider ,方法是将应用程序组件包装在主React文件中:
import React from 'react'
import ReactDOM from 'react-dom'
import { ApolloClient } from 'apollo-client'
import { createHttpLink } from 'apollo-link-http'
import { InMemoryCache } from 'apollo-cache-inmemory'
import { ApolloProvider } from 'react-apollo'

import App from './App'

const client = new ApolloClient({
  link: createHttpLink({ uri: 'https://api.github.com/graphql' }),
  cache: new InMemoryCache()
})

ReactDOM.render(
  <ApolloProvider client={client}>
    <App />
  </ApolloProvider>,
  document.getElementById('root')
)
This is enough to render the default create-react-app screen, with Apollo Client initialized:
这足以渲染默认的create-react-app屏幕,并初始化Apollo Client:

gql模板标签 (The gql template tag)
We’re now ready to do something with Apollo Client, and we’re going to fetch some data from the GitHub API and render it.
现在,我们准备使用Apollo Client做一些事情,并且我们将从GitHub API中获取一些数据并进行渲染。
To do so we need to import the gql template tag at the beginning of index.js:
为此,我们需要在index.js的开头导入gql模板标签:
import gql from 'graphql-tag'any GraphQL query will be built using this template tag, like this:
任何GraphQL查询都将使用此模板标记构建,如下所示:
const query = gql`
  query {
    ...
  }
`
执行GraphQL请求 (Perform a GraphQL request)
Importing gql was the last item we needed in our toolset.
导入gql是我们工具集中需要的最后一项。
We’re now ready to do something with Apollo Client, and we’re going to fetch some data from the GitHub API and render it.
现在,我们准备使用Apollo Client做一些事情,并且我们将从GitHub API中获取一些数据并进行渲染。
获取API的访问令牌 (Obtain an access token for the API)
The first thing to do is to obtain a personal access token from GitHub.
首先要做的是从GitHub 获取个人访问令牌 。
GitHub makes it easy by providing an interface from which you select any permission you might need:
GitHub提供了一个界面,您可以从中选择可能需要的任何权限,从而使其变得容易:

For the sake of this example tutorial you don’t need any of those permissions, they are meant for access to private user data but we will just query the public repositories data.
在本示例教程中,您不需要任何这些权限,它们仅用于访问私有用户数据,但我们仅查询公共存储库数据。
You still need a token though.
您仍然需要令牌。
The token you get is an OAuth 2.0 Bearer token.
您获得的令牌是OAuth 2.0承载令牌 。
You can easily test it by running from the command line:
您可以通过从命令行运行轻松地对其进行测试:
$ curl -H "Authorization: bearer ***_YOUR_TOKEN_HERE_***" -X POST -d " \
 { \
   \"query\": \"query { viewer { login }}\" \
 } \
" https://api.github.com/graphql
(replace ***_YOUR_TOKEN_HERE_*** with the actual token)
(用实际令牌替换***_YOUR_TOKEN_HERE_*** )
which should give you the result
这应该给你结果
{"data":{"viewer":{"login":"***_YOUR_LOGIN_NAME_***"}}}or
要么
{
  "message": "Bad credentials",
  "documentation_url": "https://developer.github.com/v4"
}
if something went wrong, for example if you forgot to insert the token.
如果出现问题,例如,如果您忘记插入令牌。
使用Apollo链接进行身份验证 (Use an Apollo Link to authenticate)
Now we need to send the Authorization header along with our GraphQL request, just like we did in the curl request above.
现在,我们需要将Authorization标头与GraphQL请求一起发送,就像我们在上面的curl请求中所做的一样。
How we do this with Apollo Client is by creating an Apollo Link middleware. Start with installing apollo-link-context:
我们如何通过创建Apollo Link中间件来使用Apollo Client。 从安装apollo-link-context :
npm install apollo-link-contextThis package allows us to add an authentication mechanism by setting the context of our requests.
该软件包允许我们通过设置请求的上下文来添加身份验证机制。
We can use it in this code by referencing the setContext function in this way:
通过以这种方式引用setContext函数,可以在此代码中使用它:
import { setContext } from 'apollo-link-context'

...

const authLink = setContext((_, { headers }) => {
  const token = '***YOUR_TOKEN**'

  return {
    headers: {
      ...headers,
      authorization: `Bearer ${token}`
    }
  }
})
and once we have this new Apollo Link, we can compose it with the HttpLink we already had, by using the concat() method on a link:
并且一旦有了这个新的Apollo链接,就可以通过在链接上使用concat()方法将其与已经拥有的HttpLink 组成 :
const link = authLink.concat(httpLink)Here is the full code for the src/index.js file with the code we have right now:
这是src/index.js文件的完整代码,其中包含我们现在拥有的代码:
import React from 'react'
import ReactDOM from 'react-dom'
import { ApolloClient } from 'apollo-client'
import { createHttpLink } from 'apollo-link-http'
import { InMemoryCache } from 'apollo-cache-inmemory'
import { ApolloProvider } from 'react-apollo'
import { setContext } from 'apollo-link-context'
import gql from 'graphql-tag'

import App from './App'

const httpLink = createHttpLink({ uri: 'https://api.github.com/graphql' })

const authLink = setContext((_, { headers }) => {
  const token = '***YOUR_TOKEN**'

  return {
    headers: {
      ...headers,
      authorization: `Bearer ${token}`
    }
  }
})

const link = authLink.concat(httpLink)

const client = new ApolloClient({
  link: link,
  cache: new InMemoryCache()
})

ReactDOM.render(
  <ApolloProvider client={client}>
    <App />
  </ApolloProvider>,
  document.getElementById('root')
)
WARNING ⚠️ 🚧 Keep in mind this code is an example for educational purposes and it exposes your GitHub GraphQL API token to the world to see in your frontend-facing code. Production code needs to keep this token private in the backend.
警告⚠️🚧请记住,此代码是出于教育目的的示例 ,它将GitHub GraphQL API令牌公开给全世界,以便在面向前端的代码中查看。 生产代码需要将此令牌在后端保持私有。
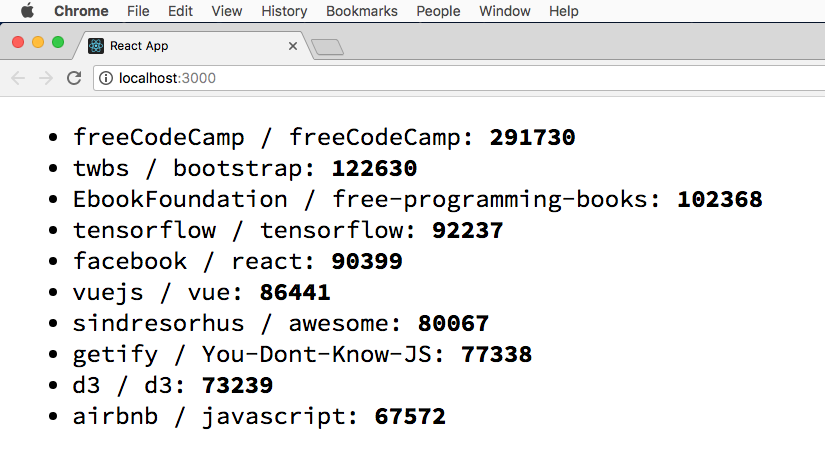
We can now make the first GraphQL request at the bottom of this file, and this sample query asks for the names and the owners of the 10 most popular repositories, with more than 50k stars:
现在,我们可以在该文件的底部发出第一个GraphQL请求,此示例查询将询问10个最受欢迎的存储库(超过5万个星标)的名称和所有者:
const POPULAR_REPOSITORIES_LIST = gql`
{
  search(query: "stars:>50000", type: REPOSITORY, first: 10) {
    repositoryCount
    edges {
      node {
        ... on Repository {
          name
          owner {
            login
          }
          stargazers {
            totalCount
          }
        }
      }
    }
  }
}
`

client.query({ query: POPULAR_REPOSITORIES_LIST }).then(console.log)
Running this code successfully returns the result of our query in the browser console:
运行此代码成功返回浏览器控制台中查询的结果:

呈现组件中的GraphQL查询结果集 (Render a GraphQL query result set in a component)
What we saw up to now is already cool. What’s even cooler is using the graphql result set to render your components.
我们到目前为止所看到的已经很酷了。 更酷的是使用graphql结果集来呈现您的组件。
We let Apollo Client the burden (or joy) or fetching the data and handling all the low-level stuff, and we can focus on showing the data, by using the graphql component enhancer offered by react-apollo.
我们让Apollo Client负担(或获得乐趣)或获取数据并处理所有低层次的东西,并且我们可以通过使用react-apollo提供的graphql组件增强器专注于显示数据。
Add this in the App.js file:
将此添加到App.js文件中:
import React from 'react'
import { graphql } from 'react-apollo'
import { gql } from 'apollo-boost'

const POPULAR_REPOSITORIES_LIST = gql`
{
  search(query: "stars:>50000", type: REPOSITORY, first: 10) {
    repositoryCount
    edges {
      node {
        ... on Repository {
          name
          owner {
            login
          }
          stargazers {
            totalCount
          }
        }
      }
    }
  }
}
`

const App = graphql(POPULAR_REPOSITORIES_LIST)(props =>
  <ul>
    {props.data.loading ? '' : props.data.search.edges.map((row, i) =>
      <li key={row.node.owner.login + '-' + row.node.name}>
        {row.node.owner.login} / {row.node.name}: {' '}
        <strong>
          {row.node.stargazers.totalCount}
        </strong>
      </li>
    )}
  </ul>
)

export default App
Here is the result of our query rendered in the component 😀
这是在组件rendered中呈现的查询结果
阿波罗服务器 (Apollo Server)
A GraphQL server has the job of accepting incoming requests on an endpoint, interpreting the request and looking up any data that’s necessary to fulfill the client needs.
GraphQL服务器的工作是接受端点上的传入请求,解释请求并查找满足客户端需求所需的任何数据。
There are tons of different GraphQL server implementations for every possible language.
每种可能的语言都有许多不同的GraphQL服务器实现。
Apollo Server is a GraphQL server implementation for JavaScript, in particular for the Node.js platform.
Apollo Server是用于JavaScript的GraphQL服务器实现,尤其是在Node.js平台上 。
It supports many popular Node.js frameworks, including:
它支持许多流行的Node.js框架,包括:
Apollo Server gives us 3 things basically:
Apollo Server基本上给了我们3件事:
gives us a way to describe our data with a schema.
提供了一种用模式描述数据的方法。
provides the framework for resolvers, which are functions we write to fetch the data needed to fulfill a request.
提供解析程序的框架,这是我们编写的用于获取满足请求所需数据的函数。
facilitates handling authentication for our API.
有助于处理我们API的身份验证 。
To start, create a folder named appserver, go into it and run npm init --yes to initialize a package.json file.
首先,创建一个名为appserver的文件夹,进入其中并运行npm init --yes初始化package.json文件。
Then run npm install apollo-server graphql.
然后运行npm install apollo-server graphql 。
阿波罗游乐场 (Apollo Playgrounds)
If you prefer an online playground, there 2 amazing playgrounds for Apollo which I recommend.
如果您更喜欢在线游乐场,我推荐2个阿波罗游乐场。
The first is hosted on Glitch, the second on CodeSandbox.
第一个托管在Glitch上 ,第二个托管在CodeSandbox上 。
Go and remix/fork those starter projects to create your own Apollo Server.
去重新混合/分叉这些入门项目,以创建自己的Apollo Server。
Apollo服务器Hello World (Apollo Server Hello World)
Create an index.js file.
创建一个index.js文件。
First you import ApolloServer and gql from apollo-server:
首先,您从apollo-server导入ApolloServer和gql :
const { ApolloServer, gql } = require('apollo-server');We create a schema definition using the gql tag. A schema definition is an template literal string containing the description of our query and the types associated with each field:
我们使用gql标签创建一个架构定义。 模式定义是模板文字字符串,其中包含查询的描述以及与每个字段关联的类型:
const typeDefs = gql`
  type Query {
    hello: String
  }
`
A resolver is an object that maps fields in the schema to resolver functions, able to lookup data to respond to a query.
解析器是将架构中的字段映射到解析器功能的对象,该对象能够查找数据以响应查询。
Here is a simple resolver containing the resolver function for the hello field, which returns the Hello world! string:
这是一个简单的解析器,其中包含hello字段的resolver函数,它将返回Hello world! 串:
const resolvers = {
  Query: {
    hello: (root, args, context) => {
      return 'Hello world!'
    }
  }
}
Given those 2 elements, the schema definition and the resolver, we initialize a new ApolloServer object:
给定这两个元素,即模式定义和解析器,我们初始化一个新的ApolloServer对象:
const server = new ApolloServer({ typeDefs, resolvers })We then call the listen() method on the sever object, and we listen for the promise to resolve, which indicates the server is ready:
然后,我们在服务器对象上调用listen()方法,并监听要解决的承诺,这表明服务器已准备就绪:
server.listen().then(({ url }) => {
  console.log(`🚀 Server ready at ${url}`)
})
Here is the full code for the simple Hello World example:
这是简单的Hello World示例的完整代码:
const { ApolloServer, gql } = require('apollo-server');

// Construct a schema, using GraphQL schema language
const typeDefs = gql`
  type Query {
    hello: String
  }
`

// Provide resolver functions for your schema fields
const resolvers = {
  Query: {
    hello: (root, args, context) => {
      return 'Hello world!'
    }
  }
}

const server = new ApolloServer({ typeDefs, resolvers })

server.listen().then(({ url }) => {
  console.log(`🚀 Server ready at ${url}`)
})
Now run node index.js and from another console window run:
现在运行node index.js并从另一个控制台窗口运行:
$ curl \
  -X POST \
  -H "Content-Type: application/json" \
  --data '{ "query": "{ hello }" }' \
  http://localhost:4000/graphql
This should return you the data:
这应该返回您的数据:
{
  "data": {
    "hello": "Hello world!"
  }
}
You can have your client, interface with this using this simple App.js file example, which you can drop-in from the above GitHub API example:
您可以使用以下简单的App.js文件示例让您的客户端与此接口连接,您可以从上述GitHub API示例中插入该示例:
import React from 'react'
import { gql } from 'apollo-boost'
import { Query } from 'react-apollo'

const App = () => (
  <Query
    query={gql`
      {
        hello
      }
    `}
  >
    {({ loading, error, data }) => {
      if (loading) return <p>Loading...</p>
      if (error) return <p>Error :(</p>

      return data.hello
    }}
  </Query>
)

export default App
You have to change the httpLink uri in the index.js file to:
您必须将index.js文件中的httpLink uri更改为:
const httpLink = createHttpLink({ uri: 'http://localhost:4000/graphql' })


 1900
1900

 被折叠的 条评论
为什么被折叠?
被折叠的 条评论
为什么被折叠?
 到【灌水乐园】发言


