


 本文介绍了如何使用dhtmlxScheduler创建在线事件日历,包括数据格式、内联JSON数据、数据库集成、调度程序初始化和功能扩展。dhtmlxScheduler支持JSON、XML和iCal格式,可以通过内联数据或数据库作为数据源。文章详细展示了如何配置数据库、服务器端脚本以及使用JavaScript进行初始化。此外,还讨论了添加新功能,如改变皮肤和导出为PDF。
dhtmxScheduler is a JavaScript tool that allows you to create your own online event calendar. In this article we’ll try to create an application of such a kind and then add some extra features to it. There are several ways of data loading among which you can choose. With dhtmlxScheduler, you can use three formats: JSON, XML and iCal. You can use either an inline object or a file as a source of data. Moreover, there’s a possibility to use a database. If you prefer this opportunity, you should have a web server (e.g. Apache or nginx) with PHP and MySQL running. We’ll take a look at both inline object and database options, so you’ll be able to choose which one you want to try.
dhtmxScheduler是一个JavaScript工具,可让您创建自己的在线事件日历。 在本文中,我们将尝试创建此类应用程序,然后向其中添加一些额外的功能。 您可以选择几种数据加载方式。 使用dhtmlxScheduler,您可以使用三种格式:JSON,XML和iCal。 您可以使用内联对象或文件作为数据源。 而且,有可能使用数据库。 如果您愿意利用此机会,则应该拥有一个运行PHP和MySQL的Web服务器(例如Apache或nginx)。 我们将研究内联对象和数据库选项,因此您可以选择要尝试的对象。
Before getting started, you should download the scheduler package and extract the codebase folder within the working directory. It can be a regular folder if you want to test this scheduler using inline data or a local web server folder in case you want to try using a database.
在开始之前,您应该下载调度程序包并在工作目录中解压缩codebase文件夹。 如果要使用嵌入式数据测试此调度程序,则可以是常规文件夹;如果要尝试使用数据库,则可以是本地Web服务器文件夹。
资料格式 (Data Formats)
Before we initialize the calendar, it’s better to prepare some data to visualize. The easiest of possible ways is to create an array and use it as a data source. One more possibility is to create a database along with a server-side script that will handle database connection. This approach will allow you to save existing events between sessions.
在初始化日历之前,最好准备一些数据以使其可视化。 最简单的方法是创建一个数组并将其用作数据源。 另一种可能性是创建数据库以及将处理数据库连接的服务器端脚本。 这种方法将允许您保存会话之间的现有事件。
内联JSON数据 (Inline JSON data)
If you want to create an array of data, you should learn what properties you can use. It will be easy since there are only four of them:
如果要创建数据数组,则应了解可以使用哪些属性。 这很容易,因为它们只有四个:
- `id` is the event ID. Number for a calendar id是事件ID。 日历编号
- `start_date` is the date when an event is supposed to start. By default, its format is “%m/%d/%Y %H:%i” “ start_date”是事件应开始的日期。 默认情况下,其格式为“%m /%d /%Y%H:%i”
- `end_date` is the date when an event ends end_date是事件结束的日期
- `text` property contains the description of an event text属性包含事件的描述
Nothing unusual, as I’ve said. Now you can create a sequence of events:
正如我所说的,这没什么不寻常的。 现在,您可以创建一系列事件:
var events = [
	{id:1, text:"Dentist", start_date:"08/11/2015 14:00",
	 end_date:"08/11/2015 15:00"},
	{id:2, text:"Conference", start_date:"08/12/2015 12:00",
	 end_date:"08/12/2015 19:00"},
	{id:3, text:"Kayaking", start_date:"08/15/2015 09:00",
	 end_date:"08/16/2015 22:00"}
];
var events = [
	{id:1, text:"Dentist", start_date:"08/11/2015 14:00",
	 end_date:"08/11/2015 15:00"},
	{id:2, text:"Conference", start_date:"08/12/2015 12:00",
	 end_date:"08/12/2015 19:00"},
	{id:3, text:"Kayaking", start_date:"08/15/2015 09:00",
	 end_date:"08/16/2015 22:00"}
];
That’s all you need to do. We’ll soon render this data on the screen, but now let’s create our testing database.
这就是您需要做的。 我们将很快在屏幕上呈现此数据,但是现在让我们创建测试数据库。
数据库 (Database)
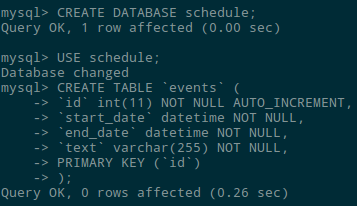
First of all, we need to create a database itself. Here’s the code:
首先,我们需要创建一个数据库本身。 这是代码:
CREATE DATABASE schedule;
USE schedule;
CREATE TABLE `events` (
	`id` int(11) NOT NULL AUTO_INCREMENT,
	`start_date` datetime NOT NULL,
	`end_date` datetime NOT NULL,
	`text` varchar(255) NOT NULL,
	PRIMARY KEY (`id`)
);
CREATE DATABASE schedule;
USE schedule;
CREATE TABLE `events` (
	`id` int(11) NOT NULL AUTO_INCREMENT,
	`start_date` datetime NOT NULL,
	`end_date` datetime NOT NULL,
	`text` varchar(255) NOT NULL,
	PRIMARY KEY (`id`)
);
Everything went well, so we can proceed:
一切顺利,因此我们可以继续:
Now we need to create a server-side script that will initialize the connection to our database. Let’s call this file data.php and place it within our working directory.
现在,我们需要创建一个服务器端脚本,该脚本将初始化与数据库的连接。 让我们将此文件data.php并将其放置在我们的工作目录中。
Here’s the code:
这是代码:
<?php
require_once("../codebase/connector/scheduler_connector.php");
$res=mysql_connect("localhost","root","");
mysql_select_db("schedule");
$conn = new SchedulerConnector($res);
$conn->render_table("events","id","start_date,end_date,text");
?>
<?php
require_once("../codebase/connector/scheduler_connector.php");
$res=mysql_connect("localhost","root","");
mysql_select_db("schedule");
$conn = new SchedulerConnector($res);
$conn->render_table("events","id","start_date,end_date,text");
?>
Notice that `mysql_connect()` takes a username and a password as its second and third parameters. So, don’t forget to change these values to actual ones.
注意,“ mysql_connect()”将用户名和密码作为其第二和第三个参数。 因此,不要忘记将这些值更改为实际值。
This code uses dhtmlxConnector that enables access to external data sources. Then it connects to MySQL and selects our previously created database. And, finally, it sets the columns we’ve created as data to render.
此代码使用dhtmlxConnector启用对外部数据源的访问。 然后,它连接到MySQL并选择我们先前创建的数据库。 最后,它将我们创建的列设置为要渲染的数据。
So, we’ve finished configuring a database, which means we can initialize a scheduler.
至此,我们已经完成了数据库的配置,这意味着我们可以初始化调度程序。
调度程序初始化 (Scheduler Initialization)
Let’s now create an HTML file that will contain the required code. I’ve called it index.html. We should include the required files first:
现在让我们创建一个包含所需代码HTML文件。 我称它为index.html 。 我们应该首先包含所需的文件:
<link rel="stylesheet" href="./codebase/dhtmlxscheduler.css">
<script src="./codebase/dhtmlxscheduler.js"></script>
<link rel="stylesheet" href="./codebase/dhtmlxscheduler.css">
<script src="./codebase/dhtmlxscheduler.js"></script>
Now we can define required DIV containers. Put this code between your <body></body> tags:
现在我们可以定义所需的DIV容器。 将此代码放在您的<body></body>标签之间:
<div id="scheduler_here" class="dhx_cal_container" style='width:100%; height:100%;'>
<div class="dhx_cal_navline">
<div class="dhx_cal_prev_button"> </div>
<div class="dhx_cal_next_button"> </div>
<div class="dhx_cal_today_button"></div>
<div class="dhx_cal_date"></div>
<div class="dhx_cal_tab" name="day_tab" style="right:204px;"></div>
<div class="dhx_cal_tab" name="week_tab" style="right:140px;"></div>
<div class="dhx_cal_tab" name="month_tab" style="right:76px;"></div>
</div>
<div class="dhx_cal_header"></div>
<div class="dhx_cal_data"></div>
</div>
It may seem a little bit messy. So many DIV’s! Guess, it’s just something you should overcome.
似乎有点混乱。 这么多的DIV! 猜猜,这只是您应该克服的事情。
Now we should define the proper style. We’ll use the full-screen mode in this example. Here’s the code we need:
现在,我们应该定义适当的样式。 在此示例中,我们将使用全屏模式。 这是我们需要的代码:
<style media="screen">
	html, body{
		margin:0px;
		padding:0px;
		height:100%;
		overflow:hidden;
	}
</style>
<style media="screen">
	html, body{
		margin:0px;
		padding:0px;
		height:100%;
		overflow:hidden;
	}
</style>
After that we can initialize the scheduler at last:
之后,我们可以最后初始化调度程序:
scheduler.init('scheduler_here', new Date(),"month");
scheduler.init('scheduler_here', new Date(),"month");
In this code, the init() constructor initializes a scheduler within the scheduler_here DIV container, sets the current date as the initial one and then uses Month as the default view. There are also Day and Week views available.
在此代码中, init()构造函数在scheduler_here DIV容器中初始化一个调度scheduler_here ,将当前日期设置为初始日期,然后使用Month作为默认视图。 也提供日和周视图。
Well, this is it. That’s all you need to create a calendar. Include the JavaScript and CSS files, define DIV’s and the style, run the constructor and you’ll get your app.
好吧,就是这样。 这就是创建日历所需的全部。 包括JavaScript和CSS文件,定义DIV和样式,运行构造函数,您将获得应用。
Here’s the result:
结果如下:
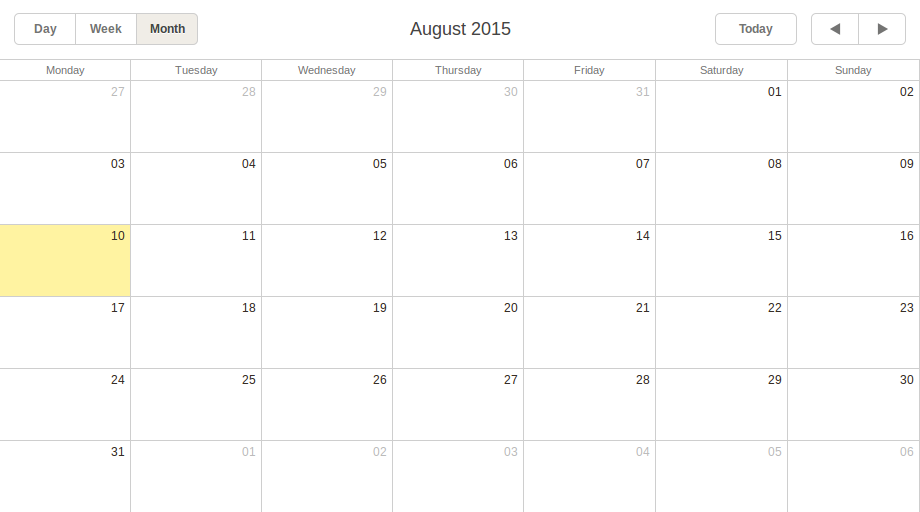
It allows you to choose one of the available views. As you can see, Month is set by default. Just as planned. Today’s date is highlighted. Moreover, there is the Today button and buttons that allow you to move forward and backward.
它允许您选择可用视图之一。 如您所见,月份是默认设置的。 正如计划。 今天的日期突出显示。 此外,还有“今日”按钮和允许您前进和后退的按钮。
Let’s now check how data handling works.
现在让我们检查数据处理的工作方式。
使用内联数据源 (Using Inline Data Source)
To use the array we talked about earlier, you can apply this code:
要使用我们之前讨论的数组,可以应用以下代码:
scheduler.parse(events, "json");
scheduler.parse(events, "json");
This method takes two parameters: the data source (the events array in our case) and the format of data.
这个方法有两个参数:数据源(在我们的例子中是events数组)和数据格式。
Refresh the page and you’ll get this:
刷新页面,您将获得以下信息:
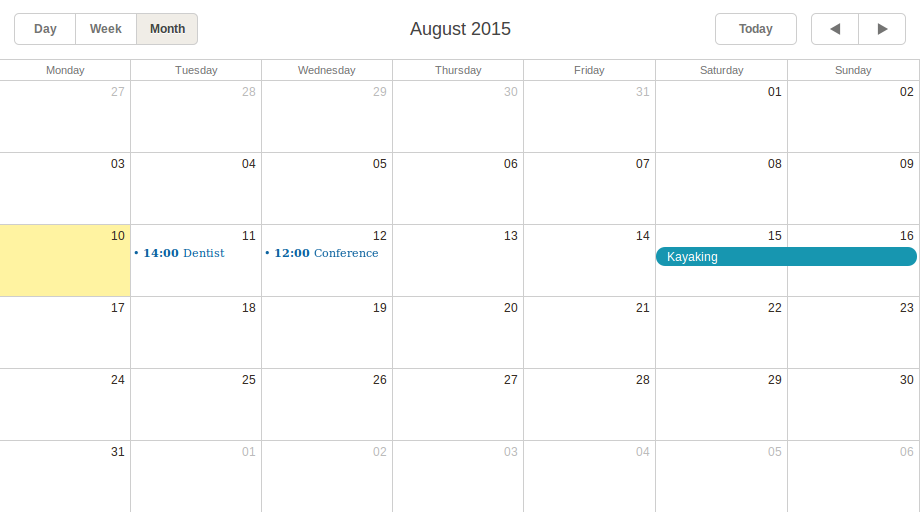
Here are our events. You can already test your scheduler, add new events, etc. But, as I’ve said before, if you use inline data only, there’s no possibility to save your data. New events you’ve created will disappear after you refresh the page. But have no fear. We’ve got our database. Let’s use it now.
这是我们的活动。 您已经可以测试调度程序,添加新事件等。但是,正如我之前说过的,如果仅使用内联数据,则无法保存数据。 刷新页面后,您创建的新事件将消失。 但是不要害怕。 我们有我们的数据库。 现在使用它。
数据库 (Database)
To avoid the data vanishing issue, we can use the database.
为了避免数据消失的问题,我们可以使用数据库。
First of all, you should change the default date format. Place this code BEFORE scheduler.init():
首先,您应该更改默认日期格式。 将此代码放在scheduler.init()之前:
scheduler.config.xml_date="%Y-%m-%d %H:%i";
scheduler.config.xml_date="%Y-%m-%d %H:%i";
Now, instead of scheduler.parse() you should use the code that will load the existing events from the database and save the created events as well:
现在,而不是scheduler.parse()您应该使用将从数据库加载现有事件并保存创建的事件的代码:
/* loading data from the server */
scheduler.load("data.php");
/* saving data */
var dp = new dataProcessor("data.php");
dp.init(scheduler);
/* loading data from the server */
scheduler.load("data.php");
/* saving data */
var dp = new dataProcessor("data.php");
dp.init(scheduler);
We use the load() method for the loading purpose. It takes the path to the server-side script as a parameter. After that, we should use dataProcessor to save data. To do so, initialize it and attach to the scheduler.
我们将load()方法用于加载目的。 它以服务器端脚本的路径作为参数。 之后,我们应该使用dataProcessor保存数据。 为此,请将其初始化并附加到调度程序。
Done. Now your data will be safe. Since our database is empty, there will be no events in the scheduler when you refresh your web page. Looks like an excellent opportunity to check how events can be created.
做完了 现在,您的数据将是安全的。 由于我们的数据库为空,因此刷新网页时,调度程序中将没有任何事件。 看起来是检查事件如何创建的绝佳机会。
计划程序基本功能 (Scheduler Basic Features)
One of the possible ways to create a new event is double-clicking on the proper area of the calendar. After that you’ll see the New Event window:
创建新事件的一种可能方法是双击日历的适当区域。 之后,您将看到“新事件”窗口:

There’s a possibility to add a description to your event, set the proper beginning and ending dates. When you click the Save button, your event will appear on the screen:
您可以在活动中添加说明,并设置正确的开始日期和结束日期。 当您单击保存按钮时,您的事件将出现在屏幕上:

You can drag it over the calendar if you want to change your plans:
如果要更改计划,可以将其拖到日历上:

Let’s now talk about the long-term events. One of the possibilities is to set the proper term when you’re creating a new event. Another way is to use the drag-and-drop functionality. All you need to do is to click on the day your event begins on and then drag the cursor to the event’s end:
现在让我们谈谈长期事件。 一种可能性是在创建新事件时设置适当的术语。 另一种方法是使用拖放功能。 您需要做的就是单击事件开始的日期,然后将光标拖到事件的结尾:

Then you’ll see the familiar New Event window.
然后,您将看到熟悉的“新事件”窗口。
What else? You can change the duration of an event nearly the same way. Just alter the size of the proper event. It may be more convenient to do it after you’ve changed the view according to the initial event duration. For example, you can use the Week view for short events:
还有什么? 您可以几乎以相同的方式更改事件的持续时间。 只需更改适当事件的大小即可。 根据初始事件的持续时间更改视图后,这样做可能会更方便。 例如,您可以将“周”视图用于短事件:

Seems that it’s all that we can get from the basic scheduler. But don’t worry. There’s a possibility to extend the existing functionality.
看来这就是我们可以从基本调度程序中获得的全部。 但是不用担心。 有可能扩展现有功能。
增加新功能 (Adding New Features)
This guides page contains a bunch of guides that can help you customize your application. There are styling guides, extensions guides, data export guides, etc. Let’s try to implement a couple of possibilities.
本指南页面包含大量指南,可帮助您自定义应用程序。 有样式指南,扩展指南,数据导出指南等。让我们尝试实现几种可能性。
改变皮肤 (Changing the Skin)
Let’s start with a simple one. Besides the default one, there are three other skins available: Glossy, Classic, and Flat. All you need to do to set another skin is to change the included CSS file.
让我们从一个简单的开始。 除了默认皮肤外,还有其他三种皮肤可用:有光泽,经典和平坦。 设置其他外观所需要做的就是更改包含CSS文件。
For example, if you change this:
例如,如果您更改此设置:
<link rel="stylesheet" href="./codebase/dhtmlxscheduler.css">
<link rel="stylesheet" href="./codebase/dhtmlxscheduler.css">
To this:
对此:
<link rel="stylesheet" href="./codebase/dhtmlxscheduler_flat.css">
<link rel="stylesheet" href="./codebase/dhtmlxscheduler_flat.css">
You’ll change the skin from Default to Flat.
您将皮肤从默认更改为平面。
The result is shown below:
结果如下所示:

导出为PDF (Export to PDF)
Another useful feature is export. There is a possibility to export your scheduler to different file formats such as PNG, PDF, Excel, etc. Let’s concentrate on PDF since this option provides you with different handy properties.
另一个有用的功能是导出。 可以将您的调度程序导出为不同的文件格式,例如PNG,PDF,Excel等。让我们专注于PDF,因为此选项为您提供了方便的属性。
To enable the exporting feature, you should include this JavaScript file to your project:
要启用导出功能,您应该将此JavaScript文件包括到您的项目中:
<script src="http://export.dhtmlx.com/scheduler/api.js"></script>
<script src="http://export.dhtmlx.com/scheduler/api.js"></script>
Next step is to add the Export button to your page:
下一步是将“导出”按钮添加到您的页面:
<input value="Export" type="button" onclick="exportTo()">
<input value="Export" type="button" onclick="exportTo()">
You can place it right under your scheduler for testing purposes. But don’t forget to change the default `height` value of the scheduler that is 100% initially.
您可以将其放置在计划程序下以进行测试。 但是请不要忘记更改调度程序的默认“高度”值,该值最初为100%。
For example:
例如:
<div id="scheduler_here" class="dhx_cal_container" style='width:100%; height:90%; margin-bottom: 10px'>
<div id="scheduler_here" class="dhx_cal_container" style='width:100%; height:90%; margin-bottom: 10px'>
Here’s our testing button:
这是我们的测试按钮:

When you click it, the exportTo() function will be called. We’ll use the scheduler.exportToPDF() method within it. And this is where you can define the properties of the output file.
单击它时,将exportTo()函数。 我们将在其中使用scheduler.exportToPDF()方法。 在这里您可以定义输出文件的属性。
Here they are:
他们来了:
- `name` is the output file name 名称是输出文件名
- `format` defines the output file format (e.g. ‘A0’, ‘A1’, ‘A2’, ‘A3’, ‘A4’, ‘A5’) “格式”定义输出文件格式(例如“ A0”,“ A1”,“ A2”,“ A3”,“ A4”,“ A5”)
- `orientation` specifies the screen orientation; there are two possible values: “portrait” and “landscape” Orientation指定屏幕方向; 有两个可能的值:“肖像”和“风景”
- `zoom` contains the number that sets the zoom coefficient `zoom`包含设置缩放系数的数字
- `header` and `footer` are strings that will be added to the output file. HTML is allowed here “ header”和“ footer”是将添加到输出文件中的字符串。 此处允许HTML
Using these properties you can define the export function:
使用这些属性,您可以定义导出功能:
function exportToPdf() {
	scheduler.exportToPDF({
		name: "my_schedule.pdf",
		format:"A4",
		orientation:"landscape",
		zoom:1,
		header:"<h1>August, 2015</h1>",
	});
};
function exportToPdf() {
	scheduler.exportToPDF({
		name: "my_schedule.pdf",
		format:"A4",
		orientation:"landscape",
		zoom:1,
		header:"<h1>August, 2015</h1>",
	});
};
That’s all you need to convert your data to PDF.
这就是将数据转换为PDF所需的全部。
结论 (Conclusion)
It was my choice of scheduler library, it’s free (though has paid version as well), simple and have modern look and feel. It wasn’t my intention to make you start using it, I just want to share my positive experience. dhtmlxScheduler allowed me to build an online time management application in a few easy steps.
这是我选择的调度程序库,它是免费的(尽管也有付费版本),简单,并且具有现代外观。 我并不是要让您开始使用它,我只是想分享自己的积极经验。 dhtmlxScheduler允许我通过几个简单的步骤来构建在线时间管理应用程序。
翻译自: https://www.script-tutorials.com/creating-online-event-calendar-with-dhtmlxscheduler/


 4584
4584

 被折叠的 条评论
为什么被折叠?
被折叠的 条评论
为什么被折叠?
 到【灌水乐园】发言


