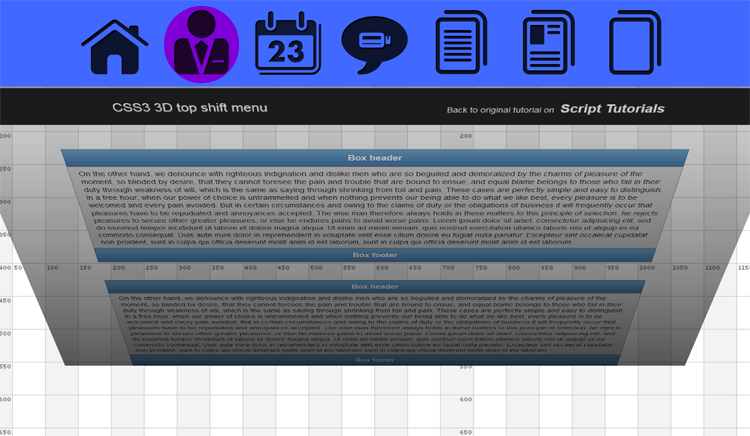

CSS3 3D top shift menu In this tutorial I will show you how to create animated 3D navigation menu (with images) with CSS3 only (JavaScript-free ). We will be using the power of CSS3 effects like perspective, box-sizing, transforms, gradients and transitions. You can use this menu in order to make a professional look of your website. Pay attention, than to see this menu you should move and hover your mouse over the blue element at the top of page.
CSS3 3D上移菜单在本教程中,我将向您展示如何仅使用CSS3(无JavaScript)创建动画3D导航菜单(带有图像)。 我们将使用CSS3效果的强大功能,例如透视图,框大小,变换,渐变和过渡。 您可以使用此菜单来使您的网站看起来更专业。 请注意,要查看此菜单,您应该移动并将鼠标悬停在页面顶部的蓝色元素上。
This is our final result:
这是我们的最终结果:


Here are samples and downloadable package:
以下是示例和可下载的软件包:
现场演示
[sociallocker]
[社交储物柜]
打包下载
[/sociallocker]
[/ sociallocker]
步骤1. HTML (Step 1. HTML)
The first step is to define the HTML markup.
第一步是定义HTML标记。
index.html (index.html)
<!DOCTYPE html>
<html lang="en">
    <head>
        <meta charset="utf-8" />
        <title>CSS3 3D top shift menu | Script Tutorials</title>
        <link href="css/layout.css" rel="stylesheet" type="text/css" />
        <link href="css/menu.css" rel="stylesheet" type="text/css" />
    </head>
    <body class="menu_body">
        <!-- The main menu element -->
        <div class="menu">
            <ul>
                <li><a href="#"><img src="images/1.png" /></a></li>
                <li><a href="#"><img src="images/2.png" /></a></li>
                <li><a href="#"><img src="images/3.png" /></a></li>
                <li><a href="#"><img src="images/4.png" /></a></li>
                <li><a href="#"><img src="images/5.png" /></a></li>
                <li><a href="#"><img src="images/6.png" /></a></li>
                <li><a href="#"><img src="images/7.png" /></a></li>
            </ul>
        </div>
        <div class="page_content">
            <div class="shade"></div>
            <div class="box">
                <div class="header">Box header</div>
                <div class="body">
                    Any dummy text
                </div>
                <div class="footer">Box footer</div>
            </div>
            <div class="box">
                <div class="header">Box header</div>
                <div class="body">
                    Any dummy text
                </div>
                <div class="footer">Box footer</div>
            </div>
        </div>
    </body>
</html>
In the body of the document we have the menu and page_content element. Main idea is to divide the page into two semantic sections. The main menu consists of UL-LI unordered list elements. Each element has own image.
在文档主体中,我们具有menu和page_content元素。 主要思想是将页面分为两个语义部分。 主菜单包含UL-LI无序列表元素。 每个元素都有自己的图像。
The page contains of the shade element (which is invisible by default) and rest code (I prepared two design boxes here). Each box contains – the header, the body and the footer.
该页面包含shade元素(默认情况下不可见)和rest代码(我在这里准备了两个设计框)。 每个框包含–页眉,正文和页脚。
步骤2. CSS (Step 2. CSS)
I want to notice that current menu should work well in most of the modern web browsers (except IE). The best results are in Firefox and Chrome.
我想注意到,当前菜单在大多数现代Web浏览器(IE除外)中应该能很好地工作。 最好的结果是在Firefox和Chrome中。
Now – let’s start styling the navigation menu! First, we write the rules for document’s BODY element:
现在–让我们开始设计导航菜单! 首先,我们为文档的BODY元素编写规则:
css / menu.css (css/menu.css)
.menu_body {
    /* CSS3 perspective */
    -webkit-perspective: 1500px;
    -moz-perspective: 1500px;
    -ms-perspective: 1500px;
    -o-perspective: 1500px;
    perspective: 1500px;
}
.menu_body {
    /* CSS3 perspective */
    -webkit-perspective: 1500px;
    -moz-perspective: 1500px;
    -ms-perspective: 1500px;
    -o-perspective: 1500px;
    perspective: 1500px;
}
It adds perspective to our page. Now we have to write the base rules for our menu and even for content section:
它为我们的页面增加了视角。 现在,我们必须为菜单甚至内容部分编写基本规则:
.menu, .page_content {
    /* CSS3 box-sizing, transition and transform */
    -webkit-box-sizing: border-box;
    -moz-box-sizing: border-box;
    -ms-box-sizing: border-box;
    -o-box-sizing: border-box;
    box-sizing: border-box;
    -webkit-transition: -webkit-transform 0.5s ease;
    -moz-transition: -moz-transform 0.5s ease;
    -ms-transition: -ms-transform 0.5s ease;
    -o-transition: -o-transform 0.5s ease;
    transition: transform 0.5s ease;
}
/* the main menu element (which appears from the top) */
.menu {
    background-color: #002edb;
    display: block;
    position: fixed;
    width: 100%;
    height: 148px;
    z-index: 1;
    /* CSS3 transform */
    -webkit-transform: rotateX(-45deg) translateY(-95%);
    -moz-transform: rotateX(-45deg) translateY(-95%);
    -ms-transform: rotateX(-45deg) translateY(-95%);
    -o-transform: rotateX(-45deg) translateY(-95%);
    transform: rotateX(-45deg) translateY(-95%);
}
/* change background color and rotate the main menu element on hover */
.menu:hover {
    background-color: #4169ff;
    /* CSS3 transform */
    -webkit-transform: rotateX(0deg);
    -moz-transform: rotateX(0deg);
    -ms-transform: rotateX(0deg);
    -o-transform: rotateX(0deg);
    transform: rotateX(0deg);
}
/* rest page content */
.page_content {
    padding: 20px 0 0;
}
Please notice that we use rotateX and translateY properties to show and hide the main menu. Now, we should prepare the rules for our unordered list with images:
请注意,我们使用rotateX和translateY属性来显示和隐藏主菜单。 现在,我们应该为带有图像的无序列表准备规则:
/* the main menu - UL-LI properties */
.menu ul {
    display: block;
    margin: 0 auto;
    overflow: hidden;
    position: relative;
    width: 1036px;
}
.menu ul li {
    float: left;
    list-style: none outside none;
    margin: 10px;
    /* CSS3 transition */
    -webkit-transition: all 0.5s ease;
    -moz-transition: all 0.5s ease;
    -ms-transition: all 0.5s ease;
    -o-transition: all 0.5s ease;
    transition: all 0.5s ease;
}
.menu ul li:hover {
    background-color: #7e00d6;
    /* CSS3 border-radius */
    -webkit-border-radius: 64px;
    -moz-border-radius: 64px;
    -ms-border-radius: 64px;
    -o-border-radius: 64px;
    border-radius: 64px;
}
We use easy transition for our images – we change color and set the radius for them. When we keep our mouse over the menu – we should make the page a little bit darker (we are going to use the shade element – gradient):
我们对图像使用简单的过渡-我们更改颜色并为其设置半径。 当我们将鼠标悬停在菜单上时–我们应该使页面更暗一些(我们将使用阴影元素–渐变):
/* page's shade element (invisible by default) */
.page_content .shade {
    display: block;
    height: 100%;
    left: 0;
    opacity: 0;
    position: absolute;
    top: 0;
    visibility: hidden;
    width: 100%;
    z-index: 1000;
    /* CSS3 linear-gradient */
    background: -moz-linear-gradient(top,  rgba(0,0,0,0.15) 0%, rgba(0,0,0,0.65) 100%);
    background: -webkit-gradient(linear, top top, bottom top, color-stop(0%,rgba(0,0,0,0.15)), color-stop(100%,rgba(0,0,0,0.65)));
    background: -webkit-linear-gradient(top,  rgba(0,0,0,0.15) 0%,rgba(0,0,0,0.65) 100%);
    background: -ms-linear-gradient(top,  rgba(0,0,0,0.15) 0%,rgba(0,0,0,0.65) 100%);
    background: -o-linear-gradient(top,  rgba(0,0,0,0.15) 0%,rgba(0,0,0,0.65) 100%);
    background: linear-gradient(to bottom,  rgba(0,0,0,0.15) 0%,rgba(0,0,0,0.65) 100%);
    /* CSS3 transition */
    -webkit-transition: all 0.5s ease;
    -moz-transition: all 0.5s ease;
    -ms-transition: all 0.5s ease;
    -o-transition: all 0.5s ease;
    transition: all 0.5s ease;
}
And finally, we should enable our Shade and also we should rotate our page_content element when we hover the menu:
最后,当我们将鼠标悬停在菜单上时,我们应该启用我们的Shade并旋转我们的page_content元素:
/* when we hover on menu - turn page_content down */
.menu:hover ~ .page_content {
    /* CSS3 transform */
    -webkit-transform: rotateX(-45deg) translateY(80px);
    -moz-transform: rotateX(-45deg) translateY(80px);
    -ms-transform: rotateX(-45deg) translateY(80px);
    -o-transform: rotateX(-45deg) translateY(80px);
    transform: rotateX(-45deg) translateY(80px);
}
/* when we hover on menu - display the shade */
.menu:hover ~ .page_content .shade {
    opacity: 1;
    visibility: visible;
}
In the long run our animated 3D CSS3 menu is complete!
从长远来看,我们3D CSS3动画菜单已完成!
现场演示
结论 (Conclusion)
Have you liked this tutorial? If so – make sure to share it with your friends and share your thoughts in the comment section below.
您喜欢本教程了吗? 如果是这样,请确保与您的朋友分享并在下面的评论部分中分享您的想法。
翻译自: https://www.script-tutorials.com/css3-3d-top-shift-menu/


 1116
1116

 被折叠的 条评论
为什么被折叠?


