


php 最快框架
You may remember our past infatuation with Phalcon, the fastest PHP framework.
您可能还记得我们过去对最快PHP框架Phalcon的痴迷。
In this post, we’ll go through the process of getting it up and running in 5 minutes on one of our Homestead Improved instances. If you’re not interested in why or what Phalcon is, just skip ahead to “Setting it up”.
在本文中,我们将介绍在5分钟内在我们的Homestead Improvement实例上启动并运行它的过程。 如果您对Phalcon的用途或目的不感兴趣,请直接跳至“设置”。

回顾 (Recap)
If you’re not familiar with it, Phalcon is a PHP framework written in Zephir, a language mid-way between C and PHP that helps in developing PHP extensions without having to know C. It’s a golden middle ground which lets PHP developers develop highly optimized modules for their programming language environment without the overhead of learning a completely new language, because Zephir compiles into C, which is what PHP extensions are made of.
如果您不熟悉Phalcon,它是用Zephir编写PHP框架,Zephir是介于C和PHP之间的一种语言,可帮助您开发PHP扩展而不必了解C。这是让PHP开发人员高度开发的黄金中间地带由于Zephir编译为C,这是PHP扩展的组成部分,因此针对其编程语言环境优化了模块,而没有学习全新语言的开销。
Originally, Phalcon was an extension written in pure C – which made it incredibly fast. However, this also introduced massive overhead in fixing bugs or inspecting what’s going on under the hood when something doesn’t work the way it should. It also took ages to add new features, since developing in C is so much more difficult. In version 2, Phalcon was rewritten in Zephir, but as PHP 7 was looming on the horizon and announced a dramatic departure from the extension API of PHP 5+, Zephir could not compile code to PHP 7 compatible extensions and was left behind in PHP 5 land.
最初,Phalcon是用纯C语言编写的扩展-使其变得异常快速。 但是,这也增加了修复错误或检查当某些事情无法正常工作时引擎盖下发生的事情的大量开销。 由于使用C语言进行开发要困难得多,因此添加新功能也花费了很长时间。 在版本2中,Phalcon用Zephir进行了重写,但是随着PHP 7迫在眉睫,并宣布与PHP 5+扩展API的戏剧性偏离,Zephir无法将代码编译为与PHP 7兼容的扩展,并留在了PHP 5中土地。
We try to walk the bleeding edge here, and there was no more room for Phalcon in our arsenal. With our Homestead Improved box up and running and powering all our tutorials, and with PHP 7’s performance advances making up for any kind of speed gains Phalcon may have offered in PHP 5 time, the cost of installing Phalcon was no longer worth it in any way.
我们试图在这里走到最前沿,而在我们的军械库中没有更多的空间容纳Phalcon。 随着我们改进的Homestead盒的安装和运行以及为我们所有教程的运行提供动力,并且PHP 7的性能提升弥补了Phalcon在PHP 5中可能提供的任何速度提升,安装Phalcon的成本不再是值得的。
Recently, things have changed: Phalcon went 3.0 LTS.
最近,情况发生了变化: Phalcon达到了3.0 LTS 。
Apart from following Semver from now on, supporting the 3.0 version for the next 3 years, and various new features and changes you can read about in the post, the biggest update by far is the fact that Zephir now supports PHP 7, and allows for not only the compilation of Phalcon, but also the compilation of any other Zephir code into PHP 7 as well. You can now easily port your custom extensions to Zephir, and have them compiled into PHP 7 in a jiffy. A compiled framework combined with PHP 7’s performance gains offers unparalleled advantages in terms of speed and resource conservation.
除了从现在开始跟随Semver,支持未来3年的3.0版本以及您可以在文章中阅读的各种新功能和更改之外,到目前为止最大的更新是Zephir现在支持PHP 7,并允许不仅是Phalcon的编译,还包括任何其他Zephir代码到PHP 7的编译。 现在,您可以轻松地将自定义扩展移植到Zephir,并轻松地将它们编译到PHP 7中。 结合PHP 7的性能提升的已编译框架在速度和资源节省方面提供了无与伦比的优势。
设置 (Setting it Up)
We’ll now go through the process of setting up Phalcon 3 on a PHP 7 powered Homestead Improved instance. You can use any kind of environment you feel comfortable in, but the instructions below will be specific to an Ubuntu 16.04 instance with PHP 7+ installed, and things like Git and Wget present. We’ll also use the Homestead Improved way of defining new sites, via the Homestead.yaml file.
现在,我们将介绍在基于PHP 7的Homestead Improvement实例上设置Phalcon 3的过程。 您可以使用自己喜欢的任何环境,但是以下说明仅适用于安装了PHP 7+的Ubuntu 16.04实例,以及类似Git和Wget的东西。 我们还将通过Homestead.yaml文件,使用“ 改进的Homestead”方法定义新站点。
安装Phalcon (Installing Phalcon)
sudo apt-get install software-properties-common
sudo apt-add-repository ppa:phalcon/stable
sudo apt-get update
sudo apt-get install php7.0-phalcon
sudo phpenmod -v 7.0 -s ALL phalcon
sudo service php7.0-fpm restart
The second to last command is a shortcut command to enable a PHP extension. The -v flag tells it which PHP version to activate it for (we want only 7.0 here) and which SAPI (command line, FPM, or both – we want both).
倒数第二个命令是启用PHP扩展的快捷命令。 -v标志告诉它激活哪个PHP版本(在这里我们只需要7.0)和哪个SAPI(命令行,FPM,或者两者都需要)。
If this tool is not available on your system, then just copy the ini file into the extensions folder like so:
如果您的系统上没有此工具,则只需将ini文件复制到extensions文件夹中,如下所示:
sudo cp /etc/php/7.0/mods-available/phalcon.ini /etc/php/7.0/fpm/conf.d/20-phalcon.ini
sudo cp /etc/php/7.0/mods-available/phalcon.ini /etc/php/7.0/cli/conf.d/20-phalcon.ini
The 20 prefix indicates priority, in case some extensions need to be loaded before others. This is not the case here.
前缀20表示优先级 ,以防某些扩展名需要先加载。 这里不是这种情况。
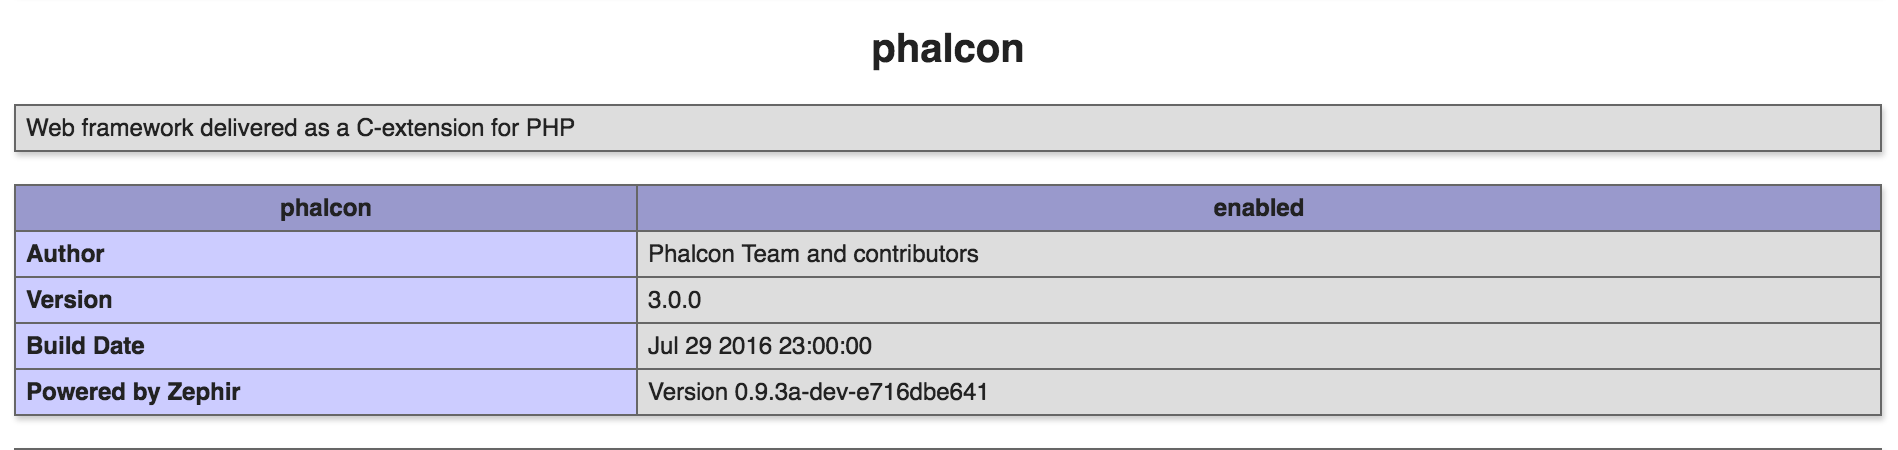
We’ve now unleased the beast. Looking at phpinfo(), it’s there.
我们现在释放了那只野兽 。 查看phpinfo() ,它在那里。
演示Phalcon应用 (Demo Phalcon App)
We can test things on a demo Phalcon application – the finished Invo app.
我们可以在演示的Phalcon应用程序(完成的Invo应用程序)上测试事物。
为Phalcon配置Nginx (Configuring Nginx for Phalcon)
We need to add our app into the Sites block of Homestead.yaml:
我们需要将我们的应用程序添加到Homestead.yaml的Sites块中:
- map: phalcon-tut.app
      to: /home/vagrant/Code/phalcon-tut/public
Make sure phalcon-tut.app or what ever vhost name you choose is added to your host OS /etc/hosts file in order to resolve to the VM’s IP address.
确保将phalcon-tut.app或您选择的任何虚拟主机名添加到主机OS /etc/hosts文件中,以便解析为VM的IP地址。
Of course, we also need to run vagrant provision outside the VM in order to apply this Nginx setup.
当然,为了应用此Nginx设置,我们还需要在VM外部运行vagrant provision配置。
Finally, we edit Nginx’s location block, and change from
最后,我们编辑Nginx的location块,然后从
location / {
        try_files $uri $uri/ /index.php?$query_string;
    }
to
至
location / {
        try_files $uri $uri/ /index.php?_url=$uri&$args;
    }
We need to restart Nginx to apply the changes:
我们需要重新启动Nginx以应用更改:
sudo service nginx restartThis takes care of the server end of things.
这可以照顾服务器端的事情。
引导应用 (Bootstrapping the app)
cd /home/vagrant/Code
git clone https://github.com/phalcon/invo phalcon-tut
Once the app has been cloned, we need to initialize its database, as per instructions. We’ll update those to be a bit more modern, by using utf8mb4 instead of utf8.
克隆应用后,我们需要按照说明初始化其数据库。 我们将使用utf8mb4而不是utf8将其更新为更现代的utf8mb4 。
echo 'CREATE DATABASE invo CHARSET=utf8mb4 COLLATE=utf8mb4_unicode_ci' | mysql -u homestead -psecret
cat schemas/invo.sql | mysql -u homestead -psecret invo
There’s one more step which isn’t described in the app’s repo – changing the baseUri in the configuration. We have to go into app/config/config.ini and change baseUri to /, otherwise assets (JS/CSS) will fail to load.
该应用程序的回购中没有描述另外一个步骤-更改配置中的baseUri。 我们必须进入app/config/config.ini并将baseUri更改为/ ,否则资产(JS / CSS)将无法加载。
After doing that, sure enough, INVO is up and running.
这样做之后,可以肯定的是,INVO已启动并正在运行。

结论 (Conclusion)
In this tutorial, we quickly configured Phalcon to run on Homestead Improved and PHP 7, and got a demo app up and running. With installation instructions significantly simplified compared to what they were, and with ready-made apps to test it out thoroughly, why not go for a Phalcon test run and tell us what you think?
在本教程中,我们快速配置了Phalcon使其可以在Homestead Improvementd和PHP 7上运行,并启动了一个演示应用程序。 与安装指南相比,安装指南显着简化,并且可以使用现成的应用程序对其进行全面测试,为什么不进行Phalcon测试并告诉我们您的想法呢?
Now that Phalcon is available on PHP 7, will you be using it for any of your new projects? How do you feel about Zephir – would you use it to close-source or hyper-optimize any of your microservices / modules, or do you still feel like that’s too much overhead?
既然Phalcon已在PHP 7上可用,您将在任何新项目中使用它吗? 您对Zephir的感觉如何–您将使用它来关闭源代码或对任何微服务/模块进行超优化,还是仍然觉得那是过多的开销?
翻译自: https://www.sitepoint.com/up-and-running-with-the-fastest-php-framework-on-php7-in-5-mins/
php 最快框架


 308
308

 被折叠的 条评论
为什么被折叠?
被折叠的 条评论
为什么被折叠?
 到【灌水乐园】发言


