


Throughout this tutorial I will be outlining how you can leverage the jQuery Interactions libraries to create more interactive and easy to manage admin areas and elements.
在本教程中,我将概述如何利用jQuery Interactions库来创建更具交互性且易于管理的管理区域和元素。
We will start off with an explanation of what these interactions are along with a summary of the three main libraries we will be using; dragable, dropable and sortable.
我们将从对这些交互作用的解释开始,并对将要使用的三个主要库进行总结。 可拖动,可拖放和可排序。
After we have covered the basics of these libraries I will show you how they can be used in a real world situation to extend your administration areas and create interactive zones.
在介绍了这些库的基础知识之后,我将向您展示如何在现实世界中使用它们来扩展您的管理区域并创建交互式区域。
什么是jQuery互动? (What are jQuery Interactions?)
jQuery Interactions are a collection of different libraries that have been created to abstract away some of the fundamental difficulties of building interactive interfaces.
jQuery Interactions是不同库的集合,这些库的创建是为了消除构建交互界面的一些基本困难。
These scripts are part of the jQuery UI (user interface) family and handle interactions such as dragging, dropping and sorting; with these libraries we can create complex functionality without the need of reinventing the wheel.
这些脚本是jQuery UI(用户界面)家族的一部分,并处理诸如拖放,排序和排序之类的交互。 使用这些库,我们可以创建复杂的功能,而无需重新发明轮子。
加载jQuery Interactions库 (Loading the jQuery Interactions Libraries)
WordPress comes pre-intstalled with all of the interactions libraries (such as draggable and droppable). All you need to do is enqueue the required script on either the front end or back end of your site and you will be able to leverage the library however you want.
WordPress预先安装了所有交互库(例如可拖动和可放置)。 您需要做的就是将所需的脚本放入站点的前端或后端,然后您就可以根据需要利用该库。
WordPress often enqueues some of the interaction libraries in the administration areas. For example, when on the ‘widgets’ admin screen both draggable and droppable are already loaded (which provides the draggable interface for managing your sidebars / widgets) However it is often better to implicitly load the script you want just in case.
WordPress通常会在管理区域加入一些交互库。 例如,在“小部件”管理屏幕上,已经同时加载了可拖动和可拖放两种方式(这提供了用于管理侧边栏/窗口小部件的可拖动界面)。但是,通常最好隐式加载所需的脚本,以防万一。
You can enqueue the interaction library you want by hooking onto either the wp_enqueue_scripts or admin_enqueue_scripts hooks. These hooks will let you enqueue your script on either the front end or back end respectively.
您可以通过钩在wp_enqueue_scripts或admin_enqueue_scripts钩上来排队所需的交互库。 这些挂钩可以让您分别在前端或后端排队您的脚本。
You will need to edit either your child theme’s functions.phpfiles or another location (such as your plugin file if you are writing a plugin) and hook onto the appropriate hook as displayed below.
您将需要编辑子主题的functions.php文件或其他位置(例如,如果您正在编写插件,则为插件文件),然后连接到相应的钩子,如下所示。
You will call the wp_enqueue_scriptfunction to load your script. Since we want to enqueue scripts that are preinstalled with WordPress we simply need to pass the correct name of the library (you can get a listing of all included scripts by going to the codex page for wp_enqueue_scripts).
您将调用wp_enqueue_script函数来加载脚本。 由于我们想让WordPress预先安装的脚本入队,我们只需要传递正确的库名即可(您可以通过转到wp_enqueue_scripts的Codex页面获得所有包含的脚本的列表)。
Since we will be looking at draggable, droppable and sortable here are the names you need to enqueue:
由于我们将研究可拖动,可拖放和可排序,因此这里是您需要排队的名称:
- jquery-ui-draggable jquery-ui-draggable
- jquery-ui-droppable jquery-ui-droppable
- jquery-ui-sortable jquery-ui-sortable
在前端排队 (Enqueuing on the front end)
Create a function and hook it onto the wp_enqueue_scripts hook.
创建一个函数并将其挂钩到wp_enqueue_scripts挂钩。
//enqueue draggable on the front end
function enqueue_scripts_front_end(){
	wp_enqueue_script('jquery-ui-draggable');
}
add_action('wp_enqueue_scripts','enqueue_scripts_front_end');
在后端排队 (Enqueuing on the back end)
Create a function and hook it onto the admin_enqueue_scripts hook.
创建一个函数并将其挂钩到admin_enqueue_scripts挂钩。
//enqueue droppable on the back end
function enqueue_scripts_front_end(){
	wp_enqueue_script('jquery-ui-droppable');
}
add_action('admin_enqueue_scripts','enqueue_scripts_front_end');
Enqueuing like this will let WordPress handle the loading of the library and all of its prerequisites (as most of the interaction library has several dependent files that it relies on).
这样排队就可以使WordPress处理库的加载及其所有先决条件(因为大多数交互库都有其依赖的几个相关文件)。
可拖动,可拖放和可排序的快速摘要 (Draggable, Droppable and Sortable a quick summary)
Overall the interaction libraries let you create interactions and movement with objects without having to do all of the hard work yourself. Explaining the libraries and all they can do is beyond the scope of this tutorial, however here are my thoughts on the libraries.
总体而言,交互库使您可以创建与对象的交互和移动,而无需自己进行所有艰苦的工作。 解释库及其所有功能超出了本教程的范围,但是,这是我对库的看法。
可拖动 (Draggable)
Exactly as it sounds, you can create draggable movements and is often used to drag elements from one area to another (commonly between lists).
听起来确实如此,您可以创建可拖动的移动,并且通常用于将元素从一个区域拖动到另一个区域(通常在列表之间)。
可滴 (Droppable)
The area in which your draggables will be dropped. There can be many areas you want to drop your things into, or maybe just one.
可拖动对象将放置的区域。 您可能想在很多地方放东西,或者可能只是一个地方。
Generally it is within the droppable API you move your items and do other actions (such as detecting when your draggable enters or leaves a correct area etc).
通常,它在可放置API中,您可以移动项目并执行其他操作(例如检测可拖动对象何时进入或离开正确区域等)。
可排序 (Sortable)
This lets you easily move your items around without having to position them yourself. This is great for when you have a collection of items and their position is crucial.
这使您可以轻松地移动项目,而无需自己放置它们。 当您有一系列项目并且它们的位置至关重要时,这非常有用。
真实示例–可拖放,可拖动和可排序的相关页面模块 (A Real World Example – A Droppable, Draggable and Sortable Related Pages Module)
Let’s look at a scenario where you might want to take advantage of the interaction libraries to create dynamic useful controls for your admin users (or yourself if you manage multiple sites).
让我们看一下一种情况,在这种情况下,您可能想利用交互库为管理员用户(或者如果您管理多个站点,则是您自己)创建动态有用的控件。
Pages contain two areas that you can edit. The title of the page and the content of the page.
页面包含两个可以编辑的区域。 页面title和页面content 。
While this is often all you need on your page, occasionally you might want to have additional information or functionality.
尽管这通常是页面上所需要的,但有时您可能希望获得其他信息或功能。
For example, if you wanted the page to link to additional areas in a controlled way you would either have to use shortcodes at the bottom of your content area or you might have to use a special page template.
例如,如果您希望页面以受控方式链接到其他区域,则可能不得不在内容区域底部使用短代码,或者可能必须使用特殊的页面模板。
What we can do is create new functionality for our pages that would allow the admin user to define links to other pages of the website. In this way the user would be able to manage links at the bottom of the page without having to edit the content area at all.
我们可以做的是为我们的页面创建新功能,使管理员用户可以定义指向网站其他页面的链接。 这样,用户将能够管理页面底部的链接,而不必完全编辑content区域。
Creating a drop and drag solution along with ordering would be perfect in this situation.
在这种情况下,创建拖放解决方案以及排序将是完美的选择。
我们需要做的总结 (A summary of what we need to do)
In our scenario we will be expanding on our pages administration functionality; We will be creating an interface in which users can select additional pages to be linked to the bottom of the current page. This interface will be a simple drop and drag interface with the option to re-sort page links.
在我们的场景中,我们将扩展pages管理功能; 我们将创建一个界面,用户可以在其中选择要链接到当前页面底部的其他页面。 该界面将是一个简单的拖放界面,可以选择对页面链接进行重新排序。
Here is a breakdown of how we will proceed:
以下是我们将如何进行的细分:
- Create your CSS and JS files 创建您CSS和JS文件
- Create a new meta box for pages 为页面创建一个新的元框
- Add a list of ‘draggable’ elements 添加“可拖动”元素列表
- Add the ‘droppable’ element 添加“可投放”元素
- Saving the related pages 保存相关页面
- The CSS elements CSS元素
- The jQuery elements jQuery元素
- Outputting the related pages 输出相关页面
We will go through each of these step by step, outlining what we need to do.
我们将逐步介绍所有这些步骤,概述我们需要做的事情。
1 –创建CSS和JS文件 (1 – Create your CSS and JS files)
Before we begin we will need to load an additional CSS and JS file for our custom styling and scripting respectively.
在开始之前,我们将需要分别加载其他CSS和JS文件以用于我们的自定义样式和脚本。
These files need to run only on the admin back-end so you will need to enqueue these two scripts and styles to the admin_enqueue_scripts hook as follows.
这些文件仅需要在admin后端上运行,因此您需要按以下步骤将这两个脚本和样式加入admin_enqueue_scripts挂钩。
//enqueue the admin scripts / styles for the related pages functionality
function enqueue_related_pages_scripts_and_styles(){
	wp_enqueue_style('related-pages-admin-styles',  get_stylesheet_directory_uri() . '/admin-related-pages-styles.css');
	wp_enqueue_script('releated-pages-admin-script', get_stylesheet_directory_uri() . '/admin-related-pages-scripts.js', array('jquery','jquery-ui-droppable','jquery-ui-draggable', 'jquery-ui-sortable'));
}
add_action('admin_enqueue_scripts','enqueue_related_pages_scripts_and_styles');
You will place all of your styling and scripting into these two files. They will be used in combination with the PHP code we will be writing.
您将所有样式和脚本放入这两个文件中。 它们将与我们将要编写PHP代码结合使用。
2 –为页面创建一个新的元框 (2 – Create a new meta box for pages)
We need to firstly create a new meta box that will hold our related pages functionality. Start by creating a function and attaching it to the add_meta_boxes hook. Inside this function we will be calling the add_meta_box functionality that defines the new meta box, what post type it relates to and other associated information.
我们首先需要创建一个新的元框,其中将包含我们相关页面的功能。 首先创建一个函数并将其附加到add_meta_boxes挂钩。 在此函数内部,我们将调用add_meta_box功能,该功能定义新的元框,与之相关的帖子类型以及其他相关信息。
Put the following code in your functions.php or applicable file.
将以下代码放入您的functions.php或适用文件中。
//Add a meta box to the 'pages' post type
function add_related_pages_meta_box_to_pages() {
	add_meta_box(
		'related_pages_meta_box', //unique ID
		'Related Pages', //Name shown in the backend
		'display_related_pages_meta_box', //function to output the meta box
		'page', //post type this box will attach to
		'normal', //position (side, normal etc)
		'default' //priority (high, default, low etc)
	);
}
add_action('add_meta_boxes','add_related_pages_meta_box_to_pages');
For additional information on the add_meta_box function you can view its codex page (to see how you customise various elements of the meta box).
有关add_meta_box函数的其他信息,您可以查看其Codex页面 (以了解如何自定义meta框的各种元素)。
Now we define our function called display_related_pages_meta_box. This function will be used to display the meta box and as such it takes in a single value of $post.
现在,我们定义名为display_related_pages_meta_box的函数。 此函数将用于显示meta框,因此它将采用$post的单个值。
//defines the output for our related pages meta box
function display_related_pages_meta_box($post){
}
3 –添加“可拖动”元素列表 (3 – Add a list of ‘draggable’ elements)
After we have the meta box set up we need to create a listing of all pages on the website.
设置完元框后,我们需要创建网站上所有页面的列表。
We need to collect all of the pages and then display them visually as block elements we can set as ‘draggable’ for our interface.
我们需要收集所有页面,然后将它们可视化显示为可设置为界面“可拖动”的块元素。
Inside the add_related_pages_meta_box_to_pages function add the following code.
在add_related_pages_meta_box_to_pages函数内部,添加以下代码。
//create nonce
wp_nonce_field('pages_meta_box','pages_meta_box_nonce');
//collect related pages (if we already have some)
$related_pages = get_post_meta($post->ID,'related_pages',true);
//collect all pages on the website
$page_args = array(
'posts_per_page' => -1,
'post_type' => 'page',
'post_status' => 'publish',
'orderby' => 'post_date',
'order' => 'DESC',
'fields' => 'ids'
);
$pages = get_posts($page_args);
//if we have pages to display
if($pages){
echo '<div class="related_pages">';
//left container (all pages)
echo '<div class="left_container">';
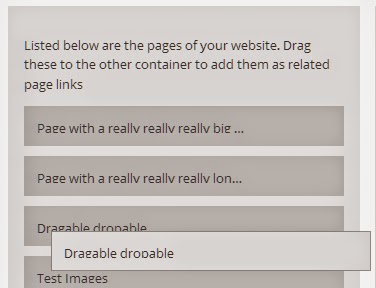
echo '<p> Listed below are the pages of your website.</p>';
echo '<p>Drag these to the other container to add them as related page links </p>';
//loop through all pages
foreach($pages as $page){
//collect their id and name and create the page item
$page_id = $page;
$page_name = get_the_title($page_id);
echo '<div class="page_item" data-page-id="' . $page_id . '">';
echo '<div class="page_title">' . $page_name . '</div>';
echo '<div class="remove_item"> Remove </div>';
echo '</div>';
}
echo '</div>';
//end left container
echo '<div class="clearfix"></div>';
echo '</div>';
}Let’s break down what exactly we are doing here.
让我们分解一下我们到底在做什么。
We first set the nonce for the page (the nonce is a security method to ensure that when we submit forms we know it came securely). Check the wp_nonce_field function on the codex page. Overall the nonce will output a hidden input type with a value. The first argument is the admin name of the nonce and the second is the name that the hidden input will have (so it can be retrieved and checked later).
我们首先为页面设置随机数(随机数是一种安全方法,可确保在提交表单时我们知道它是安全的)。 检查代码页上的wp_nonce_field 函数 。 总体而言,随机数将输出带有值的隐藏输入类型。 第一个参数是现时的管理员名称,第二个参数是隐藏输入将具有的名称(因此可以在以后检索和检查)。
We continue by collecting the meta value of related_pages into a variable. This is a post meta field that contains a JSON encoded string representing all of the related pages we want saved. We collect it now so we can use it later in our droppable section.
我们继续将related_pages的元值收集到一个变量中。 这是一个发布元字段,其中包含JSON编码的字符串,表示我们要保存的所有相关页面。 我们现在收集它,以便稍后在可放下部分中使用它。
We use get_post_meta to get the meta value by passing in the ID of the page, the name of the meta field and specifying true so that we return only one field. Have a look at the function definition on the codex.
我们使用get_post_meta来获取元值,方法是传入页面的ID,元字段的名称并指定true,以便仅返回一个字段。 看一下法典上的功能定义。
We are creating a listing of pages by supplying arguments to the get_posts functions (in this case it returns a listing of post ID’s representing the post).
我们通过向get_posts函数提供参数来创建页面列表(在这种情况下,它返回代表帖子的帖子ID列表)。
We loop through all of the pages and collect their ID and title.
我们遍历所有页面并收集其ID和标题。
Using this information we create a page item with a data-page-id attribute corresponding with the page ID (this will later on in jQuery). We add the title of the page along with a remove button.
使用此信息,我们创建一个页面项目,该页面项目的data-page-id属性与页面ID对应(稍后将在jQuery中使用)。 我们添加页面标题以及一个删除按钮。
4 –添加“可放置”元素 (4 – Add the ‘droppable’ element)
We need to create an area for the draggable items to be dropped. Once items have been dropped here they can be sorted as we like.
我们需要为拖放的项目创建一个区域。 将物品放到此处后,便可以按照我们的喜欢对其进行分类。
Go back to the add_related_pages_meta_box_to_pages function and look for the comment that says //end left container. We are going to add additional code after this comment, it will be right after the end of theleft_container but right before the clearix div and the end of the related_pages div.
返回到add_related_pages_meta_box_to_pages函数,并查找表示//end left container的注释。 我们将这一评论后添加额外的代码,这将是结束之后left_container但前右clearix DIV和结束related_pages股利。
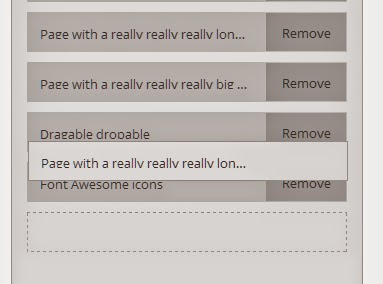
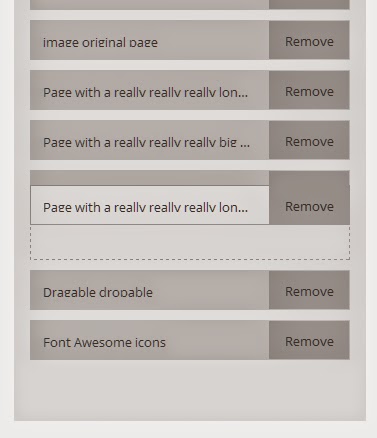
//Right container
echo '<div class="right_container">';
echo 	'<p>Drag pages from the left container onto this container </p>';
//if we have previous saved related pages
if(!empty($related_pages)){
	$related_pages_array = json_decode($related_pages);
	foreach($related_pages_array as $related_page){
		//page information
		$page_id = $related_page;
		$page_name = get_the_title($page_id);

		echo '<div class="page_item" data-page-id="' . $page_id . '">';
		echo 	'<div class="page_title">' . $page_name . '</div>';
		echo 	'<div class="remove_item active"> Remove </div>';
		echo 	'<input type="hidden" name="related_pages[]" value="' . $page_id . '"/>';
		echo '</div>';
	}
}
echo 	'<div class="droppable-helper"></div>';
echo '</div>';
Let’s go through this code so you can see what we are doing.
让我们看一下这段代码,以便您可以看到我们在做什么。
We create the right container to hold our sortable / draggable page items.
我们创建合适的容器来容纳我们的可排序/可拖动页面项。
We look at the related_pages variable we collected before which contains a listing of our already saved page items (on the first edit of a page or if we haven’t chosen anything this will be empty).
我们查看之前收集的related_pages变量,其中包含我们已保存的页面项的列表(在页面的第一次编辑中,或者如果我们未选择任何内容,则该字段将为空)。
If this variable is not empty we decode it using json_decode. This function turns a JSON encoded string value into an array so we can loop through each (look at the PHP documentation if you are interested).
如果此变量不为空,则使用json_decode对其进行json_decode 。 此函数将JSON编码的字符串值转换为数组,因此我们可以遍历每个数组( 如果您有兴趣,请查看PHP文档 )。
Now we loop through the related pages array with foreach and collect the ID representing the page. We in addition collect the pages name using the get_the_title function (view the codex for more information).
现在,我们使用foreach相关的页面数组,并收集代表该页面的ID。 此外,我们还使用get_the_title函数收集页面名称( 有关更多信息 ,请get_the_title )。
For each of the related pages, we create a page item; this page item has the class page_item and also a data attribute called data-page-id that contains the ID of the page.
对于每个相关页面,我们创建一个页面项; 该页面项具有page_item类,还有一个名为data-page-id的数据属性,其中包含页面的ID。
Inside the item we specify a remove button (which will be used later so we can remove the item).
在项目内部,我们指定了一个删除按钮(稍后将使用,因此我们可以删除该项目)。
Also inside the item we define the hidden field input that contains the value of the page itself. This will be the value that is passed to the form on submit (which we will then save). Notice that the name is related_pages[] with an []. This is important as it means on the form when we process we will be supplying an array of pages.
同样在项目内部,我们定义了包含页面本身值的隐藏字段输入。 这将是提交时传递给表单的值(然后我们将保存该值)。 注意,该名称是带有[] related_pages[] [] 。 这很重要,因为这意味着在处理表单时,我们将提供一系列页面。
Finally, outside of the page item we create a droppable helper item that we will use to make dropping items into this zone easier (when you drag an item from the left container to the right container this will activate and will show you where you should drag the item).
最后,在页面项之外,我们创建了一个可放置的帮助器项,我们将使用它来简化将项拖放到该区域中的操作(当您将一项从左侧容器拖到右侧容器中时,该选项将被激活并向您显示应拖动的位置该项目)。
5 –保存相关页面 (5 – Saving the related pages)
By this point we have created two containers, one for the listing of all pages and a second for where these pages will be dragged and sorted.
至此,我们已经创建了两个容器,一个用于列出所有页面,另一个用于拖动和排序这些页面。
Currently without the jQuery they won’t do anything. However, once you have this set up correctly you will be able to drop and drag items from the list into the other list and in doing so you will get a series of hidden inputs that will be passed on pressing save. This is where we need to define our saving function so that we can take these values and put them into a meta value.
当前没有jQuery他们什么也不会做。 但是,一旦正确设置好此设置,就可以将列表中的项目拖放到另一个列表中,这样您将获得一系列隐藏的输入,这些输入将在按保存时传递。 这是我们需要定义保存功能的地方,以便我们可以采用这些值并将其放入元值中。
Copy the following into your functions.php file or similar.
将以下内容复制到您的functions.php文件或类似文件中。
//save our related pages meta information for pages
function save_meta_information_for_page($post_id){

	//test for existence of nonce
	if(!isset($_POST['pages_meta_box_nonce'])){
		return $post_id;
	}
	//verify nonce
	if(!wp_verify_nonce($_POST['pages_meta_box_nonce'],'pages_meta_box')){
		return $post_id;
	}
	//if not autosaving
	if(defined('DOING_AUTOSAVE') && DOING_AUTOSAVE){
		return $post_id;
	}
	//check permissions
	if(!current_user_can('edit_page',$post_id)){
		return $post_id;
	}


	//SAFE to save data, let's go
	$related_pages_value = '';
	//collect related pages (if set)
	if(isset($_POST['related_pages'])){
		$related_pages_array = $_POST['related_pages'];
		$related_pages_value = json_encode($related_pages_array);
	}

	//update post meta
	update_post_meta($post_id,'related_pages',$related_pages_value);

}
add_action('save_post_page','save_meta_information_for_page');
Let’s break down what exactly we are doing.
让我们分解一下我们到底在做什么。
Firstly we create a function called save_meta_information_for_page and attach it to the save_post_page hook. This hook will fire only when pages are saved / updated. You could use the generic save_post hook (and check the post type inside), however this newer action lets you target specific post types (learn about how to use it on the save_post codex page).
首先,我们创建一个名为save_meta_information_for_page的函数,并将其附加到save_post_page挂钩。 仅当保存/更新页面时,此钩子才会触发。 您可以使用通用的save_post钩子(并检查内部的帖子类型),但是此更新操作使您可以定位特定的帖子类型( 在save_post Codex页面上了解如何使用它 )。
Inside this function we perform security checking before we do anything else.
在执行此功能之前,我们先执行安全检查。
We first test for the existence of the nonce and then verify to ensure it is correct (if it fails we don’t proceed).
我们首先测试随机数的存在性,然后进行验证以确保其正确(如果失败,则不会继续)。
After this we check to make sure we are not auto-saving, we are only interested in full page updates via the save button.
此后,我们检查以确保不自动保存,我们只对通过保存按钮进行的整页更新感兴趣。
Finally we ensure that the user can access this page and edit it using the current_user_can function. This function determines if the current logged in user can perform certain actions. In our case if the user can edit the page they are refused (Read more about this on its codex page).
最后,我们确保用户可以访问此页面并使用current_user_can函数对其进行编辑。 此功能确定当前登录的用户是否可以执行某些操作。 在我们的情况下,如果用户可以编辑页面,则会被拒绝(请在其法典页面上阅读有关此内容的更多信息 )。
Once we are sure that the page is secure we can begin our processing.
一旦确定页面安全,就可以开始处理。
We define an empty variable $related_pages_value that will be used to hold our related pages info.
我们定义一个空变量$related_pages_value ,该变量将用于保存我们的相关页面信息。
We check the global $_POST variable to see if any hidden input fields called related_pages have come through. If we do have them we assign them to a variable (which will come through as an array). We call the json_encode function to turn this array into a long string we can then save (take a look at the json_encode function if you are interested).
我们检查全局$_POST变量,以查看是否有任何名为related_pages隐藏输入字段通过。 如果确实有它们,则将它们分配给一个变量(它将作为数组出现)。 我们调用json_encode函数将这个数组转换成一个长字符串,然后可以保存( 如果您感兴趣,请看json_encode函数 )。
As a last step, we call the update_post_meta function to save this newly created string representing our page values (check out the codex entry for this here). This will ensure that when we come back into the page later we can retrieve these values and automatically put them in the right hand column for our related pages.
最后一步,我们调用update_post_meta函数来保存此新创建的字符串,该字符串表示我们的页面值( 在此处查看此法典条目 )。 这将确保以后再返回页面时,我们可以检索这些值并将其自动放入相关页面的右侧列中。
6 – CSS元素 (6 – The CSS elements)
Overall you will need some basic CSS for this tutorial.
总体而言,本教程将需要一些基本CSS。
Our system will consist of two containers, one for the listing of all pages and the other for our desired related pages.
我们的系统将包含两个容器,一个用于列出所有页面,另一个用于我们想要的相关页面。
Inside these lists we will have page items that represent the page itself. These items will have a name and a remove button (when they are dragged to the related pages area).
在这些列表中,我们将具有代表页面本身的页面项目。 这些项目将具有一个名称和一个“删除”按钮(将它们拖到相关页面区域时)。
Please go ahead and open up the admin CSS file you enqueued earlier called admin-related-pages-styles.css and add the following.
请继续并打开您先前排队的admin CSS文件admin-related-pages-styles.css并添加以下内容。
/*Clearfix for floating elements*/
.clearfix:before,
.clearfix:after {
    content: " ";
    display: table;
}
.clearfix:after{
	clear: both;
}

/*left and right containers*/
.related_pages .left_container,
.related_pages .right_container{
	float: left;
	min-height: 80px;
	width: auto;
	background: #eee;
	padding: 15px;
	-webkit-box-sizing: border-box;
	-moz-box-sizing: border-box;
	box-sizing: border-box;
	display: block;
	padding-bottom: 50px;
	border: solid 1px transparent;
	margin-right: 15px;
}
/*simple description field before page items*/
.related_pages .description{
	width: 320px;
}
/*page item itself*/
.related_pages .page_item{
	padding: 12px;
	background: #ccc;
	height: 40px;
	margin-bottom: 10px;
	width: 320px;
	display: block;
	-moz-box-sizing: border-box;
	box-sizing: border-box;
	position: relative;
	border: solid 1px transparent;
	position: relative;
	z-index: 1;
}
/*title for the pages*/
.page_item .page_title{
	position: relative;
	width: calc(100% - 85px);
	height: 100%;
	white-space: nowrap;
	overflow: hidden;
	text-overflow: ellipsis;
}

/*removing an item from related pages*/
.page_item .remove_item{
	display: none;
	position: absolute;
	top: 0px;
	right: 0px;
	height: 100%;
	line-height: 40px;
	padding: 0px 10px;
	box-sizing: border-box;
	background: #aaa;
	width: 80px;
	text-align: center;
	cursor: pointer;
}
.page_item .remove_item.active{
	display: block;
}

/*page item while dragging*/
.related_pages .page_item.ui-draggable-dragging,
.related_pages .page_item.ui-sortable-helper {
	border: solid 1px #aaa;
	background: #eee;
}

/*dragging item over droppable zone*/
.right_container.hover-over-draggable{
	border: solid 1px #aaa;
}

/*placeholder text for sorting items*/
.related_pages .my-placeholder{
	height: 40px;
	border: dashed 1px #aaa;
	margin-bottom: 10px;
	-moz-box-sizing: border-box;
	box-sizing: border-box;
	width: 320px;
}
/*placeholder for when hovering over droppable*/
.related_pages .droppable-helper{
	width: 320px;
	height: 40px;
	border: dashed 1px #aaa;
	margin-bottom: 10px;
	display: none;
	-moz-box-sizing: border-box;
	box-sizing: border-box;
}
.droppable-helper.active{
	display: block;
}
On a side note, your styles and design can vary; feel free to change this to however you want (as basically all we are doing is adding items from one list to another).
附带一提,您的样式和设计可能会有所不同。 您可以随意将其更改为所需的名称(因为基本上我们要做的就是将一个列表中的项目添加到另一个列表中)。
7 – jQuery元素 (7 – The jQuery elements)
Now that all of the PHP has been set up we can look at the jQuery and how we intent to use the draggable, droppable and sortable libraries.
既然已经设置了所有PHP,我们就可以看看jQuery,以及我们打算如何使用可拖动,可拖放和可排序的库。
First go into your admin jQuery file called admin-related-pages-scripts.js and add the following code.
首先进入名为admin-related-pages-scripts.js管理jQuery文件,并添加以下代码。
//trigger on document ready
jQuery(document).ready(function($){
});
This document ready has been loaded in no-conflict mode. All of our code will go inside this function and attach to the $ item.
此文档就绪已以无冲突方式加载。 我们所有的代码都将放在此函数内并附加到$项目。
左侧可拖动区域 (Left hand side draggable area)
The draggable library is extensive so please feel free to view the API for a full listing of its options, methods and events.
draggable库非常广泛,因此请随时查看API以获取其选项,方法和事件的完整列表 。
The left hand side container has a listing of all the page items. When we find a page we like in the left hand side container, we will drag it to the right hand container. When dropped the item will be copied into this list, ready to be sorted and saved.
左侧容器具有所有页面项目的列表。 当我们在左侧容器中找到我们喜欢的页面时,会将其拖到右侧容器中。 放下该项目后,该项目将被复制到此列表中,可以进行排序和保存。
/*Draggable Area*/
$('.left_container .page_item').draggable({
	helper: 'clone',
	revert: 'invalid',
	scope: 'related_pages_scope',
	cursor: 'move',
	zIndex: 5
});
We begin by finding the left_container item and its inner items called page_item (which as you remember are items representing each page).
我们首先找到left_container项目及其内部称为page_item项目(您记得这些是代表每个页面的项目)。
We call the draggable function (which is part of the draggable library we enqueued previously). This function takes several options however I have specified just a few to get the functionality I wanted.
我们称为draggable函数(它是我们先前排队的可拖动库的一部分)。 此功能有几个选项,但是我仅指定了几个选项即可获得所需的功能。
helper– ‘clone’ means that it will create an identical copy of the item you are dragging (so we can see it as we move it around)helper–“克隆”意味着它将为您拖动的项目创建相同的副本(以便我们在移动项目时可以看到它)revert– ‘invalid’ means that unless we drop this thing into the right container it will bounce back in an animated style (the helper will release and the item will go back to the same location as the dragged item, letting you know nothing has happened)revert-“无效”表示除非将其放到正确的容器中,否则它将以动画样式弹回(助手将释放,并且该项目将返回到与拖动的项目相同的位置,从而让您知道什么都没有发生)cursor– ‘move’ is the style that your mouse cursor will have when you start dragging. This is an aesthetic choicecursor–“ move”是开始拖动时鼠标光标的样式。 这是一个美学选择scope– ‘related_pages_scope’ is a special name that both the draggable and the droppable will share. This option helps link zones together so that they will recognize when a draggable can be dropped successfullyscope–“ related_pages_scope”是一个特殊名称,可拖动对象和可放置对象都将共享它们。 此选项有助于将区域链接在一起,以便它们识别何时可以成功拖放可拖动对象zIndex– 5 is the value I give to thepage_itemelements we are dragging around. In our CSS we have set thepage_itemto have z-index 1 so when we drag these items they will sit higher than our existing page itemszIndex– 5是我赋予我们要拖动的page_item元素的值。 在我们CSS中,我们将page_item设置为具有z-index 1,因此,当我们拖动这些项目时,它们的位置会比我们现有的页面项目高
When you have this set up you should be able to drag your page items around.
进行此设置后,您应该可以拖动页面项目。
右侧可滴落区域 (Right hand side droppable area)
The droppable library is extensive so please feel free to view the API for a full listing of its options, methods and events.
droppable库内容丰富,因此请随时查看API以获取其选项,方法和事件的完整列表 。
The right hand side container is where we will be dragging all of the page items. Each item will be dropped here and then later sorted in the desired order. Start by adding the following code.
右侧容器是我们将拖动所有页面项的位置。 每个项目都将放在这里,然后按所需顺序排序。 首先添加以下代码。
/*Droppable Area*/
$('.right_container').droppable({
	accept: '.page_item',
	scope: 'related_pages_scope',
	hoverClass: 'hover-over-draggable',
	tolerance: 'touch',
	drop: function(event,ui){

		//define items for use
		var drop_helper = $('.right_container').find('.droppable-helper');
		var page_item = ui.draggable.clone();

		//on drop trigger actions
		page_item.find('.remove_item').addClass('active');
		page_item.append('<input type="hidden" name="related_pages[]" value="' + page_item.attr('data-page-id') + '"/>');

		//add this new item to the end of the droppable list
		drop_helper.before(page_item);
		drop_helper.removeClass('active');

		trigger_remove_page_item_action();

	},
	over: function(event,ui){
		//when hovering over the droppable area, display the drop helper
		$('.right_container').find('.droppable-helper').addClass('active');

	},
	out: function(event,ui){
		$('.right_container').find('.droppable-helper').removeClass('active');
	}
});
We start by finding the right_container and then calling the droppable function on it. This function has several options and methods, some of which I have defined below.
我们首先找到right_container ,然后在其上调用droppable函数。 此函数有几个选项和方法,下面定义了其中的一些。
accept– ‘.page_item’ is the class name of items that will be accepted by this droppable. In our case we want this droppable to take our page itemsaccept–'.page_item'是此可放置对象将接受的项目的类名。 在我们的情况下,我们希望此可放置对象将我们的页面项scope– ‘related_pages_scope’ is the name that both the droppable and draggable elements share. This connects the two lists together and makes it possible to drag and drop itemsscope–“ related_pages_scope”是可放置元素和可拖动元素共享的名称。 这样可以将两个列表连接在一起,从而可以拖放项目hoverClass– ‘hover-over-draggable’ is the class name that will be added to theright_containerwhen we have a correct draggable hovering over the container. This will let us do things such as highlighting the container or enabling helper units.hoverClass- “悬停,可拖动”是将被添加到类名right_container当我们有一个正确的可拖动鼠标悬停在容器中。 这将使我们能够进行诸如突出显示容器或启用辅助单元之类的操作。tolerance– ‘touch’ means that as soon as the draggable touches the droppable area it will be able to be dropped (by default most of the item has to be inside the area to drop). This is mainly a look and feel things.tolerance–“触摸”表示一旦可拖动对象触摸可放置区域,它将能够被放置(默认情况下,大多数物品必须在要放置的区域内)。 这主要是外观上的东西。drop– This option is the event that will trigger when a correct draggable is dropped onto the droppable. This is where most of our functionality happensdrop–该选项是将正确的可拖动对象拖放到可放置对象时触发的事件。 这是我们大多数功能发生的地方This function has access to the
uiitem, which contains the reference to the item being dragged. We collect the page item being dragged into a local variable by cloning the draggable.此功能可以访问
ui项目,其中包含对要拖动的项目的引用。 我们通过克隆可拖动对象来收集被拖动到局部变量中的页面项目。We find the
droppable-helperinside the droppable list.我们在droppable列表中找到
droppable-helper。Now that we have access to a copy of the draggable we add a new hidden input field inside of it and supply the page ID by using append.
现在,我们可以访问可拖动对象的副本,可以在其中添加一个新的隐藏输入字段,并通过使用append提供页面ID。
We find the
remove_itembutton inside of the item and set it to active (so later we can remove it if we want)我们在项目内部找到了
remove_item按钮并将其设置为活动状态(因此以后我们可以根据需要将其删除)We get the
droppable-helperitem and insert our chosen related page before it.我们得到了
droppable-helper项,并在其之前插入我们选择的相关页面。We get the
droppable-helperand ensure that when we drop the draggable item we remove its active class (as we only want to see this helper item when we are hovering over the droppable)我们获得了
droppable-helper并确保在拖放可拖动项时删除其活动类(因为我们只想在悬停在可拖放项上时看到此帮助项)We call our function called
trigger_remove_page_item_actionwhich is used to bind a remove event to the remove buttons (so we can remove them from our page list later if we like)我们调用名为
trigger_remove_page_item_action的函数,该函数用于将remove事件绑定到remove按钮(因此,如果需要,我们可以稍后将其从页面列表中删除)
over– This option is the event that will trigger when a correct draggable is hovered over a correct droppable. Mainly we use this function to activate our droppable helper itemover–该选项是将正确的可拖动对象悬停在正确的可放置对象上时触发的事件。 主要是我们使用此功能来激活我们的可放置辅助项目When hovering over the droppable area, find our
droppable-helperitem and activate it将鼠标悬停在可投放区域上时,找到我们的
droppable-helper项目并激活它
out– This option is the event that will trigger when a correct draggable is hovered out of a correct droppable (its been removed). We use this to disable our droppable helper itemout–当将正确的可拖动对象悬停在正确的可放置对象(已删除)上时,将触发该事件。 我们使用它来禁用我们的可放置辅助项目When hovering out of the droppable area, find our
droppable-helperitem and deactivate it将鼠标悬停在可投放区域之外时,找到我们的
droppable-helper项目并将其停用
out– This option is the event that will trigger when a correct draggable is hovered out of a correct droppable (its been removed). We use this to disable our droppable helper itemout–当将正确的可拖动对象悬停在正确的可放置对象(已删除)上时,将触发该事件。 我们使用它来禁用我们的可放置辅助项目
The whole purpose of this droppable is to take the draggable, inject the value of the page item into it and then append it to our related pages list. You should be able to expand on this to make it as fancy or complex as you want.
此droppable的全部目的是获取可拖动对象,将页面项目的值注入其中,然后将其附加到我们的相关页面列表中。 您应该能够对此进行扩展,以使其根据您的喜好变得复杂。
右侧分选区 (Right hand side sortable area)
The sortable library is extensive so please feel free to view the API for a full listing of its options, methods and events.
可排序的库范围很广,因此请随时查看API以获取其选项,方法和事件的完整列表 。
Now that we can move items from the left container to the right container, we can start sorting the right container (related page items).
现在我们可以将项目从左边的容器移动到右边的容器,我们可以开始对右边的容器(相关页面项目)进行排序。
/*Sortable Area*/
$('.right_container').sortable({
	items: '.page_item',
	cursor: 'move',
	containment: 'parent',
	placeholder: 'my-placeholder'
});
We start by finding the right_container again that contains our related page items. We then call the sortable function and define options.
我们从再次找到包含我们相关页面项的right_container开始。 然后,我们调用sortable函数并定义选项。
items– ‘.page_item’ is the name of the items that will be sorteditems–'.page_item'是将要排序的项目的名称cursor– ‘move’ is the type of cursor that will be used when moving the itemcursor–“移动”是移动项目时将使用的光标类型containment– ‘parent’ will constrain the movement of the sortable items to the parent (this will make it so you cant move the items outside of the right containercontainment–“父级”将限制可排序项目向父级的移动(这样做将使您无法将这些项目移至正确的容器之外placeholder– ‘my-placeholder’ is the CSS name that will be used when sorting the item. When you sort an item the sortable plugin will add a temporary item into the list of items. This temporary item will move the other items up and down. For this tutorial I have supplied styles so that it will look similar to the droppable helper so you can see the sorting.placeholder–“ my-placeholder”是在对项目进行排序时将使用CSS名称。 当您对项目进行排序时,可排序插件将在项目列表中添加一个临时项目。 此临时项将上下移动其他项。 在本教程中,我提供了样式,以使其看起来类似于可放置的帮助器,因此您可以看到排序。
其他功能 (Other functions)
We also need to add a function to remove an existing page item (for example you may have dragged over a page but now no longer want it).
我们还需要添加一个功能来删除现有的页面项(例如,您可能已将页面拖到页面上,但现在不再想要它了)。
Add the following to the bottom of your JS file.
将以下内容添加到JS文件的底部。
//Remove page item functionality
function trigger_remove_page_item_action(){
	$('.remove_item').on('click',function(){
		$(this).parents('.page_item').remove();
	});
}
trigger_remove_page_item_action();
8 –输出相关页面 (8 – Outputting the related pages)
Now that we have the related pages saved to a page, we can create a function to show these pages at the bottom of the applicable page.
现在我们已经将相关页面保存到页面中,我们可以创建一个函数以在适用页面的底部显示这些页面。
//Displays the related pages information at the bottom of the page
function display_related_pages_information($html){

	global $post;
	if($post){
		//execute if we are on a page
		if(get_post_type($post) == 'page'){
			//determine if this page has any related page set
			$related_pages = get_post_meta($post->ID,'related_pages',true);
			if($related_pages){
				//begin related pages output
				$html .= '<article class="related_pages">';
				$html 	.= '<h2>Related Pages</h2>';
				$related_pages_array = json_decode($related_pages);
				foreach($related_pages_array as $related_page){
					//get page information
					$page_id = $related_page;
					$page_name = get_the_title($page_id);
					$page_permalink = get_permalink($page_id);
					//output related page
					$html .= '<section>';
					$html 	.= '<a href="' . $page_permalink . '">';
					$html 		.= $page_name;
					$html 	.= '</a>';
					$html .= '</section>';
				}
				$html .= '</article>';
			}
		}
	}

	return $html;
}
add_filter('the_content','display_related_pages_information');
Let’s break down what we are doing here.
让我们分解一下我们在这里所做的事情。
We firstly create a function called display_related_pages_information and add it to the the_content filter. This filter will give us access to the content section of the page (we will be placing our related pages after the main page content area).
我们首先创建一个名为display_related_pages_information的函数,并将其添加到the_content过滤器中。 通过此过滤器,我们可以访问页面的内容部分(我们会将相关页面放置在主页内容区域之后)。
We will have access to the $html item which contains the html for the content of the page. We will be adding our output code onto this.
我们将有权访问$html项,其中包含页面content的html。 我们将在其上添加输出代码。
We get the global $post item and then check to see if the post type is page. If we are on a page we will execute our related pages output.
我们获取全局的$post项,然后检查发布类型是否为page 。 如果我们在页面上,将执行相关页面输出。
We get the related pages from the meta value related_pages and if we have set pages we begin the output.
我们从元值related_pages获取相关页面,如果已设置页面,则开始输出。
We create an article and a header and then for each of the related pages we collect collect their ID, name and permalink. With this information we create a simple link to the desired page.
我们创建一篇文章和一个标题,然后收集每个相关页面的ID,名称和永久链接。 利用此信息,我们可以创建指向所需页面的简单链接。
We return the $html variable at the bottom of our filter and when we view our pages, if they have associated related pages they should look similar to the following.
我们在过滤器的底部返回$html变量,当我们查看页面时,如果它们具有关联的相关页面,则它们应类似于以下内容。
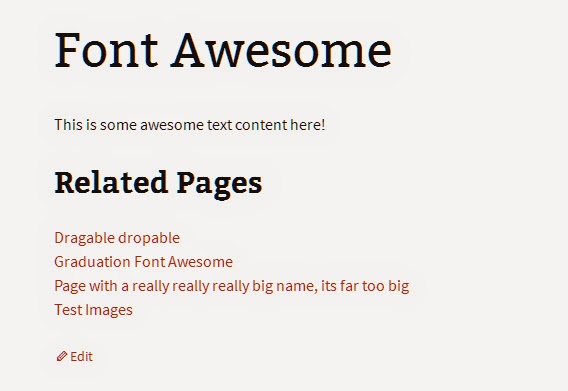
The great thing about this is that you don’t need to edit any template files and the related pages will only be shown if they have been set.
这样做的好处是,您无需编辑任何模板文件,并且只有在设置了相关页面后才会显示相关页面。
结论 (Conclusion)
Hopefully, by now, you have a much better handle on the complexities of the jQuery Interactions libraries, and how to create more interactive and easy to manage administration functions, particularly when it comes to the three main different libraries: dragable, dropable and sortable. Please let me know if you have any comments or queries below.
希望到目前为止,您可以更好地处理jQuery Interactions库的复杂性,以及如何创建更具交互性和易于管理的管理功能,尤其是涉及三个主要的不同库时:可拖动,可拖放和可排序。 如果您在下面有任何意见或疑问,请告诉我。
翻译自: https://www.sitepoint.com/using-jquery-interactions-in-your-wordpress-admin/


 364
364

 被折叠的 条评论
为什么被折叠?
被折叠的 条评论
为什么被折叠?
 到【灌水乐园】发言


