t-paas d-paas
In this article, we’ll take a look at Pagoda Box, another PaaS (Platform as a Service). If you have used other PaaS in previous projects, Pagoda Box is similar to Heroku. Pagoda Box is PHP only (for now) and has a well defined architecture to start developing with PHP. Everything in PB is a component. The database is a component, the webservers, workers, cron jobs and the caching. Having such an architecture doesn’t only give you ease in development but also a control over money usage. This post will be a quick overview of this platform. We will set up a framework and look at a list of pros and cons, comparing it to Heroku.
在本文中,我们将介绍另一个PaaS (平台即服务) Pagoda Box 。 如果您在以前的项目中使用过其他PaaS,则Pagoda Box与Heroku相似。 Pagoda Box仅限于PHP(目前),并且具有定义良好的体系结构以开始使用PHP开发。 PB中的所有内容都是组件。 数据库是组件, Web服务器 , 工作器 , cron作业和缓存 。 拥有这样的体系结构不仅可以使您的开发更加轻松,而且可以控制资金使用情况。 这篇文章将是该平台的快速概述。 我们将建立一个框架,并查看其优缺点列表,并将其与Heroku进行比较。

快速概述 (Quick overview)
Lets have a look at the components that Pagoda Box offers.
让我们看一下Pagoda Box提供的组件。
The first and the most important component is the Web Component. This component holds all the code and runs it on each request. This is the entry point in the application. You can have up to 25 instances of Web Components. You can chose from 200MB up to 1GB of RAM for each. In total, you can have 25GB per application. One Web Component with 200MB is free.
第一个也是最重要的组件是Web组件。 该组件保存所有代码,并在每个请求上运行它。 这是应用程序中的入口点。 您最多可以有25个Web组件实例。 您可以从200MB到1GB的RAM中进行选择。 每个应用程序总共可以有25GB。 一个200MB的Web组件是免费的。
The database component doesn’t need an introduction. The only database that you can use for now is the MySQL database. You can chose one of two flavors, Cloud MySQL and Private Cloud MySQL. Only the Cloud MySQL has a free basic plan with 10MB of RAM. It can be scaled up to 500MB for one instance and the Private Cloud MySQL goes up to 16 CPU Cores, 16 GB of RAM, and 300 GB of storage.
数据库组件不需要介绍。 您现在可以使用的唯一数据库是MySQL数据库。 您可以选择以下两种形式之一:Cloud MySQL和Private Cloud MySQL。 只有Cloud MySQL有10MB RAM的免费基本计划。 一个实例最多可以扩展到500MB,而私有云MySQL最多可以扩展到16个CPU核心,16 GB的RAM和300 GB的存储。
The Caching Component comes in Redis and Memcached flavors. Both provide a free basic plan of 10MB. Both of them have only the Cloud version – no Private Cloud.
缓存组件具有Redis和Memcached风格。 两者都提供10MB的免费基本计划。 他们两个都只有云版本–没有私有云。
Pagoda Box also offers Cron Job components, Shared Writable Components (with a 10MB free plan) and SSL.
Pagoda Box还提供Cron Job组件,Shared Writable Components(具有10MB的免费套餐)和SSL。
设置本地环境 (Setting up the local environment)
In this example, we will see how to deploy the Slim framework in Pagoda Box. To be more accurate, I have chosen Slim Skeleton as it requires directories with write permission.
在此示例中,我们将看到如何在Pagoda Box中部署Slim框架 。 为了更准确,我选择了Slim Skeleton,因为它需要具有写许可权的目录。
The first thing I do when starting a new project is to get Homestead set up. This is not a Laravel project but is the box I prefer to use. If you’d rather use Homestead Improved, which is simpler and more multi-platform ready, see this quickstart. Otherwise, continue with the instructions below. If you aren’t familiar with Homestead already, please read their documentation. There is a good guide with more in depth information.
开始新项目时,我要做的第一件事就是设置Homestead 。 这不是Laravel项目,而是我更喜欢使用的盒子。 如果您想使用Homestead Improvementd,它更简单并且可以用于多平台,请参阅本快速入门 。 否则,请继续以下说明。 如果您还不熟悉Homestead,请阅读其文档 。 有一个很好的指南,提供了更深入的信息。
After configuring Homestead.yaml using homestead edit my configuration looks something like this:
使用homestead edit配置Homestead.yaml之后,我的配置如下所示:
ip: "192.168.10.10"
memory: 2048
cpus: 1

authorize: ~/.ssh/id_rsa.pub

keys:
    - ~/.ssh/id_rsa

folders:
    - map: ~/projects/homestead/Code
      to: /home/vagrant/Code

sites:
    - map: slim.app
      to: /home/vagrant/Code/slim-skeleton/public

databases:
    - homestead

variables:
    - key: APP_ENV
      value: local
The next thing I do is edit the hosts file on the host machine. I added the slim.app with the IP: 192.168.10.10.
我要做的下一件事是在主机上编辑主机文件。 我添加了slim.app和IP: 192.168.10.10 。
192.168.10.10 slim.appNavigate to your project folder and then clone the Slim Skeleton. My project folder is ~/projects/homestead/Code.
导航到您的项目文件夹,然后克隆Slim Skeleton。 我的项目文件夹是~/projects/homestead/Code 。
git clone https://github.com/codeguy/Slim-Skeleton.git slim-skeletonAfter that, execute homestead up. Navigate inside the box using ssh to install dependencies using composer.
之后,执行homestead up 。 使用ssh在框内导航,以使用composer安装依赖项。
homestead ssh
cd Code
cd slim-skeleton
composer install
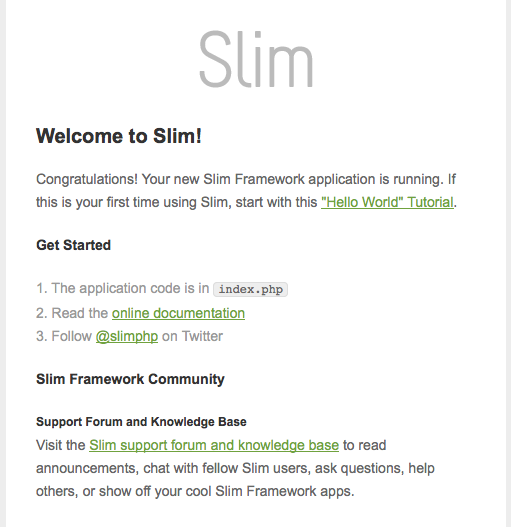
Check the browser for slim.app. You should see something like this if you did everything ok.
检查浏览器是否有slim.app 。 如果一切正常,您应该会看到类似的内容。

部署第一个应用程序 (Deploy the first application)
If you haven’t already created an account on Pagoda Box please create one first. Create a new application. You can choose to start from an existing project, from an existing repository or an empty repository. The project is stored locally so we will go with the third option. Give it a name and launch the application.
如果您尚未在Pagoda Box上创建帐户,请先创建一个。 创建一个新的应用程序。 您可以选择从现有项目,现有存储库或空存储库开始。 该项目存储在本地,因此我们将选择第三个选项。 给它起一个名字并启动应用程序。
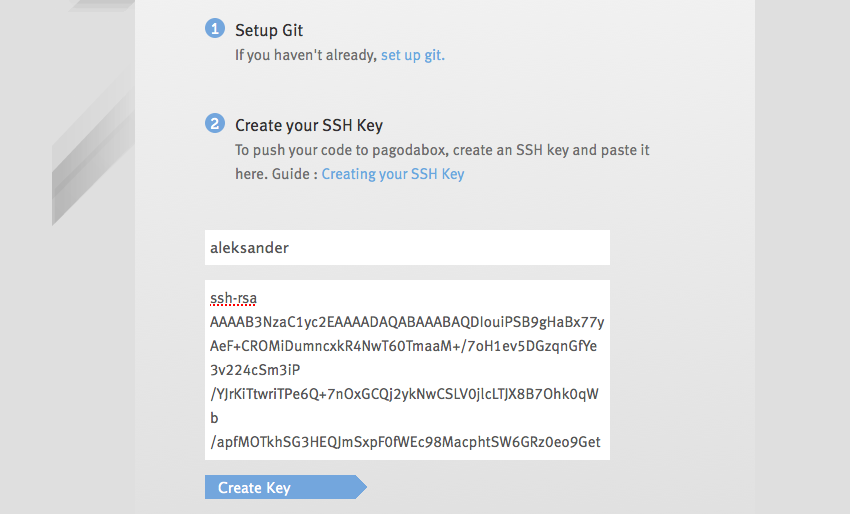
If this is the first time you created a project, you have to configure the SSH keys. In case you aren’t familiar with SSH keys , read this article from Github on generating keys.
如果这是您第一次创建项目,则必须配置SSH密钥。 如果您不熟悉SSH密钥,请阅读Github上有关生成密钥的文章。

Before executing the commands that Pagoda Box suggests, first make sure to remove the existing Git files from the slim-skeleton folder.
在执行Pagoda Box建议的命令之前,首先请确保从slim-skeleton文件夹中删除现有的Git文件。
rm -rf .git
rm .gitignore
After removing git files execute these commands:
删除git文件后,执行以下命令:
git init
git add .
git commit -m 'your commit message'
git remote add pagoda *your pagodabox git repository here*
git push pagoda --all
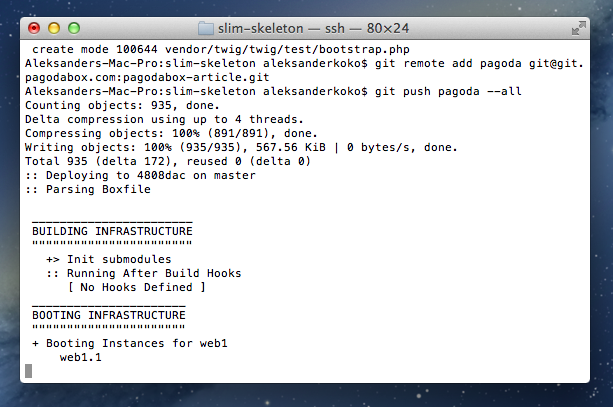
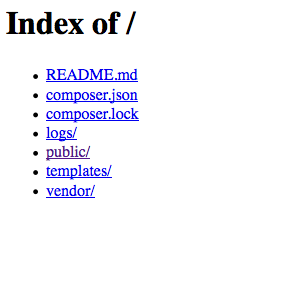
This will init a Git repo in this project, add all files, commit the changes, add a remote repository (project repo in Pagoda Box) and push everything to the server. After executing these commands click the Continue to App Dashboard button. Check your application URL in the browser to see if everything went well. If you don’t know the URL, it should be something like your-app-name.gopagoda.com. Don’t worry if you get an output like this:
这将在该项目中初始化一个Git存储库,添加所有文件,提交更改,添加一个远程存储库(Pagoda Box中的项目存储库)并将所有内容推送到服务器。 执行完这些命令后,单击“继续至应用程序仪表板”按钮。 在浏览器中检查您的应用程序URL,看一切是否顺利。 如果您不知道该URL,则应为your-app-name.gopagoda.com类的your-app-name.gopagoda.com 。 如果您得到这样的输出,请不要担心:

The first reason for this is that the webserver doesn’t point to the bootstrap PHP script. The starter PHP file (bootstrap) is located under the public folder. The index.php inside that folder initiates everything, as is the case in most modern PHP apps. Even if we navigate to the public folder we should see some errors. That’s because logs/ and templates/cache aren’t writable. By default, everything is read-only. We have to tell the webserver where the init file is, and that the two folders should be writable.
这样做的第一个原因是网络服务器未指向引导PHP脚本。 起动PHP文件(引导)位于下public文件夹。 该文件夹中的index.php会启动所有操作,就像大多数现代PHP应用程序一样。 即使我们浏览到public文件夹,我们应该看到一些错误。 那是因为logs/和templates/cache是不可写的。 默认情况下,所有内容均为只读。 我们必须告诉Web服务器初始化文件在哪里,并且两个文件夹应该可写。
If you have used other PaaS platforms in the past, you may have used some configuration files. On Pagoda Box the configuration file is the Boxfile. Using this file you can tell the platform what components you want in the application. Don’t forget that every component is configurable. For example, you may want to have 3 web components, 2 private MySQL databases, 2 writable directories, maybe Redis for caching. All this can be configured via Boxfile. When you push your code onto Pagoda Box, the platform looks for a Boxfile and if one is provided, it will build the environment using the configuration within.
如果过去曾经使用过其他PaaS平台,则可能已经使用了一些配置文件。 在Pagoda Box上,配置文件是Boxfile 。 使用此文件,您可以告诉平台您想要在应用程序中使用哪些组件。 不要忘记每个组件都是可配置的。 例如,您可能希望具有3个Web组件,2个私有MySQL数据库,2个可写目录,也许还有Redis用于缓存。 所有这些都可以通过Boxfile进行配置。 当您将代码推送到Pagoda Box时,平台将查找Boxfile,如果提供了Boxfile,它将使用其中的配置来构建环境。
When we first pushed the code without the Boxfile, the platform was building the project using the default Boxfile. Components can be also configured using the dashboard but it’s recommended to use Boxfiles. Let’s say you have different versions of your application, and you want to rollback to a previous one. The platform will also scale to the scale of the previous.
当我们第一次在没有Boxfile的情况下推送代码时,平台使用默认的Boxfile构建项目。 也可以使用仪表板配置组件,但建议使用Boxfiles。 假设您有不同版本的应用程序,并且想要回滚到上一个版本。 该平台还将扩展到以前的规模。
Create a Boxfile in the root of the project. In this example we want 1 web component, 1 MySQL database, 2 writable directories, 1 environment variable (APP_ENV: production). If you noticed, on Homestead I used an environment variable and on Pagoda I used that same environment variable, but the value was different. So if I use this environment variable the code will work without changes in both environments. My final Boxfile looks something like this:
在项目的根目录中创建一个Boxfile。 在此示例中,我们需要1个Web组件,1个MySQL数据库,2个可写目录,1个环境变量(APP_ENV:生产)。 如果您注意到,在Homestead上我使用了一个环境变量,在Pagoda上我使用了相同的环境变量,但是值是不同的。 因此,如果我使用此环境变量,则代码将在两个环境中都无需更改即可工作。 我最终的Boxfile看起来像这样:
web1:
  shared_writable_dirs:
    - logs
    - templates/cache
  document_root: public
  php_extensions:
    - mysql

db1:
  name: slim
  type: mysql

global:
  env:
    - APP_ENV: production
Now push all changes.
现在推动所有更改。
git add .
git commit -m "Adding Boxfile"
git push pagoda --all
Search again for your project in the browser and you should see that everything is OK now. You now have a ready to go project.
在浏览器中再次搜索您的项目,您现在应该看到一切正常。 您现在有一个准备就绪的项目。
利弊 (Pros and Cons)
Pagoda Box is easy to get started with. It was easier for me than with Heroku, but I must admit that it is a bit outdated and lacks a lot of new features. If you have noticed in the dashboard, they advertise the version of PHP 5.5 as a new version, when 5.6 has been out for a while. Their documentation is really good and helps you a lot. What I like the most is the analytics area and the ease of scaling. I can scale very easily if my app grows faster than I thought, but I can’t really compare to Heroku (as a leading PaaS platform) because Heroku offers a lot extensibility. I can choose different 3rd party services and use them right away. Also, Heroku has a better definition on architecture as the creator of the 12 factor-app. Pagoda Box is PHP focused, while on Heroku it is not as easy to get started with PHP. If you are new to PaaS with PHP, you should give PagodaBox a try – especially if you’re just looking for a place to quickly deploy your app on. PagodaBox makes for a perfect prototype and example host.
宝塔盒很容易上手。 对我来说,这比使用Heroku容易,但我必须承认它有点过时并且缺少许多新功能。 如果您在仪表板中注意到,当5.6推出一段时间后,他们会将PHP 5.5的版本广告为新版本。 他们的文档非常好,对您有很大帮助。 我最喜欢的是分析领域和扩展的难易程度。 如果我的应用程序增长速度超出我的预期,我可以非常轻松地进行扩展,但是我无法真正与Heroku(作为领先的PaaS平台)进行比较,因为Heroku提供了很多可扩展性。 我可以选择不同的第三方服务并立即使用它们。 另外,Heroku作为12 factor-app的创建者,对建筑的定义更好。 Pagoda Box专注于PHP,而在Heroku上, 开始使用PHP并不容易 。 如果您不熟悉使用PHP进行PaaS,则应该尝试一下PagodaBox,尤其是在您正在寻找快速部署应用程序的地方。 PagodaBox是完美的原型和示例主机。
结论 (Conclusion)
In this article we saw what Pagoda Box was, and how to get started developing locally for it using Homestead. We created a foundation app which is a good base to start your application on. But don’t stop here. The dashboard of PagodaBox has a lot of analytics tools. Experiment with the various components which you didn’t get to use throughout this article – if you don’t break things, you will never learn, and on PaaS, rarely does anything stay broken.
在本文中,我们了解了Pagoda Box是什么,以及如何开始使用Homestead在本地进行开发。 我们创建了一个基础应用程序,这是启动您的应用程序的良好基础。 但是不要在这里停下来。 PagodaBox的仪表板具有许多分析工具。 对本文中没有使用的各种组件进行试验–如果您不破坏事物,您将永远学不到,在PaaS上,几乎没有任何事物会破坏。
We want to hear from you. Would you consider Pagoda Box in your next project? Have you tried it yet? What do you think about it?
我们希望收到你的来信。 您会在下一个项目中考虑宝塔箱吗? 你尝试过了吗? 你怎么看待这件事?
翻译自: https://www.sitepoint.com/introducing-pagoda-box-paas-just-php/
t-paas d-paas


 1669
1669


 被折叠的 条评论
为什么被折叠?


