


wordpress用cdn
Have you ever imagined speeding your WordPress website by implementing a Content Delivery Network (CDN)? This tutorial illustrates how the CDN configuration using Amazon CloudFront and Rackspace Cloud Files (with Akamai CDN) speeds up the WordPress website. Before going forward, if you are not aware about CDN, then this article will provide a quick glance around CDN fairy tales.
您是否曾想过通过实施内容交付网络(CDN)来加快WordPress网站的速度? 本教程说明了使用Amazon CloudFront和Rackspace Cloud Files(带有Akamai CDN)的CDN配置如何加快WordPress网站的速度。 在继续之前,如果您不了解CDN,那么本文将简要介绍CDN童话故事。
设置W3总缓存 (Setting up W3 Total Cache)
Before starting, you should have working WordPress Installation. After this, install W3 Total Cache plugin.You will see a new tab in your sidebar, called “Performance”. To configure your CDN, start with the “General” section. There are a few steps you should take care of:-
开始之前,您应该已经可以使用WordPress安装。 之后,安装W3 Total Cache插件 。您将在侧栏中看到一个名为“性能”的新选项卡。 要配置CDN,请从“常规”部分开始。 您应该注意几个步骤:-
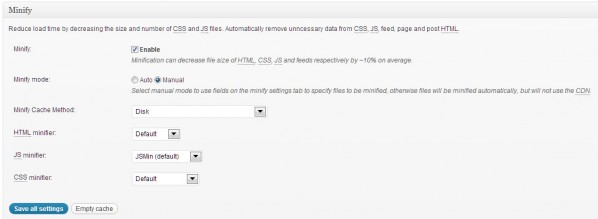
- Minify: Check “Enable”, and select “Manual” as minify mode. 缩小:选中“启用”,然后选择“手动”作为缩小模式。
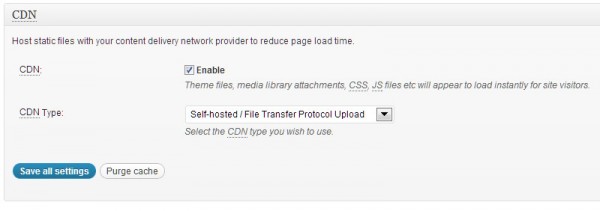
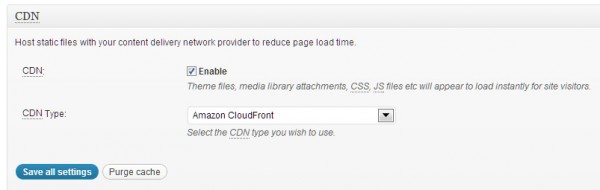
- CDN: Check “Enable”, and set the CDN Type to Self-hosted for now (we’ll change this to Amazon/Rackspace later on). CDN:选中“启用”,并将CDN类型暂时设置为“ Self-hosted”(稍后将其更改为Amazon / Rackspace)。
Hit the “Save all settings” button, and proceed to the “Minify” section. Now take the following actions:
点击“保存所有设置”按钮,然后进入“缩小”部分。 现在执行以下操作:
- General: Enable “Rewrite URL structure”. 常规:启用“重写URL结构”。
- HTML & XML: Enable “HTML minify settings”. HTML和XML:启用“ HTML缩小设置”。
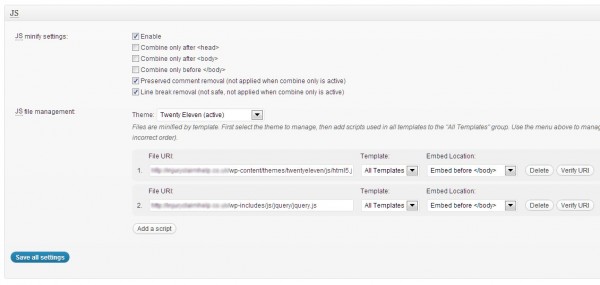
- JS: Enable “JS minify settings”, check the boxes as shown in the screenshot, and add your .JS files (you can find these by searching for them in your source code of your front-end). JS:启用“ JS最小化设置”,选中屏幕快照中所示的框,然后添加.JS文件(您可以通过在前端源代码中搜索它们来找到它们)。
- Use only the template files, no Adsense or Analytics code or something like that. Use “Blocking” in the embed location drop-down if the script is needed to load the page, otherwise use “Non-Blocking”. 仅使用模板文件,不使用Adsense或Analytics(分析)代码等。 如果需要脚本来加载页面,请在嵌入位置下拉菜单中使用“阻止”,否则请使用“非阻止”。
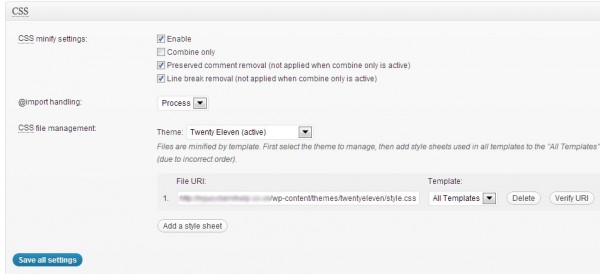
- CSS: Enable “CSS minify settings”, and again check the boxes as shown in the screenshot. Add your CSS files (which you can find the same way as the .JS files). CSS:启用“ CSS缩小设置”,然后再次选中屏幕快照中所示的框。 添加您CSS文件(可以找到与.JS文件相同的方式)。
After that, save all your settings again and proceed to the CDN section. Here you need to take these steps:
之后,再次保存所有设置,然后进入CDN部分。 在这里,您需要执行以下步骤:
- General: Check all the box from “Host attachments” to “Import external media library attachments” to have full control over content. 常规:选中从“主机附件”到“导入外部媒体库附件”的所有框,以完全控制内容。
- Configuration: Leave these unattended for now, this is where you will fill in your Amazon or Rackspace details. 配置:暂时不要理会这些,在这里您将填写您的Amazon或Rackspace详细信息。
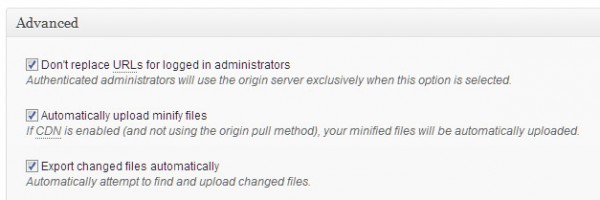
- Advanced:Check the first three boxes, and the last one Set cookie domain to “domainname.com”. 高级:选中前三个复选框,最后一个复选框,将cookie域设置为“ domainname.com”。
Save all settings. You will see some red and yellow messages on top of your W3 Total Cache settings screen. We will deal with these later, because first you need to setup up Amazon CloudFront or Rackspace Cloud Files as your CDN. Setting up Amazon CloudFront as your CDN Let’s start with Amazon CloudFront. If you haven’t done already, signup for Amazon Web Services and login to your account. When logged in, you should do a separate signup for S3 and CloudFront. Now head back to your WordPress installation, open the “General” section of W3 Total Cache, and where you first selected “Self-hosted”, now choose “Amazon CloudFront” under “Origin Pull” (this means the CDN will extract the necessary files from your site). Click “Save all settings”.
保存所有设置。 您将在W3 Total Cache设置屏幕顶部看到一些红色和黄色消息。 我们稍后将处理这些问题,因为首先您需要将Amazon CloudFront或Rackspace Cloud Files设置为CDN。 将Amazon CloudFront设置为CDN让我们从Amazon CloudFront开始。 如果尚未完成操作,请注册Amazon Web Services并登录到您的帐户。 登录后,您应该对S3和CloudFront进行单独注册。 现在回到您的WordPress安装,打开W3 Total Cache的“常规”部分,然后在您首先选择“自托管”的位置,现在在“来源拉”下选择“ Amazon CloudFront”(这意味着CDN将提取必要的内容)。您网站上的文件)。 点击“保存所有设置”。
To get it working, take these steps:
要使其正常工作,请执行以下步骤:
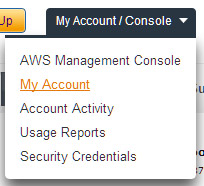
- Open the CDN section again, and scroll to “Configuration”. Fill in your “Access key ID” and “Secret key”. These keys can be find in “My Account” in the Amazon AWS portal, and then select “Security Credentials”. 再次打开CDN部分,然后滚动到“配置”。 填写“访问密钥ID”和“秘密密钥”。 这些密钥可以在Amazon AWS门户的“我的帐户”中找到,然后选择“安全凭证”。
|
|
|
- In the “Access Credentials”, you will find your “Access Key ID” and (after you click “Show”) your “Secret Access Key”. Now copy these into your WordPress CDN configuration. 在“访问凭据”中,您将找到“访问密钥ID”和(单击“显示”后)“秘密访问密钥”。 现在将它们复制到您的WordPress CDN配置中。
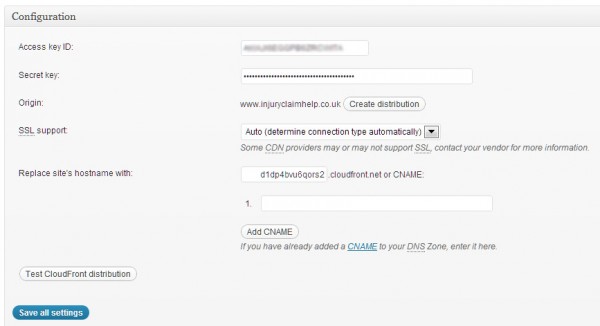
- Click on “Create distribution”, and if your credentials are right, you will see this notice: 单击“创建分发”,如果您的凭据正确,您将看到以下通知:
- You will now see a new hostname filled in, which looks something like: 现在,您将看到一个新的主机名,看起来像:
- Wait till your CloudFront distribution is deployed, which can be verified in the AWS Management Console at Amazon, in the CloudFront section. 等待部署您的CloudFront分发,可以在Amazon的AWS管理控制台的CloudFront部分中进行验证。

| |
|
| |
| While “InProgress” you will have to wait. | Once you see this, you’re good to go. |
|
| |
|
| |
| 在“进行中”期间,您将不得不等待。 | 看到此消息后,您就可以开始了。 |
- To make sure, use the “Test CloudFront distribution” button to test. 为了确保安全,请使用“测试CloudFront分发”按钮进行测试。
- Your files are automatically pulled into the CloudFront CDN (this happens when your distribution is “InProgress”). After the distribution is “InProgress”, import your attachments into the media library. There’s a button on top of the CDN section to do this, called “Importing attachments into the Media Library”. Press this, and click “Start” in the pop-up that follows. After uploading is done, close it and save configuration. 您的文件会被自动拉入CloudFront CDN(在您的发行版为“进行中”时会发生这种情况)。 分发为“进行中”后,将附件导入媒体库。 CDN部分上方有一个按钮可以执行此操作,称为“将附件导入媒体库”。 按此按钮,然后在随后的弹出窗口中单击“开始”。 上传完成后,关闭它并保存配置。
- To see if it’s really working, log out from WordPress and open the site again. In the source code you should see lines like: 要查看其是否确实有效,请从WordPress注销并再次打开该站点。 在源代码中,您应该看到如下行:
|
|
| This is your minified CSS file, loaded from CloudFront |
| This is an header image, loaded from CloudFront. |
|
|
| 这是从CloudFront加载的缩小CSS文件 |
| 这是从CloudFront加载的标头图像。 |
将Rackspace Cloud文件设置为CDN (Setting up Rackspace Cloud Files as your CDN)
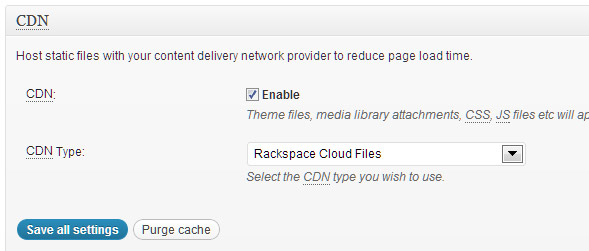
With W3 Total Cache you can also choose for Rackspace Cloud Files, with Akamai as your CDN provider. First, make sure you have a Rackspace Cloud account. After that, in the “General” section of W3 Total Cache, scroll to the CDN configuration, and select “Rackspace Cloud Files” as CDN Type. You can only choose for “Origin push”, which means you have to upload the files yourself (the plugin helps you in this).
使用W3 Total Cache,您还可以选择Rackspace Cloud Files,Akamai作为您的CDN提供程序。 首先,请确保您具有Rackspace Cloud帐户。 之后,在W3 Total Cache的“常规”部分中,滚动到CDN配置,然后选择“ Rackspace Cloud Files”作为CDN类型。 您只能选择“来源推送”,这意味着您必须自己上传文件(插件可以帮助您完成此操作)。
Hit “Save all settings”, and take the following actions:
点击“保存所有设置”,然后执行以下操作:
- Go to the CDN section, and scroll to the configuration. 转到CDN部分,然后滚动到配置。
- Fill in your Rackspace Cloud username (which you choose when signing up). 填写您的Rackspace Cloud用户名(在注册时选择)。
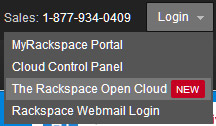
- Insert your API key. You can retrieve this by logging in at Rackspace.com into “The Rackspace Open Cloud”, and selecting “API keys” after logging in. 插入您的API密钥。 您可以通过在Rackspace.com上登录“ Rackspace Open Cloud”并在登录后选择“ API密钥”来进行检索。
|
|
|
- If you haven’t got an API key already, make a new one. Click on “Show Key”, and copy it. 如果您还没有API密钥,请新建一个。 单击“显示密钥”,然后将其复制。
- Now go back to your WordPress installation, and insert the API key into your CDN configuration API key field. 现在回到您的WordPress安装,并将API密钥插入CDN配置API密钥字段。
- Keep the location to “US” (you can change this to UK, but it doesn’t matter). 将位置保留为“美国”(您可以将其更改为英国,但这没关系)。
- Fill in a container name (should only be a unique name in your account), and click on “Create container”. If you did it well, you will see this: 填写一个容器名称(在您的帐户中只能是一个唯一的名称),然后单击“创建容器”。 如果做得好,您将看到以下内容:
- To be sure, click on “Test Cloud Files upload, and make sure you pass the test. 可以肯定的是,单击“测试云文件上传”,并确保您通过测试。
- Hit the “Save all settings button”. 点击“保存所有设置按钮”。
- Now scroll to the top, and you see a whole bunch of notices. 现在滚动到顶部,您会看到很多通知。

- You basically have to click them all, starting with “Export the media library”, than uploading all your files, and empty both the page cache and minify cache. 从“导出媒体库”开始,您基本上必须全部单击它们,而不是上传所有文件,然后清空页面缓存和缩小缓存。
- That’s it! The plugin already made sure the CDN function is turned on for your files. And to make sure it’s working, check again after you log out of WordPress, and look for something like this in the source code: 而已! 该插件已经确保您的文件的CDN功能已打开。 为了确保它能正常工作,请在退出WordPress之后再次检查,并在源代码中查找类似以下内容:

|
| Your minified CSS file loaded from Rackspace Cloud Files |
| Your image loaded from Rackspace Cloud Files |
|
|
| 从Rackspace Cloud Files加载的最小CSS文件 |
| 从Rackspace Cloud Files加载的图像 |
- You can also always login into your “Files” at your Rackspace Cloud account, and open your container. 您也可以始终通过Rackspace Cloud帐户登录“文件”,然后打开容器。

结论 (Conclusion)
As you can see, setting up a CDN for your WordPress blog is fairly simple. W3 Total Cache makes it very easy and fast, and as a result your site can load much faster.
如您所见,为您的WordPress博客设置CDN非常简单。 W3 Total Cache使它变得非常容易和快速,因此您的站点可以加载得更快。
翻译自: https://www.sitepoint.com/speed-up-your-wordpress-site-with-a-cdn/
wordpress用cdn


 2627
2627

 被折叠的 条评论
为什么被折叠?
被折叠的 条评论
为什么被折叠?
 到【灌水乐园】发言


