opencart使用教程
Creating an online shop is as easy as A, B, C with the availability of so many open-source e-commerce platforms. In less than five minutes, you can create your very own online storefront like Amazon and offer physical and digital products for sale.
拥有众多开放源代码电子商务平台,创建在线商店就像A,B,C一样容易。 在不到五分钟的时间内,您可以创建自己的在线店面(如亚马逊),并提供实体和数字产品进行销售。
OpenCart is a robust e-commerce solution for Internet merchants giving them the ability to create their own online presence and participate in e-commerce at a minimal cost.
OpenCart是面向互联网商人的强大的电子商务解决方案,使他们能够以最低的成本创建自己的在线业务并参与电子商务。
In this two-part series I’ll explain all of the necessary steps to create your own e-commerce site with OpenCart. In this article I’ll start with its installation.
在这个由两部分组成的系列文章中,我将解释使用OpenCart创建自己的电子商务网站的所有必要步骤。 在本文中,我将从其安装开始。
OpenCart功能 (OpenCart Features)
OpenCart is a powerful, open source shopping cart system that is designed to be feature rich and user friendly. Some of its features worth checking out include:
OpenCart是一个功能强大的开源购物车系统,旨在具有丰富的功能和用户友好性。 它值得一试的一些功能包括:
Open Source The best thing about OpenCart is that it is free to download and use. There is no need for you to worry about licensing cost for using it. And if you ever make modifications to the OpenCart source code, you can share them back with the OpenCart developers so the community at large can benefit from them too.
开源关于OpenCart的最好的事情是可以免费下载和使用。 您无需担心使用它的许可成本。 而且,如果您曾经修改过OpenCart源代码,则可以与OpenCart开发人员共享这些代码,以便整个社区也可以从中受益。
Unlimited Categories/Products/Manufacturers In an online store one would need to have unlimited Categories, products and manufacturers. In OpenCart you can create unlimited number of Categories for your products, add unlimited number of products to your store and add unlimited number of manufacturers.
无限的类别/产品/制造商在一家在线商店中,需要具有无限的类别,产品和制造商。 在OpenCart中,您可以为您的产品创建无限数量的类别,为您的商店添加无限数量的产品,并添加无限数量的制造商。
Guest Shopping/Checkout There are times you want to order a product online on an online store and don’t want to register before you can buy any goods. OpenCart allows guest shopping and checkout which enables a customer to add goods to their shopping cart, pay for the goods and checkout without them registering.
访客购物/结帐有时候,您想在网上商店在线订购产品,又不想注册,然后再购买任何商品。 OpenCart允许客人购物和结帐,这使客户可以将商品添加到他们的购物车中,为商品付款和结帐,而无需注册。
To learn more about OpenCart, be sure to visit their website at opencart.com.
要了解有关OpenCart的更多信息,请确保访问其网站opencart.com 。
安装OpenCart (Installing OpenCart)
To install OpenCart, you first need to visit GitHub and download the latest version of the software. OpenCart comes as a ZIP archive, so afterwards you have to extract the archive’s contents into a folder of your choosing.
要安装OpenCart,您首先需要访问GitHub并下载该软件的最新版本。 OpenCart是ZIP归档文件,因此之后,您必须将归档文件的内容提取到您选择的文件夹中。
After extracting it, you’ll see a folder called upload and three text files named install.txt, license.txt, and upgrade.txt.
解压缩后,您将看到一个名为upload的文件夹和三个名为install.txt , license.txt和upgrade.txt文本文件。
The install.txt file contains installation notes, license.txt contains the GNU General Public License under which OpenCart is released, and upgrade.txt contains instructions for upgrading an earlier version of OpenCart to the latest version if you’re already using it. The upload directory contains the files you need to upload to your web host.
install.txt文件包含安装说明, license.txt文件包含发布OpenCart的GNU通用公共许可证, upgrade.txt包含有关将OpenCart的较早版本升级到最新版本的说明(如果已在使用)。 upload目录包含您需要上载到Web主机的文件。
Copy all the files and folders found in the upload folder to the public directory of your web host. The name of the public directory may vary depending on your host and configuration, but usually it’s named something like public_html.
将在上upload文件夹中找到的所有文件和文件夹复制到Web主机的公共目录中。 公共目录的名称可能会因您的主机和配置而异,但通常使用诸如public_html之类的名称。
After copying the files, you need to make sure the following files and directories are writable:
复制文件后,需要确保以下文件和目录可写:
image/ image/cache/ image/data/ system/cache/ system/logs/ download/ config.php admin/config.php
image/ image/cache/ image/data/ system/cache/ system/logs/ download/ config.php admin/config.php
To make them writable, make sure the file’s permissions are 666 (rw-rw-rw) and directory permissions are 777 (rwxrwxrwx). You can do this with the chmod command if you have shell access, or easily through your host’s cPanel install.
要使其可写,请确保文件的权限为666(rw-rw-rw),目录权限为777(rwxrwxrwx)。 如果您具有外壳程序访问权限,则可以使用chmod命令执行此操作,也可以轻松地通过主机的cPanel安装来执行此操作。
To do this in cPanel, all you need to do is go the directory that you uploaded your OpenCart files to, right click on each of the file and folder choose “Change Permissions” for the pop up box.
要在cPanel中执行此操作,您所需要做的就是转到将OpenCart文件上传到的目录,右键单击每个文件和文件夹,然后在弹出框中选择“更改权限”。
Now create a MySQL database with a new user created and attached to it.
现在,创建一个MySQL数据库,并创建并附加一个新用户。
To create a MySQL database, you’ll need to login to your database backend. If it’s a shell, you can then use the CREATE DATABASE command and create a user with appropriate access privileges with GRANT.
要创建MySQL数据库,您需要登录到数据库后端。 如果是外壳,则可以使用CREATE DATABASE命令并使用GRANT创建具有适当访问权限的用户。
If you’re using phpMyAdmin, under Create New Database enter the name of the database you want to create and click on the Create Button. Then to attach a new user to the newly created database, click on the Privileges tab at the top and then click on the the Add New User button. Enter the username, host (most likely “local”), and your chosen password twice. Under the Database then for the user select the None option. Under Global privileges click on the check all link.
如果您使用的是phpMyAdmin,请在“创建新数据库”下输入要创建的数据库的名称,然后单击“创建”按钮。 然后要将新用户附加到新创建的数据库,请单击顶部的“权限”选项卡,然后单击“添加新用户”按钮。 输入用户名,主机(很可能是“本地”)和您选择的密码两次。 在数据库下,然后为用户选择无选项。 在“全局特权”下,单击“检查所有”链接。
After you have done all this, you should open the storefront in a browser to begin the installation wizard. The exact URL will depend on where you’ve uploaded the files; for example, if you’ve uploaded the files to public_html then you would open your domain, like www.example.com. If you’ve created public_files/store and uploaded the files there, then you would open www.example.com/store.
完成所有这些操作后,应在浏览器中打开店面以开始安装向导。 确切的URL将取决于您将文件上传到何处。 例如,如果您已将文件上传到public_html,则可以打开域,如www.example.com 。 如果您已创建public_files/store并将文件上传到那里,则可以打开www.example.com/store 。
After you have visited the URL of where you uploaded your OpenCart files, you will be shown the first step which is “Step 1 – License”. All you need to do here is accept the GNU General Public License by ticking “I agree to the License” after which you click on the continue button.
访问了您上传OpenCart文件的URL后,将显示第一步,即“步骤1 –许可”。 您需要做的就是通过勾选“我同意许可证”来接受GNU通用公共许可证,然后单击继续按钮。
The next step is “Step 2 – Pre-Installation”. The pre-installation screen displays all the installation requirements, and PHP settings and extensions. It would also check whether the correct permissions are set for the files and directories. If there are no errors, you can click on the continue button.
下一步是“步骤2 –预安装”。 预安装屏幕显示所有安装要求以及PHP设置和扩展名。 它还将检查是否为文件和目录设置了正确的权限。 如果没有错误,您可以单击继续按钮。
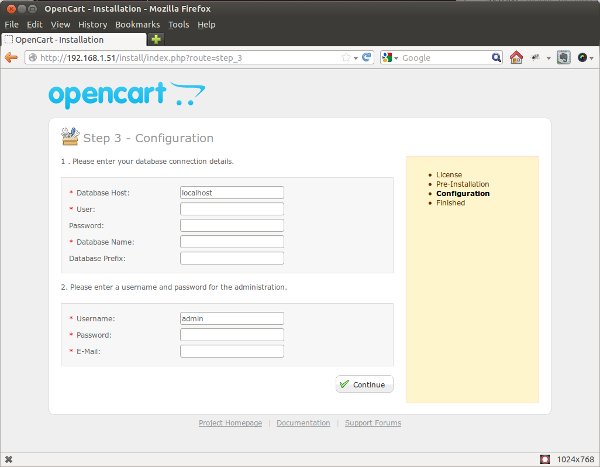
The next step is “Step 3 – Configuration”. This is where you enter the database host, the username and password of the MySQL user you created earlier, and the database name.
下一步是“步骤3 –配置”。 在这里,您可以输入数据库主机,之前创建MySQL用户的用户名和密码以及数据库名称。
The next three options, Username, Password, and Email, are for the admin account. This is where you enter the username, password, and email address that you will be using to login to the administrative backend.
接下来的三个选项,用户名,密码和电子邮件,用于管理员帐户。 在此输入用于登录管理后端的用户名,密码和电子邮件地址。
A screenshot of the “Step – 3 Configuration” screen is shown below.
下面显示了“ Step – 3 Configuration”屏幕的屏幕截图。
After you click on the continue button, you’ll be shown the final step, “Step 4 – Finished”. Seeing this means that you have successfully installed OpenCart.
单击继续按钮后,将显示最后一步,“步骤4 –完成”。 看到这表示您已经成功安装了OpenCart。
After the wizard is completed, you should delete the install directory from your server. This is the “installation directory” noted in the final wizard screen.
向导完成后,应从服务器中删除install目录。 这是最终向导屏幕中记录的“安装目录”。
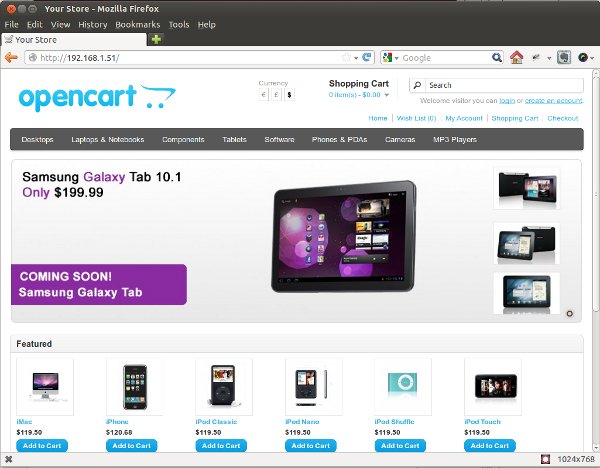
OpenCart installs a sample store during installation, and this is how the sample storefront looks:
OpenCart在安装过程中会安装一个样本商店,这是样本商店的外观:
But in this article I’m going to delete all of the products, categories, and attributes and do everything anew so that you can see how they are created.
但是在本文中,我将删除所有产品,类别和属性,并重新进行所有操作,以便您可以看到它们的创建方式。
配置商店 (Configuring Your Store)
One of the joys of having your own online store is being able to add your own products and set their prices. To do all, first you need to login in to the administrative back-end and set up a few categories to keep things organized.
拥有自己的在线商店的乐趣之一就是能够添加自己的产品并设置其价格。 为此,首先,您需要登录到管理后端,并设置一些类别来使事情井井有条。
To access the administrative back-end, go to www.example.com/admin. Log in with the username and password you provided to the install wizard and you will be taken to the Administration Dashboard.
要访问管理后端,请访问www.example.com/admin 。 使用您提供给安装向导的用户名和密码登录,您将被带到管理控制台。
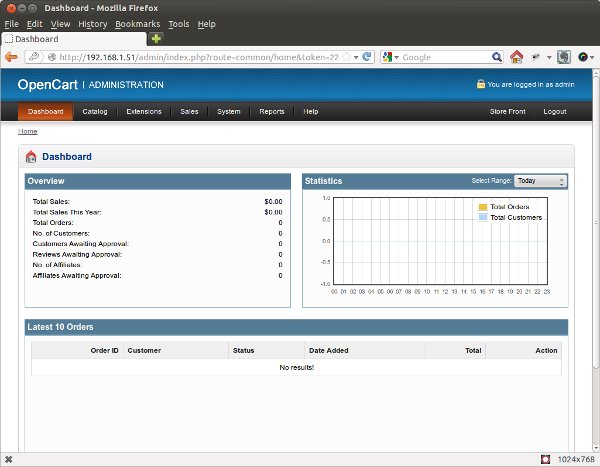
The Administration Dashboard shows a lot of useful information about your store. The overview pane shows a summary of your total sales, orders, number of customers, etc. The Statistics pane shows a graph of your orders and customers. The Latest 10 Orders pane shows you the 10 most recent orders from your store.
管理仪表板显示有关商店的许多有用信息。 概述窗格显示了总销售额,订单,客户数量等的摘要。“统计”窗格显示了订单和客户的图表。 “最近的10个订单”窗格显示了您商店中的最近10个订单。
Let’s delete the existing categories, products, and attributes so you can start setting up your own inventory. The first piece of data to delete is the existing categories.
让我们删除现有的类别,产品和属性,以便您可以开始设置自己的库存。 要删除的第一条数据是现有类别。
To delete all the categories, select Catalog > Categories from the top menu. A list of all of the defined categories will be displayed.
要删除所有类别,请从顶部菜单中选择目录>类别。 将显示所有已定义类别的列表。
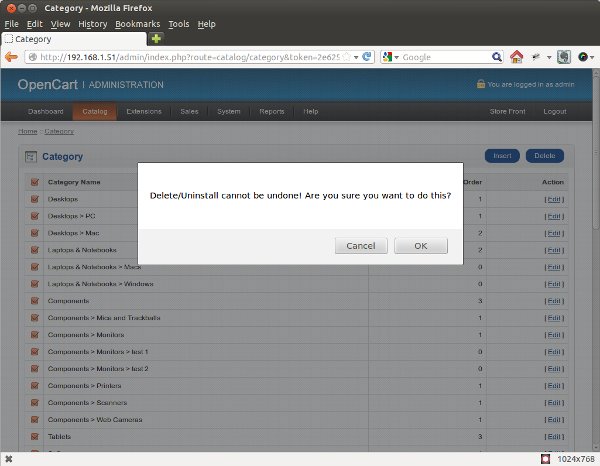
Tick the checkbox at the top left of the listing table next the Category Name label to select all of the categories at once, and then click the Delete button in the top left corner to delete them. A confirmation box will be displayed to confirm the action.
勾选清单表左上方的复选框,然后单击类别名称标签以一次选择所有类别,然后单击左上角的删除按钮将其删除。 将显示确认框以确认操作。
Then, repeat the process for the products list (Catalog > Products), attributes list (Catalog > Attributes > Attributes), attribute groups (Catalog > Attributes > Attribute Groups), and manufacturers list (Catalog > Manufacturers).
然后,对产品列表(目录>产品),属性列表(目录>属性>属性),属性组(目录>属性>属性组)和制造商列表(目录>制造商)重复该过程。
Now it’s time to start adding your own data into OpenCart!
现在是时候开始将自己的数据添加到OpenCart中了!
创建自己的类别 (Creating Your Own Categories)
Categories are classification of related products. For example, the IPhone 5, Blackberry 9800, and Samsung S2 are all products that could be classified as SmartPhones. In OpenCart you can create an unlimited number of categories and sub-categories to organize your products how you see fit.
类别是相关产品的分类。 例如,iPhone 5,Blackberry 9800和Samsung S2都是可以归类为智能手机的产品。 在OpenCart中,您可以创建无限数量的类别和子类别,以按照您认为合适的方式组织产品。
To create your own categories, navigate to Catalog > Categories. Click the Insert button on the categories page and you’ll see this form:
要创建自己的类别,请导航至目录>类别。 单击类别页面上的插入按钮,您将看到以下表格:
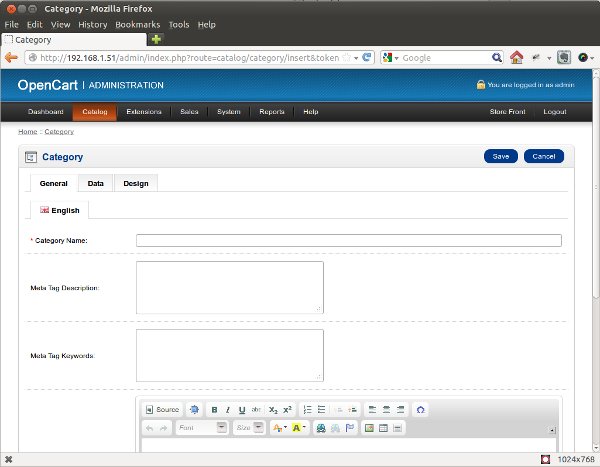
There are three different tabs available for you on the page.
该页面上为您提供了三个不同的选项卡。
Under the General tab is where you enter basic information about the category, such as the category’s name, meta tag description, keywords, and description.
在“常规”选项卡下,您可以在其中输入有关类别的基本信息,例如类别的名称,元标记描述,关键字和描述。
Under the Data tab you have the option to select a parent category (useful for creating a hierarchy with sub categories), stores (if you’re running more than one store with the same installation of OpenCart), SEO keyword, category image, whether to display the category in the top menu bar, the number of columns, sorting order, and whether the category is enabled or not.
在“数据”选项卡下,您可以选择以下项:选择父类别(用于创建具有子类别的层次结构),商店(如果您使用同一安装的OpenCart运行多个商店),SEO关键字,类别图像,是否在顶部菜单栏中显示类别,列数,排序顺序以及是否启用了类别。
Under the Design tab is the option to choose the design layout. I won’t discuss this now; you can leave it set blank for now.
在“设计”选项卡下是用于选择设计布局的选项。 我现在不讨论这个。 您可以暂时将其设置为空白。
Try to enter a few categories of your own before continuing on.
在继续之前,尝试输入自己的一些类别。
创建自己的制造商 (Creating Your Own Manufacturers)
Manufacturers are the makers and producers of your products. For example Apple, HP, Nike are all examples of manufacturers. Adding a new manufacturer is as easy as clicking Catalog > Manufacturers and then clicking the manufacturers page’s Insert button.
制造商是您产品的制造商和生产商。 例如苹果,惠普,耐克都是制造商的例子。 添加新制造商就像单击目录>制造商,然后单击制造商页面的插入按钮一样简单。
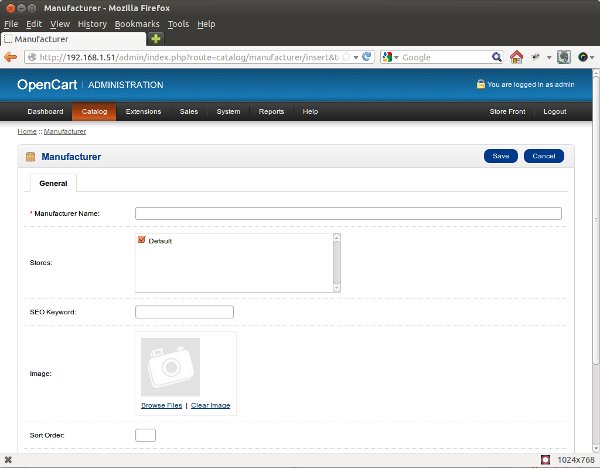
The manufacturer form provides a place for you to enter a manufacturer’s name, the stores it is applicable to, SEO keywords, a logo image, and sorting order.
制造商表单为您提供了一个输入制造商名称,适用的商店,SEO关键字,徽标图像和排序顺序的位置。
Try entering a few manufacturers as well.
也尝试输入一些制造商。
摘要 (Summary)
This is where I’ll end the first part of this tutorial. So far you’ve learned how to install OpenCart, log in to the administration section and create categories and manufacturers.
在这里,我将结束本教程的第一部分。 到目前为止,您已经了解了如何安装OpenCart,登录到“管理”部分以及创建类别和制造商。
In the next article in this series I’ll dig deeper into OpenCart and talk about adding options, attributes, attribute groups, and most importantly products! Stay tuned.
在本系列的下一篇文章中,我将更深入地研究OpenCart,并讨论添加选项,属性,属性组以及最重要的产品! 敬请关注。
Image via Fotolia
图片来自Fotolia
翻译自: https://www.sitepoint.com/your-first-ecommerce-store-with-opencart-1/
opencart使用教程


 1419
1419

 被折叠的 条评论
为什么被折叠?


