


acm 巧妙借助二进制
This article was peer reviewed by Haydar KÜLEKCİ. Thanks to all of SitePoint’s peer reviewers for making SitePoint content the best it can be!
该文章由HaydarKÜLEKCİ进行了同行评审。 感谢所有SitePoint的同行评审人员使SitePoint内容达到最佳状态!
With the explosion of machine learning services in recent years, it has become easier than ever for developers to create “smart apps”. In this article, I’ll introduce you to Microsoft’s offering for providing machine-learning capabilities to apps. Specifically, you’ll learn about the Text Analytics API and build an app to enhance the understanding of online sellers when it comes to their customers.
近年来,随着机器 学习 服务的爆炸式增长 ,开发人员创建“智能应用程序”变得比以往更加容易。 在本文中,我将向您介绍Microsoft为应用程序提供机器学习功能的产品。 具体来说,您将学习Text Analytics API并构建一个应用程序,以增强在线卖家对客户的了解。

Microsoft Text Analytics API (Microsoft Text Analytics API)
The Text Analytics API is a part of Microsoft Cognitive Services, a collection of APIs the aim of which is to give apps a human side. The Text Analytics API includes the following features:
Text Analytics API是Microsoft Cognitive Services的一部分, Microsoft Cognitive Services是API的集合,其目的是使应用程序具有人性化的一面。 Text Analytics API包括以下功能:
Sentiment analysis – returns a score between 0 and 1 to identify and extract subjective opinion about given text. Numbers that are closest to 0 indicate a negative sentiment, and numbers that are closest to 1 indicate a positive sentiment.
情感分析 –返回0到1之间的分数,以识别和提取有关给定文本的主观意见。 最接近0的数字表示负面情绪,最接近1的数字表示正面情绪。
Key phrase extraction (terminology extraction) – returns a list of strings denoting the key talking points in the text supplied.
关键字提取(术语提取) –返回表示所提供文本中关键谈话要点的字符串列表。
Topic detection – detects the topic across a group of text records. This requires a minimum of 100 text records in order for it to work.
主题检测 –在一组文本记录中检测主题。 为此,至少需要100条文本记录。
Language detection – returns the detected languages along with their certainty score denoting how sure the engine is about a language’s detection.
语言检测 –返回检测到的语言以及它们的确定性分数,这些分数表示引擎对语言检测的把握程度。
获取API密钥? (Getting an API Key?)
Microsoft Cognitive Services are offered as part of the Microsoft Azure Platform so you have to sign up for an account on the Azure website if you don’t already have one. Before doing that, you have to sign up for a Microsoft Live account which you will then use to sign up for Azure.
Microsoft认知服务作为Microsoft Azure平台的一部分提供,因此,如果您还没有帐户,则必须在Azure网站上注册一个帐户。 在此之前,您必须注册一个Microsoft Live帐户,然后将其用于注册Azure。
Microsoft Azure Website – click on the Try it now button or any sign up button.
Microsoft Azure网站 –单击立即尝试按钮或任何注册按钮。
Once you’ve supplied all the information required, you may also need to supply your credit card information. You’ll get some free credit usable within a month after signing up. The Text Analytics API should also be free of charge for up to 5000 transactions each month. This should be more than enough for testing purposes.
提供所需的所有信息后,您可能还需要提供信用卡信息。 注册后一个月内,您将获得一些可用的免费积分。 Text Analytics API还应该每月免费进行多达5000笔交易 。 对于测试目的,这应该绰绰有余。
Once your account is created, you should be redirected to the Azure portal. Once there, go to the search bar and type in cognitive services. Click on the one that says Cognitive Services accounts (preview).
创建帐户后,应将您重定向到Azure门户 。 到达那里后,转到搜索栏并输入认知服务 。 单击显示认知服务帐户的帐户(预览) 。
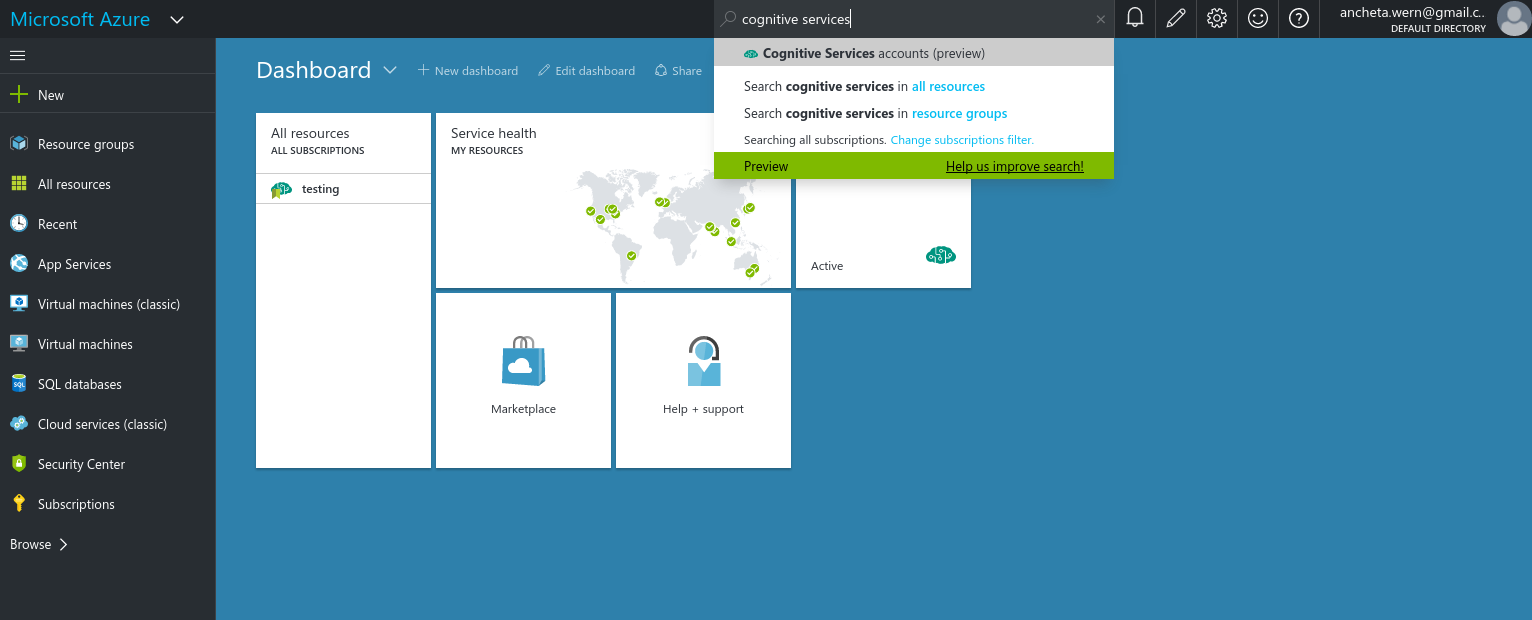
This should show you an interface similar to the one below:
这应该显示一个类似于以下界面的界面:
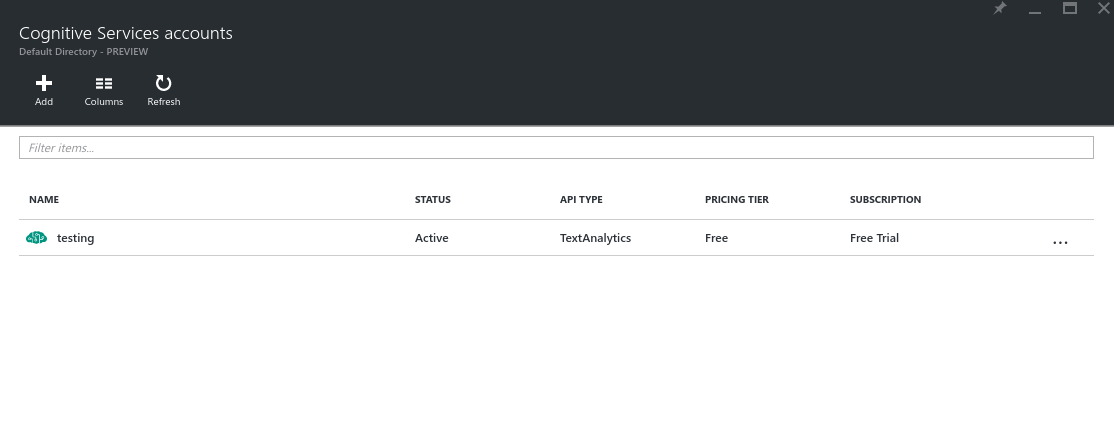
Click on the add button and fill up following fields:
单击添加按钮,并填写以下字段:
Account name – you can pick any name you want.
帐户名 -您可以选择任何名称。
API type – select Text Analytics.
API类型 –选择“文本分析”。
Pricing tier – select the free one which is the 5000 calls per month.
定价层 –选择免费层 ,即每月5000个电话。
Subscription – free trial.
订阅 –免费试用。
Resource group – select the existing one if you already have one, otherwise create a new resource group by picking the new option and then enter the name you want.
资源组 –选择现有的资源组 (如果已有的话),否则通过选择新选项创建一个新的资源组,然后输入所需的名称。
Location – select West US.
位置 -选择美国西部。
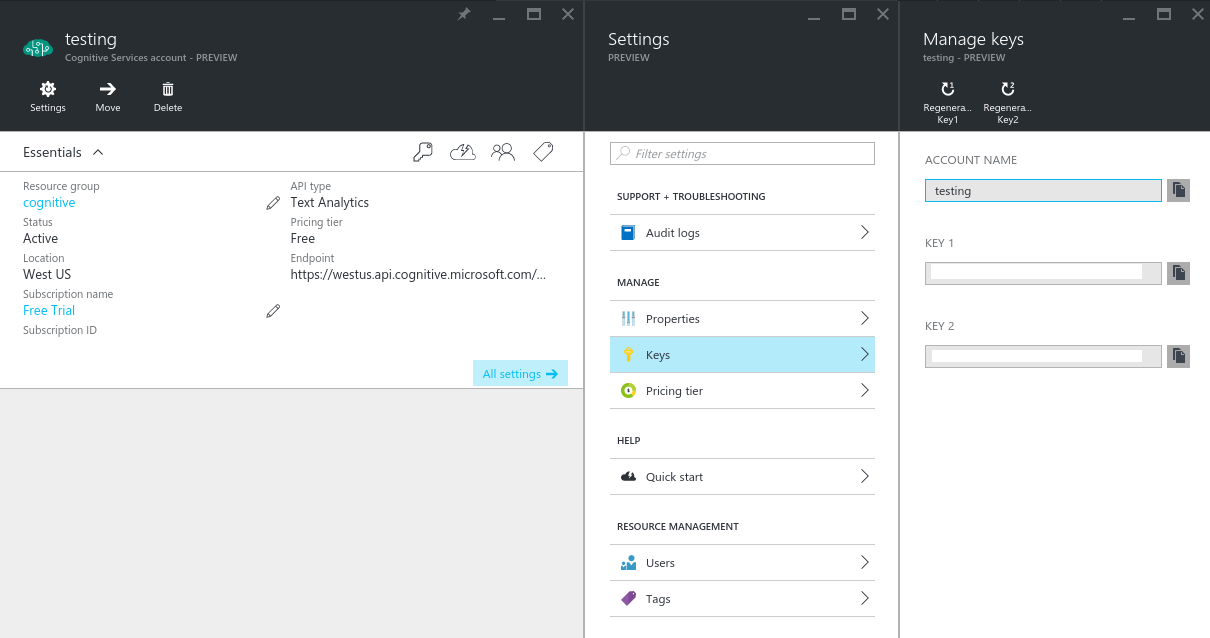
After agreeing to legal terms, click on the Create button. Give it a few seconds to deploy and click on the refresh button once you get a notification saying that the service has been deployed. This should list the new service. Click on it to view its general details. From there, you can click on keys to view the API keys that you can use when making requests.
同意法律条款后,单击“ 创建”按钮。 给它几秒钟的部署时间,然后在收到通知说服务已部署后,单击刷新按钮。 这应该列出新服务。 单击它以查看其一般详细信息。 从那里,您可以单击键以查看发出请求时可以使用的API密钥。
玩API (Playing with the API)
Now that you have an API key you can play with the API from each of these pages:
现在您已经有了一个API密钥,您可以在以下每个页面中使用该API:
Here’s an example:
这是一个例子:
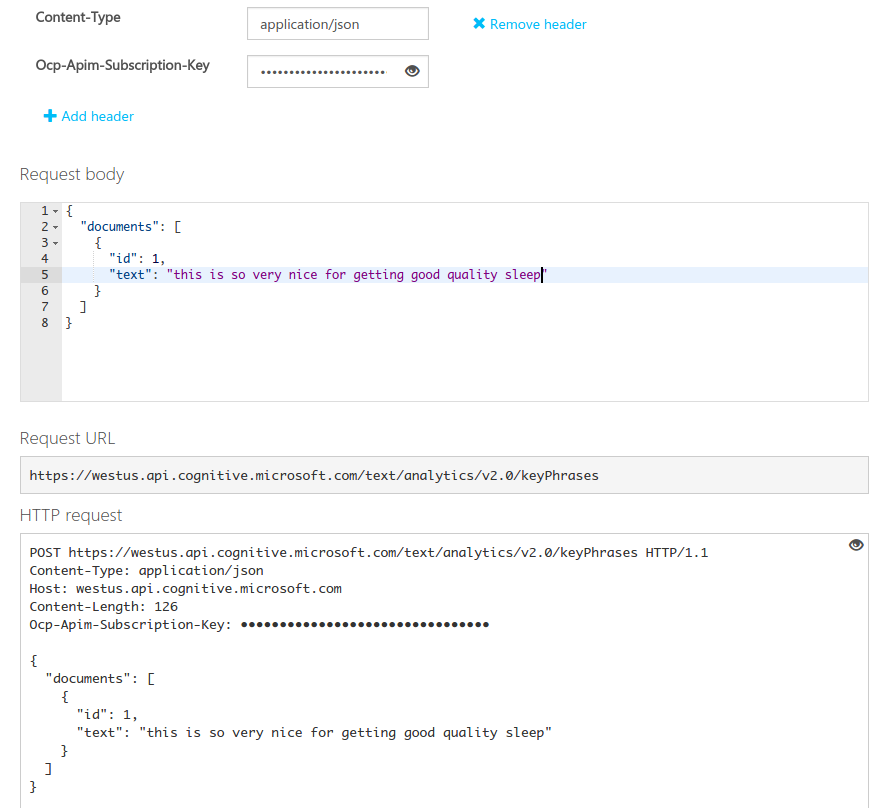
All you have to do is supply your API key as the value for the Ocp-Apim-Subscription-Key header. You can also click on Add header if there are any additional headers that the endpoint requires. Then add the following for the request body:
您所需要做的就是提供您的API密钥作为Ocp-Apim-Subscription-Key标头的值。 如果端点需要任何其他标头,也可以单击“ 添加标头”。 然后为请求正文添加以下内容:
{
  "documents": [
    {
      "id": 1,
      "text": "this is so very nice for getting good quality sleep"
    }
  ]
}
This is the common structure for the request body. Just supply an object containing a property called documents and it will have an array of objects as its value. The object should only contain two properties: id and text. The id should be unique so that each text value that you supply will be uniquely identified.
这是请求主体的通用结构。 只需提供一个包含称为documents的属性的对象,它将有一个对象数组作为其值。 该对象应仅包含两个属性: id和text 。 id应该是唯一的,以便您提供的每个text值都将被唯一标识。
Click on the Send button to send the request. It should give you the following response:
单击发送按钮发送请求。 它应该给您以下答复:
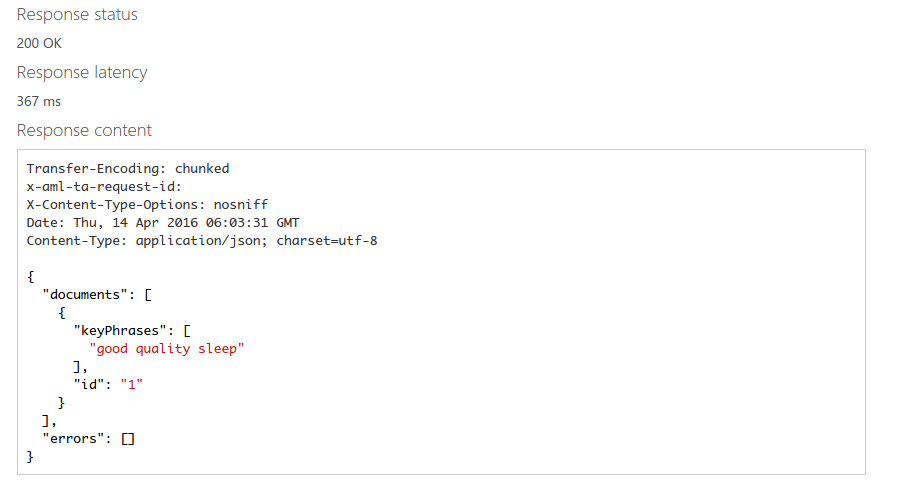
As you can see, it gives you the same structure that you have specified in your request body. Only this time it already has an array of keyPhrases instead of the text.
如您所见,它为您提供了在请求正文中指定的相同结构。 只是这一次它已经有一个keyPhrases数组而不是text 。
There’s also an operation status API, which you can only use when you have a pending operation from any of the requests that you have sent to the API. An operation is considered pending when you don’t get the data that you’re expecting in the response body of your request. In those cases, the API returns 202 Accepted for the status code. This is where the operation status endpoint comes in. This endpoint responds to GET requests to this URL:
还有一个操作状态API ,仅当您发送给该API的任何请求中有待处理的操作时才可以使用。 当您在请求的响应主体中没有获得期望的数据时,该操作被视为待处理。 在这些情况下,API返回202接受的状态码。 这是操作状态端点进入的位置。此端点响应对此URL的GET请求:
https://westus.api.cognitive.microsoft.com/text/analytics/v2.0/operations/{operationId}The operationId is the ID of the request which returned a 202 status code. You can find it in the x-aml-ta-request-id response header.
operationId是返回202状态码的请求的ID。 您可以在x-aml-ta-request-id响应标头中找到它。
设置项目 (Setting up the Project)
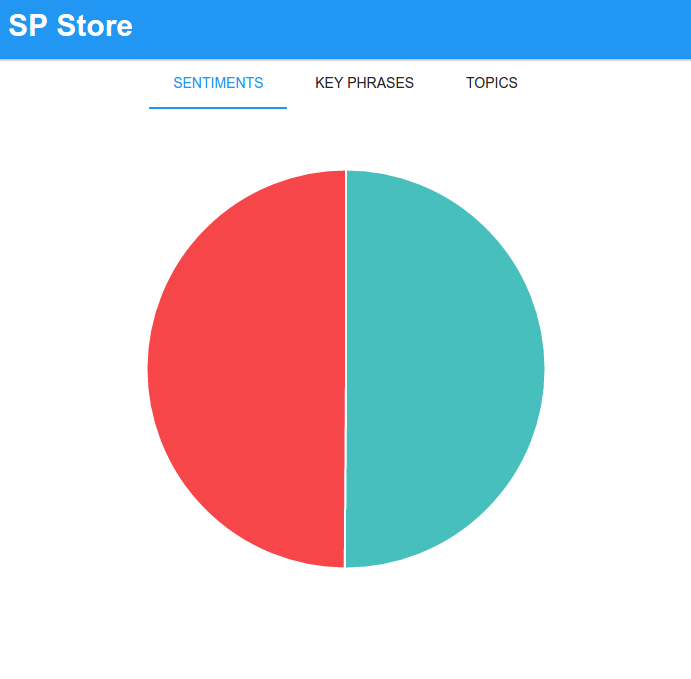
As mentioned in the introduction earlier, you’re going to build an app to enhance the understanding of online sellers when it comes to their customers. You’re going to build a small portion of the back-end of an online store where the sellers can have an insight into what their customers think of their products. This is where the text analytics API comes into play. You’ll get the customer reviews from this Amazon product and send them to the API for analysis. Then you’ll render the results in the front-end of the website. Here are some screenshots on what the app is going to look like.
如前面的简介中所述,您将要构建一个应用程序,以增强在线卖家对客户的了解。 您将在在线商店的后端中建立一小部分,卖家可以在其中了解客户对他们的产品的看法。 这是文本分析API发挥作用的地方。 您将从此Amazon产品获得客户评论,并将其发送到API进行分析。 然后,将结果呈现在网站的前端。 以下是有关该应用程序外观的一些屏幕截图。
The sentiments tab shows the average sentiment that the customers have on a specific product.
情绪选项卡显示客户对特定产品的平均情绪。
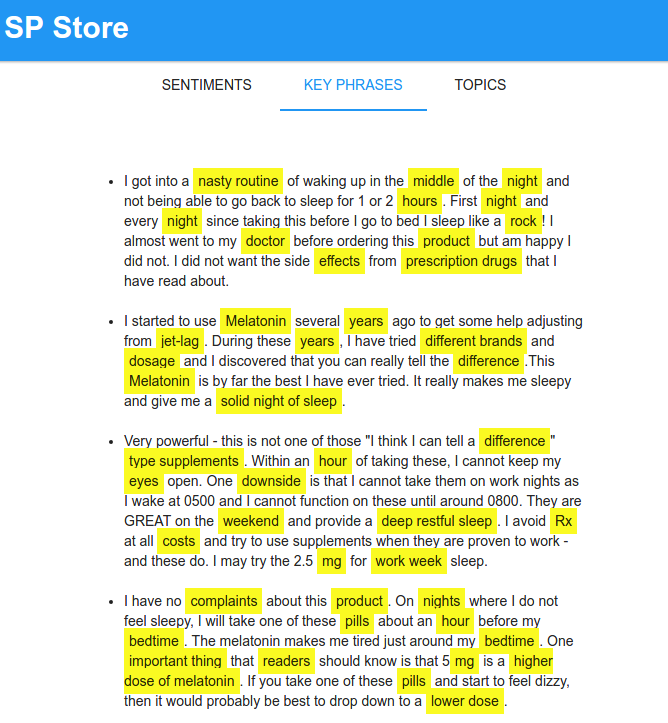
The key phrases tab highlights the key words and phrases in a specific review text.
关键字标签突出显示特定评论文本中的关键字和短语。
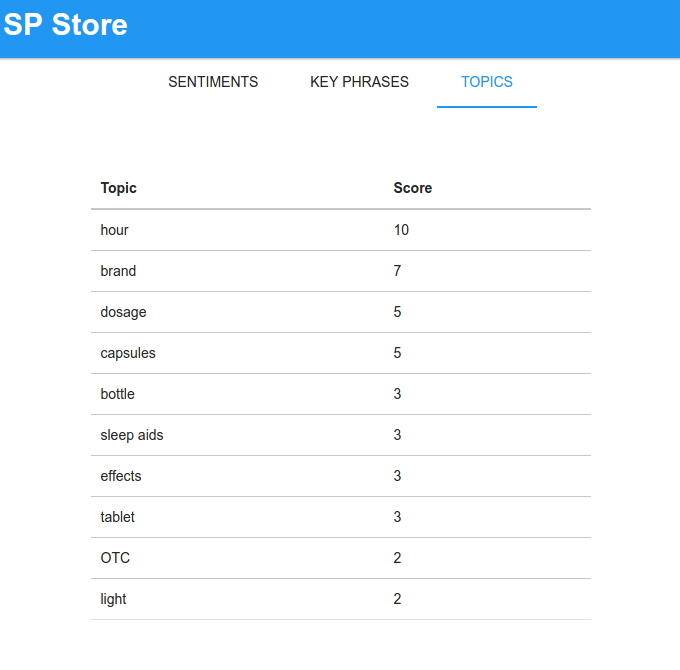
And the topics tab shows a table of the top ten topics being talked about by the customers.
主题标签显示了客户正在谈论的十大主题的表格。
安装依赖项 (Installing the Dependencies)
You’ll be using Slim’s skeleton for this project. You can install it with the following command:
您将在该项目中使用Slim的骨架。 您可以使用以下命令进行安装:
composer create-project -n -s dev akrabat/slim3-skeleton sp_storeThis will create an sp_store folder. Navigate inside that folder and use Composer to install the following libraries:
这将创建一个sp_store文件夹。 浏览该文件夹,然后使用Composer安装以下库:
slim/pdo– a PDO database library for the Slim framework.slim/pdo– Slim框架的PDO数据库库。vlucas/phpdotenv– loads environment variables for the app.vlucas/phpdotenv–加载应用程序的环境变量。guzzlehttp/guzzle– used for performing requests to the API.guzzlehttp/guzzle–用于执行对API的请求。maximebf/consolekit– used for creating commands that will get results from the API.maximebf/consolekit–用于创建从API获取结果的命令。
数据库 (Database)
The app will also use a database. You can find the SQL dump of the database schema in this gist. Here’s what each table does:
该应用程序还将使用数据库。 您可以在本要点中找到数据库模式SQL转储。 这是每个表的作用:
requests – stores the operations which haven’t returned a response yet.
请求 –存储尚未返回响应的操作。
reviews – stores the reviews for each product.
评论 –存储每个产品的评论。
review_key_phrases – stores the key phrases found for each review text.
review_key_phrases –存储为每个评论文本找到的关键词。
review_sentiments – stores the score for each review.
review_sentiments –存储每个评论的分数。
topics – stores the topics determined from a group of reviews.
主题 –存储从一组评论中确定的主题。
review_topics – stores the topics determined for each review and their corresponding distance.
review_topics –存储为每个评论确定的主题及其相应的距离。
If you don’t want to bother with acquiring product reviews to send to the API, here’s a data dump for the reviews table that I used for testing. All credit goes to Amazon and all the customers who left a review for this product.
如果您不想花时间获取要发送给API的产品评论,这里是我用于测试的评论表的数据转储 。 所有信誉归功于Amazon和所有对该产品发表评论的客户。
配置项目 (Configuring the Project)
In the root of the project directory, create a .env file and add the following:
在项目目录的根目录中,创建一个.env文件并添加以下内容:
APP_NAME="SP Store"
APP_BASE_URL=http://spstore.dev
DB_HOST=localhost
DB_NAME=sp_store
DB_USER=user
DB_PASS=secret
CS_KEY="YOUR API KEY"
Make sure to replace APP_BASE_URL with the url you assigned to your app, all the DB_ config with your database credentials, and the CS_KEY with the API key that you got from Microsoft Azure Portal.
确保将APP_BASE_URL替换为分配给应用程序的url,将所有DB_ config替换为数据库凭据,将CS_KEY替换为从Microsoft Azure Portal获得的API密钥。
Go to the app directory and edit the settings.php file and set displayErrorDetails to true so you know exactly what’s going on in case things go wrong.
转到app目录并编辑settings.php文件,并将displayErrorDetails设置为true以便您确切地知道发生了什么情况,以防出现问题。
'displayErrorDetails' => true,Change the folder permission of the cache and log folders to 755. This allows Slim to write to these directories.
将cache和log文件夹的文件夹权限更改为755 。 这使Slim可以写入这些目录。
sudo chmod -R 755 cache log建设项目 (Building the Project)
Now you’re ready to build the project. First you’ll work with the part where requests are made to the API.
现在您已经准备好构建项目。 首先,您将处理向API提出请求的部分。
实用程序类 (Utility Classes)
Create the following files inside the app/src/Lib directory:
在app/src/Lib目录中创建以下文件:
HttpRequest.php– helper class for easily performing http requests with Guzzle.HttpRequest.php–使用Guzzle轻松执行http请求的帮助程序类。Reviews.php– used for interacting with the database.Reviews.php–用于与数据库进行交互。TextAnalyzer.php– used for making requests to the API.TextAnalyzer.php–用于向API发出请求。
Open the HttpRequest.php file and add the following code:
打开HttpRequest.php文件并添加以下代码:
<?php
namespace App\Lib;

class HttpRequest
{
    private $headers;
    private $client;

    public function __construct()
    {
        $this->headers = [
            'Ocp-Apim-Subscription-Key' => getenv('CS_KEY'),
            'Content-Type' => 'application/json',
            'Accept' => 'application/json'
        ];
        $this->client = new \GuzzleHttp\Client(
            ['base_uri' => 'https://westus.api.cognitive.microsoft.com']
        );
    }

    public function make($type, $endpoint, $body)
    {
        try{
            $response = $this->client->request(
                $type, $endpoint,
                [
                    'headers' => $this->headers,
                    'body' => $body
                ]
            );
            $response_body = json_decode($response->getBody()->getContents(), true);

            if($response->getStatusCode() == 202){
                $operation_id = $response->getHeaderLine('x-aml-ta-request-id');
                return [
                    'operation_id' => $operation_id
                ];
            }

            return $response_body;

        } catch (RequestException $e) {
            if($e->hasReponse()){
                $error_data = json_decode($e->getResponse()->getBody()->getContents(), true);
                return ['error' => $error_data];
            }
        }
    }
}
Breaking down the code above, inside the constructor, supply the data required by the API in the header. This includes the Ocp-Apim-Subscription-Key which is the API key that you have. Content-Type and Accept headers are set to json which means that the request body should be in json format.
分解上面的代码,在构造函数中,在标头中提供API所需的数据。 这包括Ocp-Apim-Subscription-Key ,这是您拥有的API密钥。 Content-Type和Accept标头设置为json,这意味着请求主体应为json格式。
$this->headers = [
    'Ocp-Apim-Subscription-Key' => getenv('CS_KEY'),
    'Content-Type' => 'application/json',
    'Accept' => 'application/json'
];
$this->client = new \GuzzleHttp\Client(
    ['base_uri' => 'https://westus.api.cognitive.microsoft.com']
);
The make method accepts the http request method ($type), the endpoint ($endpoint) in the API in which to perform the request, and the data that you want to send ($body).
make方法接受http请求方法( $type ),将在其中执行请求的API中的终结点( $endpoint )以及要发送的数据( $body )。
public function make($type, $endpoint, $body)
{
  ...
}
Set those in the request:
在请求中设置:
$response = $this->client->request(
    $type, $endpoint,
    [
        'headers' => $this->headers,
        'body' => $body
    ]
);
Once a response comes back, call a couple of methods from the $response object in order to get to the data that you want. The API returns a json string which is why you have to use json_decode to convert it to an array.
响应返回后,请从$response对象中调用几个方法,以获取所需的数据。 API返回一个json字符串,这就是为什么必须使用json_decode将其转换为数组的原因。
$response_body = json_decode($response->getBody()->getContents(), true);Check for the “Accepted” status code (202). If this is the status code of the response, it means that the operation you requested isn’t completed yet. So instead of returning the $response_body, extract the x-aml-ta-request-id from the header. This is the ID of the operation that you requested. You can then get the data with this ID later by calling the get operation status endpoint.
检查“已接受”状态码(202)。 如果这是响应的状态码,则意味着您请求的操作尚未完成。 因此,无需返回$response_body ,而是从标头中提取x-aml-ta-request-id 。 这是您请求的操作的ID。 然后,您可以稍后通过调用get operation status端点来获取具有该ID的数据。
if ($response->getStatusCode() == 202) {
    $operation_id = $response->getHeaderLine('x-aml-ta-request-id');
    return [
        'operation_id' => $operation_id
    ];
}

return $response_body;
Next open the TextAnalyzer.php file and add the following code:
接下来打开TextAnalyzer.php文件并添加以下代码:
<?php
namespace App\Lib;

class TextAnalyzer
{
    private $HttpRequest;

    public function __construct()
    {
        $this->HttpRequest = new HttpRequest();
    }

    public function formatDocs($docs)
    {
        $body = [
          'documents' => $docs
        ];
        return json_encode($body);
    }

    public function requestSentiments($docs)
    {
        $body = $this->formatDocs($docs);
        return $this->HttpRequest->make('POST', '/text/analytics/v2.0/sentiment', $body);
    }

    public function requestKeyPhrases($docs)
    {
        $body = $this->formatDocs($docs);
        return $this->HttpRequest->make('POST', '/text/analytics/v2.0/keyPhrases', $body);
    }

    public function requestTopics($docs)
    {
        $body = $this->formatDocs($docs);
        return $this->HttpRequest->make('POST', '/text/analytics/v2.0/topics', $body);
    }

    public function getAnalysis($request_id)
    {
        return $this->HttpRequest->make('GET', "/text/analytics/v2.0/operations/{$request_id}");
    }
}
The code above is pretty self-explanatory so I won’t go into details on what each line does. Just know that each method performs a request to a different endpoint in the API by making use of the HttpRequest class that you created earlier. The formatDocs method is responsible for formatting the text documents in a way that the API requires. This method gets called in each of the methods except for the getAnalysis method because it doesn’t require anything for the request body.
上面的代码是不言自明的,因此我将不详细介绍每一行的功能。 只需知道每种方法都会通过使用您先前创建的HttpRequest类来执行对API中不同端点的请求。 formatDocs方法负责以API要求的方式格式化文本文档。 除了getAnalysis方法之外,每个方法都将调用此方法,因为它对于请求正文不需要任何内容。
Open the Reviews.php file and add the following:
打开Reviews.php文件并添加以下内容:
<?php
namespace App\Lib;

class Reviews
{
    private $db;

    public function __construct()
    {
        $db_host = getenv('DB_HOST');
        $db_name = getenv('DB_NAME');
        $dsn = "mysql:host={$db_host};dbname={$db_name};charset=utf8";
        $pdo = new \Slim\PDO\Database($dsn, getenv('DB_USER'), getenv('DB_PASS'));

        $this->db = $pdo;
    }

    public function getReviews()
    {
        $select_statement = $this->db->select(['id', 'review AS text'])
                   ->from('reviews')
                   ->where('analyzed', '=', 0)
                   ->limit(100);

        $stmt = $select_statement->execute();
        $data = $stmt->fetchAll();
        return $data;
    }

    public function getSentiments()
    {
        //gets sentiments from DB
        $select_statement = $this->db->select()
            ->from('review_sentiments');

        $stmt = $select_statement->execute();
        $data = $stmt->fetchAll();
        return $data;
    }

    public function getTopics()
    {
        $select_statement = $this->db->select(['topic', 'score'])
            ->from('topics')
            ->orderBy('score', 'DESC')
            ->limit(10);

        $stmt = $select_statement->execute();
        $data = $stmt->fetchAll();
        return $data;
    }

    public function getKeyPhrases()
    {
        $select_statement = $this->db->select(['review', 'key_phrases'])
            ->from('review_key_phrases')
            ->join('reviews', 'review_key_phrases.review_id', '=', 'reviews.id')
            ->where('analyzed', '=', 1)
            ->limit(10);

        $stmt = $select_statement->execute();
        $data = $stmt->fetchAll();
        return $data;
    }

    public function saveSentiments($sentiments)
    {
        foreach ($sentiments as $row) {
            $review_id = $row['id'];
            $score = $row['score'];
            $insert_statement = $this->db->insert(['review_id', 'score'])
                ->into('review_sentiments')
                ->values([$review_id, $score]);
            $insert_statement->execute();
        }
    }

    public function saveRequest($request_id, $request_type)
    {
        $insert_statement = $this->db->insert(['request_id', 'request_type', 'done'])
                ->into('requests')
                ->values([$request_id, $request_type, 0]);
        $insert_statement->execute();
    }

    public function updateRequest($request_id)
    {
        $update_statement = $this->db->update(['done' => 1])
                ->table('requests')
                ->where('request_id', '=', $request_id);
        $update_statement->execute();
    }

    public function saveTopics($topics_data)
    {
        $topics = $topics_data['topics'];
        foreach ($topics as $row) {
            $topic_id = $row['id'];
            $topic = $row['keyPhrase'];
            $score = $row['score'];
            $insert_statement = $this->db->insert(['topic_id', 'topic', 'score'])
                ->into('topics')
                ->values([$topic_id, $topic, $score]);
            $insert_statement->execute();
        }

        $review_topics = $topics_data['review_topics'];
        foreach ($review_topics as $row) {
            $review_id = $row['documentId'];
            $topic_id = $row['topicId'];
            $distance = $row['distance'];
            $insert_statement = $this->db->insert(['review_id', 'topic_id', 'distance'])
                ->into('review_topics')
                ->values([$review_id, $topic_id, $distance]);
            $insert_statement->execute();
        }
    }

    public function saveKeyPhrases($key_phrases)
    {
        foreach ($key_phrases as $row) {
            $review_id = $row['id'];
            $phrases = json_encode($row['keyPhrases']);
            $insert_statement = $this->db->insert(['review_id', 'key_phrases'])
                ->into('review_key_phrases')
                ->values([$review_id, $phrases]);
            $insert_statement->execute();
        }
    }

    public function getPendingRequests()
    {
        $select_statement = $this->db->select()
            ->from('requests')
            ->where('done', '=', 0);

        $stmt = $select_statement->execute();
        $data = $stmt->fetchAll();
        return $data;
    }

    public function setDone($from_id, $to_id)
    {
        $update_statement = $this->db->update(['analyzed' => 1])
            ->table('reviews')
            ->whereBetween('id', [$from_id, $to_id]);
        $update_statement->execute();
    }

    public function getAverageSentiment()
    {
        $select_statement = $this->db->select()
           ->from('review_sentiments')
           ->avg('score', 'avg_sentiment');
        $stmt = $select_statement->execute();
        $data = $stmt->fetch();
        return $data['avg_sentiment'];
    }
}
Again, this is pretty self-explanatory. Inside the constructor, you connect to the database. Each method in the class performs either a select, update or insert query to a specific table in the database.
同样,这是不言自明的。 在构造函数内部,您连接到数据库。 该类中的每个方法对数据库中的特定表执行选择,更新或插入查询。
命令类 (Command Class)
In this section, you’ll create a class that extends the Console Kit library. This allows you to perform requests to the API at a specific time using cron. Start by creating a Commands/Analyze.php file inside the app/src directory and add the following code:
在本节中,您将创建一个扩展控制台工具包库的类。 这样,您可以使用cron在特定时间执行对API的请求。 首先在app/src目录中创建一个Commands/Analyze.php文件,然后添加以下代码:
<?php
require 'vendor/autoload.php';

use \App\Lib\TextAnalyzer;
use \App\Lib\Reviews;

class AnalyzeCommand extends ConsoleKit\Command
{
    public function execute(array $args, array $options = array())
    {
        $dotenv = new \Dotenv\Dotenv(__DIR__ . '/../../..');
        $dotenv->load();

        $reviews = new Reviews();
        $text_analyzer = new TextAnalyzer();

        //check if there are pending requests
        $pending_requests = $reviews->getPendingRequests();
        foreach ($pending_requests as $request) {

            $request_id = $request['request_id'];
            $from_id = $request['from_review'];
            $to_id = $request['to_review'];

            $response = $text_analyzer->getAnalysis($request_id);
            if (strtolower($response['status']) == 'succeeded') {
                $result = $response['operationProcessingResult'];
                $topics = $result['topics'];
                $review_topics = $result['topicAssignments'];

                $reviews->saveTopics([
                    'topics' => $topics,
                    'review_topics' => $review_topics
                ]);

                $reviews->setDone($from_id, $to_id);
                $reviews->updateRequest($request_id);
            }
        }

        $docs = $reviews->getReviews();
        $total_docs = count($docs);

        if ($total_docs == 100) {
            $from_review = $docs[0]['id'];
            $to_review = $docs[$total_docs - 1]['id'];

            $sentiments_response = $text_analyzer->requestSentiments($docs);
            $reviews->saveSentiments($sentiments_response['documents']);
            $this->writeln('saved sentiments!');

            $key_phrases_response = $text_analyzer->requestKeyPhrases($docs);
            $reviews->saveKeyPhrases($key_phrases_response['documents']);
            $this->writeln('saved key phrases!');

            $topics_request_id = $text_analyzer->requestTopics($docs);
            $reviews->saveRequest($topics_request_id, 'topics', $from_review, $to_review);
            $this->writeln('topics requested! request ID: ' . $topics_request_id);
        }

        $this->writeln('Done!', ConsoleKit\Colors::GREEN);
    }
}

$console = new ConsoleKit\Console();
$console->addCommand('AnalyzeCommand');
$console->run();
Breaking down the code above. First, require the vendor/autoload.php file so you can use all the libraries as well as the utility classes that you created earlier.
分解上面的代码。 首先,需要使用vendor/autoload.php文件,以便可以使用所有库以及之前创建的实用程序类。
require 'vendor/autoload.php';
use \App\Lib\TextAnalyzer;
use \App\Lib\Reviews;
Inside the execute method, initialize the dotenv library so you can get the configuration variables.
在execute方法中,初始化dotenv库,以便获取配置变量。
$dotenv = new \Dotenv\Dotenv(__DIR__ . '/../../..');
$dotenv->load();
Initialize the two utility classes:
初始化两个实用程序类:
$reviews = new Reviews();
$text_analyzer = new TextAnalyzer();
Fetch all the operations that haven’t been completed yet. In the database, these are stored in the requests table. All rows that have a value of 0 in the done column are returned.
提取所有尚未完成的操作。 在数据库中,这些存储在请求表中。 将返回done列中所有值为0的done 。
$pending_requests = $reviews->getPendingRequests();Loop through all the pending requests and request an analysis by calling the getAnalysis method from the $text_analyzer object. Note that the $request_id is the operation ID returned by the API when you made a request to a specific API endpoint. You only proceed with saving the results if the status has succeeded. This means that the request has been processed and the analysis data is ready to be fetched. Below, you are only taking into consideration the result of the topic detection endpoint. This is because the sentiment and key phrases endpoints returns the data immediately when you make a request. The data that you want are buried under the topics and topicAssignments key so extract those and save them into the database by calling the saveTopics method from the $reviews object. After that, you call the setDone method to flip the done switch of all the reviews that were analyzed so they don’t get picked again for analysis the next time the command runs. The same is true with the operation, the updateRequest method sets the operation to done so you don’t make a request to the same operation later on.
遍历所有未决请求,并通过从$text_analyzer对象调用getAnalysis方法来请求分析。 请注意, $request_id是您向特定API端点发出请求时API返回的操作ID。 如果状态成功,则仅继续保存结果。 这意味着该请求已被处理,分析数据已准备就绪,可以被提取。 在下面,您仅考虑主题检测端点的结果。 这是因为情感和关键短语端点在您发出请求时会立即返回数据。 你想被下埋的数据topics和topicAssignments键,通过调用这些提取并保存到数据库中saveTopics从方法$reviews对象。 之后,您调用setDone方法来翻转所有已分析评论的完成开关,以使下次运行该命令时不会再次选择它们进行分析。 该操作也是如此, updateRequest方法将操作设置为完成,因此以后您不会updateRequest同一操作发出请求。
foreach ($pending_requests as $request) {

    $request_id = $request['request_id'];
    $from_id = $request['from_review'];
    $to_id = $request['to_review'];

    $response = $text_analyzer->getAnalysis($request_id);
    if (strtolower($response['status']) == 'succeeded') {
        $result = $response['operationProcessingResult'];
        $topics = $result['topics'];
        $review_topics = $result['topicAssignments'];

        $reviews->saveTopics([
            'topics' => $topics,
            'review_topics' => $review_topics
        ]);

        $reviews->setDone($from_id, $to_id);
        $reviews->updateRequest($request_id);
    }
}
Fetch product reviews from the database. The getReviews method limits the result to 100 rows. This is because the topics endpoint requires a minimum of 100 records in order for it to work. That’s why you’re also checking if the total number of documents returned is 100 before proceeding. If the condition returns true, determine the ID of the first and last rows that were returned. Save this information in the requests table by calling the saveRequest method. These are the same ID’s that you’ve used earlier in the code for processing pending operations.
从数据库中获取产品评论。 getReviews方法将结果限制为100行。 这是因为主题终结点至少需要100条记录才能起作用。 因此,在继续操作之前,还要检查返回的文档总数是否为100。 如果条件返回true ,请确定返回的第一行和最后一行的ID。 通过调用saveRequest方法将此信息保存在请求表中。 这些ID与您先前在代码中用于处理待处理操作的ID相同。
Next, request data from the sentiments endpoint by calling the requestSentiments method. As mentioned earlier, this endpoint immediately returns the analysis data so you can save it to the review_sentiments table by calling the saveSentiments method. You also do the same with the key phrases endpoint. As for the topics endpoint, you’re only expecting to get the operation ID when you call the requestTopics method, so store it in the $topics_request_id variable and save the operation to the database. This way it will get selected for processing the next time the command runs.
接下来,通过调用requestSentiments方法从情感端点请求数据。 如前所述,此端点立即返回分析数据,因此您可以通过调用saveSentiments方法将其保存到review_sentiments表中。 您也可以对关键短语端点执行相同的操作。 对于主题端点,只希望在调用requestTopics方法时获得操作ID,因此将其存储在$topics_request_id变量中并将操作保存到数据库。 这样,它将在下次运行命令时被选择进行处理。
$docs = $reviews->getReviews();
$total_docs = count($docs);

if ($total_docs == 100) {
    $from_review = $docs[0]['id'];
    $to_review = $docs[$total_docs - 1]['id'];

    $sentiments_response = $text_analyzer->requestSentiments($docs);
    $reviews->saveSentiments($sentiments_response['documents']);
    $this->writeln('saved sentiments!');

    $key_phrases_response = $text_analyzer->requestKeyPhrases($docs);
    $reviews->saveKeyPhrases($key_phrases_response['documents']);
    $this->writeln('saved key phrases!');

    $topics_request_id = $text_analyzer->requestTopics($docs);
    $reviews->saveRequest($topics_request_id, 'topics', $from_review, $to_review);
    $this->writeln('topics requested! request ID: ' . $topics_request_id);
}
Once you’re done with that, save the file and run the following command from the root of your project directory:
完成此操作后,保存文件并从项目目录的根目录运行以下命令:
php app/src/Commands/Analyze.php analyzeBe sure that you have at least 100 records on the reviews table and you have supplied a valid API key in the .env file when you do so.
确保您在评论表上至少有100条记录,并且在.env文件中提供了有效的API密钥。
路线 (Routes)
Open the public/index.php file and initialize the dotenv library right before the call to $app->run.
在调用$app->run之前,打开public/index.php文件并初始化dotenv库。
$dotenv = new Dotenv\Dotenv('../');
$dotenv->load();

// Run!
$app->run();
Open the app/routes.php file. It should contain the following code:
打开app/routes.php文件。 它应包含以下代码:
<?php
// Routes

$app->get('/', App\Action\HomeAction::class)
    ->setName('homepage');
The default route uses the HomeAction.php file inside the app/src/Action directory. Open that and add the following code:
默认路由使用app/src/Action目录中的HomeAction.php文件。 打开它并添加以下代码:
<?php
namespace App\Action;

use Slim\Views\Twig;
use Psr\Log\LoggerInterface;
use Psr\Http\Message\ServerRequestInterface as Request;
use Psr\Http\Message\ResponseInterface as Response;
use \App\Lib\Reviews;
use \App\Lib\TextAnalyzer;
use \App\Lib\TextFormatter;

final class HomeAction
{
    private $view;
    private $logger;

    public function __construct(Twig $view, LoggerInterface $logger)
    {
        $this->view = $view;
        $this->logger = $logger;

        $filter = new \Twig_SimpleFilter('highlight', function ($item) {
           $key_phrases = json_decode($item['key_phrases'], true);

           $highlighted_key_phrases = array_map(function($value){
             return "<span class='highlight'>{$value}</span>";
           }, $key_phrases);

           return str_replace($key_phrases, $highlighted_key_phrases, $item['review']);

        });

        $this->view->getEnvironment()->addFilter($filter);
    }

    public function __invoke(Request $request, Response $response, $args)
    {
        $reviews = new Reviews();
        $text_analyzer = new TextAnalyzer();

        $avg_sentiment = $reviews->getAverageSentiment();
        $key_phrases = $reviews->getKeyPhrases();
        $topics = $reviews->getTopics();

        $labels = ['Good', 'Bad'];
        $colors = ['#46BFBD', '#F7464A'];
        $highlights = ['#5AD3D1', '#FF5A5E'];

        $first_value = $avg_sentiment;
        $second_value = 1 - $avg_sentiment;

        if($second_value > $first_value){
            $labels = array_reverse($labels);
            $colors = array_reverse($colors);
            $highlights = array_reverse($highlights);
        }

        $sentiments_data = [
            [
                'value' => $first_value,
                'label' => $labels[0],
                'color' => $colors[0],
                'highlight' => $highlights[0]
            ],
            [
                'value' => $second_value,
                'label' => $labels[1],
                'color' => $colors[1],
                'highlight' => $colors[1]
            ]
        ];

        $page_data = [
            'app_name' => getenv('APP_NAME'),
            'sentiments_data' => json_encode($sentiments_data),
            'key_phrases' => $key_phrases,
            'topics' => $topics
        ];
        $this->view->render($response, 'home.twig', $page_data);

    }
}
Breaking down the code above, first require all the libraries that you need:
分解上面的代码,首先需要您需要的所有库:
use Slim\Views\Twig;
use Psr\Log\LoggerInterface;
use Psr\Http\Message\ServerRequestInterface as Request;
use Psr\Http\Message\ResponseInterface as Response;
use \App\Lib\Reviews;
use \App\Lib\TextAnalyzer;
use \App\Lib\TextFormatter;
Inside the constructor, add a custom twig filter that allows you to highlight specific words or phrases within a chunk of text. This custom filter accepts each $item containing the key phrases and the review text.
在构造函数中,添加一个自定义的树枝过滤器,使您可以突出显示一段文本中的特定单词或短语。 此自定义过滤器接受每个包含关键字短语和评论文本的$item 。
The value for $key_phrases comes from the review_key_phrases table in the database which, if you remember, is a json string. That’s why you need convert it back to an array using json_decode. Next, use array_map to wrap the items in the array in a span with a class of highlight. You then target this later using CSS to highlight the text. Lastly, use str_replace to replace all the occurrences of the $key_phrases with the $highlighted_key_phrases in the review text.
$key_phrases的值来自数据库中的review_key_phrases表,如果您还记得的话,它是一个json字符串。 因此,您需要使用json_decode将其转换回数组。 接下来,使用array_map在具有一类突出显示的跨度中包装数组中的项目。 然后,您稍后可以使用CSS来突出显示文本。 最后,使用str_replace将$key_phrases所有匹配项替换为评论文本中的$highlighted_key_phrases 。
$filter = new \Twig_SimpleFilter('highlight', function ($item) {
   $key_phrases = json_decode($item['key_phrases'], true);

   $highlighted_key_phrases = array_map(function($value){
     return "<span class='highlight'>{$value}</span>";
   }, $key_phrases);

   return str_replace($key_phrases, $highlighted_key_phrases, $item['review']);

});
Inside the __invoke method is the code that you want to execute when the home page is accessed. This is where you fetch and format all the data that you need for the page.
__invoke方法内部是要在访问主页时执行的代码。 在这里,您可以获取并格式化页面所需的所有数据。
$reviews = new Reviews();
$text_analyzer = new TextAnalyzer();

$avg_sentiment = $reviews->getAverageSentiment();
$key_phrases = $reviews->getKeyPhrases();
$topics = $reviews->getTopics();

$labels = ['Good', 'Bad'];
$colors = ['#46BFBD', '#F7464A'];
$highlights = ['#5AD3D1', '#FF5A5E'];

$first_value = $avg_sentiment;
$second_value = 1 - $avg_sentiment;

if ($second_value > $first_value) {
    $labels = array_reverse($labels);
    $colors = array_reverse($colors);
    $highlights = array_reverse($highlights);
}

$sentiments_data = [
    [
        'value' => $first_value,
        'label' => $labels[0],
        'color' => $colors[0],
        'highlight' => $highlights[0]
    ],
    [
        'value' => $second_value,
        'label' => $labels[1],
        'color' => $colors[1],
        'highlight' => $colors[1]
    ]
];

$page_data = [
    'app_name' => getenv('APP_NAME'),
    'sentiments_data' => json_encode($sentiments_data),
    'key_phrases' => $key_phrases,
    'topics' => $topics
];
$this->view->render($response, 'home.twig', $page_data);
Breaking down the code above, first, request for the average sentiment, key phrases and topics that are currently stored in the database.
分解上面的代码,首先,请求当前存储在数据库中的平均情感,关键短语和主题。
$avg_sentiment = $reviews->getAverageSentiment();
$key_phrases = $reviews->getKeyPhrases();
$topics = $reviews->getTopics();
Declare the data to be used by the chart in the page. You’ll be using a pie chart to represent the sentiments of the buyers in the review. Below, there are three arrays with two items each. This is because there can only be two possible sentiments for a product: either good or bad. Here, you’re assuming that the average sentiment that you got from the database represents the good side.
声明页面中图表要使用的数据。 您将使用饼图来表示评论中买家的情绪。 下面是三个数组,每个数组有两个项目。 这是因为产品只能有两种可能的情绪:好或坏。 在这里,您假设从数据库获得的平均情绪代表了好的一面。
$labels = ['Good', 'Bad'];
$colors = ['#46BFBD', '#F7464A'];
$highlights = ['#5AD3D1', '#FF5A5E'];
Calculate the difference between 1 and the average sentiment that you got. This will give you the percentage for the other half of the pie (the bad side).
计算1与平均情绪之间的差。 这将为您提供另一半的百分比(不好的一面)。
$first_value = $avg_sentiment;
$second_value = 1 - $avg_sentiment;
If the other half of the pie is bigger than the average sentiment, reverse each of the arrays that you declared earlier. This is because the default data assumes that the average sentiment is the good side.
如果饼图的另一半大于平均情绪,则反转您先前声明的每个数组。 这是因为默认数据假定平均情绪是好的一面。
if ($second_value > $first_value) {
  $labels = array_reverse($labels);
  $colors = array_reverse($colors);
  $highlights = array_reverse($highlights);
}
Format the data in such a way that it can be readily consumed by the client-side script.
格式化数据的方式应使其易于被客户端脚本使用。
$sentiments_data = [
    [
        'value' => $first_value,
        'label' => $labels[0],
        'color' => $colors[0],
        'highlight' => $highlights[0]
    ],
    [
        'value' => $second_value,
        'label' => $labels[1],
        'color' => $colors[1],
        'highlight' => $colors[1]
    ]
];
Construct the data to be supplied to the page and then render the page. Note that you’re converting $sentiments_data to json so you could render it in the page as a value for a JavaScript variable.
构造要提供给页面的数据,然后呈现页面。 请注意,您正在将$sentiments_data转换$sentiments_data json,以便可以在页面中将其呈现为JavaScript变量的值。
$page_data = [
    'app_name' => getenv('APP_NAME'),
    'sentiments_data' => json_encode($sentiments_data),
    'key_phrases' => $key_phrases,
    'topics' => $topics
];

$this->view->render($response, 'home.twig', $page_data);
前端 (Front-End)
Open app/templates/home.twig file and add the following:
打开app/templates/home.twig文件并添加以下内容:
<!DOCTYPE html>
<html lang="en">
<head>
  <meta charset="UTF-8">
  <title>{{ app_name }}</title>
  <link rel="stylesheet" href="/lib/mui/packages/cdn/css/mui.min.css">
  <link rel="stylesheet" href="/css/style.css">
  <script src="/lib/mui/packages/cdn/js/mui.min.js"></script>
  <script src="/lib/Chart.min.js"></script>
  <script>

  var sentiments_data = {{ sentiments_data|raw }}

  </script>
</head>
<body>
  <header class="mui-appbar mui--z1">
    <strong id="app-name">{{ app_name }}</strong>
  </header>

  <div id="content-wrapper" class="mui--text-center">
    <ul class="mui-tabs__bar">
      <li class="mui--is-active">
        <a data-mui-toggle="tab" data-mui-controls="pane-default-1">Sentiments</a>
      </li>
      <li>
        <a data-mui-toggle="tab" data-mui-controls="pane-default-2">Key Phrases</a>
      </li>
      <li>
        <a data-mui-toggle="tab" data-mui-controls="pane-default-3">Topics</a>
      </li>
    </ul>

    <div class="mui-tabs__pane mui--is-active" id="pane-default-1">
      <canvas id="sentiments_chart" width="400" height="400"></canvas>
    </div>

    <div class="mui-tabs__pane" id="pane-default-2">
      <ul class="align-left">
      {% for row in key_phrases %}
        <li>{{ row | highlight|raw }}</li>
      {% endfor %}
      </ul>
    </div>

    <div class="mui-tabs__pane" id="pane-default-3">
      <table class="mui-table mui-table--bordered">
        <thead>
          <tr>
            <th>Topic</th>
            <th>Score</th>
          </tr>
        </thead>
        <tbody>
          {% for row in topics %}
          <tr>
            <td>{{ row.topic }}</td>
            <td>{{ row.score }}</td>
          </tr>
          {% endfor %}
        </tbody>
      </table>
    </div>
  </div>

  <script src="/js/main.js"></script>
</body>
</html>
Material UI is used for styling the app:
Material UI用于设计应用程序的样式:
<link rel="stylesheet" href="/lib/mui/packages/cdn/css/mui.min.css">Chart.js is used for the pie chart. You can download Chart.js from cloudflare. You can also acquire Chart.js via bower or npm but take note that the version used in this tutorial is 1.1.1. Also note that there are some API changes with the newer version which at the time of writing is currently in beta. If you want to use that, you’ll have to update the code for the main.js file.
Chart.js用于饼图。 您可以从cloudflare下载Chart.js 。 您也可以通过bower或npm获取Chart.js,但请注意,本教程中使用的版本为1.1.1。 另请注意,较新版本对API进行了一些更改,在撰写本文时,该版本当前处于测试阶段。 如果要使用它,则必须更新main.js文件的代码。
<script src="/lib/Chart.min.js"></script>Those are the only dependencies for the front-end.
这些是前端的唯一依赖项。
Inside the internal script, assign the value of the sentiments_data variable to the json string that you’ve passed from the controller earlier. Take note of the use of the raw filter by Twig. This allows you to render the json string as is.
在内部脚本中,将sentiments_data变量的值分配给您之前从控制器传递的json字符串。 注意使用Twig的raw过滤器。 这使您可以按原样呈现json字符串。
<script>

var sentiments_data = {{ sentiments_data|raw }}

</script>
For the main content of the page, you have three tabs: one for the sentiments pie chart, one for the key phrases, and one for the topics.
对于页面的主要内容,您具有三个选项卡:一个用于情感饼图,一个用于关键短语,以及一个用于主题。
For the sentiments pie chart we have a canvas with a predefined width and height.
对于情感饼图,我们有一个具有预定义宽度和高度的画布。
<div class="mui-tabs__pane mui--is-active" id="pane-default-1">
  <canvas id="sentiments_chart" width="400" height="400"></canvas>
</div>
Inside the key phrases tab, loop through the results returned by the database. Then inside the loop, apply the highlight and raw filter. You’ve already seen how the highlight filter works so no need to explain that. As for the raw filter, you need it because the highlight filter outputs html so you use it to prevent the html from getting escaped.
在“关键短语”选项卡中,循环浏览数据库返回的结果。 然后在循环中,应用高highlight raw滤镜。 您已经了解了高highlight过滤器的工作原理,因此无需解释。 至于raw过滤器,您需要它,因为highlight过滤器输出html,因此您可以使用它来防止html逸出。
<div class="mui-tabs__pane" id="pane-default-2">
  <ul class="align-left">
  {% for row in key_phrases %}
    <li>{{ row | highlight|raw }}</li>
  {% endfor %}
  </ul>
</div>
For the topics tab, use a table to show the top ten topics along with each score.
对于“主题”选项卡,使用表格来显示排名前十的主题以及每个分数。
<div class="mui-tabs__pane" id="pane-default-3">
  <table class="mui-table mui-table--bordered">
    <thead>
      <tr>
        <th>Topic</th>
        <th>Score</th>
      </tr>
    </thead>
    <tbody>
      {% for row in topics %}
      <tr>
        <td>{{ row.topic }}</td>
        <td>{{ row.score }}</td>
      </tr>
      {% endfor %}
    </tbody>
  </table>
</div>
Create the public/js/main.js file and add the following:
创建public/js/main.js文件并添加以下内容:
var sentiments_ctx = document.getElementById('sentiments_chart').getContext("2d");
var sentiments_chart = new Chart(sentiments_ctx).Pie(sentiments_data);
This is the code for creating a pie chart based on the data stored in the sentiments_data variable.
这是用于基于sentiments_data变量中存储的数据创建饼图的代码。
Finally, create public/css/main.css file. It contains the following code:
最后,创建public/css/main.css文件。 它包含以下代码:
#content-wrapper {
  width: 500px;
  margin: 0 auto;
}

li {
  margin-bottom: 20px;
}

.mui-table {
  text-align: left;
}

#app-name {
  font-size: 30px;
}

header {
  padding: 10px;
}

.mui-tabs__pane {
  padding-top: 40px;
}

.align-left {
  text-align: left;
}

span.highlight {
  background-color: #FAFA22;
  padding: 5px;
}
结论 (Conclusion)
That’s it! In this tutorial you’ve learned how to make use of Microsoft’s Text Analytics API to give online sellers a better idea of how well their products are doing. Specifically, you’ve used the sentiments, key phrases and topic detection functionality of the API.
而已! 在本教程中,您学习了如何利用Microsoft的Text Analytics API使在线卖家更好地了解他们的产品效果。 具体来说,您已经使用了API的情感,关键短语和主题检测功能。
You can find the source code of the project in its Github repo.
您可以在其Github存储库中找到该项目的源代码。
I recommend you go check out the Microsoft Cognitive Services website to see what other machine learning goodness they offer. Have you used any of these cognitive services? What did you think? How could we further improve our app? Let us know in the comments!
我建议您访问Microsoft Cognitive Services网站,以了解它们提供的其他机器学习优势。 您是否使用过任何这些认知服务? 你觉得呢? 我们如何进一步改善我们的应用程序? 让我们在评论中知道!
翻译自: https://www.sitepoint.com/picking-the-brains-of-your-customers-with-microsofts-text-analytics/
acm 巧妙借助二进制


 185
185

 被折叠的 条评论
为什么被折叠?
被折叠的 条评论
为什么被折叠?
 到【灌水乐园】发言


