selenium安装与使用
Testing is a really wide subject, whether it be unit testing, functional testing, acceptance testing, etc. In this article, we’re going to see how you can do acceptance testing using Selenium. I will use a practical example to illustrate a real use case. I will assume that you already know how to do unit testing using PHPUnit, or that you at least have a grasp of what it’s all about. Let’s get started.
测试是一个非常广泛的主题,无论是单元测试,功能测试,验收测试,等等。在本文中,我们将了解如何使用Selenium进行验收测试。 我将用一个实际的例子来说明一个真实的用例。 我将假设您已经知道如何使用PHPUnit进行单元测试 ,或者您至少掌握了所有内容。 让我们开始吧。

什么是验收测试? (What Is Acceptance Testing?)
Acceptance testing is the process of telling user stories through tests, and I love this quote to describe it:
验收测试是通过测试告诉用户故事的过程,我喜欢用这句话来形容它:
A formal test conducted to determine whether or not a system satisfies its acceptance criteria and to enable the customer to determine whether or not to accept the system.
进行正式测试以确定系统是否满足接受标准,并使客户能够确定是否接受系统。
什么是Selenium? (What Is Selenium?)
Selenium is a tool to automate user interface testing. It helps with testing your application against the browser. The process could be described like so:
Selenium是一种自动化用户界面测试的工具。 它有助于针对浏览器测试您的应用程序。 该过程可以这样描述:
Go to the page
http://myapp.dev/videos.转到页面
http://myapp.dev/videos。- Assert the page contains a list of 20 videos. 断言该页面包含20个视频的列表。
- Click number two on the pagination. 单击第二个在分页上。
- Assert the page contains a list of 20 videos. 断言该页面包含20个视频的列表。
- Quit the browser. 退出浏览器。
You may be wondering: “How does it manipulate the web page using the described tests?”
您可能想知道:“它如何使用所描述的测试来操纵网页?”
The answer is “it depends”. If you’re using Selenium RC (previously named Selenium 1), it will inject auto generated JavaScript code to the page to perform the desired actions. Selenium RC is deprecated and is only supported in maintenance mode; you should be using Selenium WebDriver.
答案是“取决于”。 如果您使用的是Selenium RC(以前称为Selenium 1),它将向页面注入自动生成JavaScript代码以执行所需的操作。 Selenium RC已弃用,仅在维护模式下受支持。 您应该使用Selenium WebDriver。
When using Selenium WebDriver (Selenium 2), the tests are translated into commands and passed to the Selenium server (more about that in a moment), then passed to the browser using the web browser native API.
使用Selenium WebDriver(Selenium 2)时,测试将转换为命令并传递到Selenium服务器(稍后将进行更多介绍),然后使用Web浏览器本机API传递给浏览器。
应用程式设定 (Application Setup)
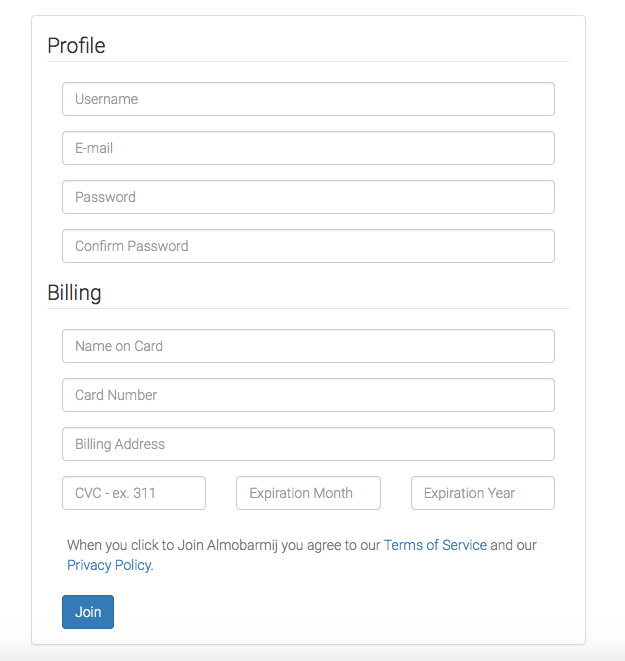
Because we don’t actually have an application to test, I’m going to use a user registration page. The user will enter his personal information and some billing info. If everything is good, the page should output Everything is Good!. Otherwise, the page will show the subscription form with a list of validation error messages.
因为我们实际上没有要测试的应用程序,所以我将使用用户注册页面。 用户将输入他的个人信息和一些账单信息。 如果一切正常,页面应输出Everything is Good! 。 否则,页面将显示带有验证错误消息列表的订阅表单。

We will start testing our application using PHPUnit with the Selenium extension. Be sure to install them using Composer before starting.
我们将开始使用带有Selenium扩展名PHPUnit测试我们的应用程序。 开始之前,请确保使用Composer安装它们。
composer require --dev phpunit/phpunit
composer require --dev phpunit/phpunit-selenium
We said before that commands are passed to a Selenium server, which then forwards them to the browser. We need to download the Selenium server, which is just a JAVA archive executable. The server can be run using java -jar selenium-server-standalone-<version>.jar. Since we will be using it frequently, it’s a good idea to move it to a bin directory and make an alias for that inside our .bashrc or .zshrc.
我们说过,在将命令传递到Selenium服务器之前,Selenium服务器会将它们转发到浏览器。 我们需要下载Selenium服务器 ,它只是JAVA存档可执行文件。 可以使用java -jar selenium-server-standalone-<version>.jar运行java -jar selenium-server-standalone-<version>.jar 。 由于我们将经常使用它,因此,最好将其移动到bin目录,并在.bashrc或.zshrc内部为其创建别名。
alias sserve="java -jar /usr/local/bin/selenium-server-standalone-<version>.jar"PHPUnit和Selenium (PHPUnit and Selenium)
PHPUnit supports both Selenium RC and WebDriver, and it provides two classes for that purpose. The PHPUnit_Extensions_SeleniumTestCase is used for the RC version, and the PHPUnit_Extensions_Selenium2TestCase is used for the WebDriver version. So, your test must extend one of them to get started. Please remember that the RC version is being deprecated, so we’ll use the WebDriver one in our example below.
PHPUnit同时支持Selenium RC和WebDriver,并且为此提供了两个类。 PHPUnit_Extensions_SeleniumTestCase用于RC版本,而PHPUnit_Extensions_Selenium2TestCase用于WebDriver版本。 因此,您的测试必须扩展其中一项才能开始。 请记住,不建议使用RC版本,因此在下面的示例中将使用WebDriver。
// tests/acceptance/UserSubscriptionTest.php

class UserSubscriptionTest extends PHPUnit_Extensions_Selenium2TestCase
{
    public function setUp()
    {
        $this->setHost('localhost');
        $this->setPort(4444);
        $this->setBrowserUrl('http://vaprobash.dev');
        $this->setBrowser('firefox');
    }
}
The setUp method is used for preparing the test environment. In this case, we use it to tell PHPUnit where our Selenium server is running, what browser we’ll be using and the URL of our application. The setHost method defaults to localhost and the setPort method defaults to 4444, so they can be omitted here. However, this can be used if your testing server is inside a Windows machine that supports Internet Explorer while you run your tests from another different machine, etc.
setUp方法用于准备测试环境。 在这种情况下,我们使用它来告诉PHPUnit我们的Selenium服务器在哪里运行,将使用哪种浏览器以及应用程序的URL。 setHost方法默认为localhost ,而setPort方法默认为4444 ,因此可以在此处省略。 但是,如果您的测试服务器位于支持Internet Explorer的Windows计算机中,而您从另一台其他计算机上运行测试,则可以使用此方法。
The tearDown method is called when the tests are done, and it’s used to clear the stage. We use it to close the browser and terminate the current session.
测试完成时将调用tearDown方法,该方法用于清除阶段。 我们使用它来关闭浏览器并终止当前会话。
public function tearDown()
{
    $this->stop();
}
资料提供者 (Data Providers)
PHPUnit data providers allow us to feed our tests with specific data without having to iterate over it. You can read more in the documentation.
PHPUnit数据提供程序允许我们为测试提供特定数据,而不必对其进行迭代。 您可以在文档中阅读更多内容 。
// tests/acceptance/UserSubscriptionTest.php

class UserSubscriptionTest extends PHPUnit_Extensions_Selenium2TestCase
{
    public function validInputsProvider()
    {
        $inputs[] = [
            [
                'username'              => 'younesrafie',
                'password'              => 'mypassword',
                'password_confirmation' => 'mypassword',
                'email'                 => 'mymail@gmail.com',
                'cardHolderName'        => 'RAFIE Younes',
                'cardNumber'            => '378282246310005',
                'billingAddress'        => 'Narjiss B Fez Morocco',
                'cvc'                   => '850',
                'expirationMonth'       => '01',
                'expirationYear'        => '2016',
            ]
        ];

        return $inputs;
    }

    public static function invalidInputsProvider()
    {
        $inputs[] = [
            [
                'username'              => '@younesrafie',
                'password'              => 'mypassword',
                'password_confirmation' => 'mypassword',
                'email'                 => 'mymail@gmail.com',
                'cardHolderName'        => 'RAFIE Younes',
                'cardNumber'            => '378282246310005',
                'billingAddress'        => 'Narjiss B Fez Morocco',
                'cvc'                   => '850',
                'expirationMonth'       => '01',
                'expirationYear'        => '2016',
            ],
            "Username must only contain alpha numeric characters and dashes."
        ];
        // ...

        return $inputs;
    }
}
The invalidInputsProvider returns a list of valid inputs except for one field, and we pass along the expected error message after the validation fails.
invalidInputsProvider返回一个有效输入的列表(一个字段除外),并且验证失败后,我们将传递预期的错误消息。

使用DOM元素 (Working With DOM Elements)
One common task when working with web pages is element selection. PHPunit’s Selenium extension provides a really nice API for that. You can select elements by class name, tag, name, ID, CSS selector, XPath, etc. The method will return a PHPUnit_Extensions_Selenium2TestCase_Element instance which you can use to select other child elements, attributes, etc. You can also set or get the element value, update element CSS and a bunch of other common tasks. For our page we may do something like the following.
使用网页时的一项常见任务是元素选择。 PHPunit的Selenium扩展为此提供了一个非常不错的API。 您可以通过类名称,标签,名称,ID,CSS选择器,XPath等选择元素。该方法将返回PHPUnit_Extensions_Selenium2TestCase_Element实例,可用于选择其他子元素,属性等。您还可以设置或获取元素值,更新元素CSS和许多其他常见任务。 对于我们的页面,我们可能会执行以下操作。
class UserSubscriptionTest extends PHPUnit_Extensions_Selenium2TestCase
{
    public function testFormSubmissionWithUsername()
    {
        $this->byName('username')->value('younesrafie');
        $this->byId('subscriptionForm')->submit();
    }
}
This test will select the username input and set a value, then submit the subscription form. We can add an assertion after that to see if the response is as expected. The page body will contain Everything is Good! if the validation passed.
此测试将选择用户名输入并设置一个值,然后提交订阅表单。 我们可以在其后添加一个断言,以查看响应是否如预期的那样。 页面正文将包含“ Everything is Good! 如果验证通过。
public function testFormSubmissionWithUsername()
{
    $this->byName('username')->value('younesrafie');
    $this->byId('subscriptionForm')->submit();

    $content = $this->byTag('body')->text();
    $this->assertEquals('Everything is Good!', $content);
}
Our data provider contains the input name and the corresponding value. We will create a separate method to handle filling the form inputs and submitting.
我们的数据提供者包含输入名称和相应的值。 我们将创建一个单独的方法来处理填写表单输入和提交的问题。
public function fillFormAndSubmit(array $inputs)
{
    $form = $this->byId('subscriptionForm');
    foreach ($inputs as $input => $value) {
        $form->byName($input)->value($value);
    }
    $form->submit();
}
有效表格提交 (Valid Form Submission)
To point the browser to a specific page we use the url method from the PHPUnit_Extensions_Selenium2TestCase class. The URL is relative to the one provided to the setBrowserUrl method. So, after pointing the browser to the index page we fill and submit the form, then test the expected success message.
为了将浏览器指向特定页面,我们使用PHPUnit_Extensions_Selenium2TestCase类中的url方法。 该URL相对于提供给setBrowserUrl方法的URL。 因此,在将浏览器指向索引页面之后,我们填写并提交表单,然后测试预期的成功消息。
// tests/acceptance/UserSubscriptionTest.php

/**
 * @dataProvider validInputsProvider
 */
public function testValidFormSubmission(array $inputs)
{
    $this->url('/');
    $this->fillFormAndSubmit($inputs);

    $content = $this->byTag('body')->text();
    $this->assertEquals('Everything is Good!', $content);
}
Assuming your Selenium server is up and running, go ahead and run your tests with phpunit tests/acceptance/UserSubscriptionTest.php. This will create a new browser session and start filling the form. We are expecting everything to pass with one successful assertion.
假设您的Selenium服务器已启动并正在运行,请继续并使用phpunit tests/acceptance/UserSubscriptionTest.php运行测试。 这将创建一个新的浏览器会话并开始填写表单。 我们期望所有的事情都能通过一个成功的断言。

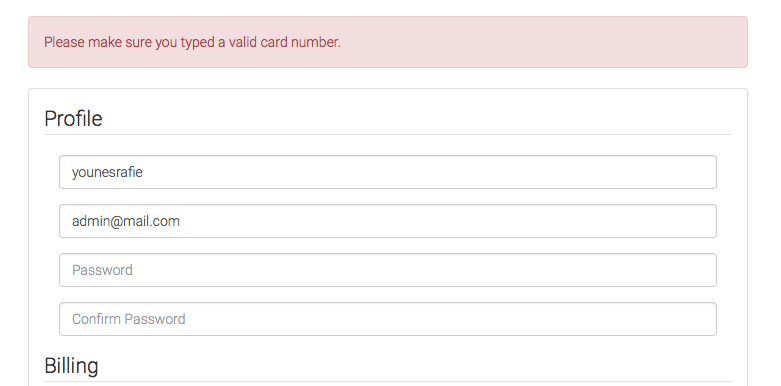
Some of the tests fail, and the testing duration is too short for us to observe what went wrong. PHPUnit has the ability to capture screenshots of failing tests using the currentScreenshot method which returns a BLOB image that we can save.
有些测试失败,并且测试持续时间太短,我们无法观察到出了什么问题。 PHPUnit可以使用currentScreenshot方法捕获失败测试的屏幕截图,该方法返回我们可以保存的BLOB图像。
file_put_contents(__DIR__ . '/../../public/screenshots/screenshot.jpg', $this->currentScreenshot());无效的表格提交 (Invalid Form Submission)
The invalid form submission is almost identical to the previous method. We fill in the form inputs and submit. Then, we verify that the validation error message is as expected. We will be using the invalidInputsProvider I mentioned earlier.
无效的表单提交几乎与以前的方法相同。 我们填写表格输入并提交。 然后,我们验证验证错误消息是否如预期的那样。 我们将使用前面提到的invalidInputsProvider 。
// tests/acceptance/UserSubscriptionTest.php

/**
 * @dataProvider invalidInputsProvider
 */
public function testInvalidFormSubmission(array $inputs, $errorMessage)
{
    $this->url('/');
    $this->fillFormAndSubmit($inputs);
    $errorDiv = $this->byCssSelector('.alert.alert-danger');
    $this->assertEquals($errorMessage, $errorDiv->text());
}
The byCssSelector method allows us to retrieve an element from the page using CSS selectors, in this case the error paragraph. We assert if the error message is as expected using the error message field from the data provider method.
byCssSelector方法允许我们使用CSS选择器从页面中检索元素,在这种情况下为错误段落。 我们使用数据提供者方法中的错误消息字段来确定错误消息是否符合预期。
Our form contains only basic interactions like selecting elements, setting values, submitting the form, etc. However, we can also use the click method on a button or link element to verify that the target page is working as expected.
我们的表单仅包含基本交互,例如选择元素,设置值,提交表单等。但是,我们还可以在按钮或链接元素上使用click方法来验证目标页面是否按预期工作。

使用其他浏览器 (Using Another Browser)
We used the Firefox browser for our tests. However, we have the ability to use any other browser as well. Selenium uses the driver approach, where every browser vendor works on providing its own driver. You can check the list of supported drivers in the documentation.
我们使用Firefox浏览器进行测试。 但是,我们也可以使用任何其他浏览器。 Selenium使用驱动程序方法,每个浏览器供应商都致力于提供自己的驱动程序。 您可以在文档中查看受支持的驱动程序列表 。
To enable the Chrome browser, you need to download the chromeDriver and specify the path as an option when launching the Selenium server.
要启用Chrome浏览器,您需要下载chromeDriver并在启动Selenium服务器时将路径指定为选项。
sserve -Dwebdriver.chrome.driver=/Users/admin/Downloads/chromedriver// tests/acceptance/UserSubscriptionTest.php
public function setUp()
{
// ...
$this->setBrowser('chrome');
}
文件准备好了吗? (Is the Document Ready?)
If your page content is loaded via AJAX, and you don’t want to trigger the tests directly on page load, you’ll want to wait until your page is loaded and your elements are present.
如果您的页面内容是通过AJAX加载的,并且您不想直接在页面加载时触发测试,则需要等到页面加载并且元素存在后再进行测试。
public function testCategorySelected()
{
    $webdriver = $this;
    $this->waitUntil(function() use($webdriver){
        try{
            $webdriver->byId('rootElement');

            return true;
        }catch (Exception $ex){
            return null;
        }

    }, 2000);
}
The callback function will wait until we return a non null value, and will timeout after two seconds with an error message. The lookup method will keep looking for the element, but if you want to specify a searching interval you can use the implicitWait method.
回调函数将等待直到我们返回非null值,并在两秒钟后超时并显示错误消息。 lookup方法将继续寻找元素,但是如果您要指定搜索间隔,则可以使用implicitWait方法。
$this->timeouts()->implicitWait(300); //milliseconds结论 (Conclusion)
This article was a brief introduction to using Selenium with PHPUnit for acceptance testing. In general, you can use Selenium for anything that requires browser automation. If you have any comments or questions, be sure to post them below and I will do my best to answer them.
本文是对将Selenium与PHPUnit一起用于验收测试的简要介绍。 通常,您可以将Selenium用于需要浏览器自动化的任何事情。 如果您有任何意见或疑问,请务必将其张贴在下面,我会尽力回答。
selenium安装与使用


 169
169

 被折叠的 条评论
为什么被折叠?


