


安徽人撸起袖子加油干
Last week, I covered the basic components of i18n in WordPress and how each of those pieces fit together.
上周,我介绍了WordPress中i18n的基本组件以及这些组件如何组合在一起。
Now let’s dig a little bit deeper and take a look at some real code, shall we?
现在让我们更深入地研究一些真实的代码,对吧?
在WordPress中本地化主题 (Localizing a Theme in WordPress)
When you are localizing a theme, you’ll usually only be addressing text strings that appear in different places of your theme.
本地化主题时,通常只处理出现在主题不同位置的文本字符串。
Therefore, let’s have a look at some basic HTML code that has a few strings in it:
因此,让我们看一下其中包含一些字符串的一些基本HTML代码:
<!DOCTYPE html PUBLIC "-//W3C//DTD XHTML 1.0 Transitional//EN"
  "https://www.w3.org/TR/xhtml1/DTD/xhtml1-transitional.dtd">
<html xmlns="https://www.w3.org/1999/xhtml">
<head>
<meta http-equiv="Content-Type" content="text/html; charset=UTF-8" />
<title>Localization Sample</title>
</head>

<body>
<p>My name is Mick.</p>
<p>I have a dog named Lacie.</p>
<p>My dog's name is Lacie, but we call her Bug.</p>
<p>Sometimes, we call her Buggers.</p>
<p>Lacie has a black coat.</p>

</body>
</html>
Not much to see here, really. We just have five different strings of text entered into an HTML document in a pretty generic way. However, we can localize this page by simply wrapping each of the strings with the _e() function.
没什么可看的,真的。 我们只是以一种非常通用的方式将五个不同的文本字符串输入到HTML文档中。 但是,我们可以通过使用_e()函数简单包装每个字符串来本地化此页面。
<!DOCTYPE html PUBLIC "-//W3C//DTD XHTML 1.0 Transitional//EN" "https://www.w3.org/TR/xhtml1/DTD/xhtml1-transitional.dtd">
<html xmlns="https://www.w3.org/1999/xhtml">
<head>
<meta http-equiv="Content-Type" content="text/html; charset=UTF-8" />
<title>Localization Sample</title>
</head>

<body>
<p><?php _e( 'My name is Mick.', 'our-very-unique-domain' ); ?></p>
<p><?php _e( 'I have a dog named Lacie.', 'our-very-unique-domain' ); ?></p>
<p><?php _e( 'My dog's name is Lacie, but we call her Bug.', 'our-very-unique-domain' ); ?></p>
<p><?php _e( 'Sometimes, we call her Buggers.', 'our-very-unique-domain' ); ?></p>
<p><?php _e( 'Lacie has a black coat.', 'our-very-unique-domain' ); ?></p>

</body>
</html>
This is a bit more interesting now. We’ve wrapped each text string with _e() and set our textdomain constant for the localization. Note that I have used a constant called our-very-unique-domain. As you begin to localize your own themes and plugins, just make sure you realize that it really doesn’t matter what you call this domain so long as it is unique to you, and you initialize the relationship with the same unique name. How do we initialize the relationship within functions.php? Let’s look at the code:
现在,这有点有趣。 我们使用_e()包装了每个文本字符串,并为本地化设置了textdomain常量。 请注意,我使用了一个称为our-very-unique-domain的常量。 当您开始本地化自己的主题和插件时,只需确保意识到,只要您对它唯一,就可以真正使用该域名,并且使用相同的唯一名称初始化关系。 我们如何初始化functions.php的关系? 让我们看一下代码:
<?php
load_theme_textdomain( 'our-very-unique-domain', TEMPLATEPATH.'/languages' );

$locale = get_locale();
$locale_file = TEMPLATEPATH."/languages/$locale.php";
if ( is_readable($locale_file) )
	require_once($locale_file);
?>
As you can see, on line 1 we’ve fired up load_theme_textdomain() and specified that our language translation files will live in the /languages folder of our theme. So far, so good, but now we see bunch of stuff that talks about locale. Theme localization depends on WPLANG constant in wp-config.php which defines the locale.
如您所见,在第1行上,我们启动了load_theme_textdomain()并指定了我们的语言翻译文件将位于主题的/languages文件夹中。 到目前为止,还算不错,但是现在我们看到了很多关于语言环境的东西。 主题本地化取决于wp-config.php中定义语言环境的WPLANG常量。
The locale is a combination of both a country and a language code specified by the GNU gettext framework – you can look up country and language abbreviations in the gettext manual.
语言环境是国家和GNU gettext框架指定的语言代码的组合–您可以在gettext手册中查找国家和语言的缩写。
Open up your wp-config.php file and look to see if you have a custom WordPress locale defined … if you don’t, go ahead and define it now. For example, if you are using German as the main language for your site, the you would see (or manually add) a line in your wp-config.php file like this:
打开wp-config.php文件,查看是否已定义自定义WordPress语言环境…如果没有,请立即进行定义。 例如,如果您使用德语作为网站的主要语言,则您将在wp-config.php文件中看到(或手动添加)一行,如下所示:
define ( 'WPLANG', 'de_DE');
define ( 'WPLANG', 'de_DE');
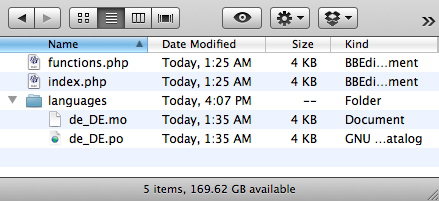
With the WordPress locale set, (in this case de_DE), our code above will now seek to find a German localization file called de_DE.mo in the /languages directory of our theme. Therefore, the files in our sample theme directory might ultimately have a structure that looks something like this:
设置了WordPress语言环境(在本例中为de_DE )后,上面的代码现在将在主题的/languages目录中查找名为de_DE.mo的德语本地化文件。 因此,示例主题目录中的文件最终可能具有如下所示的结构:
在WordPress中本地化插件 (Localizing a Plugin in WordPress)
Localizing a plugin is very similar to localizing a theme. Let’s take it from the top by looking at a very simple plugin that has not been localized.
本地化插件与本地化主题非常相似。 让我们通过查看一个尚未本地化的非常简单的插件来从顶部开始。
<?php
/*
Plugin Name: Our Sample Plugin
Plugin URI: https://www.sitepoint.com/our-sample-plugin
Description: Sample localization code demonstration
Version: 1
Author: Mick Olinik
Author URI: http://www.sitepoint.com
License: GPL2
*/

add_action( 'init', 'olin_osp_init' );
function olin_osp_init() {
	add_action( 'admin_menu', 'olin_osp_menu' );
}

function olin_osp_menu() {
	add_options_page( 'Our Sample Plugin Options', 'Our Sample Plugin', 'manage_options', 'our-sample-plugin', 'olin_osp_settings' );
}

function olin_osp_settings() {
	?>
	<div class='wrapper'>
		<h1>Our Sample Plugin Settings</h1>
		<!-- Imagine that there is some really exciting functionality happening here -->
	</div>
	<?php
}
?>
Again, not much to see here really. We’re simply registering our plugin with WordPress, creating an admin menu for our users, and then adding an admin page to modify the settings of our sample plugin.
再次,在这里看不到太多东西。 我们只是使用WordPress注册了我们的插件,为我们的用户创建了一个管理菜单,然后添加了一个管理页面来修改示例插件的设置。
However, when we move to localize the plugin, we’ll want to make some key changes. Let’s look at the same plugin with correctly localized code.
但是,当我们开始本地化插件时,我们将需要进行一些关键的更改。 让我们看一下具有正确本地化代码的同一个插件。
<?php
/*
Plugin Name: Our Sample Plugin
Plugin URI: https://www.sitepoint.com/our-sample-plugin
Description: Sample localization code demonstration
Version: 1
Author: Mick Olinik
Author URI: http://www.sitepoint.com
License: GPL2
*/

add_action( 'init', 'olin_osp_init' );
function olin_osp_init() {
	add_action( 'admin_menu', 'olin_osp_init' );
	load_plugin_textdomain( 'our-very-unique-domain', false, dirname( plugin_basename( __FILE__ ) ) . '/languages/' );
}

function olin_osp_menu() {
	add_options_page( sprintf( __( '%s Options', 'our-very-unique-domain' ), 'Our Sample Plugin' ), 'Our Sample Plugin', 'manage_options', 'our-sample-plugin', 'olin_osp_settings' );
}

function olin_osp_settings() {
	?>
	<div class='wrapper'>
		<h1><?php _e( 'Our Sample Plugin Settings', 'our-very-unique-domain' ); ?></h1>
		<!-- Imagine that there is some really exciting functionality happening here -->
	</div>
	<?php
}
?>
The first thing we’ll need to do is initialize the localization, and it’s conceptually the exact same thing for plugins as it is for themes. In the init action that we are using within our plugin, we’ll add the load_plugin_textdomain() function.
我们需要做的第一件事是初始化本地化,从概念上来说,插件和主题完全相同。 在插件中使用的init操作中,我们将添加load_plugin_textdomain()函数。
As you can see, we’re identifying our unique textdomain as well as the location of the translation files, in this case the /languages folder within the plugin. Then, we can go about our business as usual preparing strings to be localized within our code, just as in the case of themes.
如您所见,我们正在标识我们唯一的文本域以及翻译文件的位置,在本例中为插件内的/languages文件夹。 然后,就像主题一样,我们可以照常进行处理,准备将字符串本地化到代码中。
The files for Our Sample Plugin might ultimately look something like this:
我们的示例插件的文件最终看起来可能像这样:

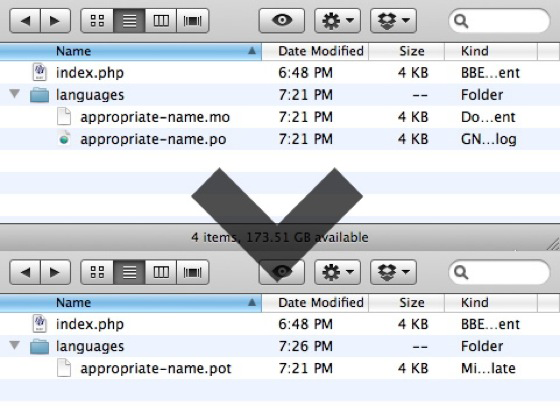
A word on .MO file nomenclature: In looking at the image above, you may notice that the nomenclature for our .MO files has changed within a plugin as opposed to how we labelled it in our theme.
.MO文件命名法:在查看上图时,您可能会注意到,.MO文件命名法在插件中发生了变化,与我们在主题中对其进行标记的方式不同。
When looking for compiled .MO translation files, WordPress looks for a different syntax for theme localizations than it does for plugin localizations. With theme localizations, you’ll want to name your .MO file in the format of locale.mo. For example, it translating your theme to German, your theme translation file in the /languages directory within your theme should be named de_DE.mo.
当寻找编译的.MO翻译文件时,WordPress为主题本地化寻找的语法与为插件本地化寻找的语法不同。 随着主题的本地化,你要来命名的格式的文件.MO locale.mo 。 例如,它将主题转换为德语,主题内/languages目录中的主题转换文件应命名为de_DE.mo 。
On the other hand, if you are localizing a plugin, WordPress will seek the translation file in your specified /languages directory within your plugin in the format of pluginname-locale.mo. In this instance, the plugin name corresponds directly to the textdomain you assigned to the localization in your plugin. Keeping with the examples we had laid out above, our translation file would thus be named our-very-unique-domain-de_DE.mo if we were translating that plugin into German.
另一方面,如果您要对插件进行本地化,则WordPress将以pluginname-locale.mo的格式在插件中指定的/languages目录中查找翻译文件。 在这种情况下,插件名称直接对应于您为插件中的本地化分配的文本域。 our-very-unique-domain-de_DE.mo上面列出的示例,如果我们将该插件翻译成德语,则我们的翻译文件将被命名为our-very-unique-domain-de_DE.mo 。
让我们做一些翻译:Poedit介绍! (Let’s Do Some Translation: Introducing Poedit!)
Poedit is a viciously popular open-source tool that you can download and install on your computer to help you create and maintain all of the files you’ll need.
Poedit是一种非常受欢迎的开源工具,您可以将其下载并安装到计算机上,以帮助您创建和维护所需的所有文件。
Poedit will automatically sort through all of the source code you have in your plugin or theme and return all strings that you have defined to be localizable through the _e() or __() functions. Then, it’s just a matter of going through each string and providing a translation for a specific language. Let’s get started by downloading and installing Poedit from http://www.poedit.net/download.php.
Poedit将自动对插件或主题中包含的所有源代码进行排序,并返回定义为可通过_e()或__()函数进行本地化的所有字符串。 然后,只需遍历每个字符串并提供特定语言的翻译即可。 让我们从http://www.poedit.net/download.php下载和安装Poedit开始。
创建一个.POT文件 (Creating a .POT file)
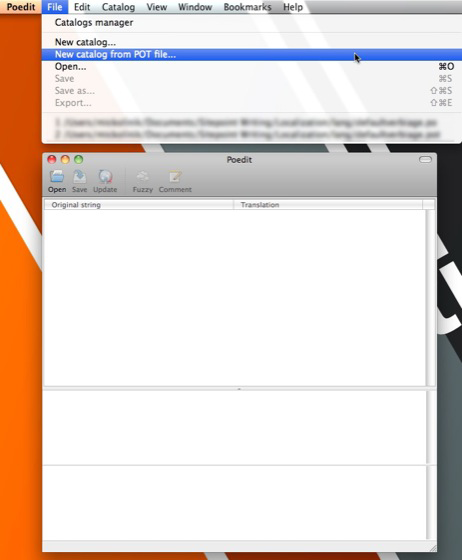
If you are localizing your own plugin or theme, the first thing we’ll need to do it create a .POT file. To refresh your memory, a .POT file is just a .PO file that doesn’t have any definitions – it merely defines the strings that need to be translated. By default, Poedit looks for .POT files to open and work off of when a translator first seeks to localize your code, but since we don’t have one yet we’ll need to make it first. To do this, fire up Poedit, click File and then select New catalog as per the screenshot below.
如果您要本地化自己的插件或主题,则首先需要创建一个.POT文件。 为了刷新您的记忆,.POT文件只是一个没有任何定义的.PO文件-它仅定义需要翻译的字符串。 默认情况下,Poedit会寻找.POT文件来打开并在翻译器首次尝试对您的代码进行本地化时停止工作,但是由于我们还没有一个,因此需要首先创建它。 为此,启动Poedit,单击“ 文件” ,然后根据下面的屏幕快照选择“ 新建目录” 。
When creating a new catalog, the first thing you’ll be brought to is the Project info tab.
创建新目录时,首先要带到的是“ 项目信息”选项卡。
You can fill this in as completely as you like, but all that is really required is to give our new catalog a project name. Give it a name, and then click on the Paths tab.
您可以随意填写,但是真正需要做的就是给我们的新目录添加一个项目名称。 为它命名,然后单击“ 路径”选项卡。

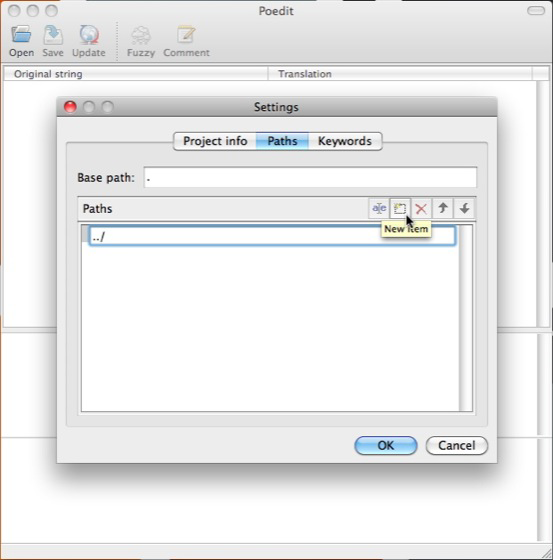
Now we need to create the path to our translation file. This path is relative to the file or files being translated.
现在,我们需要创建翻译文件的路径。 此路径是相对于要转换的一个或多个文件的。
Since I consider it best practice to create a separate directory for your language translations, I prefer adding ../ for the path as I’ve done in the screenshot below.
由于我认为最好的做法是为您的语言翻译创建一个单独的目录,因此我更喜欢在路径中添加../ ,如下面的屏幕快照所示。
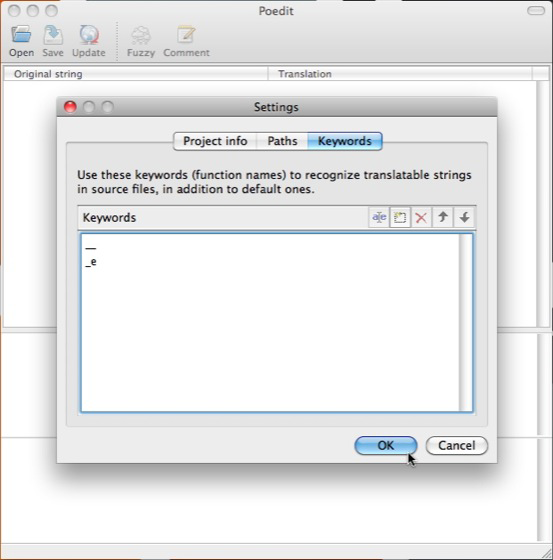
Once you have your path set, click the Keywords tab to continue.
设置好路径后,请点击“ 关键字”标签以继续。
In the Keywords tab, we need only to define the GNU gettext elements that we used to prepare our strings for localization within our code. Again, __ and _e are the most common gettext functions that are used, but if you happened to use _n, _x, or any other gettext functions you will need to define them all here.
在“ 关键字”标签中,我们只需要定义用于准备字符串以在代码中进行本地化的GNU gettext元素。 同样, __和_e是最常用的gettext函数,但是如果碰巧使用_n , _x或任何其他gettext函数,则需要在此处全部定义它们。
I like to remove the functions I don’t need, and so I’ll remove each of the functions I am not using, as in the screenshot below.
我喜欢删除不需要的功能,因此我将删除我不使用的每个功能,如下面的屏幕截图所示。
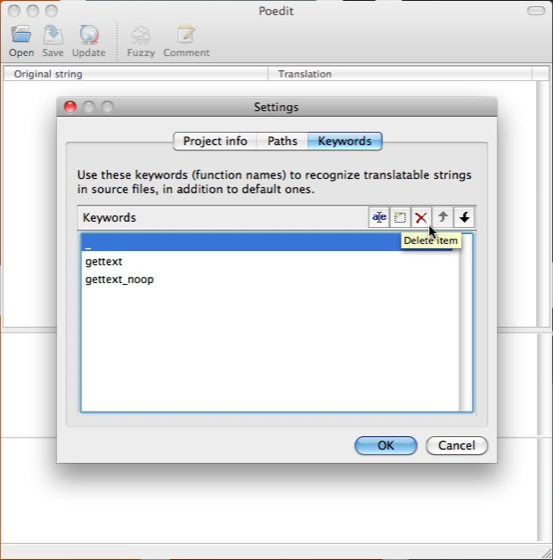
This is a standard Keywords configuration that will suit the purposes of our discussion very well. We’ve added only __ and _e because these are the functions being called in our code.
这是一个标准的关键字配置,非常适合我们的讨论目的。 我们仅添加了__和_e因为这些是在代码中被调用的函数。
Make your additions and then click OK, as per the screenshot below.
进行添加,然后按照下面的截图单击OK 。
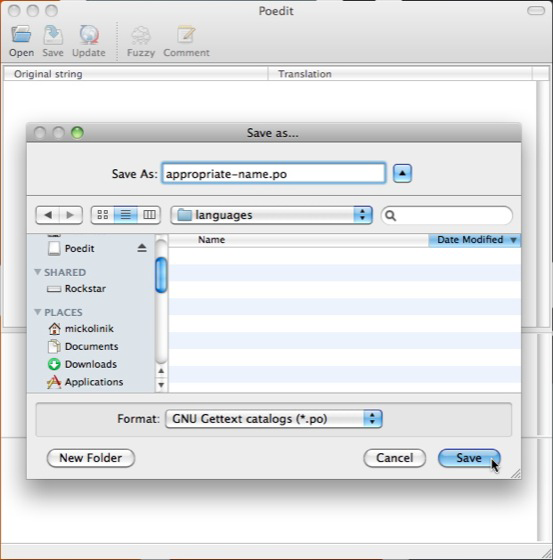
Upon clicking OK, we’ll be prompted to save our configuration as a new .PO file.
单击“ 确定”后 ,将提示我们将配置另存为新的.PO文件。
Before you save your file, be sure to navigate to the correct location per what you set in the Paths tab of your catalog. Poedit will use the location you save your file to as a point of reference when it searches for the files you have added your localization strings to.
保存文件之前,请确保根据目录的“路径”选项卡中设置的内容导航到正确的位置。 当Poedit搜索添加了本地化字符串的文件时,它将使用保存文件的位置作为参考。
In our example, we’ve added a path of ../, so we’ll want to save the new .PO file in a subdirectory where your files are located. While any subdirectory will do, you might as well use something descriptive like /languages or /lang. Save your .PO file with a name appropriate to your purpose.
在我们的示例中,我们添加了../路径,因此我们希望将新的.PO文件保存在文件所在的子目录中。 尽管任何子目录都可以使用,但您最好也使用/languages或/lang这样的描述性内容。 使用适合您的目的的名称保存您的.PO文件。
Just to be deftly creative, I went ahead and used appropriate-name.po.
为了发挥自己的创造力,我继续使用了appropriate-name.po
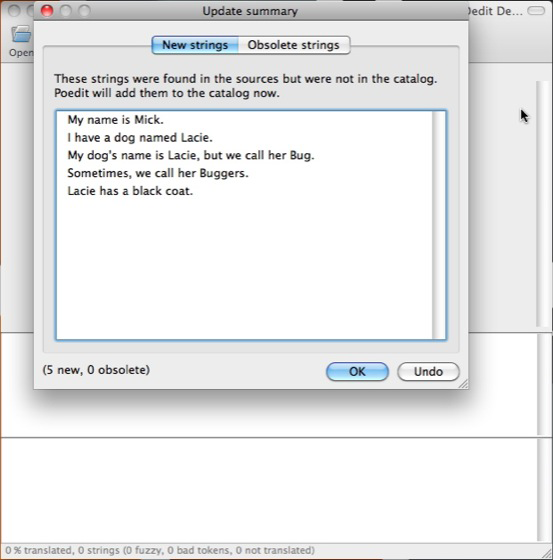
Upon saving the file, Poedit uses the path parameter that you set to find and index any files it sees. At this point, Poedit checks all of the files available against the list of gettext functions you defined in the Keywords tab and returns a list of translatable strings to you.
保存文件后,Poedit将使用您设置的path参数来查找并索引它看到的所有文件。 此时,Poedit将对照您在“ 关键字”选项卡中定义的gettext函数列表检查所有可用文件,并向您返回可翻译字符串的列表。
Our example below shows a short list of strings revolving around my dog and I. Click OK, and you have a blank .PO file with a few string definitions.
下面的示例显示了围绕我和我的狗的字符串的简短列表。单击OK ,您将获得一个空白的.PO文件,其中包含一些字符串定义。
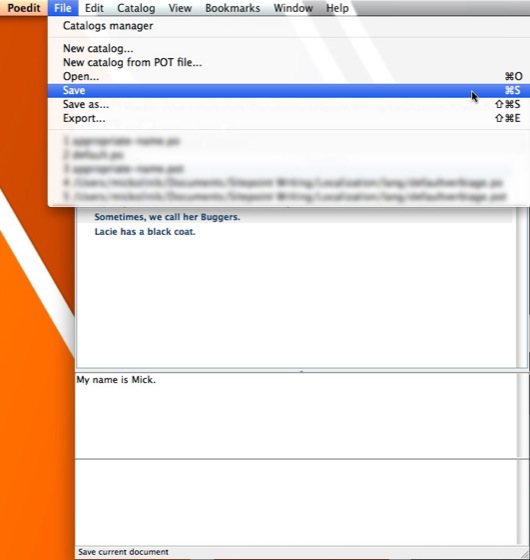
This is the tricky part – and essential for creating a .POT file with Poedit.
这是棘手的部分–对于使用Poedit创建.POT文件是必不可少的。
Before you do anything else here, save the file a second time.
在此处执行其他操作之前,请再次保存文件。
The reason this is necessary is that when Poedit initially creates the .PO file, it saves the file first and then imports the translatable strings. If you fail to save the file a second time and close it, you’ll end up with a blank .PO file that has no translatable strings, thus defeating the purpose.
之所以需要这样做,是因为当Poedit最初创建.PO文件时,它将首先保存该文件,然后导入可翻译字符串。 如果您无法再次保存该文件并关闭它,将得到一个空白的.PO文件,该文件没有可翻译的字符串,因此无法达到目的。
Once you save your .PO file a second time (with your translatable strings added), close the file and quit Poedit. Don’t worry – we’ll be right back.
再次保存.PO文件(添加了可翻译字符串)后,请关闭该文件并退出Poedit。 别担心-我们会马上回来。
Now navigate to your directory structure where you have saved your .PO file. You’ll note that you actually have two files available: a .PO file that you created, and a .MO file that Poedit automatically compiled for you when you saved the .PO file.
现在,导航到保存.PO文件的目录结构。 您会注意到实际上有两个文件可用:创建的.PO文件和保存该PO时Poedit自动为您编译的.MO文件。
Because we first want to create a template file, we don’t need the .MO file – go ahead and delete it. Then, just rename the .PO file to a .POT file.
因为我们首先要创建模板文件,所以不需要.MO文件-继续删除它。 然后,只需将.PO文件重命名为.POT文件。
When you’re done, you’ll end up with just one .POT file in your /languages directory as shown in the screenshot below.
完成后,最终在/languages目录中只有一个.POT文件,如下面的屏幕快照所示。
Now we’ve got our .POT file, so let’s start translating!
现在我们有了.POT文件,让我们开始翻译!
If all you are aiming to do set up your theme or plugin so that it can be easily localized by others, congratulations! At this point, you are all set, and you can move on with your life! So long as you include your shiny new .POT file in the correct directory, anybody will be able to work with and translate your theme or plugin into an infinite number of languages.
如果您打算设置您的主题或插件,以便其他人可以轻松地对其进行本地化,那么恭喜您! 至此,您已经准备就绪,可以继续生活! 只要您在正确的目录中包含闪亮的新.POT文件,任何人都可以使用并将您的主题或插件翻译成无限多种语言。
That said, let’s assume you want to actually do a few translations. Get started by firing Poedit back up and instead of selecting New catalog, select New catalog from POT file.
就是说,让我们假设您实际上要进行一些翻译。 通过备份Poedit开始操作,而不是选择New catalog ,而是从POT文件中选择New catalog 。
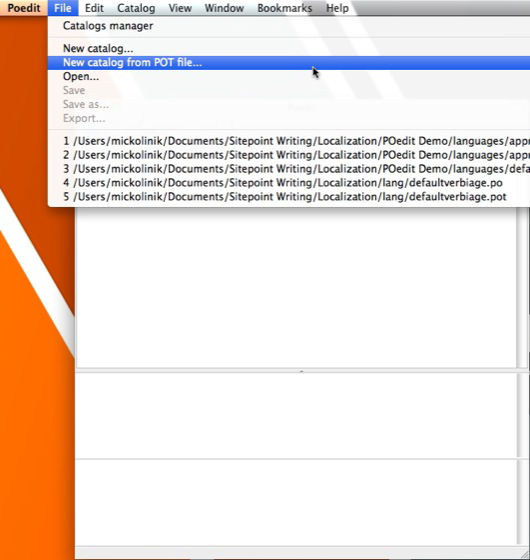
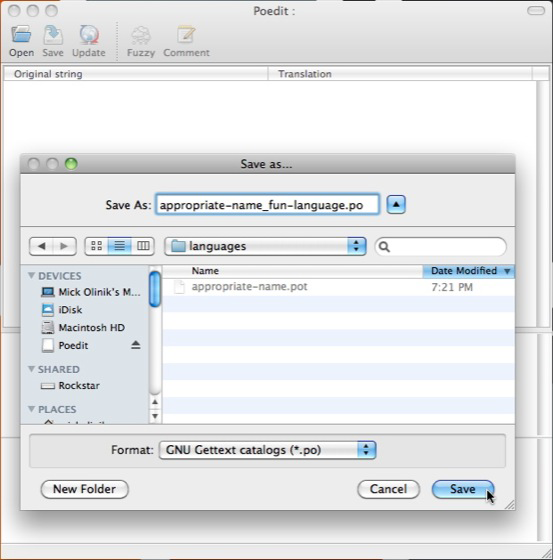
Go ahead and find the .POT file you just created, open it, and then click OK to the subsequent catalog settings (they are the exact same ones you set yourself). Poedit will then ask you what you’d like to save your new .PO file as.
继续并找到您刚刚创建的.POT文件,将其打开,然后单击“ 确定”以进行后续的目录设置(它们与您自己设置的完全相同)。 然后,Poedit将询问您要将新的.PO文件另存为的内容。
Give it an appropriate name and save it as shown in the screenshot below.
给它起一个适当的名称并保存,如下面的屏幕快照所示。
It’s really clear sailing from here on.
从这里开始确实很清楚。
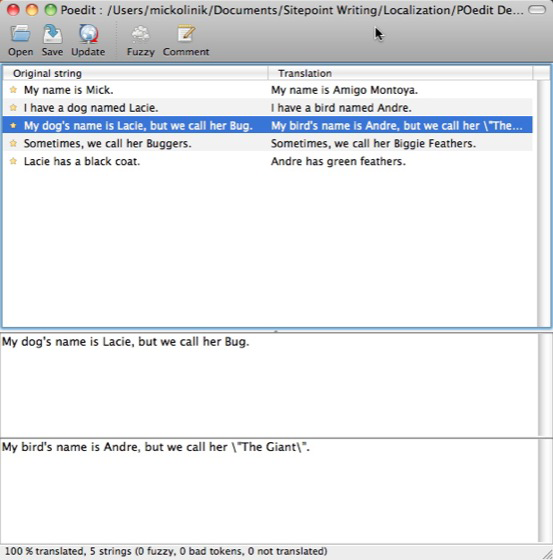
Just click on the string you’d like to translate in Poedit and type a translation into the box on the bottom of the Poedit window as shown in the image below.
只需单击要在Poedit中翻译的字符串,然后在Poedit窗口底部的框中键入翻译内容,如下图所示。
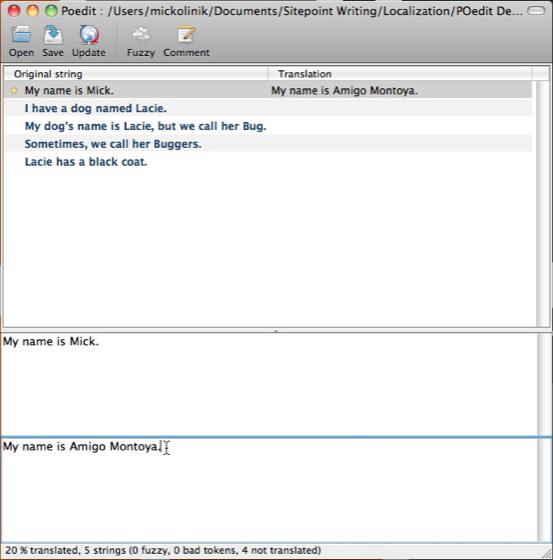
We’ll wash-rinse-and-repeat this procedure until all of the strings have been translated. Editing strings is just as easy… just click on the the string you want to edit and make your modifications.
我们将冲洗并重复此过程,直到所有字符串都已翻译。 编辑字符串同样容易……只需单击要编辑的字符串并进行修改即可。
Remember, each time you save a .PO file, a new .MO file will be compiled for you. It is the .MO file – not the .PO file – that WordPress will actually use when doing translations.
请记住,每次保存.PO文件时,都会为您编译一个新的.MO文件。 WordPress在翻译时将实际使用的是.MO文件,而不是.PO文件。
Localization sounds all well and good, but there isn’t, by chance, an easier way to do this, is there?
本地化听起来很好,但是偶然地,没有一个简单的方法可以做到这一点吗?
Funny you should ask that. There’s a pretty cool tool that’s been in development for some time now called WPML (available at wpml.org). It’s a premium plugin and well worth the investment.
有趣的是你应该问这个。 有一个很酷的工具已经开发了一段时间,现在称为WPML(可从wpml.org获得 )。 这是一个高级插件,非常值得投资。
WPML greatly reduces the amount of time and effort it takes to localize your theme or plugin, at least within the context of a single website. All you need to do is identify your localization strings properly within your plugin or your theme by wrapping them in __() or _e() tags. Once you make your string identifications, WPML takes over, eliminating the hassle of setting up .PO, .MO and .POT files and sorting out how to add them to your files and themes.
WPML极大地减少了至少在单个网站的上下文中本地化主题或插件所需的时间和精力。 您需要做的就是通过将它们包装在__()或_e()标记中来正确识别您的插件或主题中的本地化字符串。 一旦确定了字符串标识,WPML便会接手,从而消除了设置.PO,.MO和.POT文件以及解决如何将它们添加到文件和主题中的麻烦。
When you initially run WPML on your WordPress site, WPML acts like Poedit and scans through all of your theme and plugin files in search of translatable strings. Upon creating a list of strings, WPML asks the user to define which languages the website should be translatable to and automatically creates the necessary .PO and .MO files needed to support each.
最初在WordPress网站上运行WPML时,WPML的行为类似于Poedit,并扫描所有主题和插件文件以查找可翻译的字符串。 创建字符串列表后,WPML要求用户定义网站应可翻译为的语言,并自动创建支持每种语言所需的.PO和.MO文件。
After that, WPML provides a really slick interface inside the WordPress backend that gives you options to translate strings as well as whole posts and pages. Cooler yet, it also creates unique, translated permalinks so that your posts and pages can be indexed in multiple languages by default!
之后,WPML在WordPress后端提供了一个非常漂亮的界面,使您可以选择翻译字符串以及整个文章和页面。 更酷的是,它还创建了独特的翻译永久链接,因此默认情况下,您的帖子和页面可以用多种语言编制索引!
Finally, WPML also integrates a translator management system. This lets you hire professional translators to do translation work directly on your site. Alternatively, you can use their management system to assign specific members of your own staff to do translation in a particular language.
最后,WPML还集成了翻译器管理系统。 这使您可以聘请专业翻译人员直接在您的网站上进行翻译工作。 另外,您可以使用他们的管理系统来分配您自己员工的特定成员,以特定语言进行翻译。
安徽人撸起袖子加油干


 362
362

 被折叠的 条评论
为什么被折叠?
被折叠的 条评论
为什么被折叠?
 到【灌水乐园】发言


