spring 中使用tdd
In part 1, we set up our development environment, baked in some rules as inherited from The League, and created two sample but useless classes – Diffbot and DiffbotException. In this part, we’ll get started with Test Driven Development.
在第1部分中 ,我们设置了开发环境,并遵循了从The League继承的一些规则,并创建了两个示例但无用的类Diffbot和DiffbotException 。 在这一部分中,我们将开始测试驱动开发。

If you’d like to follow along, please read Part 1 or clone the part 1 branch of this tutorial’s code.
如果您想继续学习,请阅读第1部分或克隆本教程代码的第1 部分分支 。
PHPUnit (PHPUnit)
We’ve covered PHPUnit to some degree before (1, 2, 3, 4, 5, 6), but it’s time we put it into real practice now. First, let’s check if it’s installed.
我们已经覆盖PHPUnit的一定程度之前( 1 , 2 , 3 , 4 , 5 , 6 ),但它的时候,我们把它变成真正的实践了。 首先,让我们检查一下是否已安装。
php vendor/phpunit/phpunit/phpunitRunning this command should produce a report that says one test passed. This is the test included in the League Skeleton by default and it asserts that true is, in fact, true. A coverage report will also be generated and placed into the build folder.
运行此命令应生成一份报告,说明已通过一项测试。 这是默认情况下包含在League Skeleton中的测试,它断言true实际上是true 。 还将生成一份覆盖率报告,并将其放置在build文件夹中。
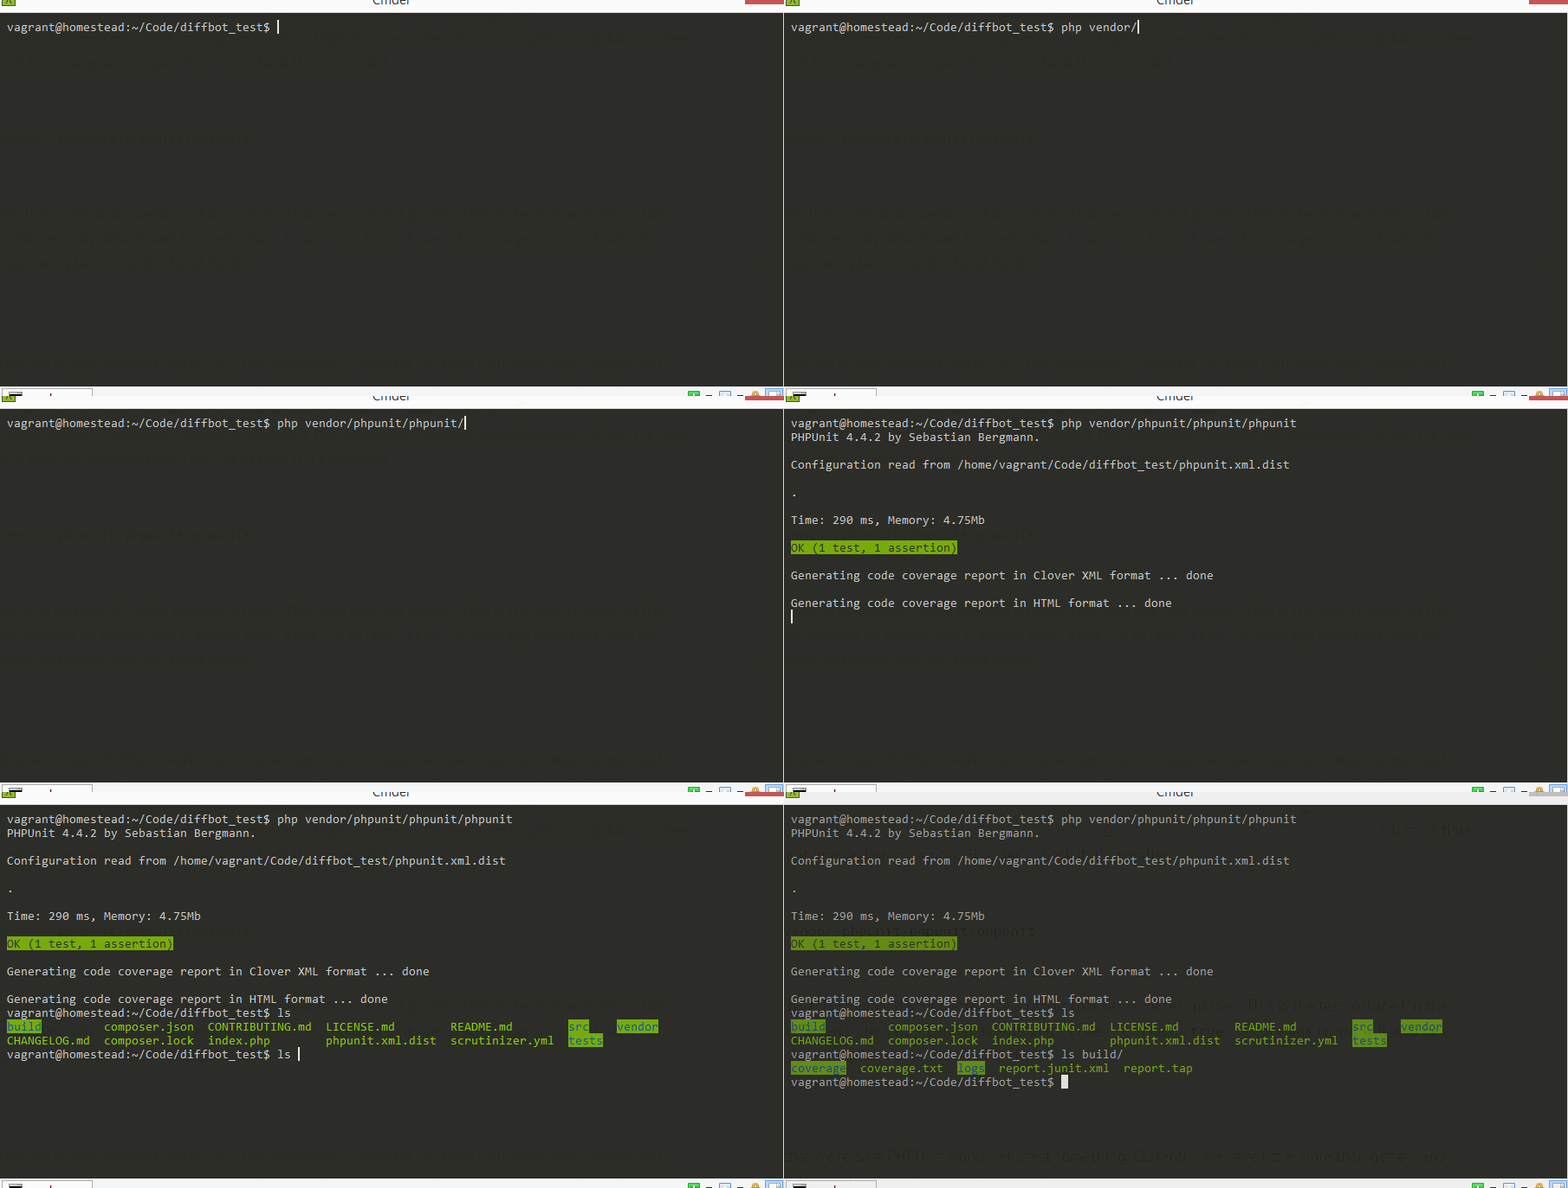
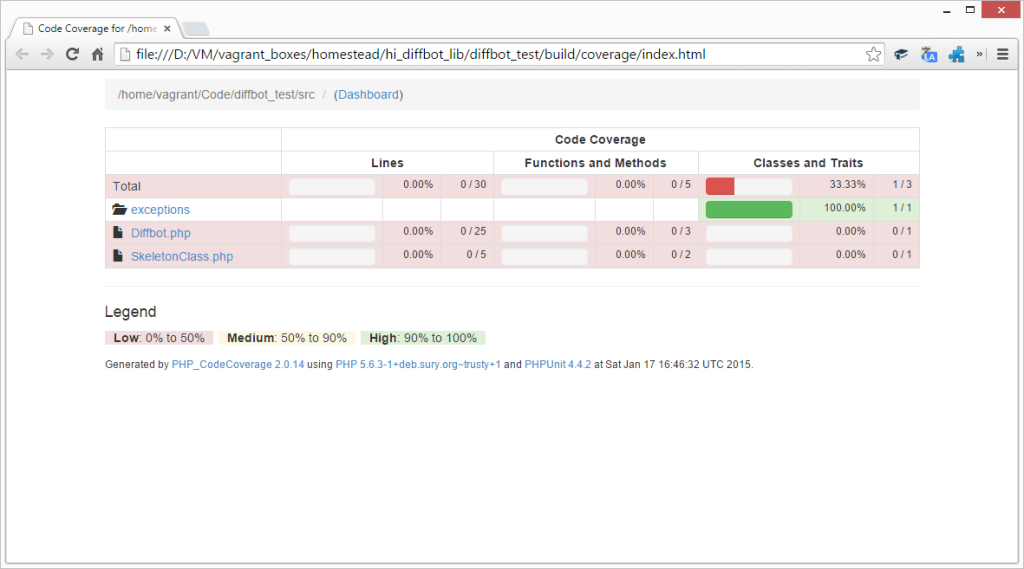
If you open this coverage report in the browser, you should see we have a low coverage score.
如果您在浏览器中打开此覆盖率报告,则应该看到我们的覆盖率较低。
Now that we’re sure PHPUnit works, let’s test something. Currently, we have little more than getters and setters in our class and those aren’t generally tested. So what can we test in our current code? Well.. how about the validity of the provided token through instantiation?
现在我们确定PHPUnit可以正常工作,让我们测试一下。 目前,我们的课程中只剩下吸气剂和吸气剂,而且这些吸气剂和吸气剂没有经过一般测试 。 那么我们可以在当前代码中测试什么呢? 那么..通过实例化提供的令牌的有效性如何?
First, let’s see the PHPUnit XML configuration file, phpunit.xml.dist. After changing the word “League” to “Diffbot”, this is what it looks like:
首先,让我们看一下PHPUnit XML配置文件phpunit.xml.dist 。 将“联赛”一词更改为“ Diffbot”后,结果如下所示:
<?xml version="1.0" encoding="UTF-8"?>
<phpunit bootstrap="vendor/autoload.php"
         backupGlobals="false"
         backupStaticAttributes="false"
         colors="true"
         verbose="true"
         convertErrorsToExceptions="true"
         convertNoticesToExceptions="true"
         convertWarningsToExceptions="true"
         processIsolation="false"
         stopOnFailure="false">
    <testsuites>
        <testsuite name="Diffbot Test Suite">
            <directory>tests</directory>
        </testsuite>
    </testsuites>
    <filter>
        <whitelist>
            <directory suffix=".php">src/</directory>
        </whitelist>
    </filter>
    <logging>
        <log type="tap" target="build/report.tap"/>
        <log type="junit" target="build/report.junit.xml"/>
        <log type="coverage-html" target="build/coverage" charset="UTF-8" yui="true" highlight="true"/>
        <log type="coverage-text" target="build/coverage.txt"/>
        <log type="coverage-clover" target="build/logs/clover.xml"/>
    </logging>
</phpunit>
The attributes of the main element tell PHPUnit to make its report as verbose as possible, and to convert all types of notices and errors to exceptions, along with some other typical defaults you can look into on their website. Then, we define testsuites – sets of tests applying to a given app or scenario. One such suite is the main application suite (the only one we’ll be using), and we call it the “Diffbot Test Suite”, defining the tests directory as the host of the tests – you’ll notice the sample League test is already inside that directory. We also tell PHPunit to ignore all PHP files in the src/ directory (we only want it to run tests, not our classes), and finally, we configure the logging – what it reports, how, and where to.
main元素的属性告诉PHPUnit使其报告尽可能详细,并将所有类型的通知和错误转换为异常,以及一些其他常见的默认值,您可以在其网站上查看这些默认值。 然后,我们定义测试套件–适用于给定应用程序或场景的测试集。 其中一个套件就是主应用程序套件(我们将使用的唯一套件),我们将其称为“ Diffbot测试套件”,将tests目录定义为tests的主机–您会注意到示例联赛测试是已经在该目录中。 我们还告诉PHPunit忽略src/目录中的所有PHP文件(我们只希望它运行测试,而不是我们的类),最后,我们配置日志记录–它报告的内容,方式和位置。
Let’s build our first test. In the tests folder, create DiffbotTest.php. If you’re using PhpStorm, this is almost automated:
让我们建立第一个测试。 在tests文件夹中,创建DiffbotTest.php 。 如果您使用的是PhpStorm,这几乎是自动化的:
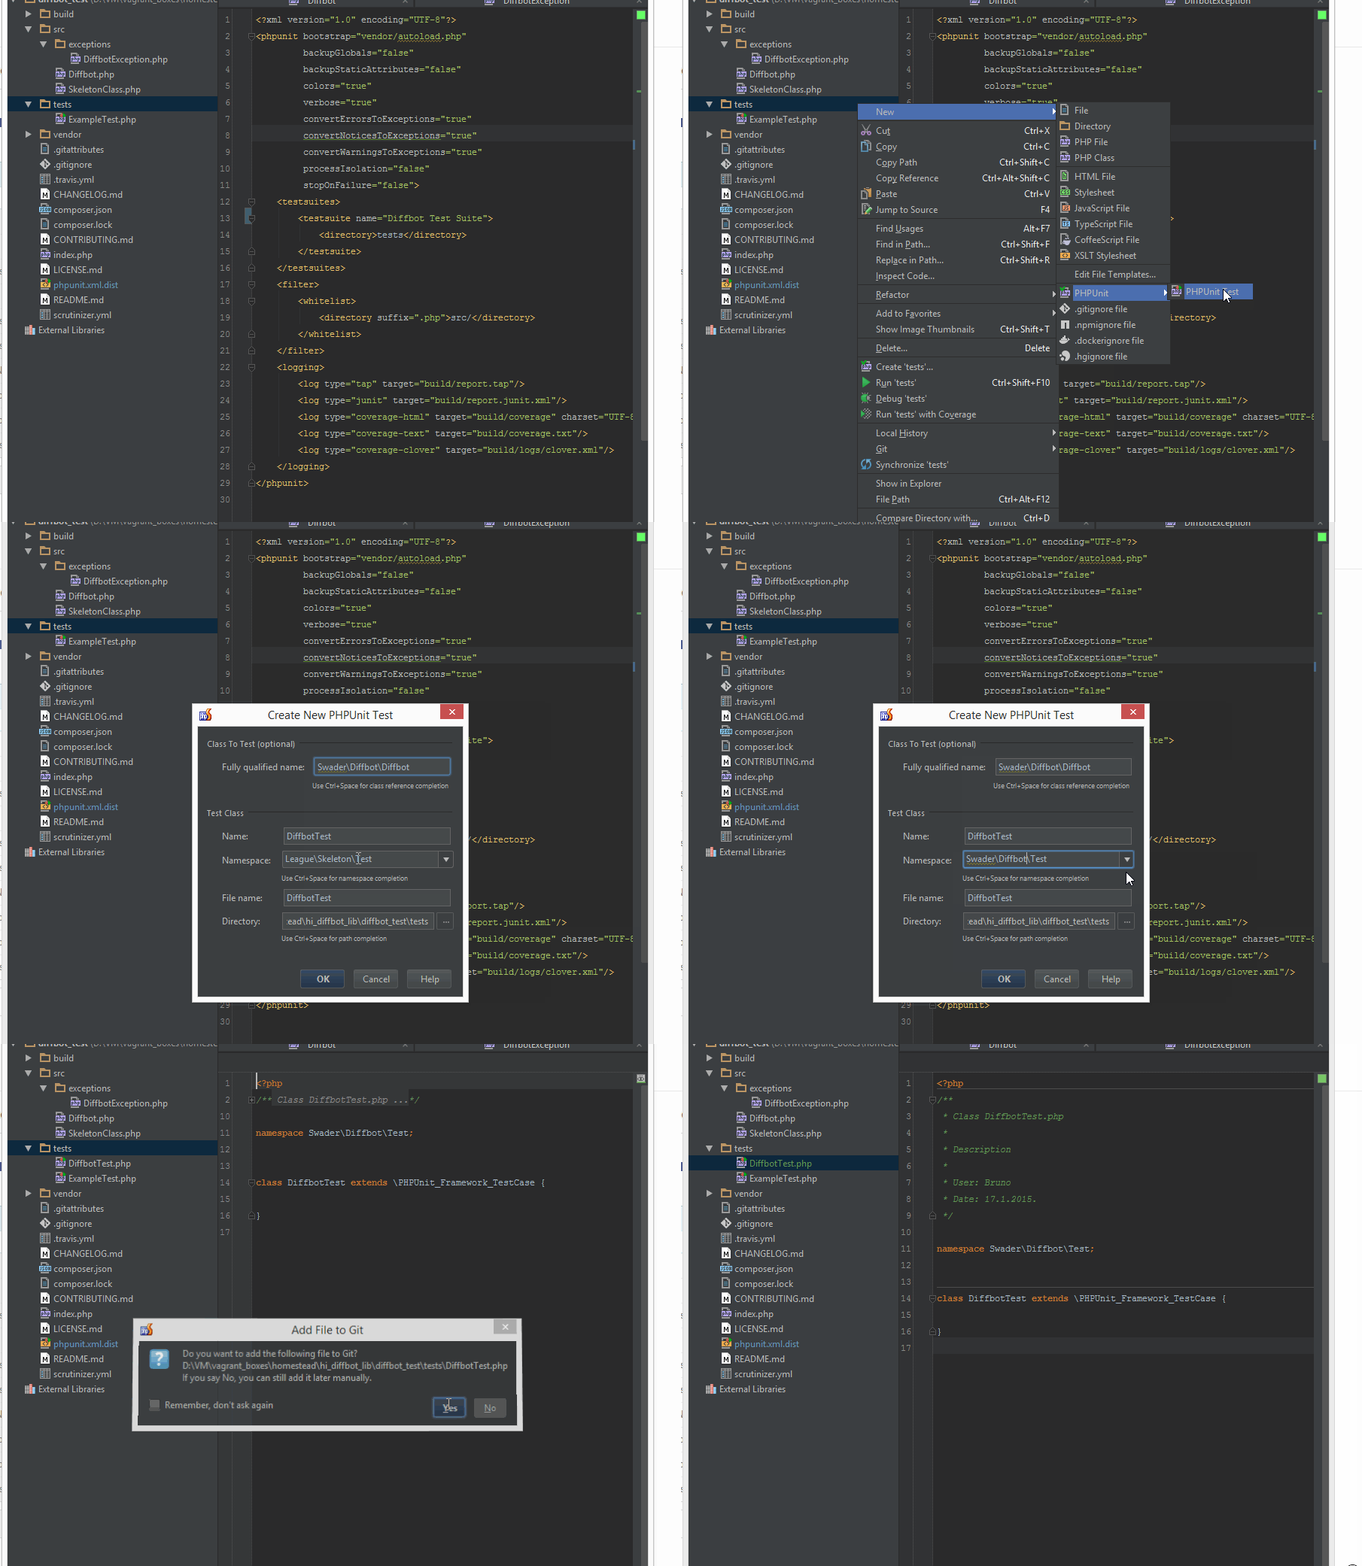
Remember to check that the namespace in the composer.json matches this:
记住要检查composer.json中的名称空间是否与此匹配:
"autoload-dev": {
        "psr-4": {
            "Swader\\Diffbot\\Test\\": "tests/"
        }
    },
Feel free to delete the ExampleTest now (as well as the SkeletonClass), and replace the contents of our DiffbotTest class with the following:
请立即删除ExampleTest(以及SkeletonClass),并用以下内容替换DiffbotTest类的内容:
<?php

namespace Swader\Diffbot\Test;

use Swader\Diffbot\Diffbot;
use Swader\Diffbot\Exceptions\DiffbotException;

/**
 * @runTestsInSeparateProcesses
 */
class DiffbotTest extends \PHPUnit_Framework_TestCase
{

    public function invalidTokens()
    {
        return [
            'empty'        => [ '' ],
            'a'            => [ 'a' ],
            'ab'           => [ 'ab' ],
            'abc'          => [ 'abc' ],
            'digit'        => [ 1 ],
            'double-digit' => [ 12 ],
            'triple-digit' => [ 123 ],
            'bool'         => [ true ],
            'array'        => [ ['token'] ],
        ];
    }

    public function validTokens()
    {
        return [
            'token'      => [ 'token' ],
            'short-hash' => [ '123456789' ],
            'full-hash'  => [ 'akrwejhtn983z420qrzc8397r4' ],
        ];
    }

    /**
     * @dataProvider invalidTokens
     */
    public function testSetTokenRaisesExceptionOnInvalidToken($token)
    {
        $this->setExpectedException('InvalidArgumentException');
        Diffbot::setToken($token);
    }

    /**
     * @dataProvider validTokens
     */
    public function testSetTokenSucceedsOnValidToken($token)
    {
        Diffbot::setToken($token);
        $bot = new Diffbot();
        $this->assertInstanceOf('\Swader\Diffbot\Diffbot', $bot);
    }
}
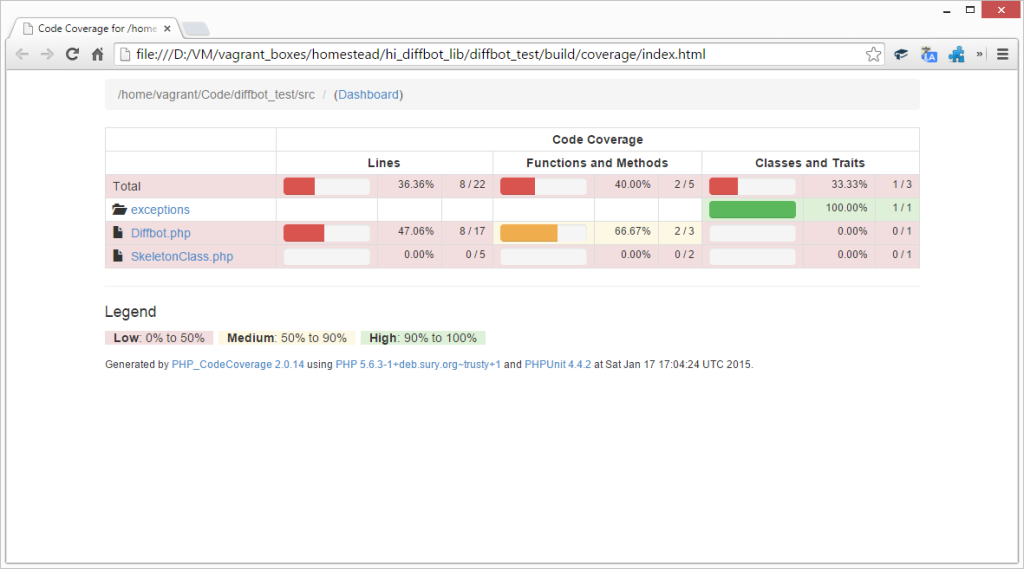
In this extremely simple example, we test the Diffbot::setToken static method. We use PHPUnit’s DataProvider syntax to feed the values in a loop automatically (many thanks to Matthew Weier O’Phinney for correcting my course in this). This also lets us know which of the keys failed when testing, rather than just expecting or not expecting an exception. If we now run the test and look at the coverage, we should see something like this:
在这个非常简单的示例中,我们测试了Diffbot::setToken静态方法。 我们使用PHPUnit的DataProvider语法自动在循环中提供值(非常感谢Matthew Weier O'Phinney纠正了我的课程)。 这也使我们知道测试时哪些键失败,而不仅仅是预期或不预期异常。 如果现在运行测试并查看覆盖率,则应该看到类似以下内容:
The achievement addict in me triggers, and suddenly I want to see as much green as possible. Let’s test instantiation:
我的成就成瘾者会触发,突然间我想看到尽可能多的绿色。 让我们测试实例化:
public function testInstantiationWithNoGlobalTokenAndNoArgumentRaisesAnException()
    {
        $this->setExpectedException('\Swader\Diffbot\Exceptions\DiffbotException');
        new Diffbot();
    }

    public function testInstantiationWithGlobalTokenAndNoArgumentSucceeds()
    {
        Diffbot::setToken('token');
        $bot = new Diffbot();
        $this->assertInstanceOf('Swader\Diffbot\Diffbot', $bot);
    }

    public function testInstantiationWithNoGlobalTokenButWithArgumentSucceeds()
    {
        $bot = new Diffbot('token');
        $this->assertInstanceOf('Swader\Diffbot\Diffbot', $bot);
    }
These methods cover all the cases of the constructor – instantiation without a token and without a globally set one, instantiation with a globally set one, and instantiation with just the token param. However, running the test, we’ll see it fails. This happens because the Diffbot class still has the static property set from the previous test, ergo not lacking the default static token when used in the second test. This is a common problem with testing globals and statics. To get around this, we’ll make sure each of our tests in the DiffbotTest class is executed in a separate process. This will be much slower to execute, but will make sure each environment is fresh and unpolluted.
这些方法涵盖了构造函数的所有情况-没有令牌且没有全局设置1的实例化,带有全局设置1的实例化,仅带有令牌参数的实例化。 但是,运行测试,我们将看到它失败。 发生这种情况是因为Diffbot类仍具有上一个测试设置的静态属性,因此在第二个测试中使用时,ergo不会缺少默认的静态标记。 这是测试全局变量和静态变量的常见问题 。 为了解决这个问题,我们将确保DiffbotTest类中的每个测试都在单独的过程中执行。 这将很慢地执行,但是将确保每个环境都是新鲜且不受污染的。
Add the following annotation above the class declaraiton, like so:
在类声明的上方添加以下注释,如下所示:
/**
 * @runTestsInSeparateProcesses
 */
class DiffbotTest extends \PHPUnit_Framework_TestCase
Now if you run the test and look at the coverage, you’ll notice we’re 100% green!
现在,如果您运行测试并查看覆盖率,您会注意到我们100%是绿色的!
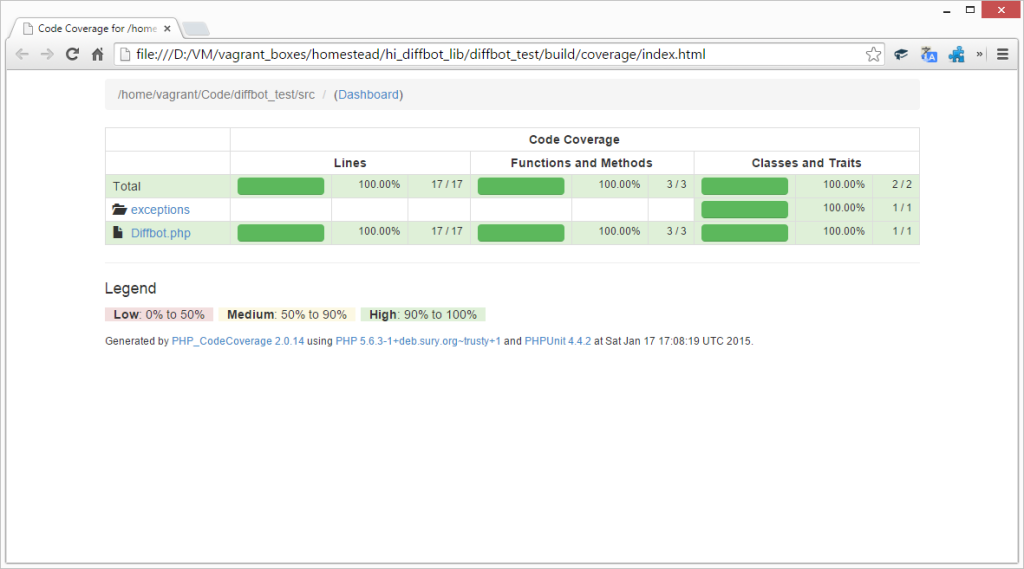
This is an anti-pattern of sorts, and usually indicative of something being wrong with the design of the class if it needs separate processes for testing, but I’ve yet to find a better approach to test this. The static property in the Diffbot class should be mutable for ease of use – if you have suggestions on improving this, I’m all ears. An alternative approach to solving this problem is building a reset method or some additional setters that you can use to manually return the class to its original state, but I avoid this approach in order not to pollute my class with test-related logic. Word is, this can be solved with backupStaticAttributes, too, but I’ve failed to make it work so far.
这是一种反模式,通常指示如果类需要单独的测试过程,则类的设计有问题,但是我还没有找到更好的方法来进行测试。 为了易于使用,Diffbot类中的静态属性应该是可变的–如果您有改进建议,我非常高兴。 解决此问题的另一种方法是构建一个reset方法或一些其他的setter,您可以使用它们将类手动返回到其原始状态,但是我避免使用这种方法,以免用与测试相关的逻辑来污染我的类。 可以的是,也可以使用backupStaticAttributes解决此问题,但是到目前为止 ,我仍然无法使其工作。
TDD (TDD)
In TDD, you’re generally supposed to think of functionality, then test for it (and fail) and then implement it so it works. That’s where the testing drives your development, hence, test driven development. This is exactly what we’ll do in this section.
在TDD中,通常应该考虑功能,然后对其进行测试(如果失败),然后实施该功能以使其正常运行。 测试就是驱动开发的地方,因此就是测试驱动的开发 。 这正是我们在本节中要做的。
Diffbot, as a service, offers several default APIs:
Diffbot作为一项服务,提供了几种默认API:
Article API extracts structured data from article type content like news and blog posts
Article API从文章类型的内容(例如新闻和博客文章)中提取结构化数据
Product API extracts info about products. Send it to a product link and it’ll pull price, availability, specs, and more.
产品API提取有关产品的信息。 将其发送到产品链接,它将拉动价格,可用性,规格等。
Image API gets you info about an image, or a set of images if you pass it a link to a page with several
Image API会为您提供有关图像或一组图像的信息(如果您将其传递给包含多个图像的页面的链接)
Analyze API automatically determines which of the above three APIs to use, and auto applies it. It tries to use the approach that produces the most information when given a URL.
Analyze API自动确定要使用上述三个API中的哪个,并自动应用它。 尝试使用给定URL时产生最多信息的方法。
Video and Discussion APIs are still in development. Video is the same as Image API but for video files, while Discussion can extract conversation threads from forums, comment sections on various sites and social network posts, and more.
视频和讨论 API仍在开发中。 视频与Image API相同,但用于视频文件,而“ 讨论”可以从论坛,各种站点和社交网络帖子上的评论部分中提取对话主题,等等。
As evident by the documentation, each of the APIs returns a similar response (all return valid JSON), but the fields returned mostly differ. This is how I see the Diffbot class as a final product – it has methods for each API type, and each API type is a separate class we’re yet to develop. These API classes all extend one abstract API class which contains the setters for the common fields, but each API class itself contains its own settable fields, too. In a nutshell, I’d like to make the following approaches possible:
从文档可以明显看出,每个API都返回相似的响应(所有返回有效的JSON),但是返回的字段大部分不同。 这就是我将Diffbot类视为最终产品的方式-它具有每种API类型的方法,并且每种API类型都是我们尚待开发的单独类。 这些API类都扩展了一个抽象API类,该抽象API类包含公共字段的设置器,但是每个API类本身也包含自己的可设置字段。 简而言之,我想使以下方法成为可能:
$diffbot = new Diffbot('myToken');

$productAPI = $diffbot->createProductAPI('http://someurl.com');
$productAPI
    ->setTimeout(3000)
    ->setFields(['prefixCode', 'productOrigin']);
$response = $productAPI->call();

// OR, LIKE THIS

$response = $diffbot
    ->createProductAPI('http://someurl.com')
    ->setTimeout(0)
    ->setPrefixCode(true)
    ->setProductOrigin(true)
    ->setHeaderCookie(['key' => 'value', 'key2' => 'value2'])
    ->call();
测试抽象类 (Testing Abstract Classes)
To make the API subclasses, we’ll need a common API abstract class which to extend. But how do we test abstract classes without extending them? With Test Doubles. As you probably know, you can’t instantiate an abstract class on its own – it needs to be extended. Hence, if an abstract class can’t be instantiated, there’s no way to test its concrete methods – those inherited by all sub-classes. A test double can be used to make a fake version of an extended abstract class, used to then test only the abstract class’ concrete methods. It’s best to show you on an example. Let’s assume our API abstract will have a method setTimeout used to set the API request timeout on the Diffbot side. Let’s also assume that any number from 0 to max int is valid. In a true TDD fashion, let’s make the file tests/Abstracts/ApiTest.php with the content:
要制作API子类,我们需要扩展一个通用的API抽象类。 但是,如何在不扩展抽象类的情况下测试它们呢? 与测试双打 。 您可能知道,您无法单独实例化一个抽象类,需要对其进行扩展。 因此,如果无法实例化抽象类,则无法测试其具体方法-所有子类都继承的方法。 测试对偶可用于制作扩展抽象类的伪版本,然后用于仅测试抽象类的具体方法。 最好向您展示一个例子。 假设我们的API抽象将具有setTimeout方法,该方法用于在Diffbot端设置API请求超时。 我们还假设从0到max int的任何数字都是有效的。 以一种真正的TDD方式,让我们使用以下内容制作文件tests/Abstracts/ApiTest.php :
<?php

namespace Swader\Diffbot\Test;

use Swader\Diffbot\Abstracts\Api;

class ApiTest extends \PHPUnit_Framework_TestCase
{
    /**
     * @return \PHPUnit_Framework_MockObject_MockObject
     */
    private function buildMock()
    {
        return $this->getMockForAbstractClass('Swader\Diffbot\Abstracts\Api');
    }

    public function validTimeouts()
    {
        return [
            'zero' => [0],
            '1000' => [1000],
            '2000' => [2000],
            '3000' => [3000],
            '3 mil' => [3000000],
            '40 mil' => [40000000]
        ];
    }

    public function invalidTimeouts()
    {
        return [
            'negative_big' => [-298979879827],
            'negative_small' => [-4983],
            'string ' => ['abcef'],
            'empty string' => [''],
            'bool' => [false]
        ];
    }

    public function testSetEmptyTimeoutSuccess()
    {
        /** @var Api $mock */
        $mock = $this->buildMock();
        $mock->setTimeout();
    }

    /**
     * @dataProvider invalidTimeouts
     */
    public function testSetTimeoutInvalid($timeout)
    {
        /** @var Api $mock */
        $mock = $this->buildMock();
        $this->setExpectedException('InvalidArgumentException');
        $mock->setTimeout($timeout);
    }

    /**
     * @dataProvider validTimeouts
     */
    public function testSetTimeoutValid($timeout)
    {
        /** @var Api $mock */
        $mock = $this->buildMock();
        $mock->setTimeout($timeout);
    }
}
We define some data providers just like in the first test class. Then, we have a method for creating our mock, so we can call it when needed. Next, we make a test method for each scenario – no timeout argument, bad argument and good argument. Only the bad one expects and exception.
就像第一个测试类一样,我们定义一些数据提供程序。 然后,我们有了创建模拟的方法,因此我们可以在需要时调用它。 接下来,我们为每种情况制作一个测试方法-没有超时参数,错误参数和良好参数。 只有坏人期望和例外。
If we run this test now, we’ll get an error:
如果我们现在运行此测试,则会收到错误消息:
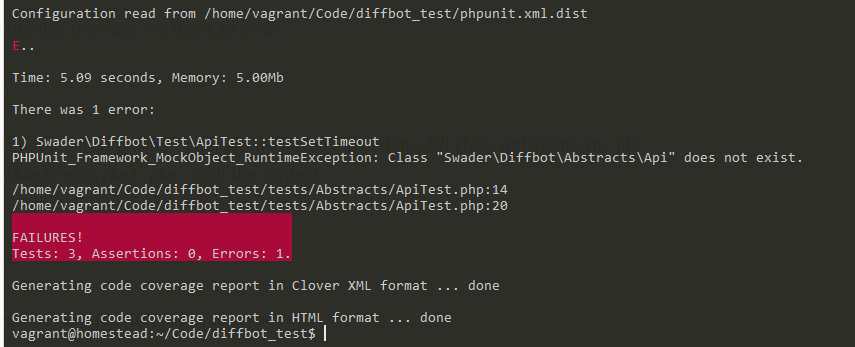
This is not at all surprising – after all, we haven’t added the API class yet! Create the file src/Abstracts/Api.php with the content:
这一点也不足为奇–毕竟,我们还没有添加API类! 使用内容创建文件src/Abstracts/Api.php :
<?php

namespace Swader\Diffbot\Abstracts;

/**
 * Class Api
 * @package Swader\Diffbot\Abstracts
 */
abstract class Api
{

}
Running the test now produces a new error:
现在运行测试会产生一个新错误:
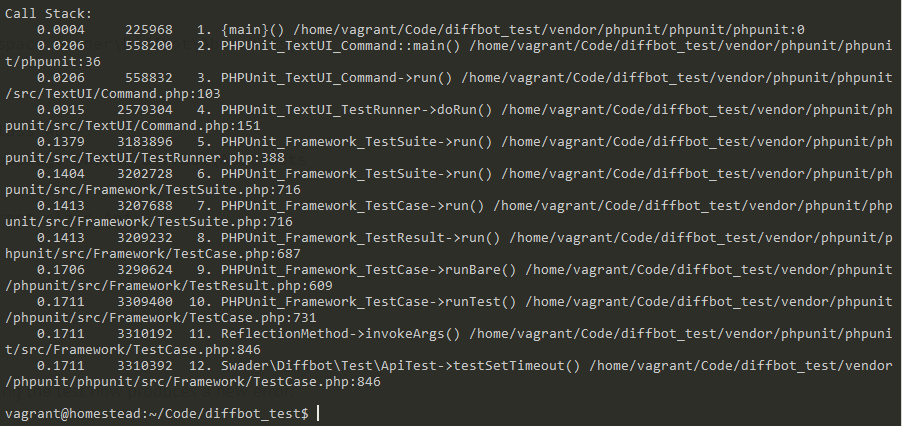
Whoa! We broke PHPUnit! Just kidding, we’re good. It’s complaining about not having a setTimeout() method, which is expected in the test – the mock is supposed to have it. Let’s change Api.php.
哇! 我们打破了PHPUnit! 开个玩笑,我们很好。 它抱怨没有在测试中期望的setTimeout()方法–模拟应该具有它。 让我们更改Api.php 。
<?php

namespace Swader\Diffbot\Abstracts;

/**
 * Class Api
 * @package Swader\Diffbot\Abstracts
 */
abstract class Api
{
    /** @var int Timeout value in ms - defaults to 30s if empty */
    private $timeout = 30000;

    public function setTimeout($timeout = null)
    {
        $this->timeout = $timeout;
    }
}
Re-running the test, we get:
重新运行测试,我们得到:
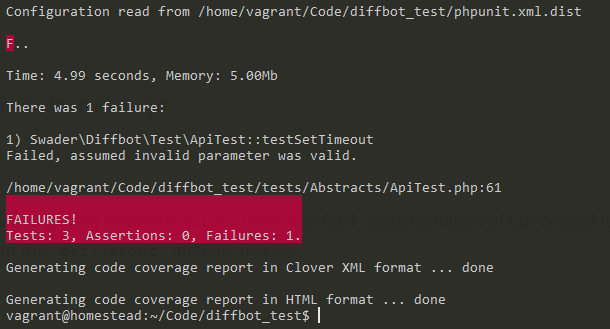
Now we’re getting somewhere. Let’s make one final implementation of our desired functionality. We edit the body of the setTimeout method, like so:
现在我们到了某个地方。 让我们最后完成所需功能的实现。 我们编辑setTimeout方法的主体,如下所示:
/**
     * Setting the timeout will define how long Diffbot will keep trying
     * to fetch the API results. A timeout can happen for various reasons, from
     * Diffbot's failure, to the site being crawled being exceptionally slow, and more.
     *
     * @param int|null $timeout Defaults to 30000 even if not set
     *
     * @return $this
     */
    public function setTimeout($timeout = null)
    {
        if ($timeout === null) {
            $timeout = 30000;
        }
        if (!is_int($timeout)) {
            throw new \InvalidArgumentException('Parameter is not an integer');
        }
        if ($timeout < 0) {
            throw new \InvalidArgumentException('Parameter is negative. Only positive timeouts accepted.');
        }

        $this->timeout = $timeout;
        return $this;
    }
Along with logic, we added a docblock, and made the function return the instance of the class we’re using, so we can chain methods. Re-running the tests, all should pass. In fact, if we look at the coverage report, we should be 100% green.
连同逻辑一起,我们添加了一个docblock,并使函数返回所用类的实例,因此我们可以链接方法。 重新运行测试,所有都应通过。 实际上,如果我们查看覆盖率报告,则应该100%绿色。

结论 (Conclusion)
In part 2, we started our TDD adventure by introducing PHPUnit and using it to develop some of our package’s functionality. You can download the full code of part 2 (includes part 1 code) from this branch. In the next part, we’ll continue building the package using the methods described here, and we’ll add in a new aspect – data mocking. Stay tuned!
在第2部分中,我们通过引入PHPUnit并使用它开发我们的某些软件包功能来开始了TDD冒险。 您可以从此分支下载第2部分的完整代码(包括第1部分的代码)。 在下一部分中,我们将继续使用此处描述的方法来构建程序包,并且将添加一个新方面–数据模拟。 敬请关注!
spring 中使用tdd


 3171
3171


 被折叠的 条评论
为什么被折叠?


