


视差图转换为深度图公司
Last week we talked about ZorroSVG, a tool for converting your chunky transparent PNG-32s into slim and flexible SVGs.
上周,我们讨论了ZorroSVG ,该工具可将您的透明透明PNG-32转换为纤薄而灵活的SVG。
That got me thinking.
那让我开始思考。
A few weeks earlier, I talked about the use of the Ken Burns effect in film and television.
几周前,我谈到了Ken Burns效应在影视中的使用。

Figure 1: The ‘Parallax Ken Burns’ effect (as a GIF)
图1:“视差Ken Burns”效果(作为GIF)
But there’s another similar, but slightly more sophisticated technique that pans and/or zooms different layers of a photograph at different rates to give the image a slightly 3D effect. Sometimes this is called a ‘Parallax-Ken Burns effect’, other times ‘The 2D to 3D Effect’, sometimes it’s the ‘2.5D Effect’. You might think of it as the ‘History Channel effect’ but it could just as easily be the ‘VH1: Behind the Music effect’.
但是还有另一种类似的技术,但是稍微复杂一些,可以以不同的速率平移和/或缩放照片的不同层,从而使图像具有3D效果。 有时将其称为“ 视差Ken Burns效果 ”,有时将其称为“ 2D到3D效果 ”,有时称为“ 2.5D效果 ”。 您可能会认为它是“ 历史频道效果 ”,但也很可能是“ VH1:音乐效果背后 ”。
This is a classic videographers trick, so all the tutorials you’ll find on Youtube for this effect are aimed at Adobe After Effects users.
这是经典的摄影师技巧,因此您可以在YouTube上找到有关该效果的所有教程,都是针对Adobe After Effects用户的。
But what if we could mimic the effect entirely inside a standalone SVG graphic?
但是,如果我们可以完全在独立的SVG图形中模拟效果呢?
That was the plan.
那是计划。
It didn’t quite work out that way (yet) but I thought it might be useful to share what I have so far. Let me be clear: this is a jumping-off point for people, rather than a finished production-ready product. I know it doesn’t work in Opera 3. ;)
这样还没有完全解决,但我认为分享到目前为止的内容可能会有用。 让我清楚一点 :这是人们的出发点,而不是成品可投入生产的产品。 我知道它在Opera 3中不起作用。
I don’t want to get super code-heavy here, but you should be able to pick through the CodePen to understand the detail.
我不想在这里得到大量的超级代码,但是您应该可以通过CodePen来理解细节。
计划是…… ( The plan was to…)
- Break down a photograph into three overlapping layers – front, middle, and background. 将照片分为三个重叠的层-正面,中间和背景。
- Convert those layers into SVGs using ZorroSVG. 使用ZorroSVG将这些图层转换为SVG。
- Manually re-combine those layers into a single multi-layered SVG 手动将这些层重新组合为一个多层SVG
To use CSS animation inside that SVG to get the Parallax-Burns effect.
要在该SVG中使用CSS动画以获取视差刻录效果。
第一次服用 ( First take)
照片 ( The Photograph)
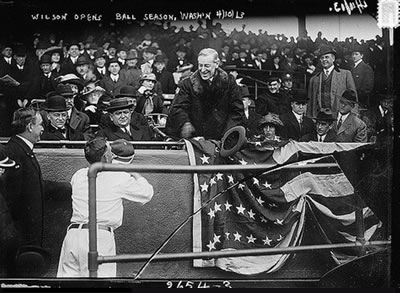
Figure 2: Woodrow Wilson archive image
图2:Woodrow Wilson存档图像
My first task was to find a good image to work with. I found this nice copyright-free archive photo of Woodrow Wilson from Flickr (fig 2) that has a good sense of depth to it.
我的首要任务是找到一个良好的形象。 我发现这张来自Flickr的伍德罗·威尔逊 ( Woodrow Wilson)精美的无版权档案照片 (图2)具有很好的深度感。
After dropping it into Photoshop, I repaired the damage in the bottom half and then split it into three separate layers (all PNG-32s):
将其放入Photoshop后,我修复了下半部分的损坏,然后将其分成三个单独的层(所有PNG-32):
As we’re going to be moving these layers in relation to each other, we’ll need to create some extra image to fill the gaps. I used Photoshop’s ‘content-aware fill’ to clone in new image behind the fence and also behind Wilson and co. It’s pretty rough but it will do.
当我们要相对移动这些图层时,我们需要创建一些额外的图像来填补这些空白。 我使用Photoshop的“内容感知填充”在篱笆后面以及在Wilson和co。之后隐藏新图像。 这很粗糙,但是可以。
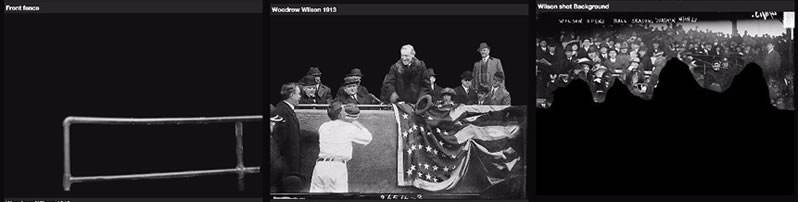
Now we have our raw image components.
现在我们有了原始图像组件。
SVG标记 ( The SVG Markup)
CodePen allows you to write SVG markup straight into the HTML panel so it’s a great place to play with SVG ideas. Let’s go straight to my first ‘proof of concept’ test:
CodePen允许您将SVG标记直接写到HTML面板中,因此它是使用SVG创意的好地方。 让我们直接进行我的第一个“概念验证”测试:
See the Pen SVG Parallax Burns by Alex (@alexmwalker) on CodePen.
请参阅CodePen上的Alex( @alexmwalker )的Pen SVG视差 刻录 。
You’ll notice that the fence layer moves farther and faster than the middle layer as it’s closer to us. That’s the key to the parallax effect.
您会注意到,篱笆层与中间层的距离越来越远,因为它离我们越近。 这就是视差效果的关键。
In SVG, there are two ways to put pixel-based images into your file – and it’s really no different to HTML in that regard.
在SVG中,有两种方法可以将基于像素的图像放入文件中–在这方面,它与HTML确实没有什么不同。
方法1.编码并嵌入像素: (Method 1. Encode & embed your pixels:)

Figure 3: Brackets live preview of the encoded image
图3:括号实时显示编码图像
You can base-64 encode your pixels. This just turns your image into a long string of numbers and letters that you can paste into your SVG document in any text editor. This is precisely what ZorroSVG does – and if you open a ZorroSVG file in a code editor you’ll see something like this (fig 3):
您可以对像素进行64位编码 。 这只是将图像转换为一长串数字和字母,您可以在任何文本编辑器中将其粘贴到SVG文档中。 这正是 ZorroSVG的工作–如果在代码编辑器中打开ZorroSVG文件,您将看到类似以下内容(图3):
Encoded images are a little unwieldy to work with, but it’s worth it to be able to encapsulate everything in a single, standalone file. This won’t break if you download it, or move it to another folder, or lose your internet connection.
编码后的图像有些笨拙,但是能够将所有内容封装在一个独立的文件中是值得的。 如果您下载它,将其移至另一个文件夹或断开互联网连接,则不会中断。
方法2.通过URL链接像素: (Method 2. Link your pixels via URL:)
As we commonly do with our HTML, it’s possible to link to an external image from inside your SVG like this.
就像我们通常使用HTML一样,可以像这样从SVG内部链接到外部图像。
<image class="back"
      xlink:href="https://i.sli.mg/lZPsUt.png"
      x="0" y="0"
      width="970" height="690">
  </image>
This is neat and easy-to-work-with, but if your SVG and its image resources get somehow moved or separated, your SVG will have sad ‘missing image’ flags in it. I don’t like that idea.
这很简洁而且易于使用,但是如果您的SVG及其图像资源以某种方式移动或分离,您的SVG中将带有可悲的“缺少图像”标志。 我不喜欢那个主意
Nevertheless that’s exactly what I’m doing in the CodePen test above. The three IMAGE elements are stacked back to front. We’ve given each IMAGE element a sensible CSS classname too – .front, .mid and .back.
尽管如此,这正是我在上面的CodePen测试中所做的。 三个IMAGE元素背对背堆叠。 我们也为每个IMAGE元素都赋予了一个明智CSS类名.front , .mid和.back 。
I’m not going to explain every line of code but the noteworthy parts include:
我不会解释每行代码,但值得注意的部分包括:
- Inside the STYLE tags at the top of the SVG, you’ll see two simple CSS scaling animations – parallax-front and parallax-mid. 在SVG顶部的STYLE标签内,您将看到两个简单CSS缩放动画-视差前端和视差中间。
I’m getting a bit fancy by adding an SVG blur filter (
filter:url(#effect-1);) to the front and back layers, but leaving Wilson’s layer sharp to increase the depth. Ideally, I’d love to slowly dial-up that blur effect as we zoom in to increase the 3D feel. But not for this demo.通过在前和后层添加SVG模糊滤镜(
filter:url(#effect-1);),我有点儿幻想,但保留了Wilson层的锐度以增加深度。 理想情况下,当我们放大以增加3D感觉时,我希望慢慢拨出模糊效果。 但是不适合这个演示。The ‘
transform-origin’ property of50% 50%means we will be scale/zooming into the exact center of our image. A value of50% 100%would feel like we were moving in-and-under Wilson. A value of50% 0%would feel like we were zooming over his head.50% 50%的'transform-origin'属性意味着我们将缩放/缩放到图像的确切中心。 值50% 100%会让我们感觉像是在威尔逊的地下移动。 值为50% 0%会感觉就像我们在放大他的头一样。
As a test, I think this is very successful. There’s a real sense of time and space that isn’t present in the original photo. But on the down-side, the SVG relies heavily on external files that may not always be available. Things would be much more robust if we could sink it all into a single, standalone file.
作为测试,我认为这是非常成功的。 原始照片中没有真实的时间和空间感。 但不利的一面是,SVG严重依赖于并非总是可用的外部文件。 如果我们可以将所有内容都存储到单个独立文件中,那么事情将会更加健壮。
二次服用 ( Second Take)
Figure 4: Brackets live preview of the encoded image
图4:方括号实时预览编码图像
If we run our three PNGs through ZorroSVG we get three new SVG files that we can open in any code editor. When I open one in Adobe Brackets and hover over the image code, I get a cool little preview of the encoded image (see figure 3).
如果我们通过ZorroSVG运行三个PNG, 则会得到三个可以在任何代码编辑器中打开的SVG文件。 当我在Adobe Brackets中打开一个并将鼠标悬停在图像代码上时,我得到了一个很酷的编码图像预览图(见图3)。
You’ll see that ZorroSVG puts the image in the top half and encodes the alpha-channel (or mask) in the bottom half. The little section of filter code at the top does the magic of automatically applying the mask.
您会看到ZorroSVG将图像放在上半部分,并在下半部分编码alpha通道(或蒙版)。 顶部的过滤器代码小部分具有自动应用蒙版的魔力。
If you run all three PNGs through Zorro you’ll notice that the filter code at the top is identical. So… if we manually edit those three encoded image sections into a single SVG file, the image layers should stack perfectly, right?
如果您通过Zorro运行所有三个PNG,您会注意到顶部的过滤器代码是相同的。 所以……如果我们将这三个编码图像部分手动编辑到一个SVG文件中,则图像层应该完美堆叠,对吗?
And they do! The stacked three-layer SVG image is probably about the same size as the original flat PNG.
他们做到了! 堆叠的三层SVG图像的大小可能与原始平面PNG大约相同。
We can then add the same CSS classes and animation code to this file and BAM! – we should have a standalone ‘Parallax Burns’ SVG file.
然后,我们可以向该文件和BAM添加相同CSS类和动画代码! –我们应该有一个独立的“视差刻录” SVG文件。

Figure 5: London Olympics – 1948 – Football
图5:1948年伦敦奥运会-足球
London-olympics-football-1948.svg
And we do. With some issues…
我们做。 有一些问题...
But it works. The example (figure 5) is a single SVG file that you could download, upload, email, or pop on a USB as you might with any JPEG.
但这有效。 该示例(图5)是单个SVG文件,您可以像使用任何JPEG一样下载,上传,通过电子邮件发送或通过USB弹出该文件。
问题? ( The Problem?)
If you viewed the above file in Chrome or (ew…shudder) Safari, you would have noticed a jerky, ticking to the animation rather than the smooth glide we saw when we were manipulating PNGs in CodePen.
如果您在Chrome或( ew ... shudder )Safari中查看了以上文件,您会发现它跳动起来,跳动到动画中,而不是我们在CodePen中操作PNG时看到的平滑滑行。
On the other hand, if you viewed the file in Firefox (and I warmly encourage you to), you would have seen gorgeous, swoon-worthy, buttery-smooth loveliness. (oh, it’s so nice…). Firefox blows every other browser away when it comes to SVG manipulation.
另一方面,如果您在Firefox中查看了该文件(并且我强烈建议您这样做),您将看到华丽,值得一看的,黄油般光滑的可爱。 (哦,太好了……)。 当涉及到SVG操纵时,Firefox将其他浏览器吹走了。
To be honest, this SVG example (fig 5) is far higher resolution than I needed to make it, but I wanted to push the browsers. Firefox doesn’t break a sweat.
老实说,这个SVG示例(图5)比我制作它所需要的分辨率要高得多,但是我想推动浏览器。 Firefox不费吹灰之力。
As this is an alpha, I haven’t tested it in IE11 yet, but be interested in hearing people’s experiences.
由于这是一个Alpha版本,因此我尚未在IE11中对其进行测试,但是有兴趣听取人们的经验。
In general, it seems that SVG can interpret most CSS successfully, but there’s little doubt that it isn’t as polished with CSS as our HTML browsers are. For instance:
通常,似乎SVG可以成功地解释大多数CSS,但是毫无疑问,它在CSS上没有我们HTML浏览器那么完美。 例如:
- SVG can’t handle 3D transforms in CSS (it flattens them to 2D) SVG无法处理CSS中的3D变换(它将其展平为2D)
- CSS animation seems generally less smooth and robust when rendered in SVG (with the exception of Firefox). Give it simple tasks and it’s fine but don’t push your luck. 在SVG中渲染时,CSS动画通常看起来不那么平滑和健壮(Firefox除外)。 给它简单的任务,这很好,但是不要碰运气。
最后的想法… ( Final thoughts…)
There may be some simple coding fixes to fixing this animation smoothing problem.
可能有一些简单的编码修复程序可以解决此动画平滑问题。
- Maybe setting image dimensions helps? 也许设置图像尺寸会有所帮助?
- We could use SVG’s built-in animation syntax called ‘SMIL’. 我们可以使用SVG的内置动画语法“ SMIL”。
- Perhaps it’s more efficient to use SVGs clip-path as the mask rather than the alpha channel filter we’re using. 也许将SVG剪切路径用作掩码比使用我们所使用的alpha通道过滤器更有效。
I’ve only been playing around with the possibilities for a few days and there is still plenty of room for experimentation.
我只玩了几天的可能性,仍然有足够的实验空间。
Nevertheless, I think this is an effect that has a place in web design if we can get the technical bits right. I could see this technique working really well in a re-imagined slideshow unit – each image slowly zooms in until it fades to be replaced by a fresh zooming image.
不过,我认为,如果我们能正确掌握技术,这将在Web设计中占有一席之地。 我可以看到这种技术在重新想象的幻灯片放映单元中非常有效–每个图像缓慢放大,直到其淡出以替换为新的缩放图像。
Anyway, have a play and let me know if you come up with any improvements.
无论如何,请试一下,如果您有任何改进,请与我联系。
Originally published in the SitePoint Design Newsletter.
最初发布在SitePoint设计新闻中 。
更新– 2016年3月11日 (Update – March 11, 2016)

Figure 6: Wilson Parallax Burns using clip-path to mask. SVG image link
图6:使用剪切路径遮罩的Wilson Parallax Burns。 SVG图片链接
In the original post, I mentioned that I thought SVG’s clip-path masking might provide a more efficient and more performant masking options than the alpha channel filter we used in my first examples.
在原始帖子中,我提到我认为SVG的剪切路径屏蔽可能会比我们在第一个示例中使用的alpha通道过滤器提供更有效,性能更高的屏蔽选项。
I’m happy to report that in this quick test, that seems to be the case.
我很高兴地报告,在这种快速测试中,情况确实如此。
The image you see here (fig 6) is a standalone SVG of about 245kb. It has a natural (unscaled) size is 965px x 664px and definitely seems to animate much more smoothly than the original version.
您在此处看到的图像(图6)是大约245kb的独立SVG。 它的自然大小(未缩放)为965px x 664px,并且绝对看起来比原始版本的动画更平滑。
Using a vector mask on the JPEGs provides a sharper, lower-fidelity mask edge than the alpha channel filter version – but it’s not a deal-breaker (I could have done a nicer job cutting the mask).
与alpha通道滤镜版本相比,在JPEG上使用矢量蒙版可提供更清晰,更低保真度的蒙版边缘-但这不是一个大问题(我本来可以做得更好切割遮罩)。
I also applied the blur filter to the fence AFTER I applied the clip-path mask, so it has a defocused blurred edge anyway.
在应用剪切路径蒙版之后,我还对栅栏应用了模糊滤镜,因此无论如何它都有散焦的模糊边缘。
翻译自: https://www.sitepoint.com/parallax-burns-converting-photographs-2d-3d-svg/
视差图转换为深度图公司


 3077
3077

 被折叠的 条评论
为什么被折叠?
被折叠的 条评论
为什么被折叠?
 到【灌水乐园】发言


