


phonegap
In this tutorial, we will cover how to use WordPress as a backend for a PhoneGap mobile app. We’ll then look at how we can create REST APIs for WordPress so that the PhoneGap app can communicate with WordPress using those APIs. We’re also going to build a simple PhoneGap app which allows users to login and then display a list of WordPress blog posts.
在本教程中,我们将介绍如何将WordPress用作PhoneGap移动应用程序的后端。 然后,我们将研究如何为WordPress创建REST API,以便PhoneGap应用可以使用这些API与WordPress通信。 我们还将构建一个简单的PhoneGap应用程序 ,该应用程序允许用户登录并显示WordPress博客文章列表。
Mobile application development solutions like AppPresser, Mobicloud and IdeaPress are limited to creating blog-style apps. Understanding how to integrate WordPress with PhoneGap will help you to build any kind of app utilizing WordPress as a backend.
诸如AppPresser,Mobicloud和IdeaPress之类的移动应用程序开发解决方案仅限于创建博客样式的应用程序。 了解如何将WordPress与PhoneGap集成将帮助您利用WordPress作为后端构建任何类型的应用程序。
创建WordPress REST API (Creating WordPress REST APIs)
Let’s start with setting up WordPress REST APIs. WordPress provides you the necessary actions to create REST APIs which can be used by any HTTP client. REST APIs can be installed via a WordPress plugin or theme.
让我们从设置WordPress REST API开始。 WordPress为您提供创建REST API所需的必要操作,这些API可以被任何HTTP客户端使用。 可以通过WordPress插件或主题安装REST API。
WordPress actions wp_ajax_ and wp_ajax_nopriv_ can be used to create GET or POST REST APIs.
WordPress操作wp_ajax_和wp_ajax_nopriv_可用于创建GET或POST REST API。
A callback attached to wp_ajax_ is executed if the HTTP client making the request is logged in into WordPress. Similarly a callback attached to wp_ajax_nopriv_ is executed if the HTTP client making the request is not logged into WordPress.
如果发出请求的HTTP客户端登录到WordPress, wp_ajax_执行附加到wp_ajax_的回调。 同样,如果发出请求的HTTP客户端未登录WordPress, wp_ajax_nopriv_执行附加到wp_ajax_nopriv_的回调。
Let’s create a REST API which allows a user to login into WordPress.
让我们创建一个REST API,该API允许用户登录WordPress。
function already_logged_in()
{
	echo "User is already Logged In";
	die();
}

function login()
{
	$creds = array();
	$creds['user_login'] = $_GET["username"];
	$creds['user_password'] = $_GET["password"];

	$user = wp_signon($creds, false);
	if (is_wp_error($user))
	{
		echo "FALSE";
		die();
	}

	echo "TRUE";
	die();
}

add_action("wp_ajax_login", "already_logged_in");
add_action("wp_ajax_nopriv_login", "login");
Let’s see how the above code works:
让我们看看上面的代码是如何工作的:
If the user is already logged in the while making an AJAX request using PhoneGap, a user session cookie is automatically sent to the server. In this case
already_logged_infunction is executed.如果在使用PhoneGap进行AJAX请求时用户已经登录,则用户会话cookie会自动发送到服务器。 在这种情况下,执行了
already_logged_in函数。If no user session cookie is sent to the server i.e., user is not logged in then
loginfunction is executed.如果没有用户会话cookie发送到服务器,即用户未登录,则执行
login功能。We need to make HTTP requests to
http://[your_domain_name]//wp-admin/admin-ajax.php?action=login&username=your_name&password=your_password. Here the action is the REST API name i.e., the string name that comes afterwp_ajax_andwp_ajax_nopriv_.我们需要向
http://[your_domain_name]//wp-admin/admin-ajax.php?action=login&username=your_name&password=your_password发出HTTP请求。 这里的操作是REST API名称,即wp_ajax_和wp_ajax_nopriv_之后的字符串名称。- You can either make a GET or POST request to this URL but it’s compulsory to provide the REST API name. 您可以对此URL进行GET或POST请求,但是必须提供REST API名称。
wp_signon is used to create a user session cookie i.e., used to login a user into WordPress.
wp_signon用于创建用户会话cookie,即,用于将用户登录到WordPress。
Let’s create another REST API which returns the ten latest blog posts in JSON format.
让我们创建另一个REST API,该API以JSON格式返回最新的十篇博客文章。
function posts()
{
	header("Content-Type: application/json");

	$posts_array = array();

	$args = array("post_type" => "post", "orderby" => "date", "order" => "DESC", "post_status" => "publish", "posts_per_page" => "10");

	$posts = new WP_Query($args);

	if($posts->have_posts()):
		while($posts->have_posts()):
			$posts->the_post();

            $post_array = array(get_the_title(), get_the_permalink(), get_the_date(), wp_get_attachment_url(get_post_thumbnail_id()));
            array_push($posts_array, $post_array);

		endwhile;
		else:
        	echo "{'posts' = []}";
        	die();
	endif;

	echo json_encode($posts_array);

	die();
}

function no_posts()
{
	echo "Please login";
	die();
}

add_action("wp_ajax_posts", "posts");
add_action("wp_ajax_nopriv_posts", "no_posts");
Let’s see how the above code works:
让我们看看上面的代码是如何工作的:
- Here we registered a HTTP API with name ‘posts’. 在这里,我们注册了一个名为“ posts”的HTTP API。
- If a user is not logged in then it returns a message to login. If the user is logged in, then it sends a JavaScripts array with ten latest posts. 如果用户未登录,则返回一条消息以登录。 如果用户已登录,则它将发送一个包含10个最新帖子JavaScripts数组。
Here we use WP_Query object to retrieve the blog posts.
在这里,我们使用WP_Query对象检索博客文章。
创建一个PhoneGap应用 (Creating a PhoneGap App)
Let’s now cover how to create a PhoneGap app by using WordPress as a backend.
现在让我们介绍如何通过使用WordPress作为后端来创建PhoneGap应用程序。
There are a couple of points to note before proceeding with this tutorial:
在继续本教程之前,需要注意两点:
There are two ways to build a PhoneGap app. You can use PhoneGap online builder or you can build it yourself using the PhoneGap desktop builder. In this tutorial, I will be assuming you use desktop builder.
有两种方法可以构建PhoneGap应用程序。 您可以使用PhoneGap在线构建器 ,也可以使用PhoneGap桌面构建器自己构建它。 在本教程中,我将假设您使用桌面生成器。
PhoneGap app doesn’t obey AJAX and Cookie Same Origin Policy. Therefore you can make an AJAX request to any website using JavaScript running in the PhoneGap app. Also during HTTP requests, all cookies are sent to the server and any domain can store cookies in the app.
PhoneGap应用程序不遵守AJAX和Cookie相同来源政策 。 因此,您可以使用在PhoneGap应用中运行JavaScript向任何网站发出AJAX请求。 同样在HTTP请求期间,所有cookie都将发送到服务器,并且任何域都可以在应用程序中存储cookie。
The PhoneGap app we will building in this tutorial will have the following directory structure and files.
我们将在本教程中构建的PhoneGap应用程序将具有以下目录结构和文件。
--www
    --cordova.js
	--js
	    --index.js
	    --index.html
www directory will be present in your newly created project.
www目录将出现在您新创建的项目中。
Here cordova.js file needs to be the same as provided by default.
这里的cordova.js文件必须与默认提供的文件相同。
Remove all content present in index.js and index.html file.
删除index.js和index.html文件中存在的所有内容。
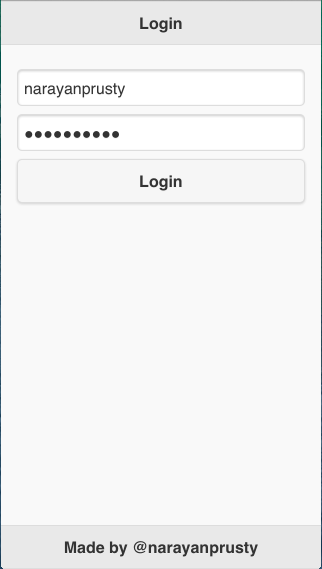
Put this code in your index.html files.
将此代码放在index.html文件中。
<!DOCTYPE html>
<html>
    <head>
        <meta charset="utf-8" />
        <meta name="viewport" content="user-scalable=no, initial-scale=1, maximum-scale=1, minimum-scale=1, width=device-width, height=device-height" />
        <title>Sitepoint - PhoneGap App using WordPress</title>
        <link rel="stylesheet" href="https://code.jquery.com/mobile/1.4.4/jquery.mobile-1.4.4.min.css">
    </head>
    <body>
        <div data-role="page">
            <div data-role="header" data-position="fixed">
                <h1>Login</h1>
            </div>

            <div data-role="main" class="ui-content">
                <input id="username" type="text" placeholder="Enter Username">
                <input id="password" type="password" placeholder="Enter Password">
                <button onclick="login();">Login</button>
                <a href="#pagetwo" id="page_two_link"></a>
            </div>

            <div data-role="footer" data-position="fixed">
                <h1>Made by @narayanprusty</h1>
            </div>
        </div>

        <div data-role="page" id="pagetwo">
            <div data-role="header" data-position="fixed">
                <h1>Posts</h1>
            </div>

            <div data-role="main" class="ui-content">
                <ul data-role="listview" id="posts">
                </ul>
            </div>

            <div data-role="footer" data-position="fixed">
                <h1>Made by @narayanprusty</h1>
            </div>
        </div>

        <script type="text/javascript" src="cordova.js"></script>
        <script src="https://code.jquery.com/jquery-1.11.1.min.js"></script>
        <script src="https://code.jquery.com/mobile/1.4.4/jquery.mobile-1.4.4.min.js"></script>
        <script type="text/javascript" src="js/index.js"></script>
    </body>
</html>
Let’s see how the above code works:
让我们看看上面的代码是如何工作的:
- Here we are using jQuery mobile to create the UI of the app. jQuery mobile is loaded from CDN. 在这里,我们使用jQuery mobile创建应用程序的UI。 jQuery mobile从CDN加载。
- We have two pages. The first one is a login page and if the credentials are correct then user is moved to second page where a list of posts is displayed. 我们有两页。 第一个是登录页面,如果凭据正确,那么用户将移至第二个页面,其中显示帖子列表。
When the login button is clicked a JavaScript
loginfunction is called.单击登录按钮后,将调用JavaScript
login功能。
Now we are done with the UI of the app, let’s code the frontend functionality. Put this code in index.js file.
现在我们已经完成了应用程序的用户界面,让我们编写前端功能的代码。 将此代码放在index.js文件中。
function fetch_and_display_posts()
{
var xhr = new XMLHttpRequest();
xhr.open("GET", "http://localhost/wp-admin/admin-ajax.php?action=posts");
xhr.onload = function(){
var posts_array = JSON.parse(xhr.responseText);
var html = "";
for(var count = 0; count < posts_array.length; count++)
{
var title = posts_array[count][0];
var link = posts_array[count][1];
var date = posts_array[count][2];
var image = posts_array[count][3];
html = html + "<li>" + "<a href='javascript:open_browser(\"" + link + "\")'>" + "<img height='128' width='128' src='" + image + "'>" + "<h2>" + title + "</h2>" + "<p>" + date + "</p></a></li>";
}
document.getElementById("posts").innerHTML = html;
$("#posts").listview("refresh");
}
xhr.send();
}
function login()
{
var username = document.getElementById("username").value;
var password = document.getElementById("password").value;
if(username == "")
{
navigator.notification.alert("Please enter username", null, "Username Missing", "OK");
return;
}
if(password == "")
{
navigator.notification.alert("Please enter password", null, "Password Missing", "OK");
return;
}
var xhr = new XMLHttpRequest();
xhr.open("GET", "http://localhost/wp-admin/admin-ajax.php?action=login&username=" + encodeURIComponent(username) + "&password=" + encodeURIComponent(password));
xhr.onload = function(){
if(xhr.responseText == "FALSE")
{
navigator.notification.alert("Wrong Username and Password", null, "Wrong Creds", "Try Again");
}
else if(xhr.responseText == "TRUE")
{
fetch_and_display_posts();
$("#page_two_link").click();
}
}
xhr.send();
}
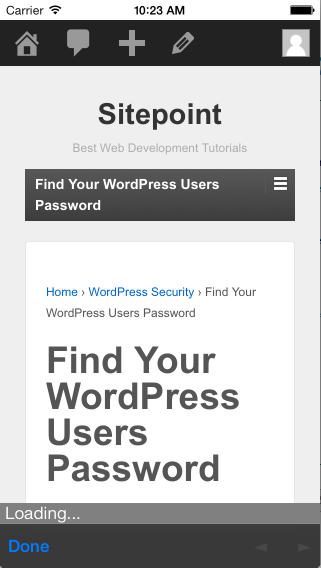
function open_browser(link)
{
window.open(link, '_blank', 'location=yes');
}Let’s see how the above code works:
让我们看看上面的代码是如何工作的:
Here we have three functions.
loginfunction retrieves the username and password from the form and sends it to WordPress. If the credentials are correct then WordPress sends back a session cookie indicating a user is logged in. Then we call thefetch_and_display_postsfunction which actually retrieves the latest ten posts and displays it in the second page. When someone clicks on a post we call theopen_browserfunction which displays the complete article in a new browser window i.e. using PhoneGap InAppBrowser.这里我们有三个功能。
login功能从表单中检索用户名和密码,并将其发送到WordPress。 如果凭据正确,则WordPress将发回会话cookie,指示用户已登录。然后,我们调用fetch_and_display_posts函数,该函数实际上检索最新的十个帖子并将其显示在第二页中。 当有人单击帖子时,我们将调用open_browser函数,该函数会在新的浏览器窗口中显示完整的文章,即使用PhoneGap InAppBrowser。Here during AJAX request I have used domain name as
localhost. Make sure you replace that with your own domain name.在这里,在AJAX请求期间,我已将域名用作
localhost。 确保将其替换为您自己的域名。
Here are the screenshots of the working PhoneGap App using WordPress.
这是使用WordPress的PhoneGap应用程序的屏幕截图。

更多信息 (Further Information)
So now you know how to create a simple PhoneGap app using WordPress as a backend. If you’re looking for more information, here are a list of some other useful resources that are great for new PhoneGap developers:
因此,现在您知道了如何使用WordPress作为后端创建一个简单的PhoneGap应用程序。 如果您正在寻找更多信息,下面是一些对新PhoneGap开发人员有用的其他有用资源的列表:
翻译自: https://www.sitepoint.com/building-a-phonegap-app-with-a-wordpress-backend/
phonegap


 753
753

 被折叠的 条评论
为什么被折叠?
被折叠的 条评论
为什么被折叠?
 到【灌水乐园】发言


