


imagick 加水印
In a previous article, Timothy Boronczyk wrote about how to create watermarks with Imagick using an overlay image. In this article, I’ll show you how to achieve a similar effect using plain text.
在上一篇文章中,Timothy Boronczyk撰写了有关如何使用Imagick使用叠加图像创建水印的信息 。 在本文中,我将向您展示如何使用纯文本实现类似的效果。
At the time of this writing, virtually no documentation exists on PHP’s Imagick API documentation, although there are plenty of command-line examples to be found on the ImageMagick website, so that is where we shall begin. Converting the command-line code from the examples into PHP is simply a tedious matter of finding the appropriate methods that perform the same functionality.
在撰写本文时 ,尽管在ImageMagick网站上可以找到很多命令行示例,但是PHP的Imagick API文档上实际上没有任何文档,因此我们将从这里开始。 将示例中的命令行代码转换为PHP只是寻找合适的方法来执行相同功能的繁琐工作。
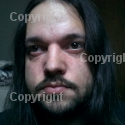
For my examples I’ll be using the following image of some completely random handsome looking gentleman.
在我的示例中,我将使用下面这张完全随意的英俊绅士形象。

在图像上绘制文字 (Drawing Text on the Image)
The easiest type of textual watermark to create is a string overlay on top of the image.
要创建的文本水印最简单的类型是在图像顶部覆盖一个字符串。
The command line example is:
命令行示例是:
convert image.png  -font Arial -pointsize 20
    -draw "gravity south
        fill black  text 0,12 'Copyright'
        fill white  text 1,11 'Copyright'"
    result.png
And the PHP equivalent is:
和PHP等效的是:
<?php
// Create objects
$image = new Imagick('image.png');

// Watermark text
$text = 'Copyright';

// Create a new drawing palette
$draw = new ImagickDraw();

// Set font properties
$draw->setFont('Arial');
$draw->setFontSize(20);
$draw->setFillColor('black');

// Position text at the bottom-right of the image
$draw->setGravity(Imagick::GRAVITY_SOUTHEAST);

// Draw text on the image
$image->annotateImage($draw, 10, 12, 0, $text);

// Draw text again slightly offset with a different color
$draw->setFillColor('white');
$image->annotateImage($draw, 11, 11, 0, $text);

// Set output image format
$image->setImageFormat('png');

// Output the new image
header('Content-type: image/png');
echo $image;
The result is:
结果是:

This example is pretty straight-forward and the code’s comments make it so you shouldn’t need much extra explanation. But while this works, the text stands out too drastically from the image and the effect should probably be more subtle.
这个例子很简单,代码的注释也很简单,因此您不需要过多的解释。 但是,尽管这样做有效,但是文本在图像中显得过于突出,效果可能会更加微妙。
使用字体蒙版的透明文本 (Transparent Text Using a Font Mask)
For a smoother effect on the watermark text, you can make the text string transparent using a font mask.
为了使水印文本更流畅,可以使用字体蒙版使文本字符串透明。
Command line example:
命令行示例:
convert -size 300x50 xc:grey30 -font Arial -pointsize 20
    -gravity center -draw "fill grey70  text 0,0  'Copyright'"
    fgnd.png
convert -size 300x50 xc:black -font Arial -pointsize 20 -gravity center
    -draw "fill white  text  1,1  'Copyright'
        text  0,0  'Copyright'
        fill black  text -1,-1 'Copyright'"
    +matte mask.png
composite -compose CopyOpacity  mask.png  fgnd.png  stamp.png
    mogrify -trim +repage stamp.png
composite -gravity south -geometry +0+10 stamp.png  image.png
    result.png
PHP equivalent:
相当于PHP:
<?php
// Create objects
$image = new Imagick('image.png');
$watermark = new Imagick();
$mask = new Imagick();
$draw = new ImagickDraw();

// Define dimensions
$width = $image->getImageWidth();
$height = $image->getImageHeight();

// Create some palettes
$watermark->newImage($width, $height, new ImagickPixel('grey30'));
$mask->newImage($width, $height, new ImagickPixel('black'));

// Watermark text
$text = 'Copyright';

// Set font properties
$draw->setFont('Arial');
$draw->setFontSize(20);
$draw->setFillColor('grey70');

// Position text at the bottom right of the image
$draw->setGravity(Imagick::GRAVITY_SOUTHEAST);

// Draw text on the watermark palette
$watermark->annotateImage($draw, 10, 12, 0, $text);

// Draw text on the mask palette
$draw->setFillColor('white');
$mask->annotateImage($draw, 11, 13, 0, $text);
$mask->annotateImage($draw, 10, 12, 0, $text);
$draw->setFillColor('black');
$mask->annotateImage($draw, 9, 11, 0, $text);

// This is needed for the mask to work
$mask->setImageMatte(false);

// Apply mask to watermark
$watermark->compositeImage($mask, Imagick::COMPOSITE_COPYOPACITY, 0, 0);

// Overlay watermark on image
$image->compositeImage($watermark, Imagick::COMPOSITE_DISSOLVE, 0, 0);

// Set output image format
$image->setImageFormat('png');

// Output the new image
header('Content-type: image/png');
echo $image;
The result is:
结果是:

Several images are created in this example. The first image $watermark is grey-scale, and the second image $mask uses pure black for the parts I want to be transparent and white for the parts I want to keep. When I apply the mask by combining the images, any grey shades found in $mask as a result of anti-aliasing will be semi-transparent and result in smoother edges.
在此示例中创建了多个图像。 第一个图像$watermark是灰度图像,第二个图像$mask将纯黑色用于我要透明的部分,将白色用于我要保留的部分。 当我通过组合图像来应用蒙$mask ,由于抗锯齿而在$mask发现的任何灰色阴影将是半透明的,并导致边缘更平滑。
In the command-line version of the code, the outside edges of the transparent image are clipped before the watermark is overlayed, but there appears to be a bug that prevents the compositeImage() method from preserving the position defined by setGravity(). This basically means that if I were to clip the edges then my watermark would lose its place at the bottom right and be re-positioned in the top-left corner. To get around this foolish behavior, I’ve created my palettes with the same dimensions as the source image so no clipping takes place.
在代码的命令行版本中,透明图像的外部边缘在叠加水印之前被裁剪,但是似乎存在一个错误 , 该错误阻止了compositeImage()方法保留由setGravity()定义的位置。 这基本上意味着,如果我要修剪边缘,那么我的水印将丢失其在右下角的位置,并重新定位在左上角。 为了避免这种愚蠢的行为,我以与源图像相同的尺寸创建了调色板,因此不会发生剪切。
平铺文字 (Tiled Text)
This final example tiles text over the entire image which makes it far more difficult to remove.
最后一个示例将文本平铺在整个图像上,这使得删除起来更加困难。
Command line:
命令行:
convert -size 140x80 xc:none -fill grey
    -gravity NorthWest -draw "text 10,10 'Copyright'"
    -gravity SouthEast -draw "text 5,15 'Copyright'"
    miff:- |
composite -tile - image.png  result.png
PHP:
PHP:
<?php
// Create objects
$image = new Imagick('image.png');
$watermark = new Imagick();

// Watermark text
$text = 'Copyright';

// Create a new drawing palette
$draw = new ImagickDraw();
$watermark->newImage(140, 80, new ImagickPixel('none'));

// Set font properties
$draw->setFont('Arial');
$draw->setFillColor('grey');
$draw->setFillOpacity(.5);

// Position text at the top left of the watermark
$draw->setGravity(Imagick::GRAVITY_NORTHWEST);

// Draw text on the watermark
$watermark->annotateImage($draw, 10, 10, 0, $text);

// Position text at the bottom right of the watermark
$draw->setGravity(Imagick::GRAVITY_SOUTHEAST);

// Draw text on the watermark
$watermark->annotateImage($draw, 5, 15, 0, $text);

// Repeatedly overlay watermark on image
for ($w = 0; $w < $image->getImageWidth(); $w += 140) {
    for ($h = 0; $h < $image->getImageHeight(); $h += 80) {
        $image->compositeImage($watermark, Imagick::COMPOSITE_OVER, $w, $h);
    }
}

// Set output image format
$image->setImageFormat('png');

// Output the new image
header('Content-type: image/png');
echo $image;
Result:
结果:
Notice that I’ve set the transparency with setFillOpacity() rather than using an image mask.
请注意,我已经使用setFillOpacity()而不是使用图像蒙版设置了透明度。
摘要 (Summary)
For me, image manipulation in PHP has become one of the most enjoyable aspects of the language, and I can only hope that Imagick will become bundled in future versions. If you’re looking for a way to contribute, I encourage you to convert other command line examples to PHP and then post your results on the official PHP manual so others can learn and enjoy.
对我而言,PHP中的图像处理已成为该语言中最令人愉悦的方面之一,我只能希望Imagick会捆绑在将来的版本中。 如果您正在寻找一种贡献的方法,建议您将其他命令行示例转换为PHP,然后将结果发布在PHP官方手册上,以便其他人可以学习和享受。
Image via Fotolia
图片来自Fotolia
翻译自: https://www.sitepoint.com/adding-text-watermarks-with-imagick/
imagick 加水印


 608
608

 被折叠的 条评论
为什么被折叠?
被折叠的 条评论
为什么被折叠?
 到【灌水乐园】发言


