


选项卡式登录界面
In the last few years, there has been an increasing demand for a customised registration widget for WordPress. There exists a healthy disrespect for the WordPress default login and registration pages, solely because they are not intuitive as they may not reflect the design and branding of a client or a web developer.
在过去的几年中,对WordPress的自定义注册小部件的需求不断增长。 对于WordPress默认登录和注册页面存在一种健康的不尊重,这仅仅是因为它们不直观,因为它们可能无法反映客户或Web开发人员的设计和品牌。
To solve this problem, a couple of developers have released several kinds of login and registration pages, but the good ones come with a price and they don’t come cheap.
为了解决这个问题,一些开发人员发布了几种登录和注册页面,但是好的页面需要付费,而且价格也不便宜。
However, if you have been on the fence or overall disappointed with what’s available for free on the WordPress plugin repository, you can have your spirit lifted because you can learn how to create a tabbed WordPress login and registration widget for free! You only need to sacrifice a short period of your time to get a grasp of the entire process. Once you acquire the knowledge which is pretty simple; you should have a feature rich registration page on your WordPress powered sites.
但是,如果您对WordPress插件存储库中的免费功能一无所知或对整体感到失望,则可以放心,因为您可以学习如何免费创建选项卡式WordPress登录和注册小部件! 您只需要牺牲一小段时间就可以掌握整个过程。 一旦您获得了非常简单的知识; 您应该在WordPress支持的网站上具有功能丰富的注册页面。
In this article, we will build a simple tabbed login and registration form widget with a flipping effect made possible by the QuickFlip jQuery library.
在本文中,我们将构建一个简单的选项卡式登录和注册表单窗口小部件,并通过QuickFlip jQuery库实现翻转效果。
If you want to jump ahead of the tutorial, you can view a demo of the login and registration widget and download the widget plugin.
如果您想跳过本教程,可以查看 登录和注册小部件 的演示并下载小部件插件 。
To keep things simple, the registration form will consist of a username, password and email field. The login form will contain no CAPTCHA.
为简单起见,注册表单将包含用户名,密码和电子邮件字段。 登录表单将不包含验证码。
Without further fussing, let’s get started with the widget development.
无需大惊小怪,让我们开始进行小部件开发。
小部件开发 (Widget Development)
First off, include the plugin header.
首先,包括插件头。
<?php
/*
Plugin Name: Tabbed Login Registration Widget
Plugin URI: https://www.sitepoint.com
Description: A tabbed login and registration widget for WordPress
Version: 1.0
Author: Agbonghama Collins
Author URI: http://w3guy.com
License: GPL2
*/
Before we enter into the widget development properly, we need to turn on output buffering to prevent any Warning: Cannot modify header information – headers already sent error.
在我们正确进入窗口小部件开发之前,我们需要打开输出缓冲以防止出现任何警告:无法修改标头信息–标头已发送错误。
// Turn on output buffering
ob_start();
To create a WordPress widget, extend the standard WP_Widget class, include the necessary methods and finally, register the widget.
要创建WordPress小部件,请扩展标准WP_Widget类,包括必要的方法,最后注册该小部件。
Create a child-class extending the WP_Widget class.
创建扩展WP_Widget类的子类。
class Tab_Login_Registration extends WP_Widget {The static property $login_registration_status will save the registration and login form generated error messages.
静态属性$login_registration_status将保存注册和登录表单生成的错误消息。
static private $login_registration_status;Give the widget a name and description using the __construct() magic method.
使用__construct()魔术方法为小部件命名和描述。
/**
	 * Register widget with WordPress.
	 */
	function __construct() {
		parent::__construct(
			'tab_login_registration', // Base ID
			__( 'Tabbed Login Registration Widget', 'text_domain' ), // Name
			array( 'description' => __( 'A tabbed login and registration widget for WordPress', 'text_domain' ), ) // Args
		);
	}
Two methods – login_form() and registration_form() – that returns the HTML code for the login and registration form will be created for reuse later.
将创建返回登录和注册表单HTML代码的两种方法( login_form()和registration_form() ,以备后用。
/**
	 * Returns the HTML for the login form
	 * @return string
	 */
	static function login_form() {
		$html = '<form method="post" action="' . esc_url( $_SERVER['REQUEST_URI'] ) . '">';
		$html .= '<input type="text" name="login_username" placeholder="Username" /><br/>';
		$html .= '<input type="password" name="login_password" placeholder="Password" /><br/>';
		$html .= '<input type="checkbox" name="remember_login" value="true" checked="checked"/> Remember Me<br/>';
		$html .= '<input type="submit" name="login_submit" value="Login" /><br/>';
		$html .= '</form>';

		return $html;

	}
/**
* Returns the HTML code for the registration form
* @return string
*/
static function registration_form() {
$html = '<form method="post" action="' . esc_url( $_SERVER['REQUEST_URI'] ) . '">';
$html .= '<input type="text" name="registration_username" placeholder="Username" /><br/>';
$html .= '<input type="password" name="registration_password" placeholder="Password" /><br/>';
$html .= '<input type="email" name="registration_email" placeholder="Email" /><br/>';
$html .= '<input type="submit" name="reg_submit" value="Sign Up" /><br/>';
$html .= '</form>';
return $html;
}The register_user() below handles the registration of a new user.
下面的register_user()处理新用户的注册。
/**
	 * Register new users
	 */
	function register_user() {

		if ( isset( $_POST['reg_submit'] ) ) {

			$username = esc_attr( $_POST['registration_username'] );
			$password = esc_attr( $_POST['registration_password'] );
			$email    = esc_attr( $_POST['registration_email'] );

			$register_user = wp_create_user( $username, $password, $email );

			if ( $register_user && ! is_wp_error( $register_user ) ) {

				self::$login_registration_status = 'Registration completed.';
			} elseif ( is_wp_error( $register_user ) ) {
				self::$login_registration_status = $register_user->get_error_message();
			}

		}
	}
Here’s how the method registers a new user.
这是该方法注册新用户的方式。
First, we make sure the user is actually registering an account. This is done by detecting that the ‘Sign Up’ button was clicked i.e. $_POST['reg_submit'] has been set.
首先,我们确保用户实际上是在注册一个帐户。 通过检测到单击了“注册”按钮即已设置$_POST['reg_submit']来完成此操作。
The form data are then escaped for HTML attributes using the esc_attr function.
然后使用esc_attr函数对HTML属性的表单数据进行转义。
The username, password and email entered by the user are then passed to wp_create_user() function to insert the new user into the WordPress database.
然后,用户输入的用户名,密码和电子邮件将传递到wp_create_user()函数,以将新用户插入WordPress数据库。
If all goes well, the property $login_registration_status will be set to the text Registration completed otherwise the error returned by wp_create_user() will be it value.
如果一切顺利,则属性$login_registration_status将设置为Text Registration completed否则wp_create_user()返回的错误将是它的值。
When the login form is submitted, the login_user() function below sign in the user.
提交登录表单后,下面的login_user()函数登录用户。
/**
	 * Login registered users
	 */
	function login_user() {
		if ( isset( $_POST['login_submit'] ) ) {

			$creds                  = array();
			$creds['user_login']    = esc_attr( $_POST['login_username'] );
			$creds['user_password'] = esc_attr( $_POST['login_password'] );
			$creds['remember']      = esc_attr( $_POST['remember_login'] );

			$login_user = wp_signon( $creds, false );

			if ( ! is_wp_error( $login_user ) ) {
				wp_redirect( home_url( 'wp-admin' ) );
			} elseif ( is_wp_error( $login_user ) ) {
				self::$login_registration_status = $login_user->get_error_message();
			}
		}
	}
Allow me to explain how login_user() sign in users to WordPress.
让我解释一下login_user()如何login_user()用户登录WordPress。
Similar to the aforementioned register_user(), first we ensure the user is trying to log in by checking if $_POST['login_submit'] has been set.
与前面提到的register_user()相似,首先我们通过检查$_POST['login_submit']是否已设置来确保用户尝试登录。
An associated array $creds of the login credentials entered by the user is created.
创建了用户输入的登录凭证的关联数组$creds 。
The associative array is then passed to wp_signon for authentication.
然后将关联数组传递给wp_signon进行身份验证。
If the credential is deemed valid and by wp_signon, the user will be redirected to the WordPress dashboard by wp_redirect otherwise property $login_registration_status is set to the login generated error.
如果证书被认为是有效的,并通过wp_signon ,用户会被重定向到WordPress后台wp_redirect否则财产$login_registration_status设置为登录生成的错误。
The back-end widget settings form is created by the form() method that will consist of a field that will contain the title of the widget.
后端窗口小部件设置表单由form()方法创建,该方法将由一个包含窗口小部件标题的字段组成。
public function form( $instance ) {
		if ( isset( $instance['title'] ) ) {
			$title = $instance['title'];
		} else {
			$title = __( 'Login / Registration', 'text_domain' );
		}
		?>
		<p>
			<label for="<?php echo $this->get_field_id( 'title' ); ?>"><?php _e( 'Title:' ); ?></label>
			<input class="widefat" id="<?php echo $this->get_field_id( 'title' ); ?>"
			       name="<?php echo $this->get_field_name( 'title' ); ?>" type="text"
			       value="<?php echo esc_attr( $title ); ?>">
		</p>
	<?php
	}
When the widget title is entered into the form field, the update() method sanitizes and saves the data to the database for reuse.
在窗口小部件标题输入到表单字段时, update()方法将清除数据并将其保存到数据库中以供重复使用。
public function update( $new_instance, $old_instance ) {
		$instance          = array();
		$instance['title'] = ( ! empty( $new_instance['title'] ) ) ? strip_tags( $new_instance['title'] ) : '';

		return $instance;
	}
The widget() method displays the tabbed login and registration form at the front-end of WordPress.
widget()方法在WordPress的前端显示选项卡式的登录和注册表单。
public function widget( $args, $instance ) { ?>
		<script type="text/javascript">
			$('document').ready(function () {
				$('#flip-container').quickFlip();

				$('#flip-navigation li a').each(function () {
					$(this).click(function () {
						$('#flip-navigation li').each(function () {
							$(this).removeClass('selected');
						});
						$(this).parent().addClass('selected');
						var flipid = $(this).attr('id').substr(4);
						$('#flip-container').quickFlipper({}, flipid, 1);

						return false;
					});
				});
			});
		</script>

		<?php
		$title = apply_filters( 'widget_title', $instance['title'] );

		echo $args['before_widget'];
		if ( ! empty( $title ) ) {
			echo $args['before_title'] . $title . $args['after_title'];
		} ?>

		<?php $this->login_user(); ?>

		<?php $this->register_user(); ?>

		<div class="login-reg-error"><?php echo self::$login_registration_status; ?></div>
		<div id="flip-tabs">
			<ul id="flip-navigation">
				<li class="selected"><a href="#" id="tab-0">Login</a></li>
				<li><a href="#" id="tab-1">Register</a></li>
			</ul>
			<div id="flip-container">
				<div>
					<ul class="orange">
						<?php echo self::login_form(); ?>
					</ul>
				</div>
				<div>
					<ul class="green">
						<?php echo self::registration_form(); ?>
					</ul>
				</div>
			</div>
		</div>

		<?php
		echo $args['after_widget'];
	}
Code explanation: The JavaScript code add the tabbing and flipping effect to the widget.
代码说明: JavaScript代码向小部件添加了跳动和翻转效果。
The login_user() and register_user() are included to respectively sign in a registered user or register a new user.
包括login_user()和register_user()分别用于登录注册用户或注册新用户。
The login_form() and registration_form() static methods are called to display the login and registration form.
调用login_form()和registration_form()静态方法以显示登录和注册表单。
Finally, we close the widget class.
最后,我们关闭小部件类。
} // class Tab_Login_RegistrationThe widget class Tab_Login_Registration needs to be registered using the widgets_init hook so it is recognized by WordPress internals.
小部件类Tab_Login_Registration需要使用widgets_init钩子进行注册,以便WordPress内部人员可以识别它。
// register Foo_Widget widget
function register_tab_login_registration() {
	register_widget( 'Tab_Login_Registration' );
}

add_action( 'widgets_init', 'register_tab_login_registration' );
We still need to include jQuery, the widget CSS and QuickFlip library to get the tab and flipping effect in the widget working.
我们仍然需要包括jQuery,小部件CSS和QuickFlip库,以在小部件正常工作时获得选项卡和翻转效果。
The jQuery, and Quickflip javascript as well as the CSS are included/enqueue to the header of WordPress by wp_enqueue_style and wp_enqueue_script.
的jQuery和Quickflip JAVASCRIPT以及所述CSS包括/排队到WordPress的由标题wp_enqueue_style和wp_enqueue_script 。
function plugin_assets() {
	wp_enqueue_style( 'tlrw-styles', plugins_url( 'css/styles.css', __FILE__ ) );
	wp_enqueue_script( 'tlrw-jquery', plugins_url( 'js/jquery.js', __FILE__ ) );
	wp_enqueue_script( 'tlrw-quickflip', plugins_url( 'js/jquery.quickflip.js', __FILE__ ) );
}

add_action( 'wp_enqueue_scripts', 'plugin_assets' );
We are done coding the login and registration widget.
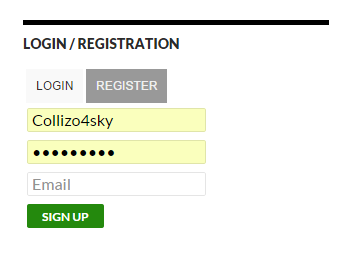
我们完成了登录和注册小部件的编码。
Below is a screenshot of the widget.
以下是小部件的屏幕截图。
查看小部件的演示 。
结语 (Wrap Up)
To further understand how the widget was built and how to implement it on your WordPress site, download the widget plugin, which includes the jQuery, Quickflip, and the widget stylesheet files.
为了进一步了解小部件的构建方式以及如何在WordPress网站上实现小部件 ,请下载小部件插件 ,其中包括jQuery,Quickflip和小部件样式表文件。
If you have any questions or suggestions for code improvement, let me know in the comments.
如果您对代码改进有任何疑问或建议,请在评论中告诉我。
翻译自: https://www.sitepoint.com/build-a-tabbed-wordpress-login-and-registration-widget/
选项卡式登录界面


 2497
2497

 被折叠的 条评论
为什么被折叠?
被折叠的 条评论
为什么被折叠?
 到【灌水乐园】发言


