diffbot
A while back, we looked at Diffbot, the machine learning AI for processing web pages, as a means to extract SitePoint author portfolios. That tutorial focused on using the Diffbot UI only, and consuming the API created would entail pinging the API endpoint manually. Additionally, since then, the design of the pages we processed has changed, and thus the API no longer reliably works.
不久前 ,我们研究了Diffbot ,这是一种用于处理网页的机器学习AI,是一种提取SitePoint作者作品集的方法 。 该教程仅侧重于使用Diffbot UI,而使用创建的API将需要手动ping API端点。 此外,此后,我们处理的页面的设计已更改,因此API不再可靠地工作。
In this tutorial, apart from rebuilding the API so that it works again, we’ll use the official Diffbot client to build custom entities that correspond to the data we seek (author portfolios).
在本教程中,除了重新构建API以使其再次起作用之外,我们还将使用Diffbot官方客户端来构建与我们想要的数据相对应的自定义实体(作者投资组合)。

自举 (Bootstrapping)
We’ll be using Homestead Improved as usual. The following few commands will bootstrap the Vagrant box, create the project folder, and install the Diffbot client.
我们将像往常一样使用Homestead Improvement 。 以下几个命令将引导Vagrant框,创建项目文件夹,并安装Diffbot客户端。
git clone https://github.com/swader/homestead_improved hi_diffbot_authorfolio; cd hi_diffbot_authorfolio
./bin/folderfix.sh
vagrant up; vagrant ssh
mkdir -p Code/Project/public; cd Code/Project; touch public/index.php
composer require swader/diffbot-php-client
Additionally, we can install Symfony’s vardumper as a development requirement, just to get prettier debug outputs.
另外,我们可以安装Symfony的vardumper作为开发要求,只是为了获得更漂亮的调试输出。
composer require symfony/var-dumper --devIf we now give index.php the following content, provided we added homestead.app to our host machine’s /etc/hosts file, we should see “Hello world” if we visit http://homestead.app in our browser:
如果我们现在给index.php提供以下内容,并在我们的主机的/etc/hosts文件中添加了homestead.app ,那么如果在浏览器中访问http://homestead.app ,我们应该会看到“ Hello world”:
<?php
// index.php

require '../vendor/autoload.php';

echo "Hello World";
Diffbot初始化 (Diffbot Initialization)
Note that to follow along, you’ll need a free Diffbot token – get one here.
请注意,要继续进行,您将需要一个免费的Diffbot令牌- 在此处获取一个。
define('TOKEN', 'token');
use Swader\Diffbot\Diffbot;

$d = new Diffbot(TOKEN);
This is all we need to init Diffbot. Let’s test it on a sample article.
这就是我们初始化Diffbot所需要的。 让我们在示例文章中对其进行测试。
echo $d->createArticleAPI('https://www.sitepoint.com/crawling-searching-entire-domains-diffbot')->call()->getAuthor(); // Bruno Skvorc自定义API (Custom API)
First, we need to rebuild our API from the last post, so that it can become operational again. We do this by logging into the dev panel and going to https://www.diffbot.com/dev/customize/.
首先,我们需要从上一篇文章重建我们的API,以便它可以再次运行。 我们通过登录开发人员面板并转到https://www.diffbot.com/dev/customize/来实现此目的 。
Let’s create a new API:
让我们创建一个新的API:
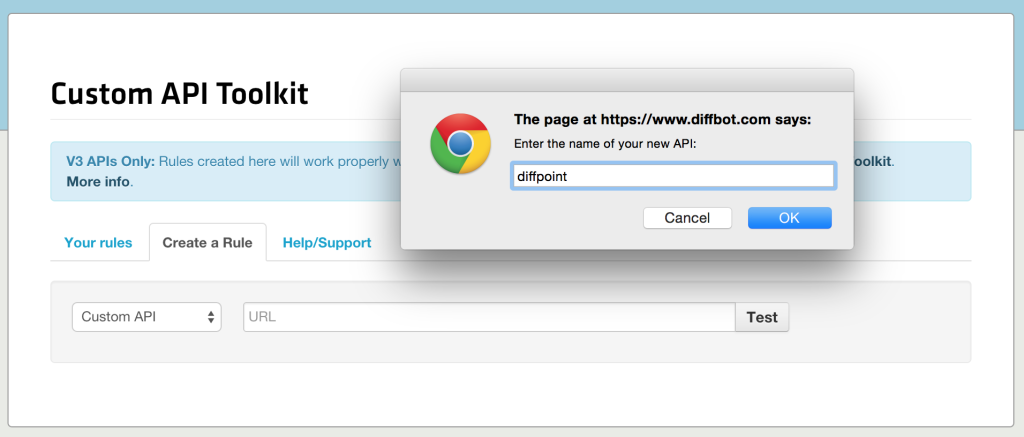
After entering a sample URL like www.sitepoint.com/author/bskvorc/, we can add some custom fields, like author:
输入示例网址(如www.sitepoint.com/author/bskvorc/ ,我们可以添加一些自定义字段,例如author :

We can use this same approach to define fields like bio, and nextPage, in order to activate Diffbot’s automatic pagination:
我们可以使用相同的方法来定义诸如bio和nextPage类的字段,以激活Diffbot的自动分页 :
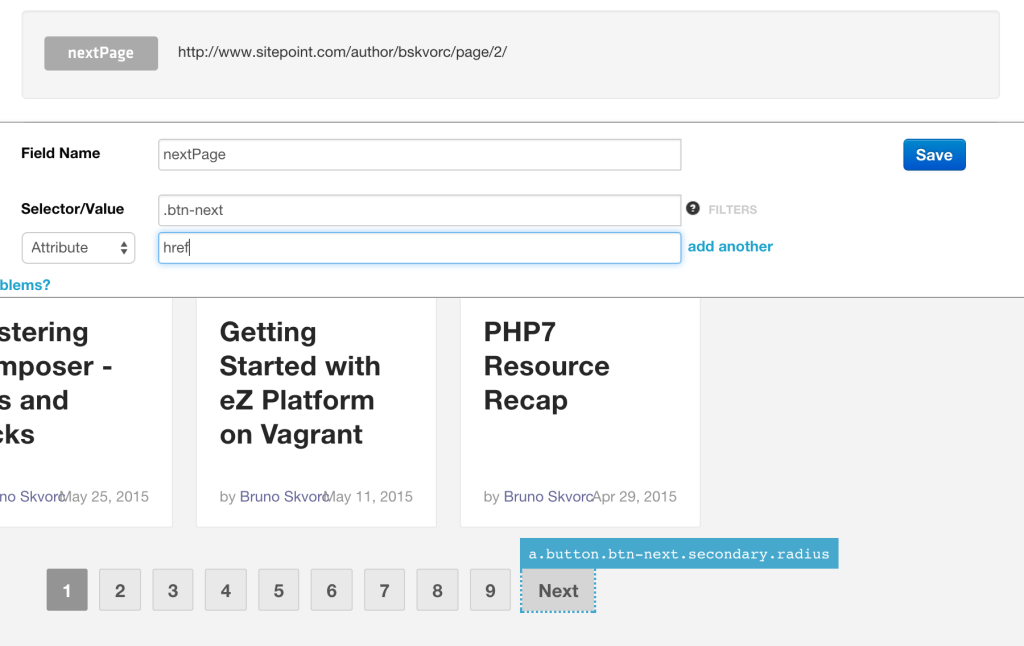
We also need to define a collection which would gather all the article cards and process them. Making a collection entails selecting an element the selector of which is repeated multiple times. In our case, that’s the li element of the .article-list class.
我们还需要定义一个集合,该集合将收集所有商品卡并进行处理。 进行收集需要选择一个元素,该元素的选择器会重复多次。 在我们的例子中,这就是.article-list类的li元素。
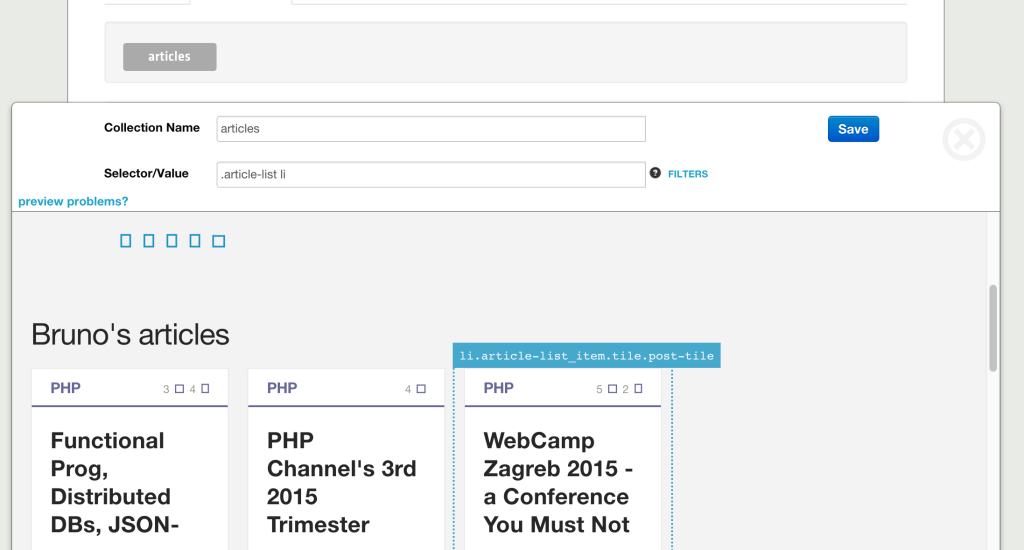
Within that collection, we define fields for each card (when in doubt, the browser’s dev tools can help us identify the classes and elements we need to specify as selectors to get the desired result):
在该集合中,我们为每个卡定义字段(有疑问时,浏览器的开发工具可以帮助我们识别需要指定为选择器的类和元素,以获取所需的结果):
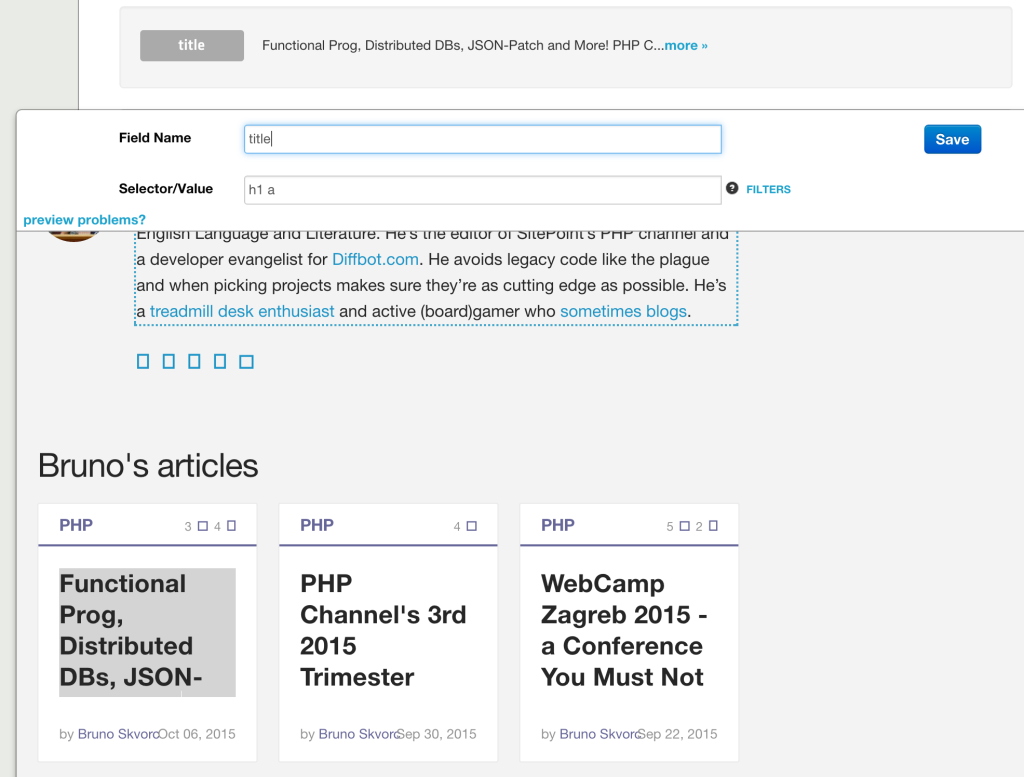

Besides title and primary category, we should also to extract the date of publication, primary category URL, article URLs, number of likes, etc. For the sake of brevity, we’ll skip defining those here.
除了标题和主要类别之外,我们还应该提取发布日期,主要类别URL,文章URL,顶数等。为简洁起见,我们将在此处跳过对其的定义。
If we now access our endpoint directly rather than in the API toolkit, we should get the fully merged 9 pages of posts back, processed just the way we want them.
如果现在直接访问端点而不是在API工具包中访问端点,则应返回完全合并的9页帖子,并按照我们希望的方式进行处理。
http://api.diffbot.com/v3/diffpoint?token=token&url=https://www.sitepoint.com/author/bskvorc/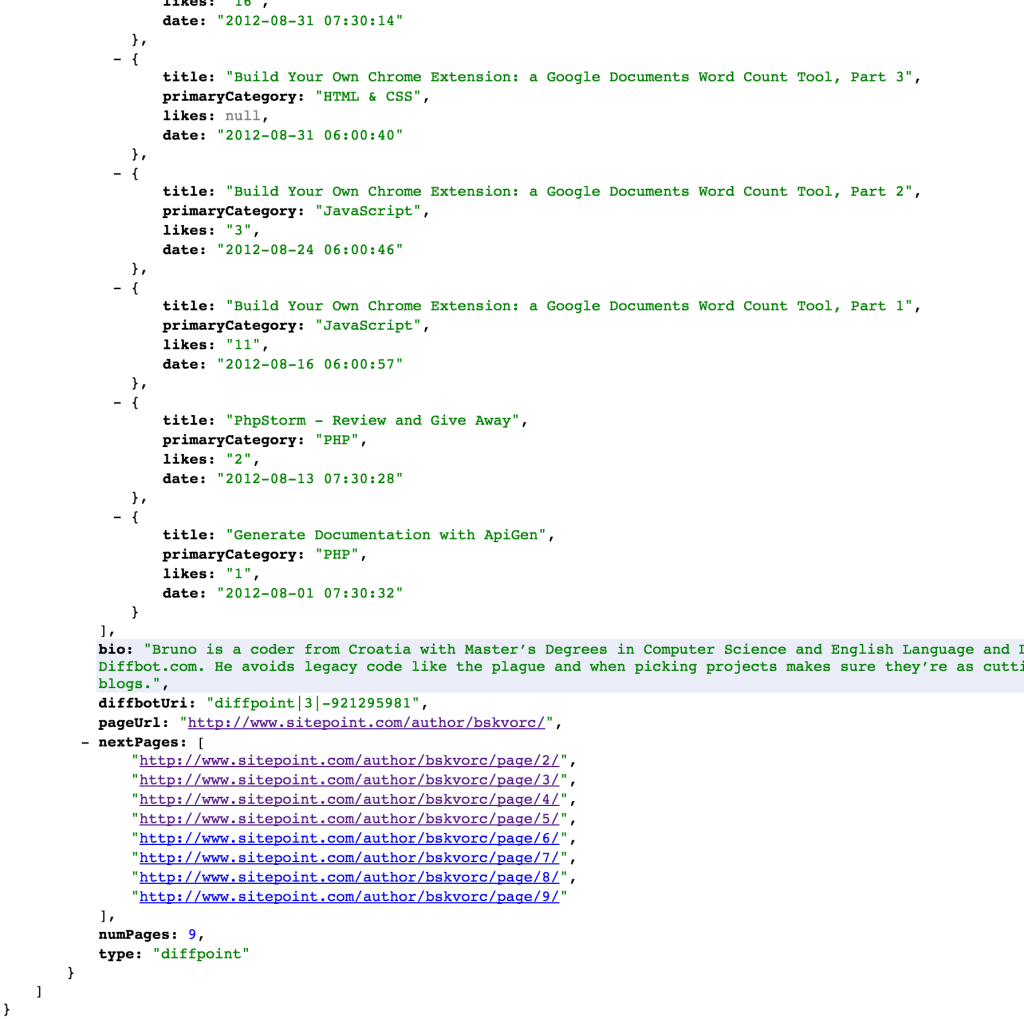
We can see that the API successfully found all the pages in the set and returned even the oldest of posts.
我们可以看到API成功找到了集合中的所有页面,甚至返回了最旧的帖子。
扩展客户 (Extending the Client)
Let’s see if the Custom API behaves as expected.
让我们看看自定义API的行为是否符合预期。
echo $d->createCustomAPI('https://www.sitepoint.com/author/bskvorc', 'diffpoint')->call()->getBio();This should echo the correct bio.
这应该回显正确的生物。
This step is, in a way, optional. We could consume the returned data as is, and just iterate through keys and arrays, but let’s pretend our data is much more complex than a simple portfolio page and do it right regardless.
从某种意义上讲,此步骤是可选的。 我们可以按原样使用返回的数据,并且仅通过键和数组进行迭代,但是让我们假设我们的数据比简单的投资组合页面要复杂得多,并且无论如何都可以正确处理。
We need two new classes: an Entity Factory, and an Entity. Let’s create them at /src/AuthorFolio.php and src/CustomFactory.php, relative to the root of our project (src is in the root folder).
我们需要两个新类:一个实体工厂和一个实体。 让我们在相对于项目根目录的src/CustomFactory.php /src/AuthorFolio.php和src/CustomFactory.php创建它们( src在根文件夹中)。
作者作品集 (AuthorFolio)
Let’s start with the new entity. As per the docs, we have an abstract class we can extend.
让我们从新实体开始。 根据docs ,我们可以扩展一个抽象类。
<?php

// src/AuthorFolio.php

namespace My\Custom;

use Swader\Diffbot\Abstracts\Entity;

class AuthorFolio extends Entity
{

}
We extend the abstract entity and give our new entity its own namespace. This is optional, but useful. At this point, the entity would already be usable – it is essentially identical to the Wildcard entity which uses magic methods to resolve requests for various properties of the returned data (which is why the getBio method in the example above worked without us having to define anything). But the goal is to have the AuthorFolio class verbose, with support for custom, SitePoint-specific data and maybe some shortcut methods. Let’s do this now.
我们扩展了抽象实体,并给我们的新实体自己的名称空间。 这是可选的,但很有用。 在这一点上,该实体将已经可用–与使用魔术方法解析对返回数据的各种属性的请求的Wildcard实体基本相同(这就是为什么上面的示例中的getBio方法可以工作而无需定义的原因)任何东西)。 但是我们的目标是使AuthorFolio类更加详细,并支持自定义的,特定于SitePoint的数据以及一些快捷方法。 让我们现在开始。
The API will return the full list of an author’s articles – but not their count. To find out how many posts an author has, we’d have to count the articles property, so let’s wrap that process in a shortcut method. We can also tell PHPStorm that the class will have an articles property using the @property tag, so it stops complaining about accessing the field with magic methods:
API将返回作者文章的完整列表,但不返回其计数。 要找出作者的帖子count ,我们必须count articles属性,因此让我们将该过程包装在快捷方式中。 我们还可以告诉PHPStorm该类将使用@property标记提供一个articles属性,因此它不再抱怨使用魔术方法访问该字段:
<?php

// src/AuthorFolio.php

namespace My\Custom;

use Swader\Diffbot\Abstracts\Entity;

/**
 * Class AuthorFolio
 * @property array articles
 * @package My\Custom
 */
class AuthorFolio extends Entity
{
    public function getType()
    {
        return 'authorfolio';
    }

    public function getNumPosts()
    {
        return count($this->articles);
    }
}
Other methods we could define are totalLikes, activeSince, favoredCategory, etc.
我们可以定义的其他方法是totalLikes , activeSince , favoredCategory等。
CustomFactory (CustomFactory)
The entity being ready, it’s time to define a custom factory to bind it to the type of return data we’re getting from our custom API. We’re writing an alternative to the default factory, but the original class already contains some methods we can use – it’s designed to be reused by its children. As such, we merely need to extend the original, map the new type to our custom entity, and we’re done.
该实体已经准备就绪,是时候定义一个自定义工厂,将其绑定到我们从自定义API获取的返回数据类型了。 我们正在编写默认工厂的替代方法,但是原始类已经包含了一些我们可以使用的方法–它被设计为其子级重用。 这样,我们只需要扩展原始对象,将新类型映射到我们的自定义实体,就可以完成。
<?php

// src/CustomFactory.php

namespace My\Custom;

use Swader\Diffbot\Factory\Entity;

class CustomFactory extends Entity
{
    public function __construct()
    {
        $this->apiEntities = array_merge(
            $this->apiEntities,
            ['diffpoint' => '\My\Custom\AuthorFolio']
        );
    }
}
We merged the original API-to-entity list with our own custom binding, thereby telling the Factory class to both keep an eye on the standard types and APIs, and our new ones. This means we can keep using this factory for default Diffbot APIs as well.
我们将原始的API到实体列表与我们自己的自定义绑定合并在一起,从而告诉Factory类要同时关注标准类型和API以及新的API。 这意味着我们也可以继续将此工厂用于默认的Diffbot API。
接通工厂 (Plugging the Factory In)
To make our classes autoloadable, we should probably add them to composer.json:
为了使我们的类可自动加载,我们应该将它们添加到composer.json :
"autoload": {
    "psr-4": {
      "My\\Custom\\": "src"
    }
  }
We activate these new autoload mappings by running composer dump-autoload.
我们通过运行composer dump-autoload激活这些新的自动加载映射。
Next, we instantiate the new factory, plug it into our Diffbot instance, and test the API:
接下来,我们实例化新工厂,将其插入我们的Diffbot实例,并测试API:
$d = new Diffbot(TOKEN);

$d->setEntityFactory(new My\Custom\CustomFactory());

$api = $d->createCustomAPI('https://www.sitepoint.com/author/bskvorc', 'diffpoint');
$api->setTimeout(120000);

$result = $api->call();

dump($result->getNumPosts());
Note that we increased the timeout because a heavily paginated set of posts can take a while to render on Diffbot’s end.
请注意,我们增加了超时时间,因为大量分页的帖子可能需要一段时间才能呈现在Diffbot的末端。
结论 (Conclusion)
In this tutorial, by using the official Diffbot client, we constructed custom entities and built a custom API which returns them. We saw how easy it is to leverage machine learning and optical content processing for grabbing arbitrary data from websites of any type, and we saw how heavily customizable the Diffbot client is.
在本教程中,通过使用官方的Diffbot客户端 ,我们构造了自定义实体,并构建了一个返回它们的自定义API。 我们看到了利用机器学习和光学内容处理从任何类型的网站中获取任意数据的难易程度,并且看到了Diffbot客户端的可定制性非常强。
While this was a rather simple example, it isn’t difficult to imagine advanced use cases on more complex entities, or perhaps several of them spread over multiple APIs, all processed through a single EntityFactory, each custom API corresponding to a special Entity type. With a well trained visual neural network, the only processing limit is one’s imagination.
尽管这是一个非常简单的示例,但不难想象在更复杂的实体上使用高级用例,或者它们中的几个分布在多个API上,都通过单个EntityFactory处理,每个自定义API对应于一种特殊的Entity类型。 拥有训练有素的视觉神经网络,唯一的处理极限就是想像力。
If you’d like to read more about the Diffbot client, check out the full docs and play around for yourself – just don’t forget to fetch a fresh free two-week demo token!
如果您想了解有关Diffbot客户端的更多信息,请查看完整的文档并自己玩耍-别忘了获取新的免费的两周演示令牌!
翻译自: https://www.sitepoint.com/powerful-custom-entities-with-the-diffbot-php-client/
diffbot


 1165
1165

 被折叠的 条评论
为什么被折叠?


