


ifttt
The Amazon Echo is a voice enabled speaker and personal assistant that has a range of capabilities which grow every day. As a developer who is fascinated by both the Internet of Things and artificial intelligence — the Echo holds so much potential!
Amazon Echo是具有语音功能的扬声器和个人助理,其功能每天都在增长。 作为一个既对物联网又对人工智能着迷的开发人员,Echo拥有巨大的潜力!
The best way to begin experimenting with your own Echo customizations is via IFTTT (If This Then That), a service that allows rule based actions and triggers between a range of devices and services with no programming required. In this article, we will explore a few examples of functionality that the Echo can achieve when paired with IFTTT.
开始尝试自己的Echo定制的最佳方法是通过IFTTT(如果做到了),该服务允许在各种设备和服务之间进行基于规则的操作和触发,而无需编程。 在本文中,我们将探讨Echo与IFTTT配对时可以实现的一些功能示例。
If you are in Australia — like me — and aren’t quite sure how to get your hands on an Echo and set it up to work here, I have a quick guide on how to set up an Amazon Echo in Australia that I wrote at Dev Diner on this very topic! Whilst you can’t get everything to work just yet, developers can get enough working that you’ll be able to develop for the Echo in no time.
如果您像我一样在澳大利亚,并且不太确定如何使用Echo并将其设置为在这里工作,我有一份关于如何在澳大利亚建立Amazon Echo的快速指南, Dev Diner就是这个话题! 尽管您还无法使所有功能正常工作,但开发人员可以获得足够的工作,使您能够立即为Echo进行开发。
对IFTTT完全陌生? (Completely New to IFTTT?)
If you are completely new to IFTTT, we have a more generic overview of how it works in an earlier piece on Connecting LIFX Light Bulbs to the IoT Using IFTTT. We’ve also connected it to Node.js via the IFTTT Maker channel and WordPress via the IFTTT WordPress channel. Throughout this article, if you find any concepts in IFTTT a bit confusing, check the earlier articles — however I’ve aimed to structure this so that most readers can pick things up solely from this article.
如果您是IFTTT的新手,我们会在较早的文章“ 使用IFTTT将LIFX灯泡连接到IoT”上对它的工作方式进行更一般的概述。 我们还通过IFTTT Maker渠道将其连接到Node.js,并通过IFTTT WordPress渠道将其连接到WordPress 。 在整篇文章中,如果您发现IFTTT中的任何概念都有些混乱,请查看前面的文章-但是,我旨在进行结构化,以便大多数读者可以单独从本文中学习。
将您的Echo连接到IFTTT (Connecting Your Echo to IFTTT)
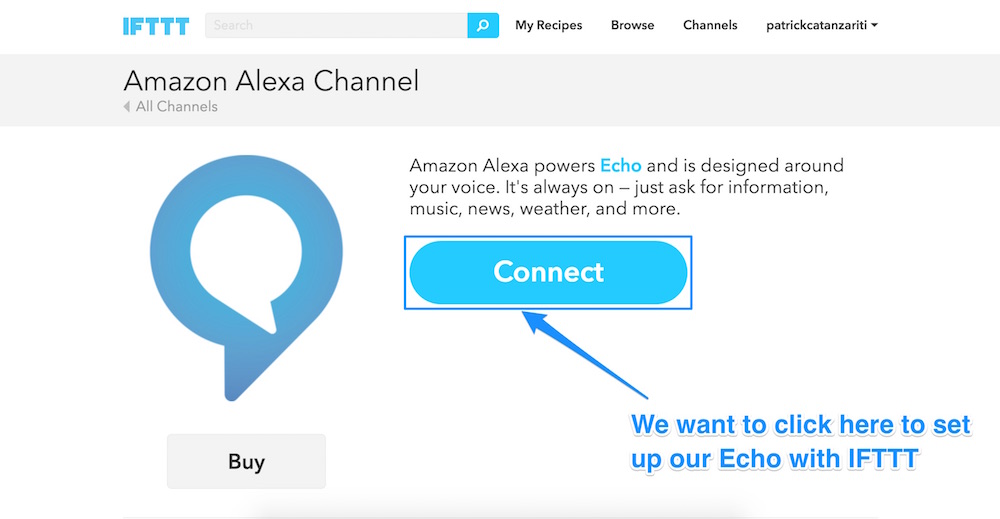
To enable any of the below capabilities, we need to add the Amazon Alexa channel to IFTTT. Head to the Amazon Alexa page and click “Connect”:
要启用以下任何功能,我们需要将Amazon Alexa频道添加到IFTTT。 转到Amazon Alexa页面 ,然后单击“连接”:
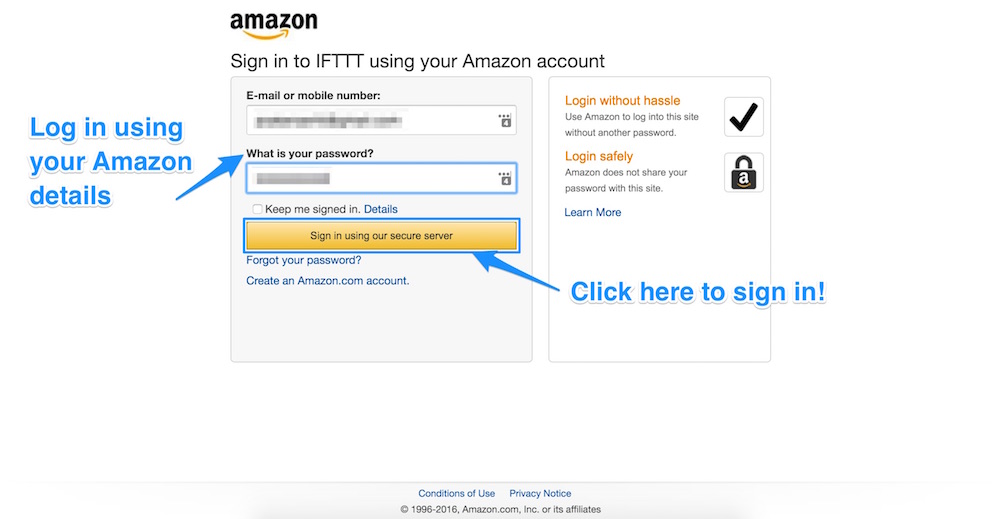
From here, you will be prompted to enter in your Amazon account details. Make sure you put in the account details for the account which your Echo is assigned to (if you have multiple accounts):
从这里,将提示您输入您的Amazon帐户详细信息。 确保输入您的Echo分配到的帐户的帐户详细信息(如果您有多个帐户):
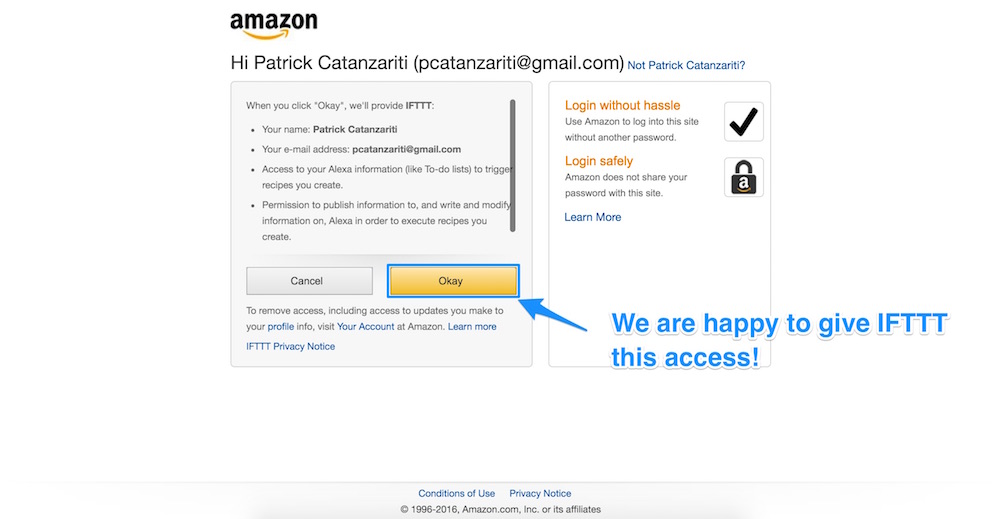
Agree to give IFTTT access to all of your Alexa information by clicking “Okay”:
单击“确定”,同意授予IFTTT访问您所有Alexa信息的权限:
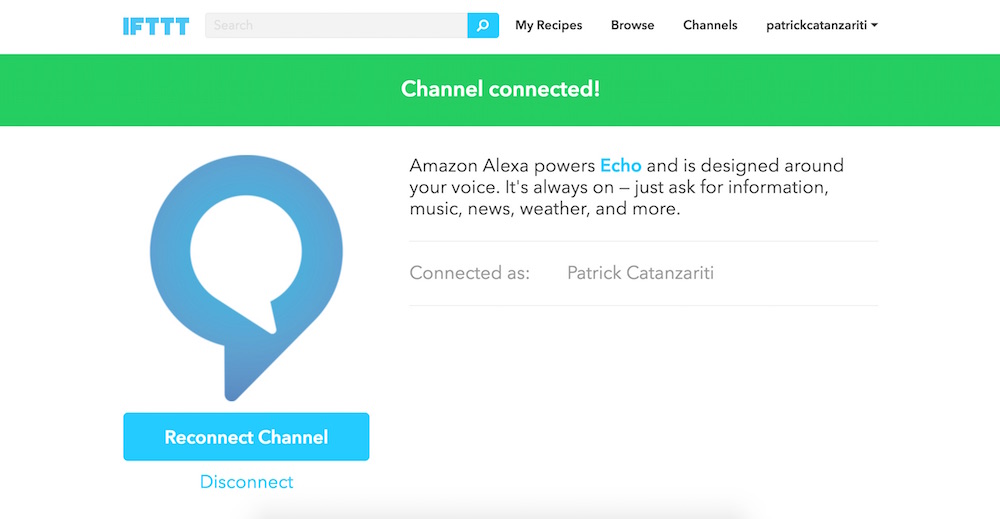
When you’ve granted it the right permissions, you’ll be directed back to IFTTT and should see a “Channel Connected!” message:
授予正确的权限后,您将被带回IFTTT,并应看到“已连接频道!” 信息:
From there, the steps for beginning a new recipe with the Echo are always the same, as the Echo is only a trigger in IFTTT — not an action. In other words, you can only use the Echo in IFTTT to cause actions to occur, you cannot get IFTTT to make the Echo speak back to you or look up information (I hold out hope that this will be a future addition!).
从那里开始,使用Echo开始新配方的步骤始终是相同的,因为Echo只是IFTTT中的触发器,而不是动作。 换句话说,您只能在IFTTT中使用Echo引起动作,不能让IFTTT使Echo向您讲话或查找信息(我希望这会成为将来的补充!)。
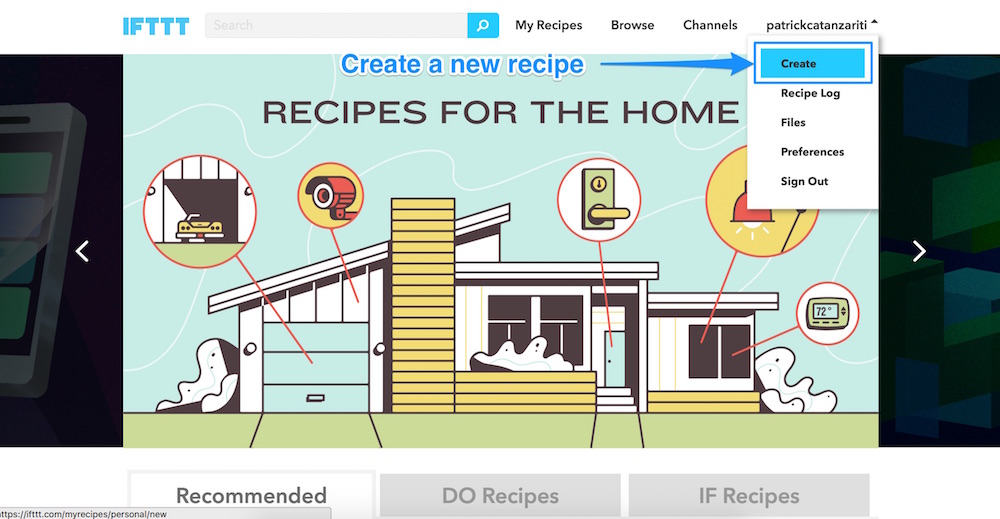
To create a new recipe, as always, you head to the top right hand corner and click your username. Then click “Create”:
与往常一样,要创建新食谱,请转到右上角,然后单击您的用户名。 然后点击“创建”:
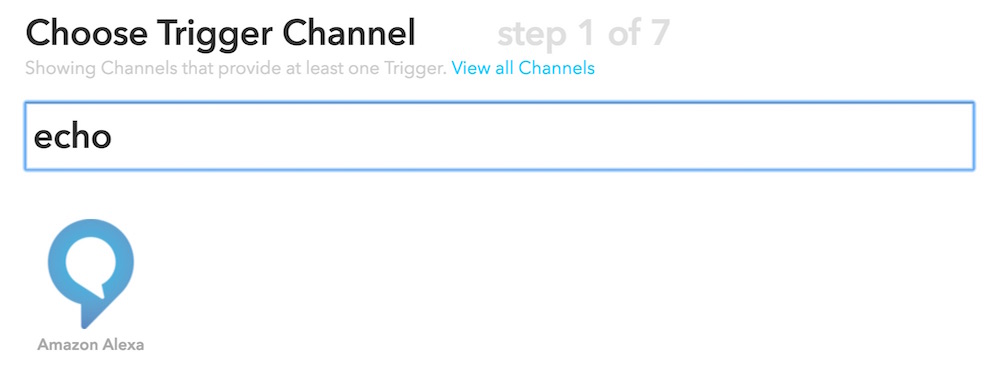
From there, search for the Amazon Alexa channel. It will also appear if you search for “echo”, so you can find it in a range of ways!
从那里搜索Amazon Alexa频道。 如果您搜索“ echo”,它也会出现,因此您可以通过多种方式找到它!
From here, the trigger option chosen will differ depending on the recipe we want to create. Each recipe below will start from this point in the process.
从这里开始,根据我们要创建的配方,选择的触发选项将有所不同。 下面的每个配方都将从过程中的这一点开始。
将Echo连接到LIFX灯泡 (Connecting the Echo to LIFX Light Bulbs)
Whilst there is a LIFX skill you can install onto the Echo, it didn’t work for me when I tried to use it. If you also have the same issue, you can use IFTTT to achieve the same results, just as we did within the Connecting LIFX Light Bulbs to the IoT Using IFTTT article here at SitePoint.
虽然您可以将LIFX技能安装到Echo上,但是当我尝试使用它时,它对我却不起作用。 如果您也遇到相同的问题,则可以像在SitePoint上使用IFTTT将LIFX灯泡连接到IoT一样,使用IFTTT获得相同的结果。
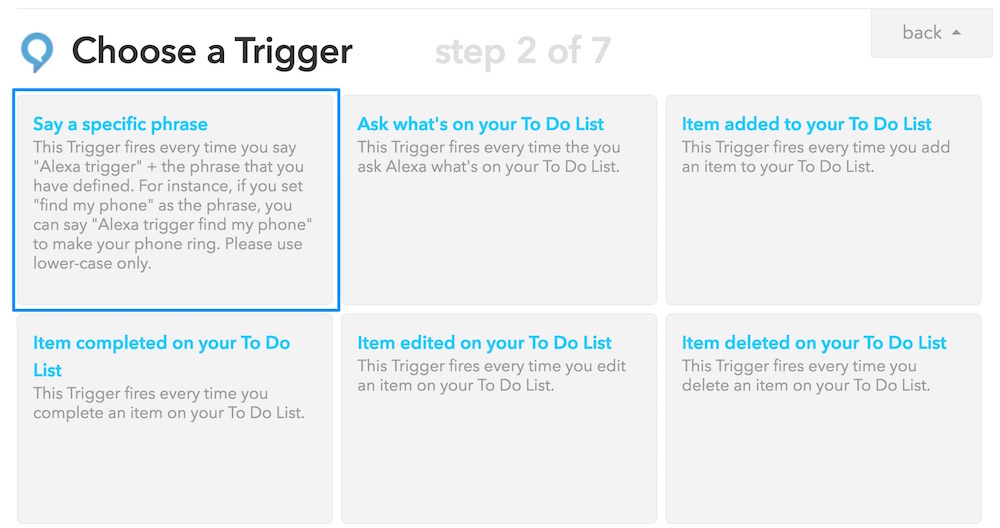
We want to trigger our lights via voice. To do this, we use the Echo trigger channels “Say a specific phrase” trigger:
我们想通过声音触发灯光。 为此,我们使用Echo触发通道“说一个特定的短语”触发:
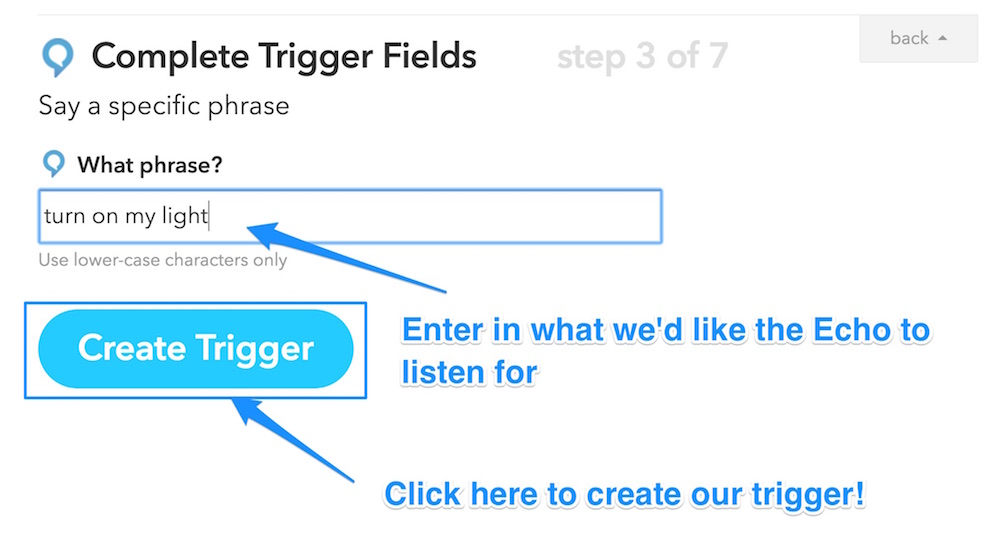
From here, we set up which phrase we want to use. As an initial test, we can put down “turn on my light” and then click “Create Trigger” (note — your phrase needs to be all lowercase for it to be accepted):
在这里,我们设置了要使用的短语。 作为初始测试,我们可以放下“打开我的灯”,然后单击“创建触发器” (注意-您的短语必须全部小写才能被接受) :
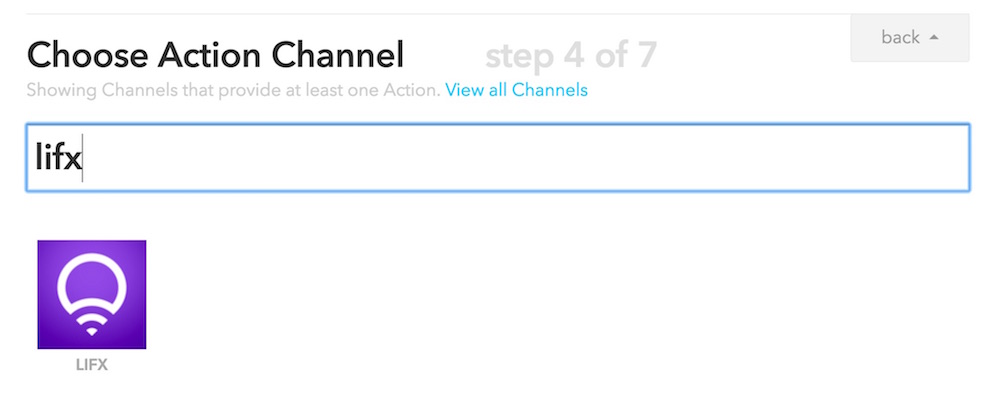
To connect up your Echo to your LIFX light bulbs, choose the LIFX action channel:
要将Echo连接到LIFX灯泡,请选择LIFX操作通道:
Then, choose the action of “Turn lights on”:
然后,选择“打开灯”的操作:

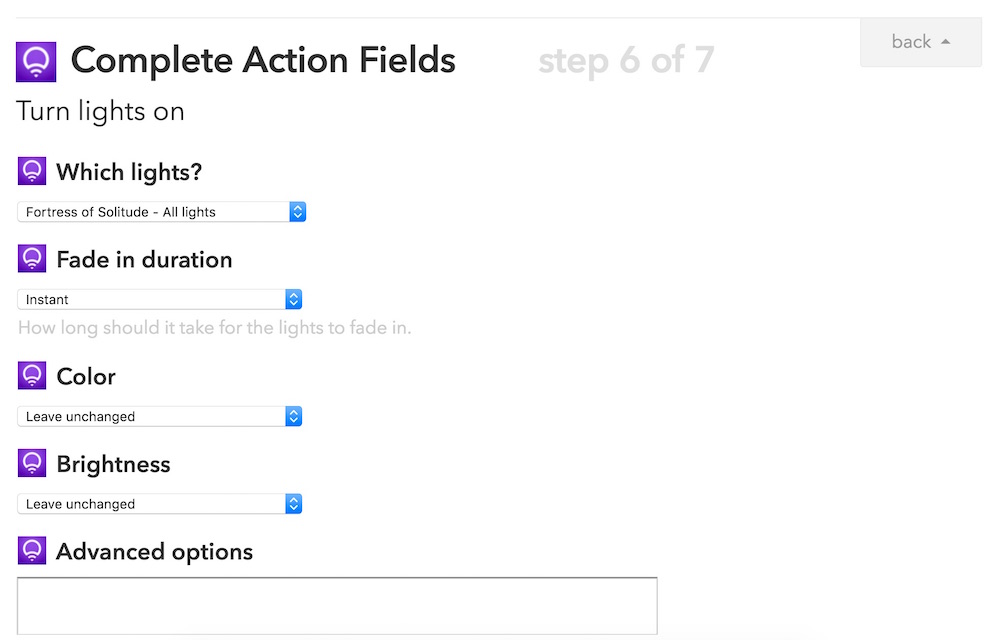
Finally, select which light you want the command to turn on (you could write more specific phrases in the Echo trigger, such as “turn on my bedroom light” and set specifics within this rule). Choose how quickly you’d like the lights to fade in — we’ve chosen “Instant” as we want them to turn straight on. You can choose to set the color and brightness of the light when you give this command, however we’ve left this as is so that it remains at the last setting the bulb was given. The advanced options aren’t necessary for this one! Click to continue to create the recipe.
最后,选择要打开命令的灯(您可以在Echo触发器中写一些更具体的短语,例如“打开我的卧室的灯”并在此规则内设置详细信息)。 选择您希望灯快速消失的速度-我们选择了“即时”,因为我们希望它们直接打开。 您可以在发出此命令时选择设置灯光的颜色和亮度,但是我们将其保留为原样,以便保留在给出灯泡的最后设置中。 高级选项对此不是必需的! 单击以继续创建配方。
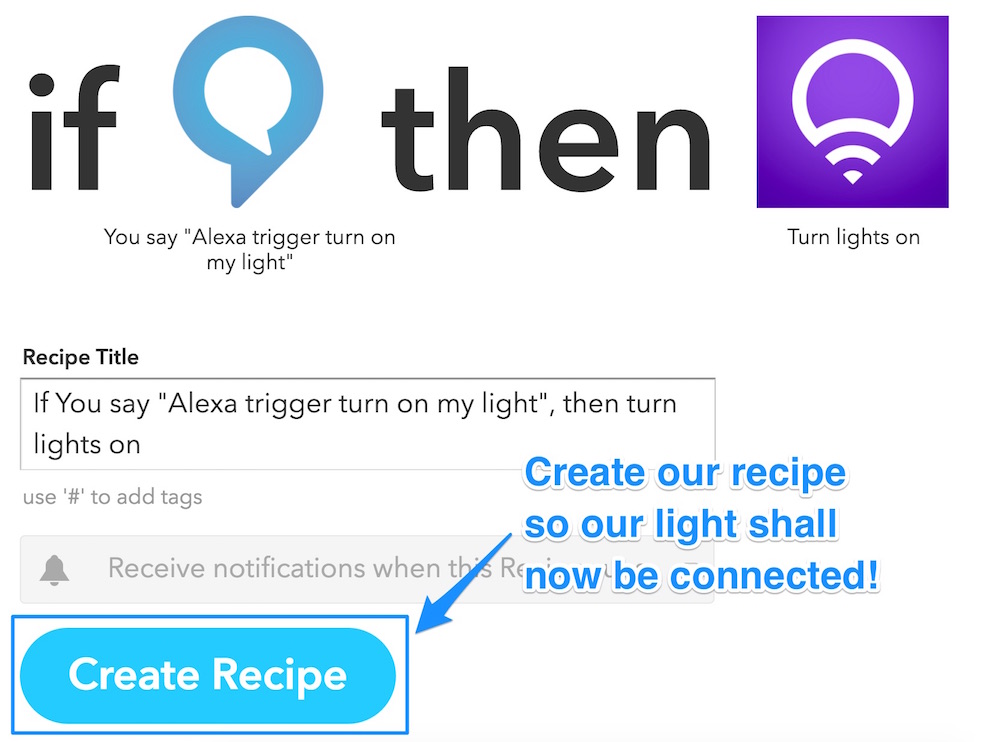
You should then have a confirmation of the recipe and the trigger sentence. It shows that our trigger sentence is “Alexa trigger turn on my light” — this is because any sentence we give within IFTTT will begin with “trigger”. I’ll show you a workaround I use for this soon! For now, choose “Create Recipe” to finalize the process:
然后,您应该确认配方和触发语句。 它表明我们的触发语句是“ Alexa触发我的灯” –这是因为我们在IFTTT中给出的任何语句都将以“触发”开头。 我将很快为您显示解决方法! 现在,选择“创建配方”以完成该过程:
If you now speak to your Echo and say “Alexa trigger turn on my light”, you should find that your LIFX light turns on! It is the Internet of Things magic at work!
如果现在与Echo通话并说“ Alexa触发器打开了我的灯”,则应该发现LIFX灯已经打开! 这是工作中的物联网魔术!
You can use the same process to create a recipe to allow Alexa to turn off your light in the same way.
您可以使用相同的过程创建配方,以允许Alexa以相同的方式关闭光源。
以更自然的方式重命名触发器 (Renaming Triggers in a More Natural Way)
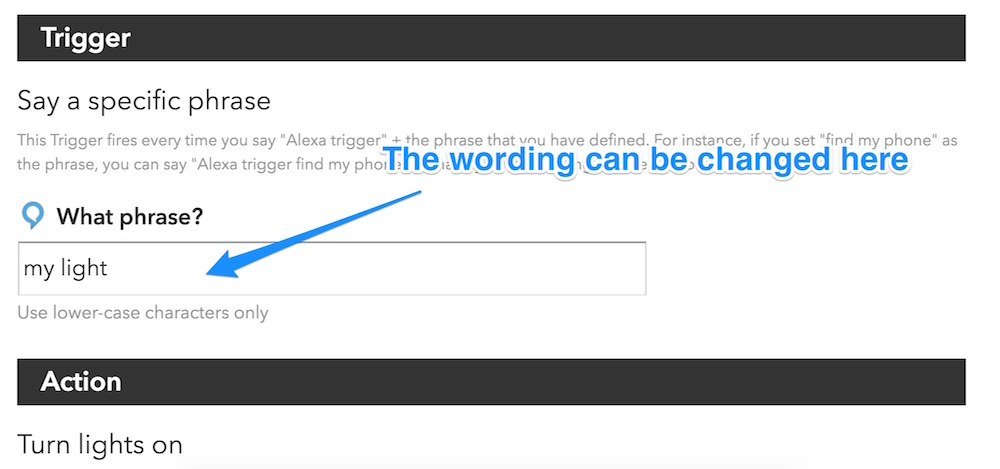
Saying “Alexa trigger turn on my light” is a bit awkward. Instead, you can try out a few phrases to see what feels right by editing the recipe.
说“ Alexa触发器打开我的灯”有点尴尬。 相反,您可以尝试一些短语来通过编辑配方来查看正确的感觉。
To do so, go to the My Recipes page on IFTTT and find your recipe. Scroll down and you’ll find the “What phrase?” section. I find it is best to write the phrase in the shortest format possible, building upon the word “trigger” in the sentence. For my light, we’ve now got just the phrase “my light”. Which results in “Alexa, trigger my light” — a much more natural sounding phrase to remember!
为此,请转到IFTTT上的“我的食谱”页面并找到您的食谱。 向下滚动,您会发现“什么短语?” 部分。 我发现最好在句子中以“触发”一词为基础,以尽可能短的格式编写该短语。 对于我的光,我们现在只有短语“我的光”。 这样就产生了“ Alexa,触发了我的光”-一个更自然的听起来要记住的短语!
警报关闭时打开灯 (Turn On Light When Alarm Goes Off)
We can bring more intelligence to this idea of triggering LIFX lights by triggering them with other non-voice triggers. If you need a bit of added incentive to wake up in the morning, you can set your LIFX lights to turn on when your Echo’s alarm goes off. To do this, the LIFX action would be exactly the same, just set the Echo trigger to “Your Alarm goes off”:
通过使用其他非语音触发器来触发LIFX灯,我们可以为这种思想带来更多的智能。 如果您需要额外的动力来早上醒来,可以将EFX的警报响起时,将LIFX灯打开。 为此,LIFX操作将完全相同,只需将Echo触发器设置为“您的警报响起”:

触发Android SMS消息 (Triggering Android SMS Messages)
Using IFTTT, we can send SMSes via an Android device. IFTTT has a generic “SMS” channel, but this only lets you send SMSes to yourself. The Android SMS channel lets you send them to any number you define. I have set up a trigger to get my Echo to be able to send my fiancée a message to let her know I’m on my way to see her.
使用IFTTT,我们可以通过Android设备发送短信。 IFTTT具有通用的“ SMS”频道,但这仅允许您向自己发送SMS。 Android SMS频道可让您将其发送到您定义的任何号码。 我已经设置了一个触发器,使我的Echo能够向未婚夫发送消息,让她知道我正要去见她。
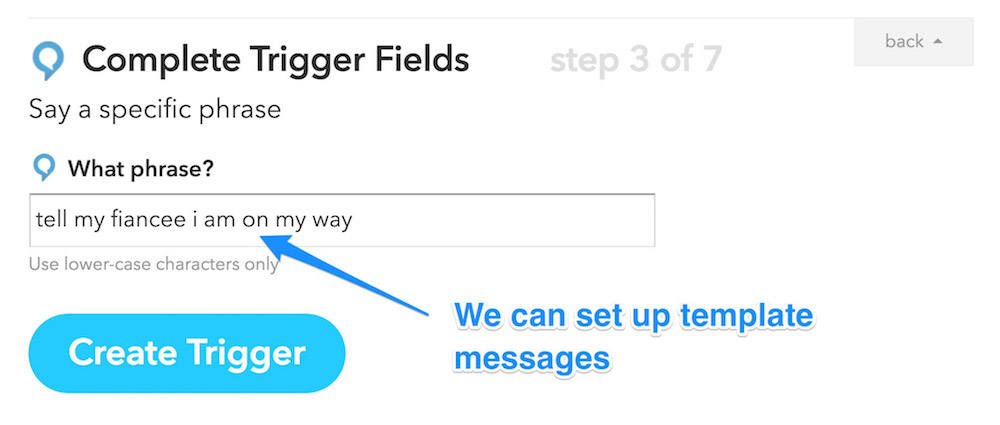
With these sorts of triggers, we can set up a range of template messages for IFTTT and the Echo. My message says “tell my fiancee i am on my way”:
通过这些触发器,我们可以为IFTTT和Echo设置一系列模板消息。 我的讯息说:“告诉我的未婚妻我在路上”:
We then choose the “Android SMS” action channel:
然后,我们选择“ Android SMS”操作通道:

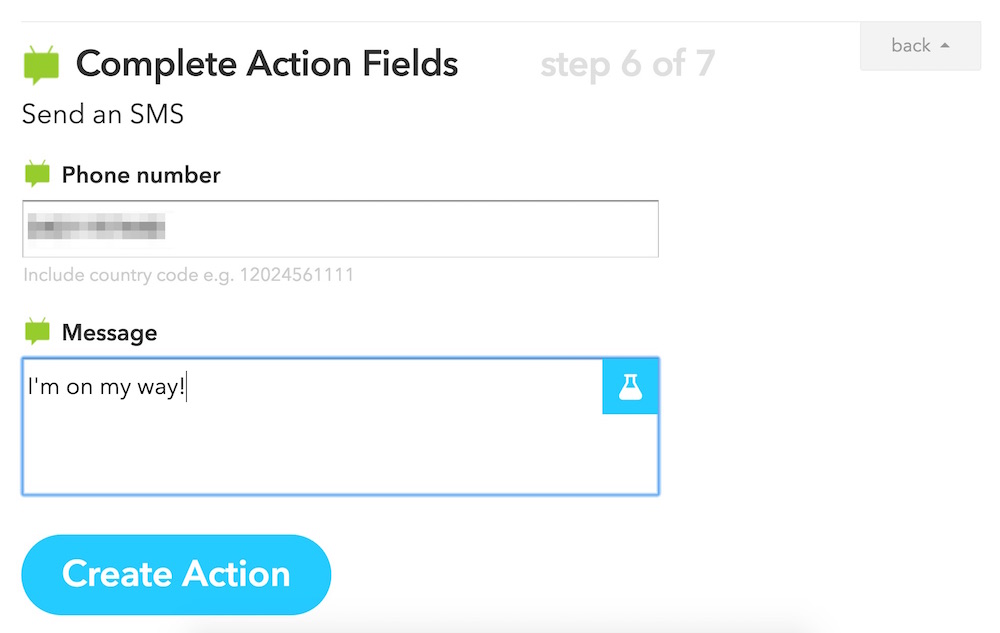
Within the settings for this action, we include the phone number we want to SMS along with the message we want to send:
在此操作的设置中,我们包括要发送短信的电话号码以及要发送的消息:
When I trigger this by saying “Alexa, trigger tell my fiancee i am on my way”, it sends her an SMS:
当我说“ Alexa,触发告诉我的未婚妻我要去的路上”时,它会向她发送一条短信:

用电子邮件发送您的待办事项清单 (E-mailing Your To-Do List)
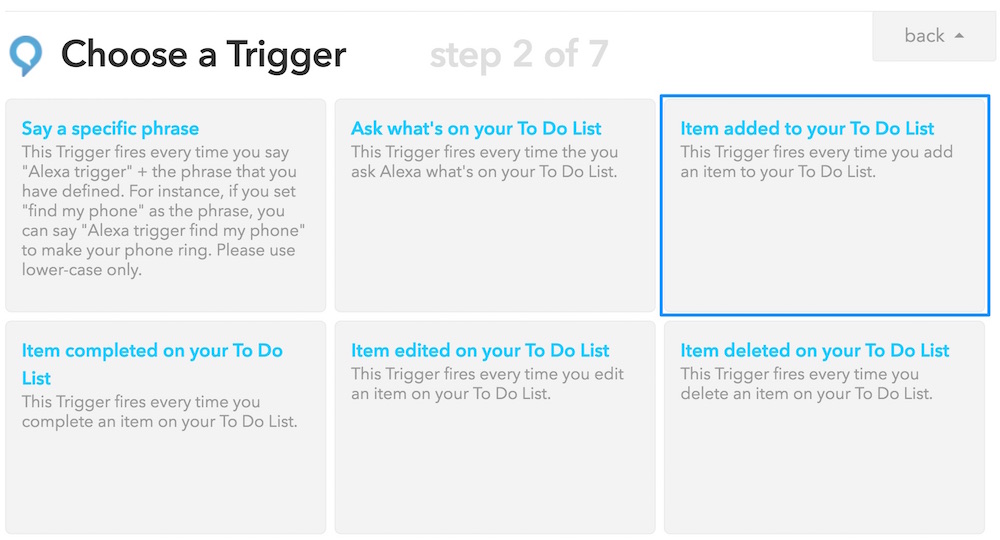
The Echo also has a to-do list which you can add things to by saying things like “Alexa, add ‘Buy Milk’ to my to-do list”. IFTTT can trigger actions any time an item is added to this to-do list. For example, we can email our to-do list to our Gmail account each time something is added to it.
Echo还具有一个待办事项列表,您可以通过说“ Alexa,将“购买牛奶”添加到我的待办事项列表”之类的内容进行添加。 每当将项目添加到此待办事项列表时,IFTTT都可以触发操作。 例如,每次添加任务时,我们都可以通过电子邮件将待办事项列表发送到我们的Gmail帐户。
To start this concept, we choose “Item added to your To Do List” as our Echo trigger:
要开始这个概念,我们选择“添加到您的待办事项列表中的项目”作为我们的回声触发器:
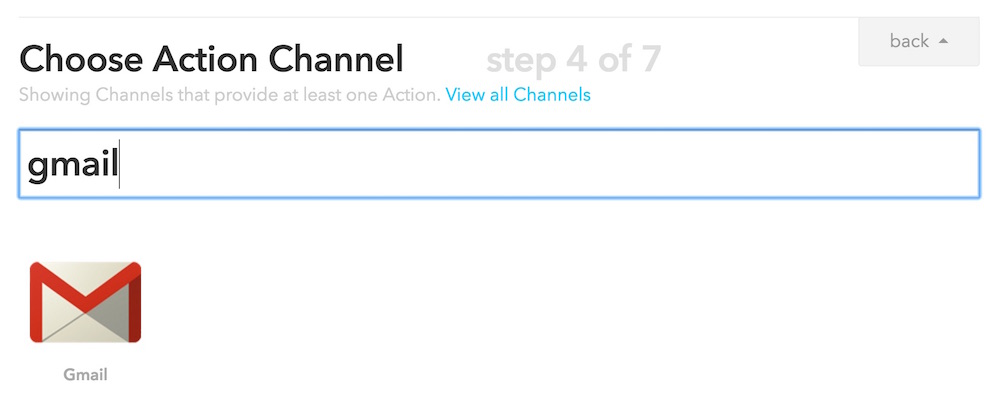
Then, we continue onto adding the action. You can use the “email” action channel or the “Gmail” action channel. We’ve used the “Gmail” action channel here:
然后,我们继续添加操作。 您可以使用“电子邮件”操作通道或“ Gmail”操作通道。 我们在这里使用了“ Gmail”操作渠道:
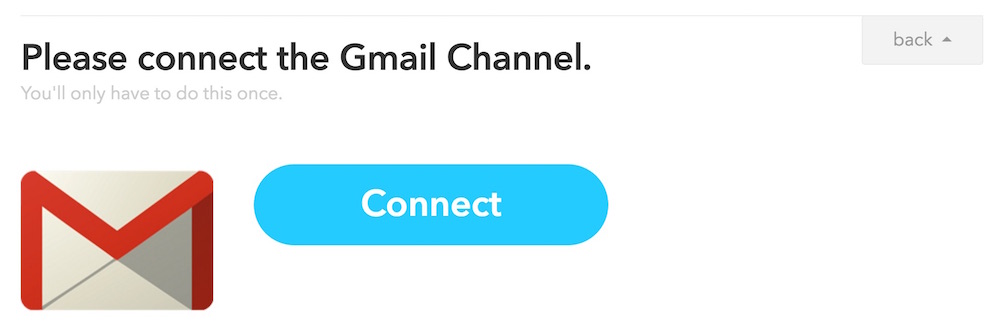
If you haven’t used the Gmail channel before, you’ll need to give it access:
如果您以前从未使用过Gmail频道,则需要授予其访问权限:
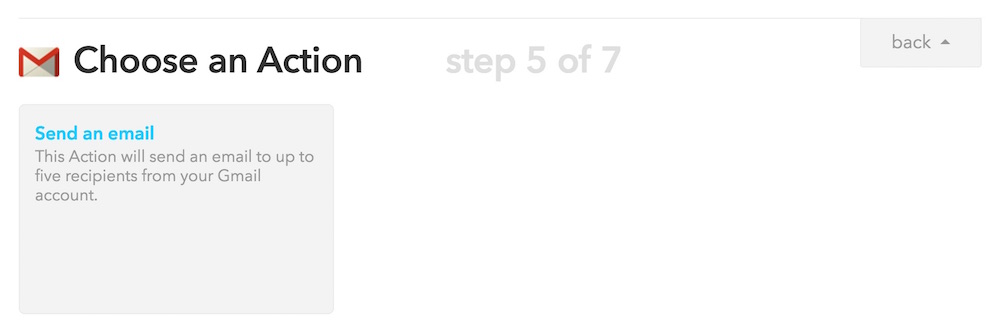
Once IFTTT has access to our Gmail, we choose the one action available — “Send an email”:
IFTTT可以访问我们的Gmail后,我们选择一个可用操作-“发送电子邮件”:
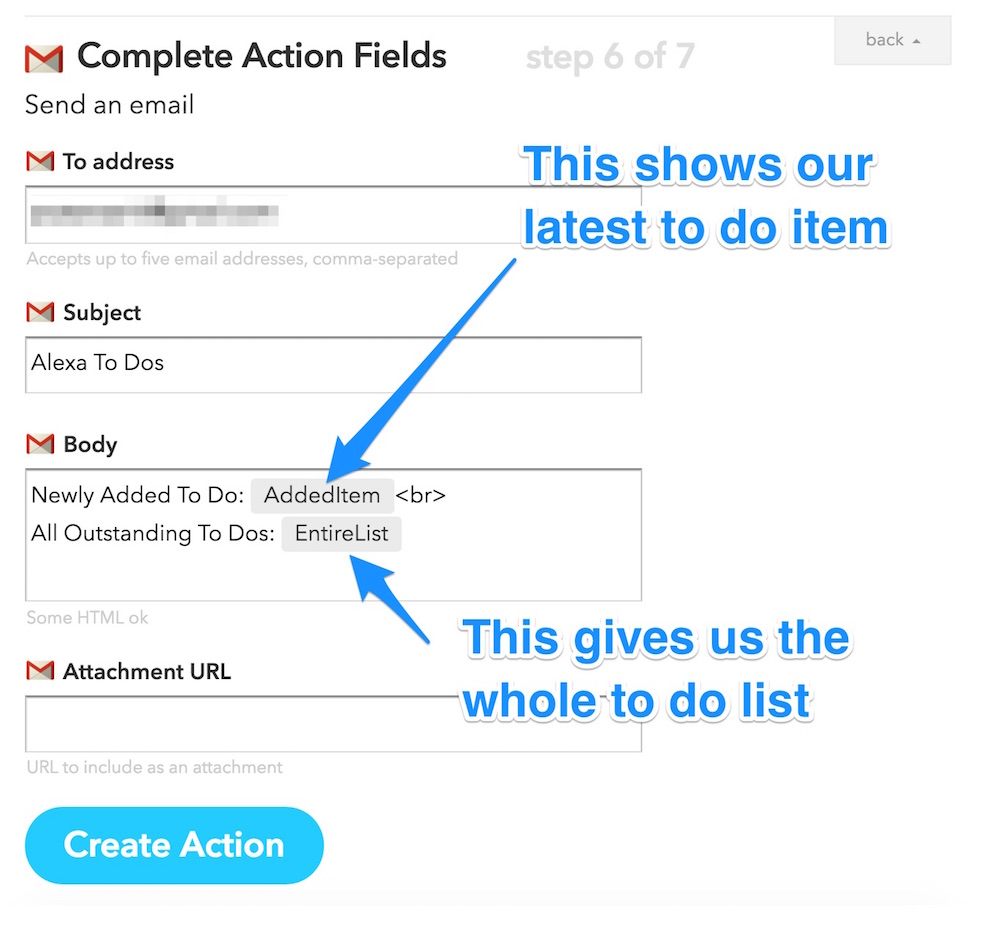
We then add in the email address and subject line we want to send these emails to. Within the Body, we have two tags that embed data into our email — AddedItem and EntireList. AddedItem will print out the item we just added to the to-do list and EntireList will print out the whole to-do list. Once we are happy with how the email is laid out, we click “Create Action”:
然后,我们添加要将这些电子邮件发送到的电子邮件地址和主题行。 在AddedItem ,我们有两个用于将数据嵌入到电子邮件中的标签AddedItem和EntireList 。 AddedItem将打印出我们刚刚添加到待办事项列表中的项目,而EntireList将打印出整个待办事项列表。 一旦我们对电子邮件的布局感到满意,请单击“创建操作”:
Once we’ve added in that recipe, if you add an item to your to do list it will email you with that item and a list of all items on your list:
在我们添加该食谱后,如果您将一个项目添加到待办事项列表中,它将通过电子邮件向您发送该项目以及列表中所有项目的列表:
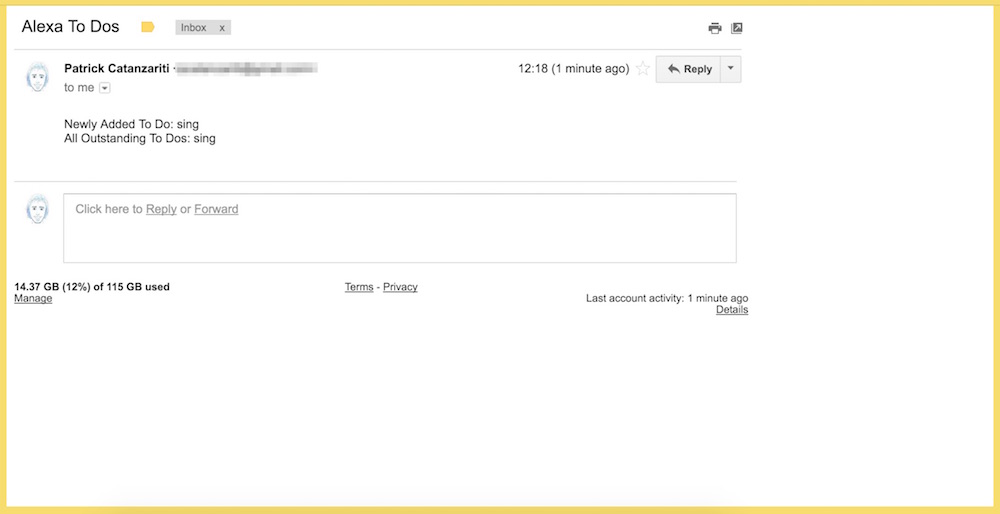
I’ve got “sing” added to my to-do list because when I asked the Echo to “Add something to my to do list”, it misunderstood me… but I thought it was kinda funny and left it.
我已将“唱歌”添加到我的待办事项列表中,因为当我要求Echo将“在我的待办事项列表中添加一些内容”时,它误会了我的意思……但是我认为这很有趣,因此就把它留了下来。
将您的待办事项添加到Google电子表格中 (Add Your To-Dos Into a Google Spreadsheet)
E-mails might be a bit messy for some. IFTTT also connects to Google Drive, so you can add items into spreadsheets too. To add to-do list items into a spreadsheet, we instead set the action channel to “Google Drive”:
电子邮件对于某些人可能有点混乱。 IFTTT还连接到Google云端硬盘,因此您也可以将内容添加到电子表格中。 要将待办事项列表项添加到电子表格中,我们将操作渠道设置为“ Google云端硬盘”:
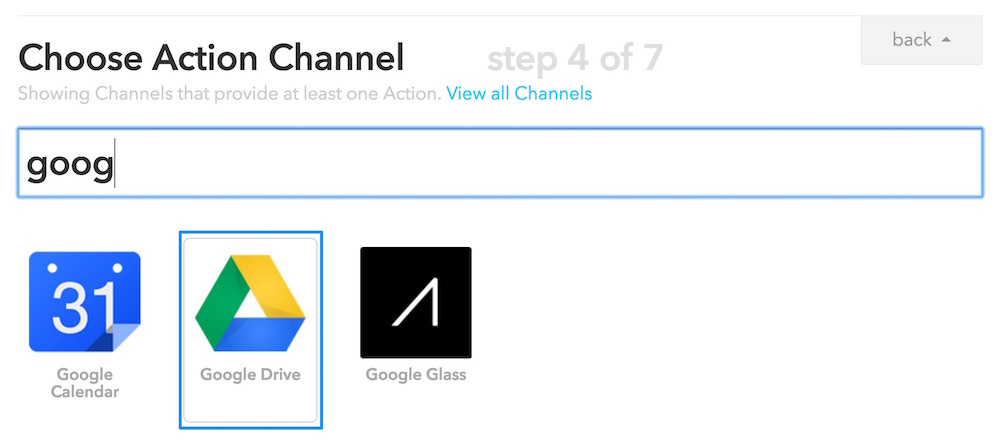
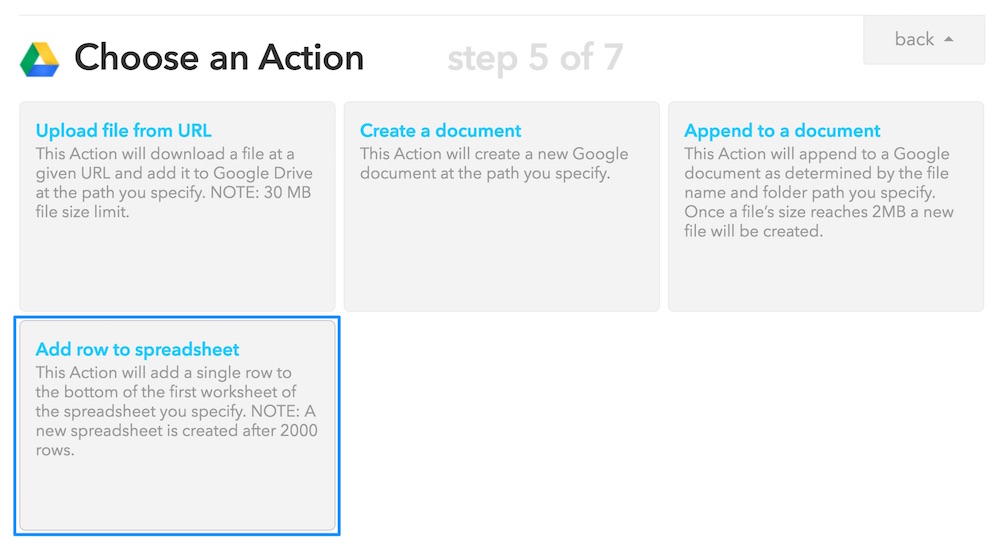
Then choose “Add row to spreadsheet” for the action:
然后选择“将行添加到电子表格”进行操作:
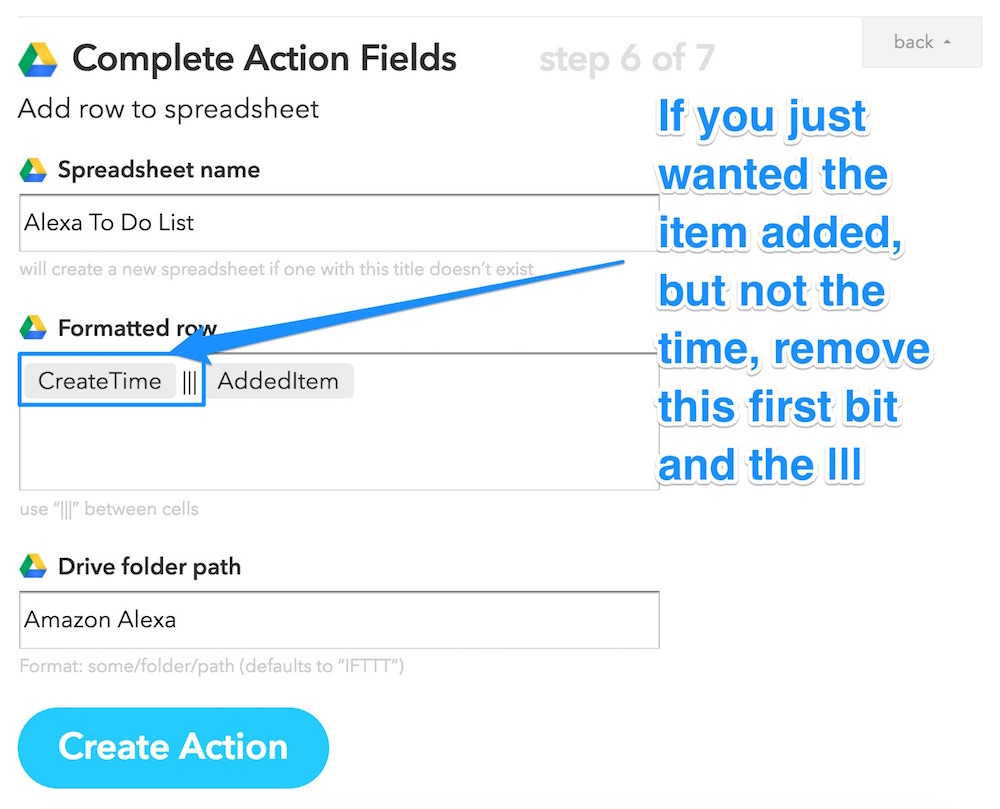
Within the action fields for this action, we set a name for our spreadsheet (e.g. “Alexa To Do List”) and set up how we want the row to be formatted. Within our example, we have got “CreateTime ||| AddedItem“. The “|||” represents a column break, so CreateTime would be in one column and AddedItem would be in the other. CreateTime adds a timestamp of when the to-do list item was created and AddedItem shows the actual to-do list item itself.
在此操作的操作字段中,我们为电子表格设置了一个名称(例如“ Alexa待办事项列表”),并设置了如何格式化行。 在我们的示例中,我们得到了“ CreateTime ||| AddedItem “。 “ |||” 表示分栏CreateTime ,因此CreateTime将位于一列中, AddedItem将位于另一列中。 CreateTime添加创建待办事项列表项的时间戳, AddedItem显示实际的待办事项列表项本身。
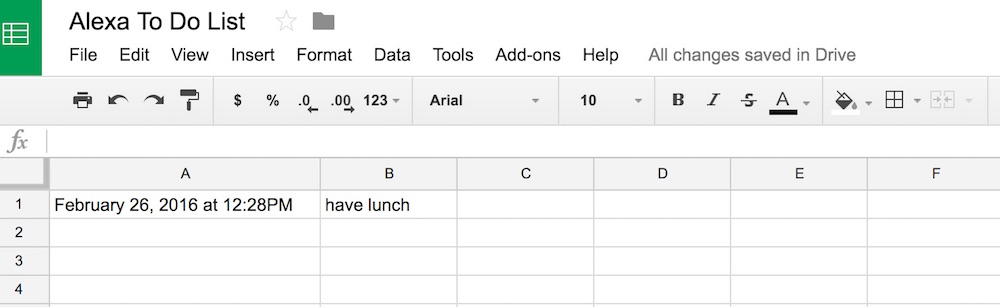
When you add a new to-do list item, it will create the spreadsheet for you (if you don’t already have one set up) and then add the to-do list item into the spreadsheet:
当您添加一个新的待办事项列表项时,它将为您创建电子表格(如果尚未设置),然后将待办事项列表项添加到电子表格中:
结论 (Conclusion)
There is a whole range of possibilities that combining the powers of the Echo and IFTTT can enable. Hopefully the examples above have spurred on some ideas of your own!
结合Echo和IFTTT的功能可以实现多种可能性。 希望以上示例激发了您自己的一些想法!
In the coming months, we’ll be exploring how to go beyond IFTTT to program the Echo with completely customised functionality, including AI and more!
在接下来的几个月中,我们将探索如何超越IFTTT对Echo进行完全自定义的功能编程,包括AI等!
If you have an Echo and give IFTTT integration a go, I’d love to hear what you pair together! What have you connected the Echo to via IFTTT? Let me know in the comments below, or get in touch with me on Twitter at @thatpatrickguy.
如果您拥有Echo,并且可以进行IFTTT集成,那么我很想听听您配对的知识! 您通过IFTTT将Echo连接到了什么? 在下面的评论中让我知道,或者在Twitter上通过@thatpatrickguy与我联系 。
翻译自: https://www.sitepoint.com/how-to-empower-the-amazon-echo-with-ifttt/
ifttt


 2633
2633

 被折叠的 条评论
为什么被折叠?
被折叠的 条评论
为什么被折叠?
 到【灌水乐园】发言


