


In the first article about MongoLab, I showed you how to get set up with MongoDB for local development, and MongoLab, the PaaS service built specifically to handle remote deployments of a MongoDB database.
在有关MongoLab的第一篇文章中 ,我向您展示了如何使用MongoDB进行本地开发,以及如何使用MongoLab(一种专门用于处理MongoDB数据库的远程部署的PaaS服务)进行设置。
In this article I am going to show you how to work seamlessly with MongoLab to continue building a simple PHP app that uses a MongoDB database hosted on MongoLab.
在本文中,我将向您展示如何与MongoLab无缝协作,以继续构建一个简单PHP应用程序,该应用程序使用MongoLab上托管的MongoDB数据库。
I am also going to show you a better way to connect to MongoLab from your own computer. It eliminates the need for a local instance of MongoDB to be running at all.
我还将向您展示从您自己的计算机连接到MongoLab的更好方法。 它根本不需要运行MongoDB的本地实例。
改进了与MongoDB的连接 (Improved connection to MongoDB)
There seems to be an issue with MongDB where the default connection parameters are set for localhost. That means, as shown in the first article, it has to be running and then a connection made to MongoLab via the shell.
MongDB似乎有一个问题,其中为localhost设置了默认的连接参数。 这意味着,如第一篇文章中所示,它必须正在运行,然后通过外壳与MongoLab建立连接。
Changing the installation process on your own machine for MongoDB solves the problem. On my Mac, I used the popular package manager called HomeBrew to install MongoDB.
更改您自己的MongoDB计算机上的安装过程即可解决该问题。 在我的Mac上,我使用了流行的软件包管理器HomeBrew来安装MongoDB。
Once you have HomeBrew installed, it is simply a matter of running:
安装HomeBrew后,只需运行即可:
brew install mongodbfrom the terminal app. Make sure you note what appears after the installation completes – there is some very helpful information provided. I’ll include it here for reference:
从终端应用程序。 确保您注意到安装完成后出现的内容–提供了一些非常有用的信息。 我将其包括在这里以供参考:
==> Caveats
If this is your first install, automatically load on login   with:
mkdir -p ~/Library/LaunchAgents
cp /usr/local/Cellar/mongodb/2.0.3-x86_64/homebrew.mxcl.mongodb.plist ~/Library/LaunchAgents/
launchctl load -w ~/Library/LaunchAgents/homebrew.mxcl.mongodb.plist

If this is an upgrade and you already have the homebrew.mxcl.mongodb.plist loaded:
launchctl unload -w ~/Library/LaunchAgents/homebrew.mxcl.mongodb.plist
cp /usr/local/Cellar/mongodb/2.0.3-x86_64/homebrew.mxcl.mongodb.plist ~/Library/LaunchAgents/
launchctl load -w ~/Library/LaunchAgents/homebrew.mxcl.mongodb.plist

Or start it manually:
mongod run --config /usr/local/Cellar/mongodb/2.0.3-x86_64/mongod.conf

The launchctl plist above expects the config file to be at /usr/local/etc/mongod.conf.
If this is a first install, you can copy one from /usr/local/Cellar/mongodb/2.0.3-x86_64/mongod.conf:
cp /usr/local/Cellar/mongodb/2.0.3-x86_64/mongod.conf /usr/local/etc/mongod.conf
==> Summary
Windows用户呢? (What about Windows users?)
The recommended way to install MongoDB for Windows is via the pre-built binaries. That will provide the same capability described in this article.
建议的Windows安装MongoDB的方法是通过预构建的二进制文件 。 这将提供本文所述的相同功能。
我在Linux上,该怎么办? (I’m on Linux, what do I do?)
There is specific advice for the popular Linux distros on the MongoDB web site.
在MongoDB网站上有针对流行Linux发行版的特定建议。
连接到MongoLab (Connecting to MongoLab)
I’m going to assume that you have an account set up as described in part 1. If you have, then you can jump into the console/terminal window and enter this command (found in the database window on your MongoLab account):
我将假设您已按照第1部分中的说明设置了一个帐户。如果有,则可以跳到控制台/终端窗口并输入以下命令(在您的MongoLab帐户的数据库窗口中找到):
mongo youraccount.mongolab.com:31347/your_database -u <user> -p <password>You will be connected directly to the database you have hosted on the cloud at MongoLab. back in the console/terminal type:
您将直接连接到您在MongoLab上托管在云上的数据库。 返回控制台/终端类型:
show collectionsThis will present a list of the collections you currently have in your database. Remember that a collection is roughly equivalent to a database table in MongoDB speak.
这将显示您当前在数据库中拥有的集合的列表。 请记住,集合大致相当于MongoDB所说的数据库表。
So now we have a direct connection for our MongoLab database, so we will continue building our little app.
因此,现在我们可以直接连接我们的MongoLab数据库,因此我们将继续构建我们的小应用程序。
添加任务 (Adding Tasks)
So if you are following along from the last article, you will have a basic list of tasks displayed in your browser. The tasks are being read from our MongoLab database, but we can work with the data just as if we were using localhost.
因此,如果您跟随上一篇文章的介绍,您将在浏览器中显示基本的任务列表。 这些任务是从MongoLab数据库中读取的,但是我们可以像处理本地主机一样使用数据。
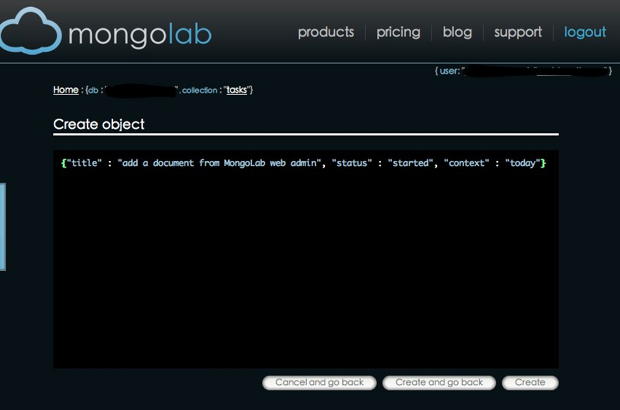
We can add documents through the MongoLab web interface:
我们可以通过MongoLab Web界面添加文档:
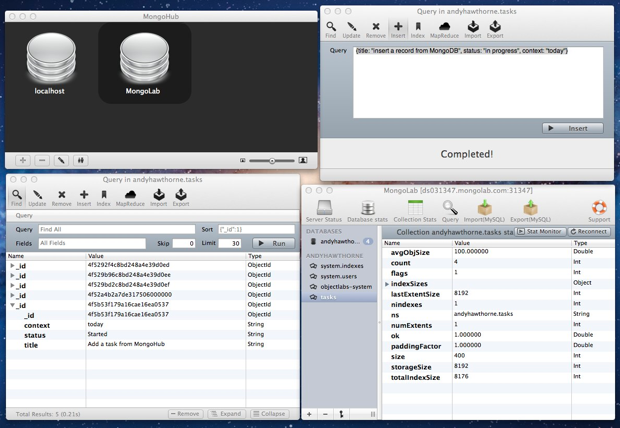
Or you could install one of the GUI tools available for MongoDB:
或者,您可以安装可用于MongoDB的GUI工具之一:
MongoHub – Mac
MongoHub – Mac
MongoVue – Windows
MongoVue – Windows
JMongoBrowser – Windows, Mac, Linux
JMongoBrowser – Windows,Mac,Linux
That is another nice feature of MongoLab. Being able to connect to the cloud service means that you can do the same from the GUI’s listed above:
这是MongoLab的另一个不错的功能。 能够连接到云服务意味着您可以通过上面列出的GUI进行相同的操作:
编写代码的时间 (Time for code)
We left off last time with a list of tasks being displayed. It would be nice if we could add a task via PHP though, using a simple web form. Create a new file in the project called ‘create.php’ and then add a simple form to it:
上次我们停止显示了任务列表。 如果我们可以使用简单的Web表单通过PHP添加任务,那就太好了。 在名为“ create.php”的项目中创建一个新文件,然后向其中添加一个简单的表单:
<!DOCTYPE html>
<head>
    <meta http-equiv="Content-Type" content="text/html; charset=iso-8859-1" />
    <title>Add a task</title>
    <link type="text/css" rel="stylesheet" href="" />
    <!--[if lt IE 9]>
        <script src="http://html5shim.googlecode.com/svn/trunk/html5.js"></script>
    <![endif]-->
</head>
<body>
    <h1>Task Creator</h1>
    <form action="<?php echo $_SERVER['PHP_SELF'];?>" method="post">
        <h3>Title</h3>
        <p><input type="text" name="title" id="title" /></p>
        <h3>Status</h3>
        <p><input type="text" name="status" id="status" /></p>
        <h3>Context</h3>
        <p><input type="text" name="context" id="context" /></p>
        <p><input type="submit" name="submit" value="Save"/></p>
    </form>
    </body>
</html>
Notice that we are using PHP_SELF to post the form back to itself. That way, we can do a simple conditional test to see what state the form is in.
请注意,我们正在使用PHP_SELF将表单发布回自身。 这样,我们可以做一个简单的条件测试来查看表单处于什么状态。
连接到MongoLab (Connect to MongoLab)
Next, we can write our connection routine at the top of the file to connect to MongoLab:
接下来,我们可以在文件顶部编写连接例程以连接到MongoLab:
<?php
try
{
    $connection = new Mongo('mongodb://<user>:<password>your_database.mongolab.com:31347/your_database');
    $database   = $connection->selectDB('your_database');
    $collection = $database->selectCollection('tasks');
}
catch(MongoConnectionException $e)
{
    die("Failed to connect to database ".$e->getMessage());
}
插入文件程序 (Insert document routine)
Now we can add an array of variables passed in from the form as $_POST values in the try block:
现在我们可以在try块中添加从表单传入的变量数组作为$ _POST值:
try {

        $connection = new Mongo('mongodb://<user>:<password>your_database.mongolab.com:31347/your_database');
        $database   = $connection->selectDB('your_database');
        $collection = $database->selectCollection('tasks');

         $task               = array();
         $task['title']      = $_POST['title'];
         $task['status']     = $_POST['status'];
         $task['context']    = $_POST['context'];
         $task['saved_at'] = new MongoDate();

         $collection->insert($task);
There is nothing unusual going on here apart from the call to $collection->insert. That is a call to a method in the PHP Mongo class; it attempts an insert into the collection we have referenced in our connection.
除了调用$ collection-> insert之外,这里没有其他异常。 那是对PHP Mongo类中的方法的调用。 它会尝试在我们的连接中引用的集合中插入一个。
We can add another “catch” exception here too, in case the insert doesn’t work:
我们也可以在此处添加另一个“ catch”异常,以防插入不起作用:
catch(MongoException $e)
{
    $die('Failed to insert data '.$e->getMessage());
}
连线表格 (Wire up the form)
Now all we need is to put a trigger in to check: that the form needs to be shown, or a successful insert message, depending on whether a record has been added.
现在,我们需要做的是检查触发器:是否需要显示表单,或者是否插入成功消息,这取决于是否添加了记录。
Right at the top of the PHP block create an empty variable called $trigger. Then add a conditional test to see if the form submit button variable is set and has a value. If it has, then we can trigger the save action, otherwise we just need to display the form:
在PHP块的顶部,创建一个名为$ trigger的空变量。 然后添加条件测试以查看表单提交按钮变量是否已设置并具有值。 如果有,那么我们可以触发保存操作,否则我们只需要显示以下表单:
$trigger = "";
if((!empty($_POST['submit'])) && ($_POST['submit'] === 'Save'))
{
    $trigger = "do_save";
}
else
{
    $trigger = "show_form";
}
Then we can add a further conditional test to see what value $trigger has and proceed accordingly. The whole PHP block now looks like this:
然后,我们可以添加进一步的条件测试,以查看$ trigger的值并进行相应的处理。 现在,整个PHP块如下所示:
<?php
$trigger = "";
if((!empty($_POST['submit'])) && ($_POST['submit'] === 'Save'))
{
$trigger = "do_save";
}
else
{
$trigger = "show_form";
}
switch($trigger)
{
case 'do_save':
try
{
$connection = new Mongo('mongodb://<user>:<password>your_database.mongolab.com:31347/your_database');
$database = $connection->selectDB('andyhawthorne');
$collection = $database->selectCollection('tasks');
$task = array();
$task['title'] = $_POST['title'];
$task['status'] = $_POST['status'];
$task['context'] = $_POST['context'];
$task['saved_date'] = new MongoDate();
$collection->insert($task);
}
catch(MongoConnectionException $e)
{
die("Failed to connect to database ".$e->getMessage());
}
catch(MongoException $e)
{
$die('Failed to insert data '.$e->getMessage());
}
break;
case 'show_form':
default:
}
?>You’ll notice that we have added an insert field: $task[‘saved_date’] = new MongoDate(). MongoDB will not complain, even though we haven’t used that field before. MongoDate() is a built-in timestamp function in the PHP driver.
您会注意到我们添加了一个插入字段:$ task ['saved_date'] = new MongoDate()。 即使我们以前没有使用过该字段,MongoDB也不会抱怨。 MongoDate()是PHP驱动程序中的内置时间戳函数。
The only thing left to do is:
剩下要做的唯一一件事是:
<?php if ($trigger === 'show_form'): ?>Add this above the opening form tag. Then after the closing form tag:
将其添加到开始表单标签上方。 然后在结束表单标签之后:
<?php else: ?>
    <p>
        Task saved. _id: <?php echo $task['_id'];?>.
        <a href="<?php echo $_SERVER['PHP_SELF'];?>">Add another task?</a>
    </p>
<?php endif;?>
This will respond to the conditional test at the top of our PHP block.
这将响应我们PHP块顶部的条件测试。
试试看 (Try it out)
Add some records with your snazzy new form. Here comes the great bit though. As you save each document it will be sent to your MongoLab database:
使用时髦的新表格添加一些记录。 虽然来了很多。 保存每个文档时,它将被发送到您的MongoLab数据库:
更新和删除记录 (Updating and Deleting Records)
MongoLab does not yet support bulk uploading from the web admin area, but you can create, edit, and delete documents. Just before we consider how to do that from PHP, lets look at the CRUD operations from within MongoLab itself.
MongoLab尚不支持从Web管理区域批量上传,但是您可以创建,编辑和删除文档。 在我们考虑如何从PHP进行操作之前,让我们先从MongoLab本身内部看一下CRUD操作。
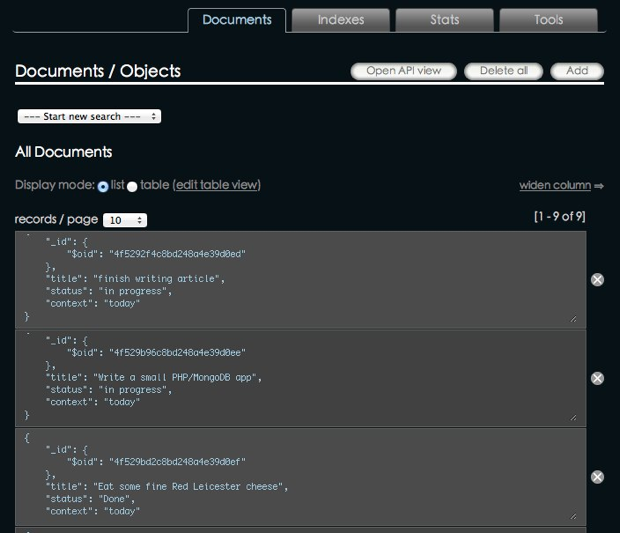
When you click through to view a particular collection, you will see the documents displayed in a paginated list:
当您单击以查看特定集合时,您将看到在分页列表中显示的文档:
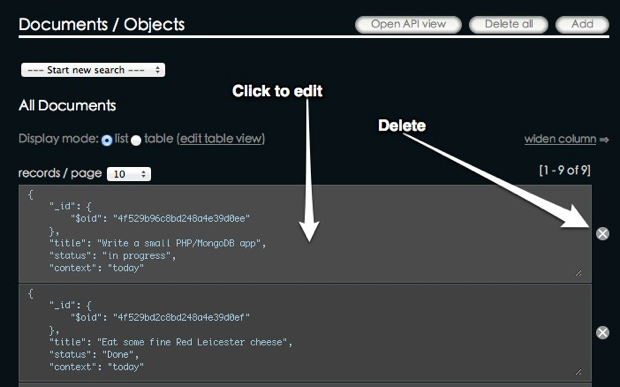
Clicking the “x” will indeed delete the document. Clicking on an individual document will send you through to the edit screen:
单击“ x”确实会删除该文档。 单击单个文档将带您进入编辑屏幕:
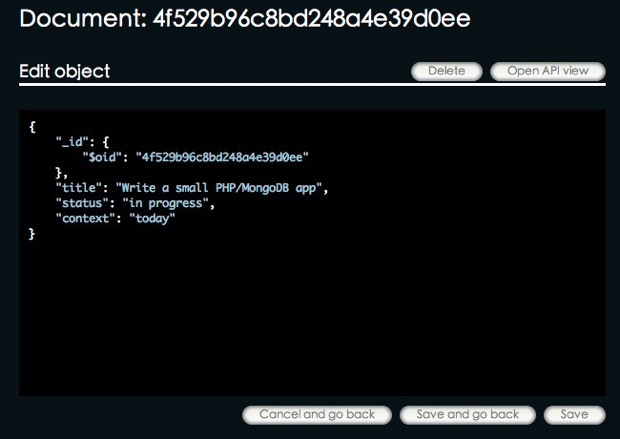
Edit away, and then save the new version. Easy eh?
编辑,然后保存新版本。 容易吗?
PHP呢? (What about from PHP?)
For editing documents, the process is similar to inserting:
对于编辑文档,该过程类似于插入:
- Create a web form 建立网路表单
- Connect to MongoLab and retrieve a document 连接到MongoLab并检索文档
- Populate the form with the correct record 用正确的记录填充表格
- Save the changes 保存更改
So far we have seen how to use the $collection->find() method that creates a result-set of all the documents in the collection. For selecting an individual document we can use something like this:
到目前为止,我们已经看到了如何使用$ collection-> find()方法创建集合中所有文档的结果集。 为了选择单个文档,我们可以使用以下方法:
$id = $_REQUEST['id'];
$task = $collection->findOne(array('_id' => new MongoId($id)));
To run an update you can then build an array of form data the same as for an insert, and use code like this to run the update:
要运行更新,您可以构建与插入相同的表单数据数组,并使用如下代码运行更新:
$id = $_REQUEST['id'];
$collection->update(array('_id' => new MongoId($id)), $form_data);
Where $form_data is the array of data sent in from your web form. Deleting a document follows the same idea:
其中$ form_data是从Web表单发送来的数据数组。 删除文档遵循相同的想法:
$id = $_REQUEST['id'];
$collection->remove(array('_id' => new MongoId($id)));
最后… (Finally…)
Working with MongoDB has been made much easier thanks to MongoLab. The fact that it runs your database in the cloud, means that you can develop your application, and deploy it, without having to worry about the database stuff at all.
感谢MongoLab,使用MongoDB变得更加容易。 它在云中运行数据库的事实意味着您可以开发应用程序并进行部署,而不必担心数据库的问题。
In this article you have seen a fully worked example of inserting documents via PHP, and you have also seen how to manage those documents in the MongoLab web admin area. Once the ability to do bulk inserts from the admin area is added, MongoLab will have everything you need for deploying MongoDB databases. The features it already has, makes the whole process of building a MongoDB based PHP web app simple.
在本文中,您已经看到了一个通过PHP插入文档的完整示例,还看到了如何在MongoLab Web管理员区域中管理这些文档。 一旦添加了从管理区域进行批量插入的功能,MongoLab将拥有部署MongoDB数据库所需的一切。 它已经具有的功能使构建基于MongoDBPHP Web应用程序的整个过程变得简单。
Leaf image via Shutterstock
叶图像通过Shutterstock
翻译自: https://www.sitepoint.com/getting-started-with-mongolab-part-2/


 123
123

 被折叠的 条评论
为什么被折叠?
被折叠的 条评论
为什么被折叠?
 到【灌水乐园】发言


