


MongoDB is one of those NoSQL databases that has gathered popularity quickly. Even if you are a little skeptical about the NoSQL movement, some time spent with MongoDB will be a good experience. Especially when you learn that it is an open-source project, and is supported on all of the major operating systems.
MongoDB是那些Swift流行起来的NoSQL数据库之一。 即使您对NoSQL的发展持怀疑态度,花一些时间在MongoDB上也是一个很好的体验。 特别是当您了解到它是一个开源项目并且在所有主要操作系统上都受支持时。
It should come as no surprise that a number of PaaS options have appeared for remotely hosting MongoDB. The one I am going to introduce you to in this article is called MongoLab.
远程托管MongoDB出现了许多PaaS选项,这不足为奇。 我将在本文中向您介绍的一个称为MongoLab 。
免费帐户选项 (The Free Account Options)
There is a free account option available. You get 240MB on a shared account, and it can be hosted on Amazon, Rackspace, or Joyent. There is also the option to scale up, should your needs grow. You get a web admin area that shows you an overview of your databases, users, and collections. It also shows you the required connection strings so that you can connect to your database via the MongoDB shell from your own machine.
有一个免费帐户选项。 您可以通过共享帐户获得240MB的存储空间,并且可以托管在Amazon,Rackspace或Joyent上。 如果您的需求不断增长,也可以选择扩大规模。 您将获得一个Web管理区域,该区域向您显示数据库,用户和集合的概述。 它还显示了所需的连接字符串,以便您可以从自己的计算机通过MongoDB Shell连接到数据库。
取得帐号 (Get an Account)
It only takes seconds to sign up for a free account. Just go here to sign up and you’ll be up and running in no time.
注册免费帐户仅需几秒钟。 只需去这里注册 ,您就可以立即启动并运行。
安装MongoDB (Installing MongoDB)
You will need MongoDB installed on your own computer. There are various options you can use, and they are described in detail on the MongoDB website. I recommend that you follow their instructions for creating a data directory. I have installed MongoDB on several different machines, and the process works as detailed every time.
您将需要在自己的计算机上安装MongoDB。 您可以使用多种选项,有关这些选项的详细信息,请参见MongoDB网站 。 我建议您按照他们的指示创建数据目录。 我已经在几台不同的计算机上安装了MongoDB,并且该过程每次都按详细方式工作。
If you use a Mac, I suggest that you download the 64-bit binary release. I have used that method on several different machines and it just works. You can place the folder anywhere you like; I put mine in my home directory to make it easy to call the bin folder from the terminal.
如果使用Mac,建议您下载64位二进制发行版 。 我已经在几台不同的机器上使用了该方法,并且它可以正常工作。 您可以将文件夹放在您喜欢的任何位置。 我将我的文件夹放在主目录中,以方便从终端调用bin文件夹。
关于司机的话 (A Word about Drivers)
There are MongoDB drivers for all the popular programming languages.
有适用于所有流行编程语言的MongoDB驱动程序。
PHP (PHP)
If you want to work with PHP and MongoDB as detailed in this article, you will need to install the Mongo PHP drivers. There are drivers available for all the main operating systems.
如果要按照本文中的详细说明使用PHP和MongoDB,则需要安装Mongo PHP驱动程序 。 有适用于所有主要操作系统的驱动程序。
Python (Python)
Other programming languages are also supported. If Python is your thing, for example, then you will need to install PyMongo.
还支持其他编程语言。 例如,如果您使用Python,则需要安装PyMongo 。
Once you have that done, running Python from the shell should allow you to do:
完成此操作后,从外壳运行Python应该可以:
import pymongo… without getting any errors.
……没有任何错误。
Ruby (Ruby)
There is a Mongo gem for Ruby. First, make sure RubyGems is up to date:
有一个Mongo Ruby宝石。 首先,确保RubyGems是最新的:
gem update --systemThen you can install the Mongo gem:
然后,您可以安装Mongo gem:
gem install mongoBest advice also suggests that you install the bson_ext gem to optimize performance:
最佳建议还建议您安装bson_ext gem以优化性能:
gem install bson_extNow you can fire up the Ruby interactive shell and do this:
现在您可以启动Ruby交互式shell并执行以下操作:
require 'mongo'Hit enter, and you should get this response:
按Enter键,您将得到以下响应:
=> trueThis tells you all is well.
这告诉你一切都很好。
创建数据库 (Creating a Database)
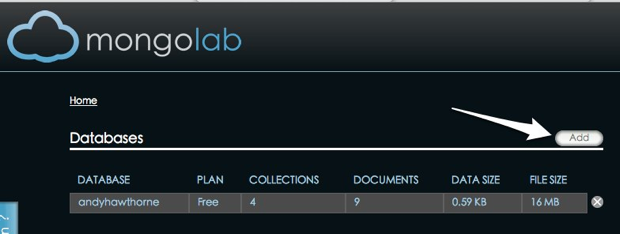
In the MongoLab web admin panel, you can create a database, which you then connect to and use via your local shell. While logged into your account, click on the “Add” button to create a database:
在MongoLab网络管理面板中,您可以创建一个数据库,然后连接到该数据库并通过本地外壳使用。 登录到您的帐户后,单击“添加”按钮创建一个数据库:
You will then be prompted to enter some basic config information:
然后将提示您输入一些基本的配置信息:
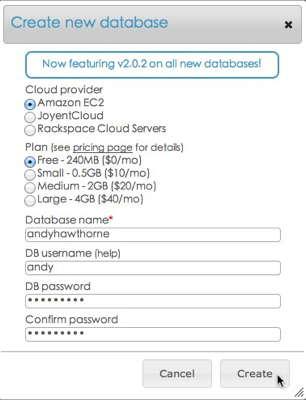
Once that is done, your database will be ready for you to connect to.
完成此操作后,您的数据库就可以连接了。
连接到您的MongoLab帐户 (Connecting to your MongoLab Account)
It might seem strange at first, but to connect to your MongoLab account, you will need MongoDB running on your own machine. Once you have it running, you can then connect to your MongoDB instance on your MongoLab account.
乍一看似乎很奇怪,但是要连接到MongoLab帐户,您将需要在自己的计算机上运行MongoDB。 一旦运行,就可以使用MongoLab帐户连接到MongoDB实例。
First, start the localhost server from terminal/console:
首先,从终端/控制台启动本地主机服务器:
./mongodb/bin/mongodThis assumes that you have MongoDB installed in your home directory. Then open your MongoLab account in your web browser. You will see the connection information you need at the top of the database window in the web admin area:
假设您的主目录中安装了MongoDB。 然后在网络浏览器中打开您的MongoLab帐户。 您将在Web管理员区域的数据库窗口顶部看到所需的连接信息:
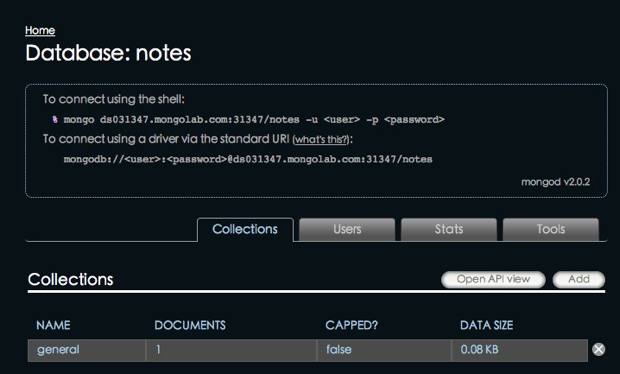
I recommend that you use the shell access method since the standard URI method is not yet supported by all drivers.
我建议您使用shell访问方法,因为并非所有驱动程序都支持标准URI方法。
Open another terminal tab, and instead of the usual ./mongodb/bin/mongo, do this:
打开另一个终端选项卡,而不是通常的./mongodb/bin/mongo ,执行以下操作:
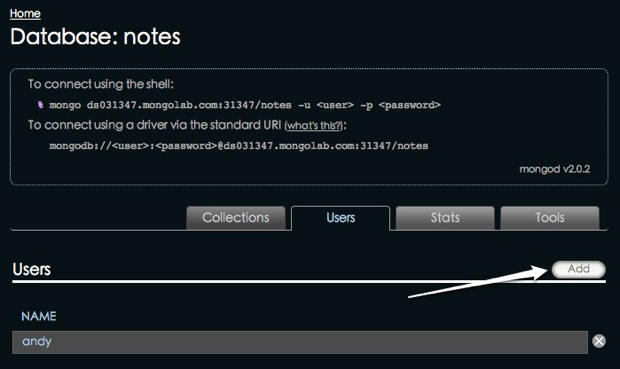
./mongodb/bin/mongo dbh23.mongolab.com:27237/my_new_db -u <db-user> -p <db-password>The exact string you need to use will be the one shown in the web admin section of your account. You can create a user for your database in the web admin area, by clicking on the users tab:
您需要使用的确切字符串将是您帐户的网络管理部分中显示的字符串。 您可以在Web管理区域中通过单击用户选项卡为数据库创建一个用户:
创建集合并添加一些记录 (Creating a Collection and Adding Some Records)
One of the nice things about MongoDB is that you don’t have to define data structures first. We can just go ahead and start creating records in the shell. We will then be able to view those records in the web admin area of our MongoLab account.
MongoDB的优点之一是您不必先定义数据结构。 我们可以继续并开始在Shell中创建记录。 然后,我们将能够在MongoLab帐户的Web管理区域中查看这些记录。
So in the console/terminal session you have running that is connected to your MongoLab database, try the following:
因此,在已连接到MongoLab数据库的正在运行的控制台/终端会话中,请尝试以下操作:
db.task.insert({title:"create a web app that uses Mongodb",status:"in progress",context:"today"})When you hit return, your record will be saved. What has happened at this point is your collection has been created in the database you are connected to, and your document has been saved to it. With MongoDB, a collection is contextually equivalent to a table, and a document is equivalent to a row in more traditional databases such as MySQL.
当您按回车键时,您的记录将被保存。 此时发生的事情是,已在连接的数据库中创建了您的收藏集,并且文档已保存到该收藏夹中。 使用MongoDB,集合在上下文上等效于表,而文档在更传统的数据库(如MySQL)中等效于行。
Go ahead and add a few more documents in the same manner.
继续并以相同方式添加更多文档。
We can then check our documents in the MongoLab web admin area. Click on “Tasks” in the list of collections:
然后,我们可以在MongoLab网络管理区域中检查我们的文档。 单击集合列表中的“任务”:

And you will see a list of the documents you have created:
您将看到已创建的文档的列表:

使用PHP访问MongoLab数据库并检索文档 (Using PHP to Access the MongoLab Database and Retrieve Documents)
This assumes that you have managed to install the MongoDB PHP drivers for your local system.
假设您已经成功为本地系统安装了MongoDB PHP驱动程序。
The first iteration for our simple app requires us to:
我们的简单应用的第一次迭代要求我们:
- Connect to the MongoLab database 连接到MongoLab数据库
- Establish which database we want to work with 建立我们要使用的数据库
- Establish which collection we want to work with 建立我们要使用的集合
We can do that by creating some variables and using the connection string information provided for us by MongoLabs. This time, we’ll use the driver (standard URI) version. We can put our connection attempt in a try/catch block so that the app fails gracefully if we can’t connect for some reason:
我们可以通过创建一些变量并使用MongoLabs为我们提供的连接字符串信息来做到这一点。 这次,我们将使用驱动程序(标准URI)版本。 我们可以将连接尝试放在try / catch块中,以便在由于某些原因而无法连接时,应用正常运行:
<?php
try
{
    $connection = new Mongo('mongodb://<username>:<password>@ds031347.mongolab.com:31347/your_database');
    $database   = $connection->selectDB('your_database');
    $collection = $database->selectCollection('tasks');
}
catch(MongoConnectionException $e)
{
    die("Failed to connect to database ".$e->getMessage());
}

$cursor = $collection->find();

?>
Hopefully, much of this is self explanatory. However, there is some PHP MongoDB class specific stuff in there such as this:
希望其中大部分可以自我解释。 但是,其中有一些PHP MongoDB类特定的东西,例如:
$cursor = $collection->find();That line of code uses the MongoCursor method to retrieve all the documents in the collection.
该行代码使用MongoCursor方法检索集合中的所有文档。
Next, we’ll create a HTML document below the existing code, and iterate through the documents to display them on our page:
接下来,我们将在现有代码下创建一个HTML文档,并遍历这些文档以在页面上显示它们:
<!DOCTYPE html>
<head>
    <meta http-equiv="Content-Type" content="text/html; charset=iso-8859-1" />
    <title>Tasks Viewer</title>

    <link type="text/css" rel="stylesheet" href="" />
    <!--[if lt IE 9]>
        <script src="http://html5shim.googlecode.com/svn/trunk/html5.js"></script>
    <![endif]-->

</head>
<body>
<h1>My Tasks</h1>

<?php while ($cursor->hasNext()):
    $task = $cursor->getNext(); ?>
    <h2><?= $task['title'] ?></h2>
    <strong>Status:</strong> <?= $task['status']?> <br />
    <strong>Context:</strong> <?= $task['context']?><br />
<?php endwhile;?>
</body>
</html>
Again, if you have spent much time with PHP, this should look fairly simple. We use a while loop to iterate through the returned documents, printing out the data held within them. Notice that the PHP class has hasNext() and getNext() methods specifically for that purpose.
同样,如果您花了很多时间使用PHP,这应该看起来很简单。 我们使用一个while循环来遍历返回的文档,打印出保存在其中的数据。 请注意,PHP类具有专门用于此目的的hasNext()和getNext()方法。
You can read more about the PHP MongoDB class here.
您可以在此处阅读有关PHP MongoDB类的更多信息。
最后… (Finally…)
Hopefully this article has whetted your appetite enough for you to have a serious look at MongoDB. MongoLab is an excellent service that provides cloud-based access to MongoDB, and runs very quickly indeed. Provided that you get everything installed correctly, you can be coding apps that connect to MongoDB using your favorite technologies in no time.
希望本文引起了您的胃口,足以让您认真看一下MongoDB。 MongoLab是一项出色的服务,可提供对MongoDB的基于云的访问,并且运行速度非常快。 只要正确安装所有组件,您就可以立即编写使用自己喜欢的技术连接到MongoDB的应用程序。
In the next article, we’ll expand on this simple app, and add the C, U, and D parts of the usual “CRUD” operations we use with other databases.
在下一篇文章中,我们将在这个简单的应用程序上进行扩展,并添加与其他数据库一起使用的常规“ CRUD”操作的C,U和D部分。
Leaf image via Shutterstock
叶图像通过Shutterstock
翻译自: https://www.sitepoint.com/getting-started-with-mongolab/


 2491
2491


 被折叠的 条评论
为什么被折叠?
被折叠的 条评论
为什么被折叠?
 到【灌水乐园】发言


