


js 背景遮罩
技术3:提取技术 (Technique 3: The Extract Technique)
As with the Background Eraser technique, it’s a smart idea to set the source for the History Brush early in the procedure, in case you need to do some touch-up later on.
与背景橡皮擦技术一样,在过程中尽早设置“历史记录画笔”的来源是一个聪明的主意,以防您稍后需要进行一些润色。
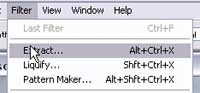
Now, let’s run the Filter > Extract command. (In earlier versions of Photoshop, this was located under the Image menu.)
现在,让我们运行“过滤器”>“提取”命令。 (在早期版本的Photoshop中,它位于“图像”菜单下。)
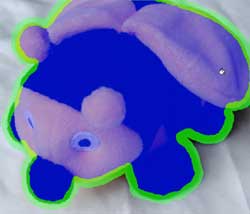
The Extract dialog box will appear. With the Brush tool selected, draw an outline around the object you wish to extract. The outline should overlap both the object and the background. Use a Brush size that is big enough for you to outline comfortably, but small enough to outline any details of the picture. (You may switch Brush sizes while you’re outlining.) The outline will be highlighted in the window.
将出现“提取”对话框。 选中“画笔”工具后,在要提取的对象周围绘制轮廓。 轮廓线应与对象和背景重叠。 使用足以让您舒适地勾勒轮廓的笔刷大小,但要足以勾勒出图片的任何细节的画笔大小。 (您可以在概述时切换画笔大小。)轮廓将在窗口中突出显示。
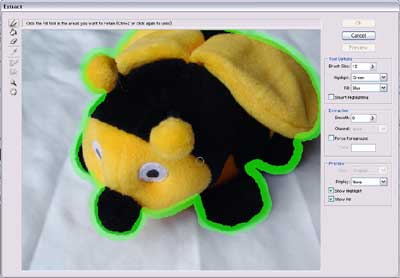
If you need to zoom in while you’re outlining, hold down the Space Bar to change the cursor temporarily to the “hand” icon. You can then click and drag to move around in the picture. Let go of the Space Bar when you’re ready to go back to drawing.
如果要在概述时进行放大,请按住空格键将光标临时更改为“手”图标。 然后,您可以单击并拖动以在图片中移动。 准备好返回绘图时,松开空格键。
When you’ve completed the outline, change to the Paint Bucket tool.
完成轮廓后,更改为“油漆桶”工具。
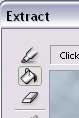
Fill the areas that you wish to “keep” with the paint bucket tool.
用油漆桶工具填充您要“保留”的区域。
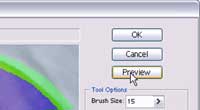
Click the Preview button to see how the object appears when extracted.
单击预览按钮以查看提取时对象的外观。
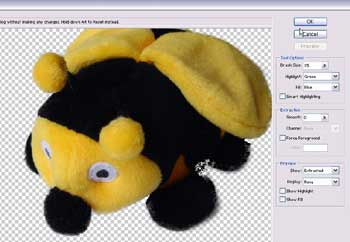
Here’s what my preview looks like. It’s good enough for my purposes, so I click “OK” to apply the Filter.
这是我的预览效果。 对于我的目的来说已经足够好了,因此我单击“确定”以应用过滤器。
Again, I use the History Brush to restore parts of the object that were erased or partially erased.
同样,我使用“历史记录画笔”还原对象已擦除或部分擦除的部分。
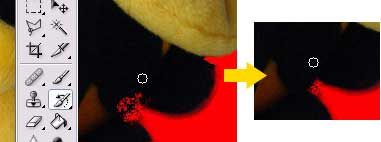
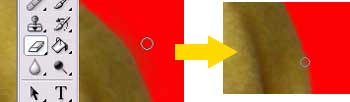
And again, I use the Eraser Tool to get rid of stray pixels around the edges.
再一次,我使用橡皮擦工具消除边缘周围的杂散像素。
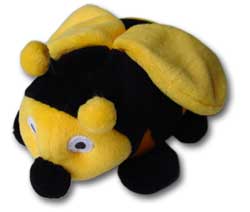
Here’s the final picture (with drop-shadow applied):
这是最后一张图片(应用了阴影):
Extract Filter Technique:
提取过滤技术:
- Set source for the History Brush in the History Palette. 在“历史记录”面板中设置“历史记录画笔”的源。
- Use Filter > Extract command to outline, fill, and Extract object (1:45 minutes). 使用“过滤器”>“提取”命令来概述,填充和提取对象(1:45分钟)。
- Use the History Brush to restore parts of object (1:45 minutes). 使用历史记录画笔还原对象的一部分(1:45分钟)。
- Use the Eraser Tool to clean up the edges (1:30 minutes). 使用橡皮擦工具清理边缘(1:30分钟)。
Total time: 5 minutes
总时间:5分钟
My take: This method, while a little faster, didn’t seem much different from the Background Eraser technique. However, I have found that the Extract Filter works quite nicely when you have objects with a lot of fine details (like hair blowing in the wind, tree branches, etc.) that would be a pain to try to isolate. The Extract Filter works best with objects on solid-colored backgrounds.
我的看法:这种方法虽然速度稍快,但与背景橡皮擦技术似乎并没有太大不同。 但是,我发现当您的对象具有很多精细的细节(例如风中吹散的头发,树枝等)时,尝试分离非常困难。 提取过滤器最适合单色背景上的对象。
技术4:快速蒙版技术 (Technique 4: The Quick Mask Technique)
If you’ve never used Quick Mask mode in Photoshop, you’re missing out on a huge time-saver! Quick Mask mode lets you use brush, pencil, paint bucket, etc. tools to paint an “inverse selection” using shades of gray and black. (Black identifies parts that won’t be selected; gray identifies parts that, when selected, will have some level of transparency.) When you switch back to Normal mode, the “clear” parts of your Quick Mask are selected so that you can apply changes. We’ll use Quick Mask mode to paint the background of the image, then apply a Layer Mask to hide the background.
如果您从未在Photoshop中使用过“快速蒙版”模式,那么您会错过节省大量时间的功能! 快速蒙版模式使您可以使用画笔,铅笔,油漆桶等工具使用灰色和黑色阴影来绘制“反选”。 (黑色表示将不被选择的部分;灰色表示被选择的部分将具有一定程度的透明度。)当您切换回普通模式时,将选择快速蒙版的“清除”部分,以便您可以应用更改。 我们将使用“快速蒙版”模式绘制图像的背景,然后应用“图层蒙版”以隐藏背景。
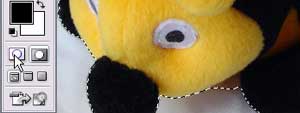
Click the Quick Mask icon in the tool palette to switch to Quick Mask mode.
单击工具面板中的“快速蒙版”图标以切换到“快速蒙版”模式。

Using a fairly large brush, with the foreground color set to black, I’ll start to block out the background. You’ll notice that the masked areas in which you paint will turn pink.
使用相当大的笔刷,将前景色设置为黑色,我将开始遮挡背景。 您会注意到,您在其中绘制的蒙版区域将变为粉红色。
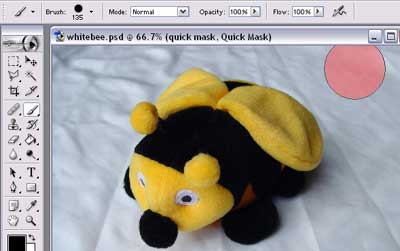
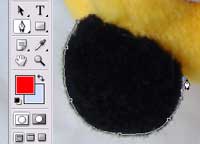
The large brush size allows me to color in the main areas of the background fairly quickly.
大画笔尺寸使我可以在背景的主要区域快速着色。
I can then use smaller brushes to fill in the details around the edges.
然后,我可以使用较小的画笔来填充边缘周围的细节。

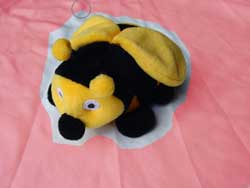
Eventually, I have the entire background colored in pink:
最终,我将整个背景涂成粉红色:

Tip: You may change the foreground color to white if you want to “paint back” parts of the object.
提示:如果要“粉饰”对象的某些部分,可以将前景色更改为白色。
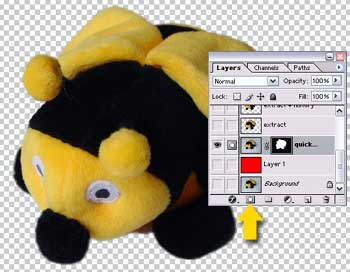
Switch back to Normal Mode, and you’ll see the selection. Because everything that’s painted in is not selected, the final result is that the bee is selected.
切换回普通模式,您将看到选择。 因为没有选择所有涂漆的东西,所以最终结果是选择了蜜蜂。
At this point, I click the Layer Mask icon at the bottom of the Layers Palette to create a layer mask, which essentially isolates the bee from the background.
此时,我单击“图层面板”底部的“图层蒙版”图标以创建一个图层蒙版,该蒙版实际上将蜜蜂与背景隔离。
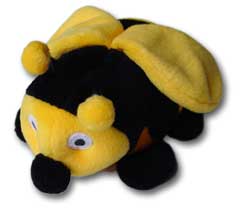
So, here’s the final picture:
所以,这是最终的图片:
And in summary:
并总结一下:
Quick Mask Technique:
快速蒙版技术:
- Switch to Quick Mask mode and paint everything you want to get rid of. 切换到“快速蒙版”模式并绘制要摆脱的所有内容。
- Switch back to normal mode and use the resultant selection to make a Layer Mask. 切换回普通模式,并使用结果选择制作“图层蒙版”。
Total time: 6 minutes
总时间:6分钟
My take: A great method, because it gives you precision-control over what gets selected. This method works well for any picture — solid background color or not. The only unfortunate aspect of this method is that, for some objects, you may see a “color halo” where the edges have picked up on some of the background color. (One way to get around this is to take a little more time and paint around the edges with a gray airbrush to make the edges a little transparent.)
我的观点:一种很棒的方法,因为它可以让您精确控制所选择的内容。 此方法适用于任何图片-是否为纯色。 该方法唯一不幸的方面是,对于某些对象,您可能会看到“颜色晕”,其中边缘在某些背景颜色上出现了斑点。 (解决此问题的一种方法是花费更多时间,并用灰色喷枪在边缘周围进行绘画,以使边缘略透明。)
Note: This same type of effect can be achieved by creating a Layer Mask, then painting on the layer mask with black paint to hide the background. The two techniques are virtually identical — I just chose to write about Quick Mask because I’ve already covered the concept of Layer Masks in another article!
注意:可以通过创建“图层蒙版”,然后在图层蒙版上用黑色颜料绘画以隐藏背景来实现相同类型的效果。 这两种技术实际上是相同的-我选择写Quick Mask是因为我已经在另一篇文章中介绍了Layer Masks的概念!
笔工具技术 (Pen Tool Technique)
My final technique will be to use the Pen Tool to create a path that outlines the object, then use the path to create a selection for a Layer Mask.
我的最终技术将是使用钢笔工具创建轮廓对象的路径,然后使用该路径为“图层蒙版”创建选择。
Choose the Pen Tool. In the horizontal options bar, make sure that “Paths,” not “Shape layer,” is selected. Then, start using the Pen Tool to create a path around the object. I find that it’s helpful to zoom in for greater detail.
选择钢笔工具。 在水平选项栏中,确保选择了“路径”,而不是“形状层”。 然后,开始使用钢笔工具在对象周围创建路径。 我发现放大更多细节会很有帮助。
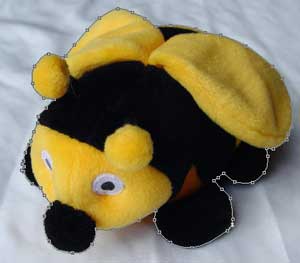
Here’s my completely outlined bee. You can see all the different points that I created using the Pen Tool, as well as the resultant path.
这是我完全概述的蜜蜂。 您可以看到我使用钢笔工具创建的所有不同点,以及生成的路径。
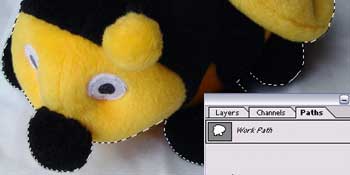
Open the Paths palette and Ctrl-click (Command-click for Mac) on the path layer. This creates a selection from the path. In the diagram, you can see the dotted line that shows the selection.
打开“路径”调板,然后在路径层上按住Ctrl键单击(对于Mac,则为Command键单击)。 这将从路径中创建一个选择。 在该图中,您可以看到显示选择的虚线。
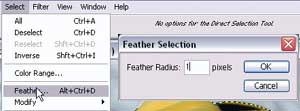
If you have a pretty solid-shaped object, you can skip the next step. Because I have a fuzzy, plush object, I’m going to feather my selection slightly so that the edges will be a little blurred. I choose Select > Feather and make a Feather Radius of 1 pixel.
如果您有一个漂亮的实心形状的对象,则可以跳过下一步。 因为我有一个模糊的毛绒物体,所以我将略微羽化我的选择,以使边缘有些模糊。 我选择“选择”>“羽毛”,并使羽毛半径为1像素。
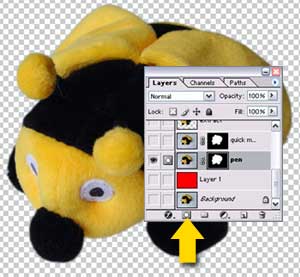
Finally, I click the Layer Mask icon in the Layers palette to create a layer mask from my selection. This hides the background and isolates the bee.
最后,我单击“图层”调板中的“图层蒙版”图标以根据自己的选择创建一个图层蒙版。 这将隐藏背景并隔离蜜蜂。
Here’s the final picture:
这是最后一张图片:
In summary:
综上所述:
Pen Tool Technique:
笔工具技术:
- Use the Pen Tool (set to “Paths,” not “Shape Layer”) to create an outline of the object. 使用钢笔工具(设置为“路径”,而不是“形状层”)来创建对象的轮廓。
- Ctrl-click (Command-click for Mac) the path layer to make a selection. 按住Ctrl键并单击(对于Mac,则为Command键并单击)路径层以进行选择。
- Use the selection to create a layer mask. 使用选择创建图层蒙版。
Total time: 3 minutes
总时间:3分钟
My take: This method works for any object, regardless of the background, and is also quite precise. It’s reasonably fast if you’re comfortable with using the Pen Tool; otherwise, this method might take a long time! This method is probably better for objects that have crisp, hard edges, and, similar to Quick Mask mode, you may have a slight color halo if the object has picked up some of the background colors.
我的观点:无论背景如何,此方法都适用于任何对象,而且非常精确。 如果您对使用钢笔工具感到满意,这将相当快。 否则,此方法可能需要很长时间! 此方法可能对边缘清晰,坚硬的对象更好,并且类似于“快速蒙版”模式,如果该对象拾取了某些背景颜色,则可能会有轻微的颜色光晕。
Goodbye, Tension Headaches!
再见,紧张的头痛!
So, there you have it: five different ways to isolate an object from a background! Here’s a quick summary of the different methods and when I think they’re best used.
因此,您已经拥有了:隔离对象与背景的五种不同方式! 这是不同方法的简要概述,我认为它们是最佳使用方法。
The Magic Eraser Technique
魔术橡皮擦技术
Great for erasing backgrounds that are mostly all the same color that contrast with the object (set a high tolerance and use one click!), but may involve a bit of touch-up work at the end. No good for objects that are on multi-colored backgrounds.
非常适合擦除与对象形成对比的几乎所有相同颜色的背景(设置高公差并单击一下!),但最后可能需要一些修饰工作。 对于多色背景上的对象没有好处。
The Background Eraser Technique
背景橡皮擦技术
This technique would be great on a photo object that is already “isolated” but has a solid, contrasting background color. Even still, I might pass up this technique for the next method, as they’re essentially the same and I think the Extract method goes a little faster.
对于已经“隔离”但具有稳定的对比背景色的照片对象,此技术非常有用。 即便如此,我还是可能会将这种技术用于下一种方法,因为它们本质上是相同的,并且我认为Extract方法的运行速度更快。
The Extract Filter Technique
提取过滤技术
Works best for erasing mostly solid-colored, contrasting backgrounds. Photoshop also does a nice job of getting rid of the color halo problem, but you may have to do some additional touch-up work at the end.
最适合消除大多数纯色,对比鲜明的背景。 Photoshop还可以很好地解决色晕问题,但最后您可能还需要进行一些其他修饰工作。
The Quick Mask Technique
快速蒙版技术
Almost the ideal solution: relatively quick, pixel-perfect control over edges, and works with any kind of background. Plus, by using a layer mask, you don’t actually delete any part of the background. The only complaint I have with this method is that you may get a color halo.
几乎是理想的解决方案:对边缘进行相对快速的像素完美控制,并且可以在任何类型的背景下使用。 另外,通过使用图层蒙版,您实际上并没有删除背景的任何部分。 我对这种方法的唯一抱怨是您可能会遇到颜色晕。
The Pen Tool Technique
笔工具技术
Fantastic technique for objects with hard edges, and it works with any kind of background. You can be as detailed as you want to get a perfect outline, and you can always go back and modify the path if you need to. Plus, you get lots of practice using the Pen Tool.
奇妙的技术,用于具有坚硬边缘的对象,并且可以在任何类型的背景下使用。 您可以根据想要得到完美轮廓的详细程度,也可以随时返回并修改路径。 另外,您可以使用钢笔工具进行大量练习。
Please feel free to download the sample file that holds all the layers with the different techniques applied, so that you can get a close-up look at how well each solution performed.
请随意下载示例文件 , 该文件包含应用了不同技术的所有层,因此您可以仔细查看每种解决方案的执行情况。
翻译自: https://www.sitepoint.com/masking-techniques-photoshop-2/
js 背景遮罩


 1024
1024


 被折叠的 条评论
为什么被折叠?
被折叠的 条评论
为什么被折叠?
 到【灌水乐园】发言


