


This article was sponsored by WRLD 3D. Thank you for supporting the partners who make SitePoint possible.
本文由WRLD 3D赞助。 感谢您支持使SitePoint成为可能的合作伙伴。
“Anywhere in the city? Anywhere in the city: I’ll tell you the best public toilet.”
“在城市的任何地方? 在城市的任何地方:我会告诉你最好的公共厕所。”
These are the words of George Costanza to Jerry Seinfeld in 1991. In that episode of Seinfeld; the visionary George invented an app before his time – the bathroom finder! If you’re a frequent traveller, a parent, or just someone who knows the importance of a clean and well-maintained space for some “serenity”, you’ll understand the utility of this idea.
这是乔治·科斯坦萨杰里·塞恩菲尔德在1991年宋飞的那个情节的话; 有远见的乔治在他出世之前发明了一个应用程序-浴室取景器! 如果您是经常出差的旅客,父母或只是知道清洁和维护良好的空间对于某些“宁静”的重要性的人,您将了解这种想法的实用性。

So, this time in the second tutorial of our WRLD series we’re going to build a… let’s call it a “facility finder app”.
因此,这次在WRLD系列的第二篇教程中,我们将构建一个……让我们将其称为“设施查找器应用程序”。
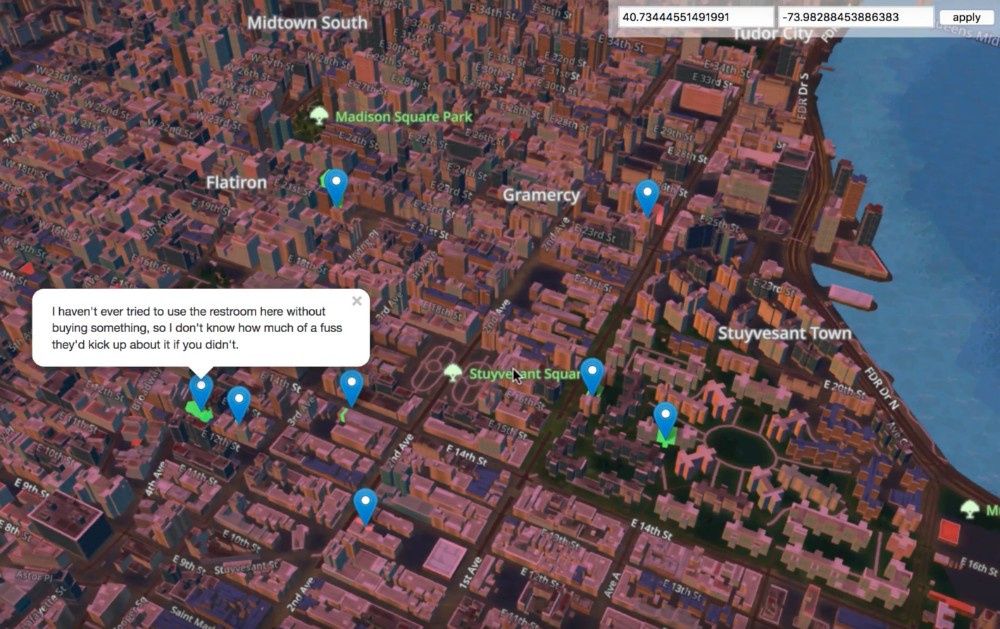
A sneak peek of what we’re going to build together
窥探我们将要共同构建的内容
It’s not the first time someone has tried this mind you. In 2010, bathroomreview.ca did just that (as described in Forbes). But the site is no longer operational.
这不是有人第一次尝试这种想法。 在2010年,bathroomreview.ca做到了这一点(如《福布斯》中所述 )。 但是该站点不再可用。
We covered quite a bit of ground in the last tutorial, this time round, we’re going to reuse some of that learning. For instance, we’ll use ParcelJS to build our static files, but we won’t go into too much detail about how to set it up again. We’ll also highlight buildings and set the appropriate weather conditions and time of day, depending on what they are for the user. If you’re unsure about how these work, refer back to the previous tutorial.
在本轮的上一教程中,我们涵盖了相当多的基础,我们将重用其中的一些知识。 例如,我们将使用ParcelJS来构建静态文件,但是我们不会过多地介绍如何重新设置它。 我们还将突出显示建筑物并根据用户的需求设置适当的天气条件和一天中的时间。 如果不确定这些方法的工作原理,请返回上一教程 。
In this tutorial, we’re going to cover these topics:
在本教程中,我们将介绍以下主题:
Creating a simple AdonisJS server-side API (to cache location data and handle CORS requests).
创建一个简单的AdonisJS服务器端API(以缓存位置数据并处理CORS请求)。
Requesting public facilities data, from refugerestrooms.org, if there are no cached locations within 10 meters of the user. We’ll use the Google Distance Matrix API to calculate the distance between points of interest.
如果距离用户10米之内没有缓存的位置,请从refugerestrooms.org请求公共设施数据。 我们将使用Google Distance Matrix API计算兴趣点之间的距离。
- Highlighting buildings with public facilities, colored to match their rating. Green for good, red for bad. Each building will have an info card for extra info (like how to reach the bathroom). 突出显示具有公共设施的建筑物,并对其颜色进行着色以使其达到其等级。 绿色代表好,红色代表坏。 每个建筑物都会有一张信息卡,以提供更多信息(例如如何到达浴室)。
At the end, we’ll talk a bit about how to turn this kind of app into a viable business. That’s really the point of this isn’t it? The WRLD APIs provide tools to visualise real-world data in a map of the real world. Our job is to work out how to use this technology for commercial applications!
最后,我们将讨论如何将这种应用程序变成可行的业务。 这真的是重点吗? WRLD API提供了在真实世界地图中可视化真实世界数据的工具。 我们的工作是研究如何将该技术用于商业应用!
The code for this tutorial can be found on Github. It has been tested with a modern versions or Firefox, Node, and macOS.
获取设施数据 (Getting Facility Data)
Let’s begin by learning how to get the facility data, and the form we get it in. We’re going to use refugerestrooms.org as a source of data. We learn that we can search by latitude and longitude, by looking at the documentation. In fact, we can make the following request, and see a set of facilities close to my location:
让我们从学习如何获取设施数据以及获取数据的形式开始。我们将使用refugerestrooms.org作为数据源。 我们了解到可以通过查看文档按纬度和经度进行搜索。 实际上,我们可以发出以下请求,并查看我所在地附近的一组设施:
curl https://www.refugerestrooms.org/api/v1/restrooms/by_location.json? ↵
    lat=-33.872571799999996&lng=18.6339362
There are a few other parameters we could be specifying (like whether to filter by accessible and/or unisex facilities), but the main thing this gives us is a way to plug coordinates into a search and get close-by locations.
我们可以指定其他一些参数(例如是否通过可访问和/或男女通用的设施进行过滤),但是这给我们提供的主要功能是一种将坐标插入搜索并获得附近位置的方法。
We can’t just call this from the browser, though. There are all sorts of security reasons why this is disallowed. There are also performance reasons. What if 10 people made the same request, standing 10 meters apart from each other? It would be a waste to fire off 10 requests to the same remote server, when we could serve it faster from a caching proxy.
但是,我们不能只是从浏览器中调用它。 出于种种安全原因,不允许这样做。 也有性能原因。 如果10个人提出相同的要求,并且彼此间隔10米,该怎么办? 如果我们可以从缓存代理中更快地向同一远程服务器发出10个请求,那将是一种浪费。
Instead, we’re going to set up a simple AdonisJS caching API. Our browser app will send requests to the AdonisJS API, and if there’s no “nearby” data; it will send a request to the Refuge API. We can’t spend too much time on the details of AdonisJS, so you’ll have to check out the documentation for details.
相反,我们将建立一个简单的AdonisJS缓存API。 我们的浏览器应用程序会将请求发送到AdonisJS API,如果没有“附近”数据,则将发送请求; 它将向Refuge API发送请求。 我们不能花太多时间在AdonisJS的细节上,因此您必须查看文档以获取详细信息。
I’m also just about done writing a book about it, so that’s the best place to learn how it works!
我也即将写一本关于它的书 ,所以这是学习它的最佳方式!
The easiest way, to create a new AdonisJS app, is to install the command-line tool:
创建新的AdonisJS应用最简单的方法是安装命令行工具:
npm install --global @adonisjs/cliThis enables the adonis command-line globally. We can use it to create a new application skeleton:
这将全局启用adonis命令行。 我们可以使用它来创建新的应用程序框架:
adonis new proxyThis takes a little while, since it’s installed a few things. When it finishes, you should see a message to run the development server. This can be done with:
这需要一些时间,因为它已安装了一些东西。 完成后,您应该会看到一条消息,以运行开发服务器。 这可以通过以下方式完成:
adonis serve --devOpen up http://127.0.0.1:3333 in your browser, and you should be greeted by this beauty:
在浏览器中打开http://127.0.0.1:3333,您会被这种美丽所吸引:
创建迁移和模型 (Creating Migrations and Models)
Let’s story the search data in a database. AdonisJS supports a few different engines, but we’ll use SQLite for the sake of simplicity. We can install the appropriate driver, using:
让我们讲一下数据库中的搜索数据。 AdonisJS支持几种不同的引擎,但是为了简单起见,我们将使用SQLite。 我们可以使用以下方法安装适当的驱动程序:
npm install --save sqlite3Next, let’s make a migration and a model. We’re only interested in the coordinates used to search, and the returned JSON. If the coordinates are close enough to where a user is searching for, we’ll reuse the existing search response instead of re-requesting the search data.
接下来,让我们进行迁移和建模。 我们只对用于搜索的坐标以及返回的JSON感兴趣。 如果坐标足够接近用户要搜索的位置,我们将重用现有的搜索响应,而不是重新请求搜索数据。
We can use the adonis command-line utility to create migrations and models:
我们可以使用adonis命令行实用程序来创建迁移和模型:
adonis make:migration search
adonis make:model search
That creates a couple files. The first is a migration, to which we can add three fields:
这样就创建了几个文件。 第一个是迁移,我们可以在其中添加三个字段:
"use strict"

const Schema = use("Schema")

class SearchSchema extends Schema {
    up() {
        this.create("searches", table => {
            table.increments()
            table.string("latitude")
            table.string("longitude")
            table.text("response")
            table.timestamps()
        })
    }

    down() {
        this.drop("searches")
    }
}

module.exports = SearchSchema
This is from
proxy/database/migrations/x_search_schema.js这来自
proxy/database/migrations/x_search_schema.js
We’ve added the latitude, longitude, and response fields. The first two make sense as string even though they contain float data, because we want to do sub-string searches with them.
我们添加了latitude , longitude和response字段。 尽管前两个包含浮点数据,但它们还是string有意义,因为我们希望使用它们进行子字符串搜索。
Next, let’s create a single API endpoint:
接下来,让我们创建一个API端点:
"use strict"

const Route = use("Route")

// we don't need this anymore...
// Route.on("/").render("welcome")

Route.get("search", ({ request, response }) => {
    const { latitude, longitude } = request.all()

    // ...do something with latitude and longitude
})
This is from
proxy/start/routes.js这是来自
proxy/start/routes.js
Each AdonisJS route is defined in the routes.js file. Here, we’ve commented out the initial “welcome” route, and added a new “search” route. The closure is called with a context object; which has access to the request and request objects.
每个AdonisJS路由都在routes.js文件中定义。 在这里,我们已经注释掉了最初的“欢迎”路线,并添加了新的“搜索”路线。 该闭包由上下文对象调用; 可以访问request和request对象。
We can expect search requests to provide latitude and longitude query string parameters; and we can get these with request.all. We should check to see if we have any vaguely related coordinates. We can do this by using the Search model:
我们可以期望搜索请求提供latitude和longitude查询字符串参数; 我们可以通过request.all获得这些。 我们应该检查是否有任何模糊相关的坐标。 我们可以使用Search模型来做到这一点:
const Search = use("App/Models/Search")

const searchablePoint = (raw, characters = 8) => {
    const abs = Math.abs(parseFloat(raw))
    return parseFloat(abs.toString().substr(0, characters))
}

Route.get("search", async ({ request, response }) => {
    const { latitude, longitude } = request.all()

    const searchableLatitude = searchablePoint(latitude)
    const searchableLongitude = searchablePoint(longitude)

    // console.log(searchableLatitude, searchableLongitude)

    const searches = await Search.query()
        .where("latitude", "like", `%${searchableLatitude}%`)
        .where("longitude", "like", `%${searchableLongitude}%`)
        .fetch()

    // console.log(searches.toJSON())

    response.send("done")

    // ...do something with latitude and longitude
})
This is from
proxy/start/routes.js这是来自
proxy/start/routes.js
We begin by importing the Search model. This is a code representation of the database table we created (using the migration). We’ll use this to query the database for “nearby” searches.
我们首先导入Search模型。 这是我们创建的数据库表(使用迁移)的代码表示。 我们将使用它来查询数据库中的“附近”搜索。
Before we can do that, we need a way to search for nearly coordinates. The searchablePoint function takes a raw coordinate string and creates an absolute float value, removing the optional - from the front of the string. Then, it returns the first 8 characters of the coordinate string. This will shorten -33.872527399999996 to 33.872527. We can then use these 8 characters in a SQL “where like” clause, to return all searches with similar coordinate strings.
在此之前,我们需要一种搜索近似坐标的方法。 searchablePoint函数采用原始坐标字符串并创建一个绝对浮点值,并从字符串开头删除了可选的- 。 然后,它返回坐标字符串的前8字符。 这会将-33.872527399999996缩短为33.872527 。 然后,我们可以在SQL“ where like”子句中使用这8个字符,以返回具有相似坐标字符串的所有搜索。
AdonisJS uses the async and await keywords to great effect. Methods like Search.query return promises, so we can await their results while still writing 100% asynchronous code.
AdonisJS使用async和await关键字效果很好。 诸如Search.query方法Search.query返回Search.query ,因此我们可以await其结果的同时仍然编写100%异步代码。
I’m skipping a lot of AdonisJS details, which I really don’t like doing. If you’re struggling with this part; speak to me on Twitter, and I’ll point you in the right direction.
我跳过了许多AdonisJS详细信息,我真的不喜欢这样做。 如果您正在为这部分苦苦挣扎; 在Twitter上与我交谈 ,我会为您指明正确的方向。
匹配附近的位置 (Matching Nearby Locations)
Now that we’ve got the “nearby” locations, we can compare their relative distances to where the user is standing. If you don’t yet have a Google API key, refer back to the previous tutorial for how to get one. We’re about to be the Google Distance Matrix service:
现在我们有了“附近”的位置,我们可以将它们的相对距离与用户站立的位置进行比较。 如果您还没有Google API密钥,请返回上一教程,了解如何获得它。 我们即将成为Google Distance Matrix服务:
https://maps.googleapis.com/maps/api/distancematrix/json? ↵
    mode=walking& ↵
    units=metric& ↵
    origins=-33.872527399999996,18.6339164& ↵
    destinations=-33.872527399999997,18.6339165& ↵
    key=YOUR_API_KEY
The Distance Matrix service actually allows multiple origins, so we can combine all of your previous searches into a longish origin string:
Distance Matrix服务实际上允许多个原点,因此我们可以将您之前的所有搜索组合成冗长的原点字符串:
const reduceSearches = (acc, search) => {
    const { latitude, longitude } = search
    return `${acc}|${latitude},${longitude}`
}

Route.get("search", async ({ request, response }) => {
    const { latitude, longitude } = request.all()

    // ...get searches

    const origins = searches
        .toJSON()
        .reduce(reduceSearches, "")
        .substr(1)

    // console.log(origins)

    response.send("done")

    // ...do something with latitude and longitude
})
This is from
proxy/start/routes.js这是来自
proxy/start/routes.js
We can convert the search results into an array of objects. This is useful because we can reduce the array, combining each search’s latitude and longitude into a string. That string will begin with a |, so we need to get the string starting at index 1.
我们可以将搜索结果转换为对象数组。 这很有用,因为我们可以缩小数组,将每个搜索的纬度和经度组合成一个字符串。 该字符串将以|开头| ,因此我们需要从索引1开始的字符串。
I’m a fan of the browser fetch API, so let’s install a NodeJS polyfill:
我是浏览器fetch API的狂热者,所以让我们安装NodeJS polyfill:
npm install --save node-fetch-polyfillUsing this polyfill, we can fetch a list of distances from Google:
使用此polyfill,我们可以获取Google的距离列表:
"use strict"

const fetch = use("node-fetch-polyfill")

const Env = use("Env")
const Route = use("Route")
const Search = use("App/Models/Search")

const searchablePoint = (raw, characters = 8) => {
    // ...
}

const reduceSearches = (acc, search) => {
    // ...
}

Route.get("search", async ({ request, response }) => {
    const { latitude, longitude } = request.all()

    // ...get origins

    const key = Env.get("GOOGLE_KEY")

    const distanceResponse = await fetch(
        `https://maps.googleapis.com/maps/api/distancematrix/json? ↵
            mode=walking&units=metric&origins=${origins}& ↵
            destinations=${latitude},${longitude}&key=${key}`,
    )

    const distanceData = await distanceResponse.json()

    // console.log(distanceData)

    response.send("done")

    // ...do something with data
})
This is from
proxy/start/routes.js这是来自
proxy/start/routes.js
fetch returns a promise, so we can await it. The response has a json method, which serialises the raw response into a JSON array or object.Give then combined origin coordinates (of everything remotely resembling the starting point), we get a list of all distances. The response objects are in the same order as the origin coordinates. This will become useful as we continue…
fetch返回一个承诺,因此我们可以await它。 响应有一个json方法,它将原始响应序列化为JSON数组或对象,然后结合原点坐标(所有与起点相似的东西),得到所有距离的列表。 响应对象与原点坐标的顺序相同。 随着我们的继续,这将变得有用。
AdonisJS provides its own
.envfile support. We can forgo the previous tutorial’senv.example.jsandenv.jsfiles; and just use the.envand.env.exampleones already present. I’ve addedGOOGLE_KEYto both, as should you. We can then useEnv.getto get the value.AdonisJS提供了自己的
.env文件支持。 我们可以放弃上一教程的env.example.js和env.js文件; 并仅使用现有的.env和.env.example。 我已经将GOOGLE_KEY都添加到了两者中,你也应该添加了。 然后,我们可以使用Env.get获取值。
We can inspect the results to find whether any of them are within 10 meters of the requested coordinates:
我们可以检查结果以查找是否在所请求坐标的10米范围内:
Route.get("search", async ({ request, response }) => {
    const { latitude, longitude } = request.all()

    // ...get distance data

    for (let i in distanceData.rows) {
        const { elements } = distanceData.rows[i]

        if (typeof elements[0] === "undefined") {
            continue
        }

        if (elements[0].status !== "OK") {
            continue
        }

        const matches = elements[0].distance.text.match(/([0-9]+)\s+m/)

        if (matches === null || parseInt(matches[1], 10) > 10) {
            continue
        }

        response.json(JSON.parse(searchRows[i].response))
        return
    }

    // ...cached result not found, fetch new data!
})
This is from
proxy/start/routes.js这是来自
proxy/start/routes.js
We can loop through the distance rows, performing a few checks for each. If the origin coordinates are invalid, the Distance Matrix service could return an error for that row. If the elements are malformed (undefined or erroneous) then we skip the row.
我们可以遍历距离行,对每行进行一些检查。 如果原点坐标无效,则距离矩阵服务可能会为该行返回错误。 如果元素格式不正确(未定义或错误),则我们跳过该行。
If there is a valid measurement (which is one in the form of n m, where n is 1 – 10); then we return the response for that row. We don’t need to request new Refuge data. In the likely event that we have no nearby coordinates cached; we can request new data:
如果存在有效的度量(以nm的形式表示,其中n为1 – 10); 然后我们返回该行的响应。 我们不需要请求新的避难所数据。 在可能的情况下,我们没有缓存附近的坐标; 我们可以请求新数据:
Route.get("search", async ({ request, response }) => {
    const { latitude, longitude } = request.all()

    // ...check for cached data

    const refugeResponse = await fetch(
        `https://www.refugerestrooms.org/api/v1/restrooms/by_location.json? ↵
            lat=${latitude}&lng=${longitude}`,
    )

    const refugeData = await refugeResponse.json()

    await Search.create({
        latitude,
        longitude,
        response: JSON.stringify(refugeData),
    })

    response.json(refugeData)
    return
})
This is from
proxy/start/routes.js这是来自
proxy/start/routes.js
If there are no cached searches, we request a new set of Refuge results. We can return them unaltered; but not before saving the search to the database. The first request should be marginally slower than subsequent requests. We’re essentially offloading Refuge API processing onto the Distance Matrix API. We also have a way to manage CORS permissions, now.
如果没有缓存的搜索,我们将请求一组新的避难所结果。 我们可以原封不动地退还它们。 但在将搜索保存到数据库之前不可以。 第一个请求应比后续请求稍慢。 我们实际上是将避难所API处理工作转移到Distance Matrix API上。 现在,我们还有一种方法来管理CORS权限。
在浏览器中获取结果 (Getting Results in the Browser)
Let’s start using this data in the browser. Try to set up a ParcelJS build chain (or look back to the previous tutorial where we did this). This include installing and loading the WRLD SDK into an app.js file. It should look like this:
让我们开始在浏览器中使用此数据。 尝试建立一个ParcelJS构建链(或回顾我们之前做的上一个教程)。 这包括将WRLD SDK安装和加载到app.js文件中。 它看起来应该像这样:
const Wrld = require("wrld.js")

const tester = async () => {
    const response = await fetch(
        "http://127.0.0.1:3333/search? ↵
            latitude=-33.872527399999996&longitude=18.6339164",
    )

    const data = await response.json()

    console.log(data)
}

tester()
This is from
app/app.js这是来自
app/app.js
You should be able to bundle this with the following command:
您应该可以将其与以下命令捆绑在一起:
parcel index.htmlYour folder structure should resemble this:
您的文件夹结构应类似于此:
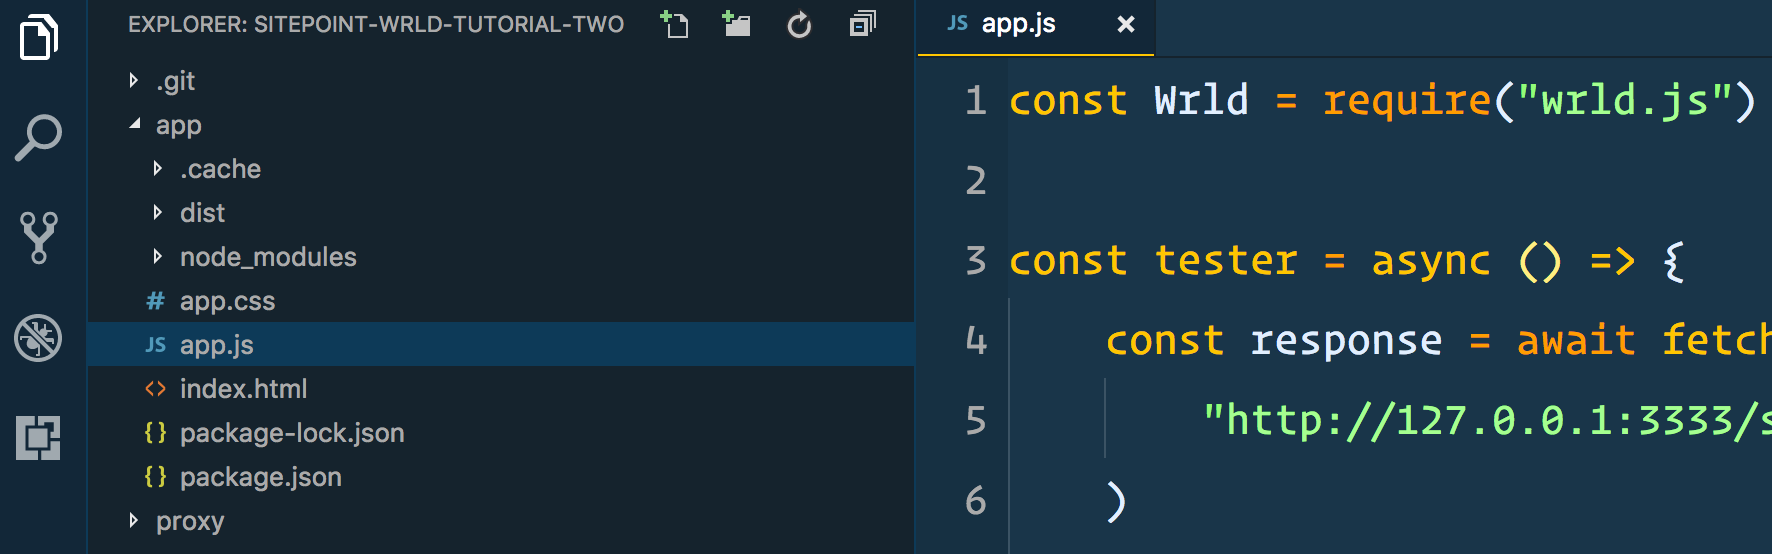
It’s the same folder structure we made, in the previous tutorial. You may as well copy all that, replacing the contents of app.js with what you see above. The tester function is to demonstrate that we can’t yet request data from our caching proxy server. For that, we need to enable the AdonisJS CORS layer:
它与上一教程中制作的文件夹结构相同。 您也可以复制所有内容,用上面看到的内容替换app.js的内容。 tester功能旨在证明我们尚无法从缓存代理服务器请求数据。 为此,我们需要启用AdonisJS CORS层 :
"use strict"

module.exports = {
    /*
    |--------------------------------------------------------------------------
    | Origin
    |--------------------------------------------------------------------------
    |
    | Set a list of origins to be allowed...
    */
    origin: true,

    // ...rest of the CORS settings
}
This is from
proxy/config/cors.js这是来自
proxy/config/cors.js
If we set origin to true, all CORS requests will be successful. In a production environment, you’d probably want to provide a closure that conditionally returns true; so that you can limit who can make requests to this API.
如果将origin设置为true ,则所有CORS请求都将成功。 在生产环境中,您可能希望提供一个有条件地返回true的闭包。 这样就可以限制谁可以对此API发出请求。
If you refresh the browser, that is open to the URL ParcelJS is serving; you should now be able to see results in the console:
如果刷新浏览器,则ParcelJS所服务的URL是打开的。 您现在应该可以在控制台中看到结果:
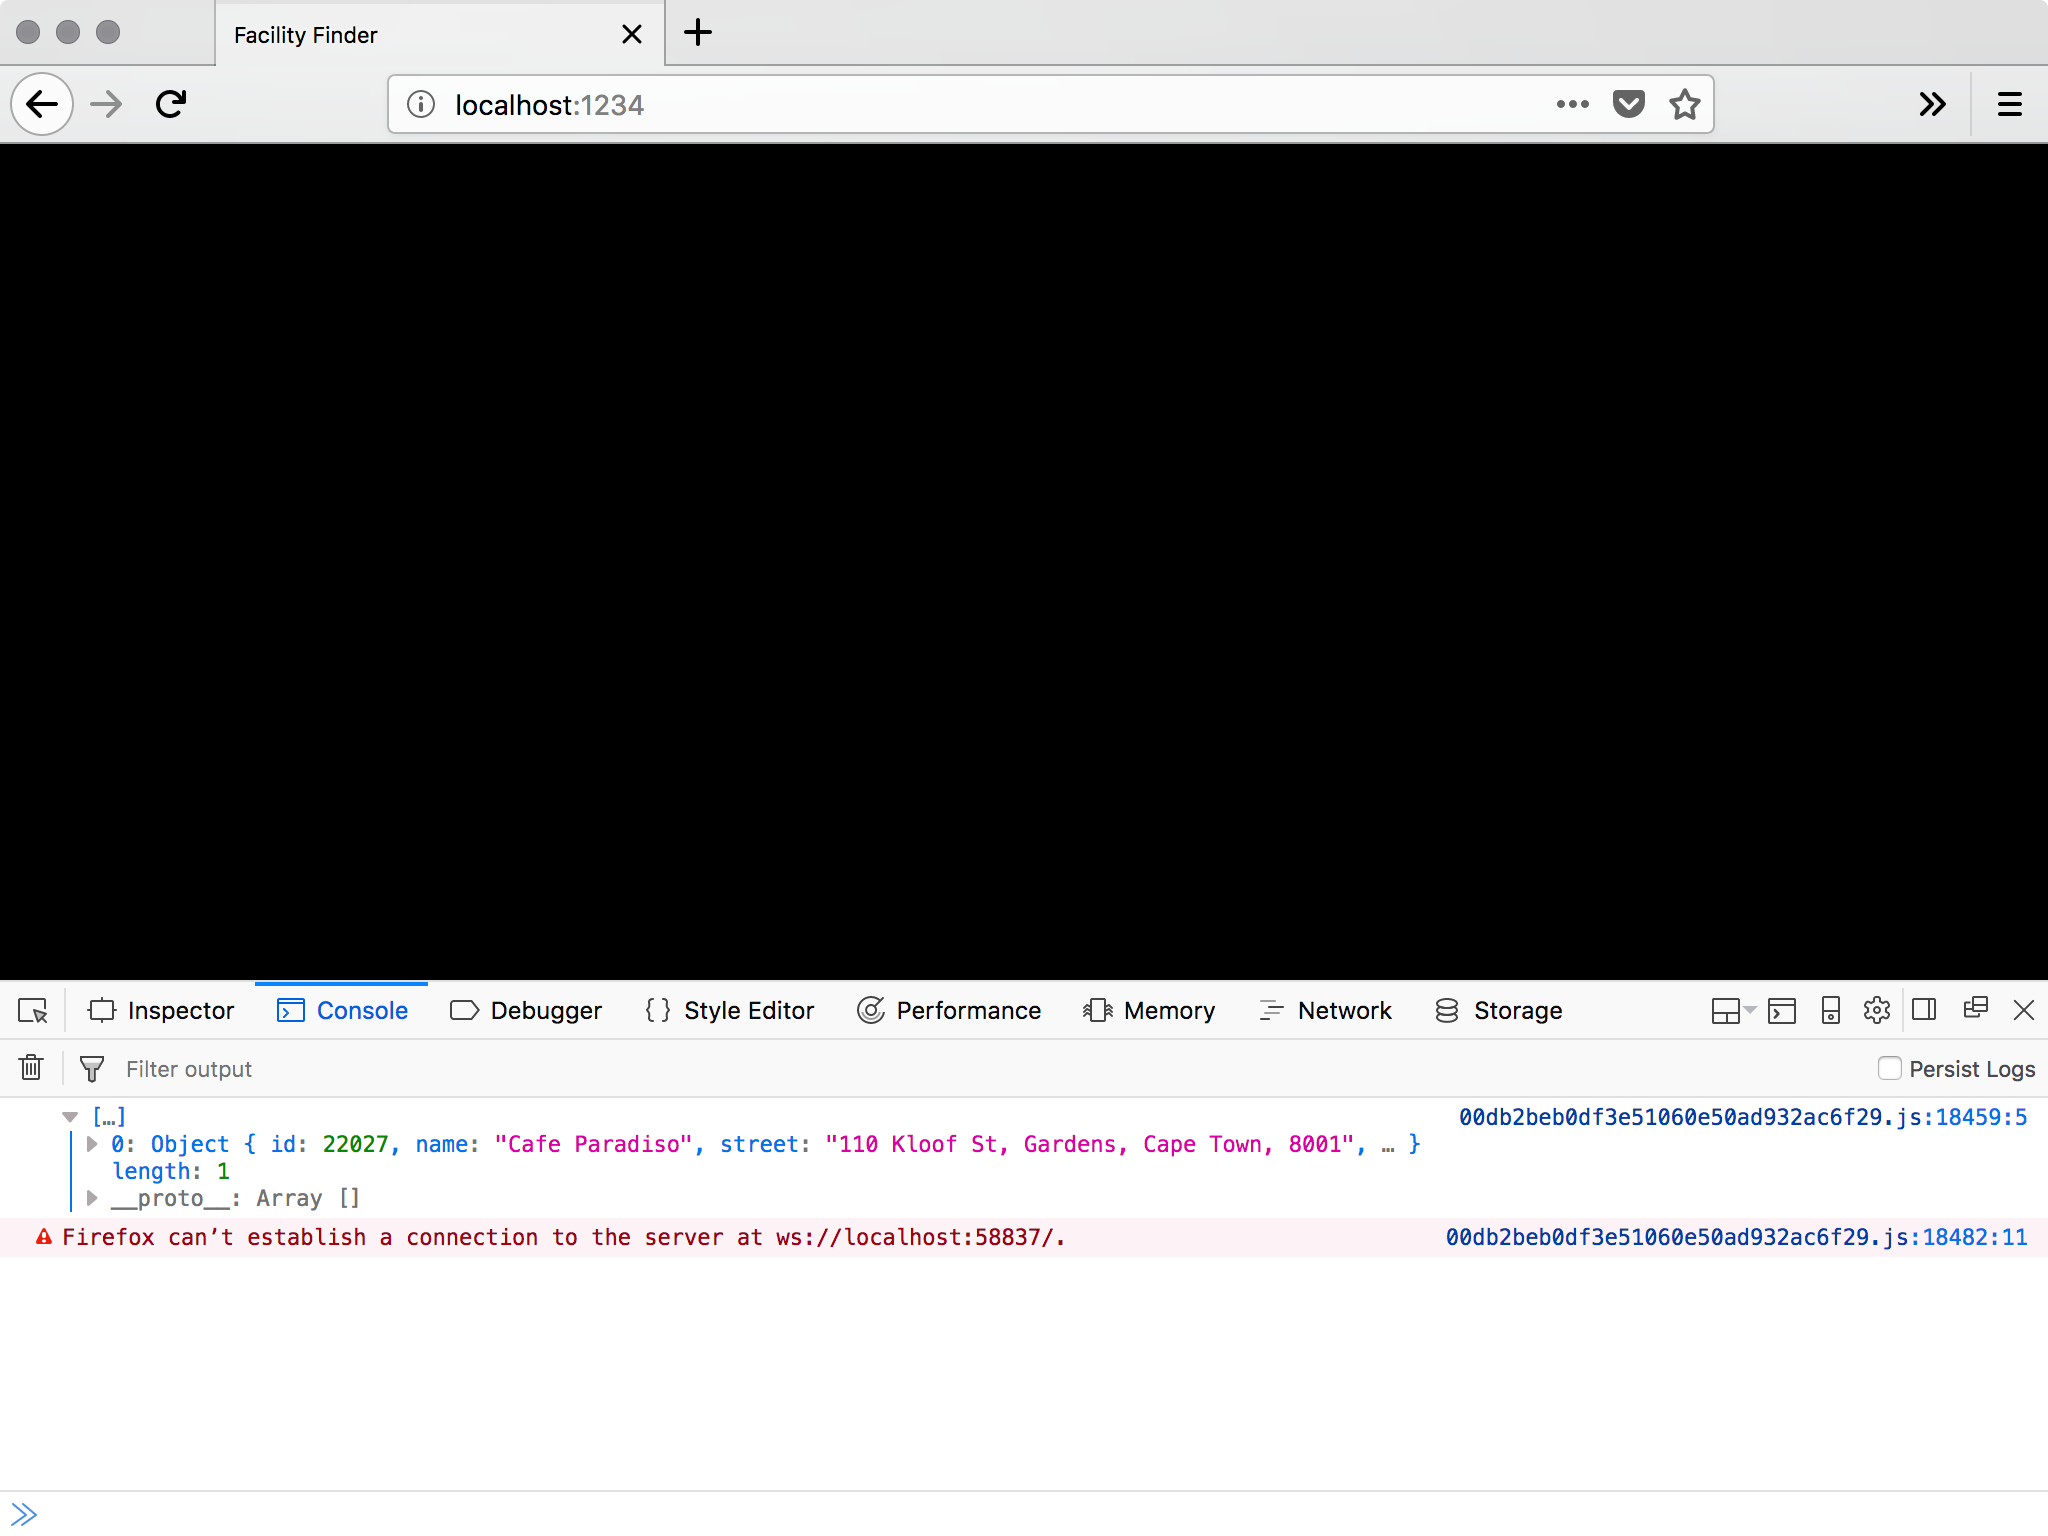
Pay no attention to that warning. It’s just ParcelJS Hot Module Replacement having a moment…
请勿注意该警告。 只是ParcelJS Hot Module Replacement有一点时间...
From this point forward, we can start to use the caching proxy server to find the nearest facilities to a set of coordinates. Let’s add the map!
从这一点开始,我们可以开始使用缓存代理服务器来查找与一组坐标最接近的设施。 让我们添加地图!
与WRLD集成 (Integrating with the WRLD)
Let’s begin by adding the env.js and env.example.js files, from the first tutorial, to the app folder. Then we can use these to render the map again:
首先,将第一个教程中的env.js和env.example.js文件添加到app文件夹中。 然后,我们可以使用它们再次渲染地图:
const Wrld = require("wrld.js")
const env = require("./env")

const keys = {
    wrld: env.WRLD_KEY,
}

// ...tester code

window.addEventListener("load", async () => {
    const map = Wrld.map("map", keys.wrld, {
        center: [40.7484405, -73.98566439999999],
        zoom: 15,
    })
})
This is from
app/app.js这是来自
app/app.js
Here we are, back at the Empire State Building. It would be better if we could start off somewhere closer to the user though. And, if we could provide a way to override the geolocation with custom coordinates. Let’s tap into the HTML5 Geolocation API:
我们回到帝国大厦。 不过,如果我们可以从更靠近用户的地方开始会更好。 并且,如果我们可以提供一种使用自定义坐标覆盖地理位置的方法。 让我们利用HTML5 Geolocation API:
window.addEventListener("load", async () => {
    let map

    navigator.geolocation.getCurrentPosition(
        position => {
            const { latitude, longitude } = position.coords

            map = Wrld.map("map", keys.wrld, {
                center: [latitude, longitude],
                zoom: 15,
            })
        },
        error => {
            map = Wrld.map("map", keys.wrld, {
                center: [40.7484405, -73.98566439999999],
                zoom: 15,
            })
        },
    )
})
This is from
app/app.js这是来自
app/app.js
We can use getCurrentPosition to get the best-guess coordinates of the user. If the user declines the request for geolocation data, or something else goes wrong, we can default to a set of known coordinates.
我们可以使用getCurrentPosition来获取用户的最佳猜测坐标。 如果用户拒绝对地理位置数据的请求,或者发生其他问题,我们可以默认使用一组已知坐标。
There’s no documented error argument, but I like to put the parameter there to make the code clearer.
没有记录的错误参数,但是我喜欢将参数放在此处以使代码更清晰。
That’s the automatic location detection taken care of. Now, what if we want to override it with custom coordinates? We can add some form inputs to our HTML, and target them with some Javascript:
这就是自动位置检测。 现在,如果我们想用自定义坐标覆盖它呢? 我们可以在HTML中添加一些表单输入,并使用一些Javascript作为目标:
<body>
    <div id="map"></div>
    <div class="controls">
        <input type="text" name="latitude" />
        <input type="text" name="longitude" />
        <input type="button" name="apply" value="apply" />
    </div>
    <script src="./app.js"></script>
</body>
This is from
app/index.html这是来自
app/index.html
.controls {
    position: absolute;
    top: 0;
    right: 0;
    background: rgba(255, 255, 255, 0.5);
    padding: 10px;
}
This is from
app/app.css这是来自
app/app.css
window.addEventListener("load", async () => {
    let map

    const latitudeInput = document.querySelector("[name='latitude']")
    const longitudeInput = document.querySelector("[name='longitude']")
    const applyButton = document.querySelector("[name='apply']")

    applyButton.addEventListener("click", () => {
        map.setView([latitudeInput.value, longitudeInput.value])
    })

    navigator.geolocation.getCurrentPosition(
        position => {
            const { latitude, longitude } = position.coords

            latitudeInput.value = latitude
            longitudeInput.value = longitude

            map = Wrld.map("map", keys.wrld, {
                center: [latitude, longitude],
                zoom: 15,
            })
        },
        error => {
            map = Wrld.map("map", keys.wrld, {
                center: [40.7484405, -73.98566439999999],
                zoom: 15,
            })
        },
    )
})
This is from
app/app.js这是来自
app/app.js
We begin by getting references to the new input elements we added. When applyButton is clicked, we want to recenter the map. When the geolocation data is successful, we can populate these inputs with the appropriate latitude and longitude.
我们首先获得对添加的新input元素的引用。 单击applyButton ,我们想更新地图。 地理位置数据成功后,我们可以使用适当的纬度和经度填充这些输入。
Now, how about highlighting nearby facility buildings?
现在,如何突出显示附近的设施建筑物?
let map
let highlightedFacilities = []

const highlightFacilities = async (latitude, longitude) => {
    for (let facility of highlightedFacilities) {
        facility.remove()
    }

    highlightedFacilities = []

    const facilitiesResponse = await fetch(
        `http://127.0.0.1:3333/search?latitude=${latitude}&longitude=${longitude}`,
    )

    const facilitiesData = await facilitiesResponse.json()

    for (let facility of facilitiesData) {
        // console.log(facility)

        const color =
            facility.upvote >= facility.downvote
                ? [125, 255, 125, 200]
                : [255, 125, 125, 200]

        const highlight = Wrld.buildings
            .buildingHighlight(
                Wrld.buildings
                    .buildingHighlightOptions()
                    .highlightBuildingAtLocation([
                        facility.latitude,
                        facility.longitude,
                    ])
                    .color(color),
            )
            .addTo(map)

        highlightedFacilities.push(highlight)
    }
}

window.addEventListener("load", async () => {
    // ...add button event

    navigator.geolocation.getCurrentPosition(
        position => {
            const { latitude, longitude } = position.coords

            // ...create map

            map.on("initialstreamingcomplete", () => {
                highlightFacilities(latitude, longitude)
            })
        },
        error => {
            // ...create map

            map.on("initialstreamingcomplete", () => {
                highlightFacilities(40.7484405, -73.98566439999999)
            })
        },
    )
})
This is from
app/app.js这是来自
app/app.js
When we create the map, or change its focus, we can call the highlightFacilities function. This accepts a latitude and longitude, removes all previously highlighted buildings, and highlights all buildings returned by the caching proxy search.
创建地图或更改地图焦点时,可以调用highlightFacilities函数。 这接受latitude和longitude ,删除所有以前突出显示的建筑物,并突出显示由缓存代理搜索返回的所有建筑物。
We’re choosing a green highlight, for buildings with 50% or more upvotes; and a red highlight for the rest. This will make it easier to find better facilities.
对于带有50%或更多投票的建筑物,我们选择绿色高亮显示; 其余部分用红色突出显示。 这将使寻找更好的设施变得更加容易。
We could even update the override inputs with the current centre of the map, so a user can pan around and find new bathrooms close to that map region. We could also make the highlighted buildings a bit clearer; by adding map markers and show popups when pressed/clicked:
我们甚至可以使用地图的当前中心来更新替代输入,以便用户可以平移并找到靠近该地图区域的新浴室。 我们还可以使突出显示的建筑物更加清晰。 通过添加地图标记并在按下/单击时显示弹出窗口:
let map
let highlightedFacilities = []
let highlighterMarkers = []

const highlightFacilities = async (latitude, longitude) => {
    for (let facility of highlightedFacilities) {
        facility.remove()
    }

    highlightedFacilities = []

    for (let marker of highlighterMarkers) {
        marker.remove()
    }

    highlighterMarkers = []

    const facilitiesResponse = await fetch(
        `http://127.0.0.1:3333/search?latitude=${latitude}&longitude=${longitude}`,
    )

    const facilitiesData = await facilitiesResponse.json()

    for (let facility of facilitiesData) {
        const location = [facility.latitude, facility.longitude]

        // ...add highlight color

        const intersection = map.buildings.findBuildingAtLatLng(location)

        let marker

        if (intersection.found) {
            marker = L.marker(location, {
                elevation: intersection.point.alt,
                title: facility.name,
            }).addTo(map)
        } else {
            marker = L.marker(location, {
                title: facility.name,
            }).addTo(map)
        }

        if (facility.comment) {
            marker.bindPopup(facility.comment).openPopup()
        }

        highlighterMarkers.push(marker)
    }
}

window.addEventListener("load", async () => {
    // ...add button event

    navigator.geolocation.getCurrentPosition(
        position => {
            const { latitude, longitude } = position.coords

            // ...create map

            map.on("panend", event => {
                const { lat, lng } = map.getBounds().getCenter()

                latitudeInput.value = lat
                longitudeInput.value = lng
            })
        },
        error => {
            // ...create map

            map.on("panend", event => {
                const { lat, lng } = map.getBounds().getCenter()

                latitudeInput.value = lat
                longitudeInput.value = lng
            })
        },
    )
})
This is from
app/app.js这是来自
app/app.js
We can add panend events to the places we create the map. This is triggered when the user has started to pan, and the map comes to rest. We get the visible map bounds, and get the centre from that.
我们可以将panend事件添加到我们创建地图的地方。 当用户开始平移并且地图静止时触发。 我们得到可见的地图边界,并从中得到中心。
Then, in the highlightFacilities function, we added markers and optional popups (if there are commends to display. This makes it a little easier to spot the highlighted buildings, and to find out any additional information about the facilities they contain.
然后,在highlightFacilities函数中,我们添加了标记和可选的弹出窗口(如果有建议显示的话。这使得发现突出显示的建筑物以及查找有关其所包含设施的任何其他信息更加容易。
增加气氛 (Adding Atmosphere)
Let’s finish up by adding some atmospheric effects to the map view. For starters, we can add a “weather conditions” endpoint to our caching proxy:
最后,向地图视图添加一些大气效果。 首先,我们可以将“天气状况”端点添加到我们的缓存代理中:
Route.get("condition", async ({ request, response }) => {
    const { latitude, longitude } = request.all()

    const key = Env.get("OPENWEATHER_KEY")

    const weatherResponse = await fetch(
        `http://api.openweathermap.org/data/2.5/weather? ↵
            lat=${latitude}&lon=${longitude}&appid=${key}`,
    )

    const weatherData = await weatherResponse.json()

    response.json(weatherData)
})
This is from
proxy/start/routes.js这是来自
proxy/start/routes.js
This requires the creation of a Open Weather Map account. The API key we get there needs to be added to .env and .env.example. We can then start to request this data in the browser. If the weather for that region matches one of the WRLD weather presets; we can apply it to the map. We can also use the browser’s time to set the time of day:
这需要创建一个开放式天气地图帐户。 我们到达那里的API密钥需要添加到.env和.env.example 。 然后,我们可以开始在浏览器中请求此数据。 如果该地区的天气与WRLD天气预设之一匹配; 我们可以将其应用于地图。 我们还可以使用浏览器的时间来设置一天中的时间:
const Wrld = require("wrld.js")
const env = require("./env")

const keys = {
    wrld: env.WRLD_KEY,
}

let map
let highlightedFacilities = []
let highlighterMarkers = []

const highlightFacilities = async (latitude, longitude) => {
    // ...highlight buildings and add markers

    try {
        const weatherResponse = await fetch(
            `http://127.0.0.1:3333/condition? ↵
                latitude=${latitude}&longitude=${longitude}`,
        )

        const weatherData = await weatherResponse.json()

        if (weatherData.weather && weatherData.weather.length > 0) {
            const condition = weatherData.weather[0].main.toLowerCase()

            switch (condition) {
                case "snow":
                    map.themes.setWeather(Wrld.themes.weather.Snowy)
                    break
                case "few clouds":
                case "scattered clouds":
                case "broken clouds":
                    map.themes.setWeather(Wrld.themes.weather.Overcast)
                    break
                case "mist":
                    map.themes.setWeather(Wrld.themes.weather.Foggy)
                    break
                case "shower rain":
                case "rain":
                case "thunderstorm":
                    map.themes.setWeather(Wrld.themes.weather.Rainy)
                    break
                default:
                    map.themes.setWeather(Wrld.themes.weather.Clear)
                    break
            }
        }

        const time = new Date().getHours()

        if (time > 5 && time <= 10) {
            map.themes.setTime(Wrld.themes.time.Dawn)
        } else if (time > 10 && time <= 16) {
            map.themes.setTime(Wrld.themes.time.Day)
        } else if (time > 16 && time < 21) {
            map.themes.setTime(Wrld.themes.time.Dusk)
        } else {
            map.themes.setTime(Wrld.themes.time.Night)
        }
    } catch (e) {
        // weather and time effects are entirely optional
        // if they break, for whatever reason, they shouldn't kill the app
    }
}

const latitudeInput = document.querySelector("[name='latitude']")
const longitudeInput = document.querySelector("[name='longitude']")
const applyButton = document.querySelector("[name='apply']")

const initMapEvents = async (latitude, longitude) => {
    map.on("initialstreamingcomplete", () => {
        highlightFacilities(latitude, longitude)
    })

    map.on("panend", event => {
        const { lat, lng } = map.getBounds().getCenter()

        latitudeInput.value = lat
        longitudeInput.value = lng
    })

    applyButton.addEventListener("click", () => {
        map.setView([latitudeInput.value, longitudeInput.value])
        highlightFacilities(latitudeInput.value, longitudeInput.value)
    })
}

window.addEventListener("load", async () => {
    navigator.geolocation.getCurrentPosition(
        position => {
            // ...create map

            initMapEvents(latitude, longitude)
        },
        error => {
            // ...create map

            initMapEvents(latitude, longitude)
        },
    )
})
This is from
app/app.js这是来自
app/app.js
I’ve taken the opportunity to move all the post-map-creation code into a reusable initMapEvents function. Additionally, I’ve added weather and time effects into the highlightBuildings function; as this is the most reasonable place to change these things. We don’t want the map to continue snowing if the user enters coordinates for a desert…
我利用这次机会将所有创建地图后的代码移至可重用的initMapEvents函数中。 另外,我已经将天气和时间效果添加到了highlightBuildings函数中。 因为这是更改这些内容的最合理的地方。 如果用户输入沙漠坐标,我们不希望地图继续下雪……
Unfortunately, without a lot more work, the time of day will always be relative to the user’s browser, but I don’t think it’s essential that we do that for this tutorial.
不幸的是,如果没有更多的工作,一天中的时间总是相对于用户的浏览器而言的,但是我认为在本教程中这样做并不是必需的。
摘要 (Summary)
This has been a fun project to create. More than that, it’s something you could make and turn into a business (hopefully with more success than George’s various exploits). Maybe you have discovered another kind of thing people need an app to look for. If you have the right permissions and account limits (like OpenWeatherMap, Google, Refuge, and WRLD), you can create any kind of finder app.
这是一个有趣的项目。 不仅如此,这是您可以制作并发展为业务的东西(希望比乔治的各种功绩取得更大的成功)。 也许您发现了人们需要应用程序寻找的另一种东西。 如果您具有正确的权限和帐户限制(例如OpenWeatherMap,Google,Refuge和WRLD),则可以创建任何种类的finder应用。
The way I see it, there are a couple ways to make money from such an app. You could sell it on the iOS and Android stores. You could build it into a React Native app, or even just a simple web app wrapper.
从我的角度来看,有两种方法可从此类应用中获利。 您可以在iOS和Android商店中出售它。 您可以将其构建到React Native应用程序中,甚至只是一个简单的Web应用程序包装器。
Alternatively, you could display ads on screen. Users could pay to have those ads removed, but then you’d probably also need to think a bit about account logins and/or restoring purchases.
或者,您可以在屏幕上显示广告。 用户可以付费删除这些广告,但是您可能还需要考虑一些有关帐户登录和/或恢复购买的信息。
Either way, it’s a practical thing you can build; in less than 200 lines of code. Take things a step further and add directions for each point of interest. Perhaps even allow users to filter points of interest so that only the closes 3 are shown…
无论哪种方式,这都是您可以构建的实用工具。 少于200行代码。 更进一步,为每个兴趣点添加方向。 也许甚至允许用户过滤兴趣点,以便仅显示关闭3。
WRLD has most of the tools you need.
WRLD提供了您需要的大多数工具。
翻译自: https://www.sitepoint.com/build-seinfeld-bathroom-finder/


 6313
6313

 被折叠的 条评论
为什么被折叠?
被折叠的 条评论
为什么被折叠?
 到【灌水乐园】发言


