


wordpress入门主题
In WordPress we often have to stick with plain PHP when creating plugins. This leads to PHP and HTML code getting mixed up in a single page, which isn’t a good practice. Separation of concerns is a design principle that states that we should split up a program into different parts, namely the logic and the presentation. In this tutorial, we will be taking a look at one solution to this problem: WordPress MVC. It’s a plugin that adds MVC support to WordPress so we can write our plugins the MVC way.
在WordPress中,创建插件时,我们通常必须坚持使用纯PHP。 这导致PHP和HTML代码混在一个页面中,这不是一个好习惯。 关注点分离是一项设计原则,指出我们应将程序分为不同的部分,即逻辑和表示。 在本教程中,我们将研究解决此问题的一种解决方案:WordPress MVC。 这是一个向WordPress添加MVC支持的插件,因此我们可以以MVC方式编写插件。
什么是MVC? (What Is MVC?)
Before we move on, it’s important that we are all on the same page. If you already know what MVC is, feel free to skip to the next section.
在继续之前,重要的一点是我们都在同一个页面上。 如果您已经知道MVC是什么,请随时跳到下一部分。
Ok so what is MVC? MVC stands for Model View Controller. The Model represents the data that our application utilizes. It’s the part that does the talking to the database. The View deals with the presentation. It’s where we put in HTML code and basic presentation logic. Lastly there’s the Controller whose main job is to tie those two together. Examples include validating and sanitizing user input. It’s basically responsible for controlling the overall flow of the application.
好的,什么是MVC? MVC代表模型视图控制器。 该模型表示我们的应用程序利用的数据。 这是与数据库对话的部分。 视图处理演示文稿。 这是我们放入HTML代码和基本表示逻辑的地方。 最后,还有一个Controller,其主要工作是将两者捆绑在一起。 示例包括验证和清除用户输入。 它基本上负责控制应用程序的整体流程。
安装与设定 (Installation and Setup)
WP MVC is a plugin which we need to install in order to make MVC work with WordPress. You can download the plugin here and install it like you would usually install a plugin in WordPress. Once that’s done, login to WordPress and activate it from your plugins page.
WP MVC是一个插件,我们需要安装它才能使MVC与WordPress一起使用。 您可以在此处下载插件并进行安装,就像通常在WordPress中安装插件一样。 完成后,登录WordPress并从您的插件页面激活它。
以MVC方式构建插件 (Building a Plugin the MVC Way)
Before we move on, I’ll give you a brief overview of what we will be building in this tutorial. We will build a plugin that will list out all the anime that is created in the admin side of the website. Pretty much like what this site does. In the admin side, we will have an interface where we can add, list, edit or delete anime shows. In the public side, we will have them presented in a grid view in a specific page.
在继续之前,我将为您简要介绍本教程将要构建的内容。 我们将构建一个插件,该插件列出在网站管理员端创建的所有动漫。 就像这个网站一样。 在管理端,我们将有一个界面,可以在其中添加,列出,编辑或删除动漫节目。 在公共方面,我们将在特定页面的网格视图中显示它们。
Now we’re ready to build a new plugin. You can do that by navigating to the path where you installed the WP MVC plugin.
现在我们准备构建一个新插件。 您可以通过导航到WP MVC插件的安装路径来实现。
cd path/to/plugins/wp-mvcThen add execution permissions to the wpmvc file. This is the file that we will be using to generate a new plugin.
然后将执行权限添加到wpmvc文件。 这是我们将用于生成新插件的文件。
chmod +x wpmvcNext, we can now generate a new plugin. Execute the following command to do that.
接下来,我们现在可以生成一个新插件。 执行以下命令。
./wpmvc generate plugin AnimeListThis will create a new plugin under the wp-content/plugins directory of your WordPress installation. For me, it created an anime-list directory. Open that directory and then open the anime_list_loader.php file. This file contains the functions that will get executed upon activating or deactivating the plugin. As we will need to save a lot of custom data, we will have to create a custom table instead of using the options API to store things in the database. To do that, we have to add the code that will create the new table upon plugin activation. Add the following code inside the activate method.
这将在WordPress安装的wp-content/plugins目录下创建一个新插件。 对我来说,它创建了一个anime-list目录。 打开该目录,然后打开anime_list_loader.php文件。 该文件包含将在激活或停用插件后执行的功能。 因为我们将需要保存大量的自定义数据,所以我们将不得不创建一个自定义表,而不是使用options API将事物存储在数据库中。 为此,我们必须添加在激活插件后将创建新表的代码。 在activate方法内添加以下代码。
global $wpdb;

$sql = '
CREATE TABLE '. $wpdb->prefix . 'animelists (
  id int(11) NOT NULL auto_increment,
  title varchar(255) NOT NULL,
  poster varchar(255) NOT NULL,
  plot TEXT NOT NULL,
  genres TEXT default NULL,
  PRIMARY KEY  (id)
)';

dbDelta($sql);
In the code above, we are creating a table which has the id, title, poster, plot and genres field using a raw SQL query. The dbDelta function is then used to execute the SQL query.
在上面的代码中,我们正在使用原始SQL查询创建一个包含id,title,poster,plot和genres字段的表。 然后,使用dbDelta函数执行SQL查询。
Next, under the deactivate method, we have to clean up our mess. The code below removes the table from the WordPress database.
接下来,在deactivate方法下,我们必须清理混乱。 下面的代码从WordPress数据库中删除该表。
require_once ABSPATH.'wp-admin/includes/upgrade.php';

global $wpdb;

$sql = 'DROP TABLE ' . $wpdb->prefix . 'anime_lists';
$wpdb->query($sql);
Normally this isn’t the way you would like to do it. Some users might still need the data that your plugin has acquired over time. Even if they deactivate your plugin. But to keep things simple, we won’t handle that here.
通常,这不是您想要的方式。 某些用户可能仍需要您的插件随时间获取的数据。 即使他们停用了您的插件。 但是为了简单起见,我们不会在这里处理。
Now is a good time to activate your new plugin from the WordPress admin page. If everything worked correctly, that should have created a wp_anime_lists table in your WordPress database.
现在是时候从WordPress管理页面激活您的新插件了。 如果一切正常,那应该已经在WordPress数据库中创建了wp_anime_lists表。
Next, execute the following command:
接下来,执行以下命令:
./wpmvc generate scaffold AnimeList AnimeListThe command above generates the views, controllers and model for the model that you specify. The first AnimeList is the name of the plugin and the second one is the name of the model. Note that wpmvc uses a naming convention here. A model should always be in singular form and the table is plural form. And every capital letter in the name of the model means that it should be separated with underscores. The name of the model should be based on the name of the table. So using the rules above, if the name of the table is anime_lists, the model should be named AnimeList. Underscores are turned into CamelCasing and plural is converted to singular form.
上面的命令为您指定的模型生成视图,控制器和模型。 第一个AnimeList是插件的名称,第二个是模型的名称。 请注意,wpmvc在此处使用命名约定。 模型应始终为单数形式,表格为复数形式。 该模型名称中的每个大写字母表示应使用下划线将其分隔。 模型的名称应基于表的名称。 因此,使用上述规则,如果表的名称是anime_lists ,则模型应命名为AnimeList 。 下划线变为CamelCasing,复数形式转换为单数形式。
Next, open up the add.php file and edit.php under the app/views/admin/anime_lists/ and add the following code:
接下来,打开app/views/admin/anime_lists/下的add.php文件和edit.php并添加以下代码:
<h2>Add Anime List</h2>

<?php echo $this->form->create($model->name); ?>
<?php echo $this->form->input('title'); ?>
<?php echo $this->form->input('poster'); ?>
<?php echo $this->form->input('plot'); ?>
<?php echo $this->form->input('genres'); ?>
<?php echo $this->form->input('producer'); ?>
<?php echo $this->form->end('Add'); ?>
On the edit.php file:
在edit.php文件上:
<h2>Edit Anime List</h2>

<?php echo $this->form->create($model->name); ?>
<?php echo $this->form->input('title'); ?>
<?php echo $this->form->input('poster'); ?>
<?php echo $this->form->input('plot'); ?>
<?php echo $this->form->input('genres'); ?>
<?php echo $this->form->input('producer'); ?>
<?php echo $this->form->end('Update'); ?>
What we did above was to create the forms for adding new anime shows and editing existing one’s. This utilizes the form helpers which is built-in to wpmvc. To break it down, first we create a new form and then supply the name of the model as its argument. In this case the name of the model is AnimeList.
我们在上面所做的是创建用于添加新的动漫节目和编辑现有动画节目的表格。 这利用了内置在wpmvc中的表单助手 。 要分解它,首先我们创建一个新表单,然后提供模型名称作为其参数。 在这种情况下,模型的名称为AnimeList 。
<?php echo $this->form->create($model->name); ?>Next, we output each of the columns that we have added in the table using the input method. This method takes up the name of the field as its first argument. By default, wpmvc determines what type of field it would output by checking the data type. So if the data type is varchar, it will output a text input. If the data type is text it will output a textarea and so on.
接下来,我们使用input法输出在表中添加的每个列。 此方法将字段名称作为其第一个参数。 默认情况下,wpmvc通过检查数据类型来确定将输出的字段类型。 因此,如果数据类型为varchar ,它将输出文本输入。 如果数据类型是text ,则将输出文本区域,依此类推。
<?php echo $this->form->input('title'); ?>
<?php echo $this->form->input('poster'); ?>
<?php echo $this->form->input('plot'); ?>
<?php echo $this->form->input('genres'); ?>
<?php echo $this->form->input('producer'); ?>
If you want to use another input type, you can specify an array containing the type of input as a second argument:
如果要使用另一种输入类型,则可以指定一个包含输入类型的数组作为第二个参数:
<?php echo $this->form->input('is_awesome', array('type' => 'checkbox')); ?>Finally, we close off the form using the end method. This takes up the label of the button as its argument.
最后,我们使用end方法关闭表单。 这将按钮的标签作为其参数。
<?php echo $this->form->end('Add'); ?>At this point we can now add a few anime shows. WP MVC automatically handles adding a new menu on the WordPress dashboard named after the name of the model. In this case the name of the new menu should be ‘Anime Lists’. From there you can start adding new items using the ‘add new’ sub-menu.
此时,我们现在可以添加一些动漫节目。 WP MVC自动处理在WordPress仪表板上添加以模型名称命名的新菜单。 在这种情况下,新菜单的名称应为“动漫列表”。 在这里,您可以使用“添加新”子菜单开始添加新项目。
Next we need to update the code which lists the existing items. You can find it on the following path:
接下来,我们需要更新列出现有项目的代码。 您可以在以下路径中找到它:
app/controllers/admin/admin_anime_lists_controller.phpBy default, it contains the following code:
默认情况下,它包含以下代码:
<?php

class AdminAnimeListsController extends MvcAdminController {

    var $default_columns = array('id', 'name');

}

?>
This results to an error returned for every row in the table since we don’t have a name field in the anime_lists table. To solve this issue, all we have to do is use the fields that we have on the wp_anime_lists table:
由于在anime_lists表中没有name字段,因此anime_lists对表中的每一行返回错误。 要解决此问题,我们要做的就是使用wp_anime_lists表上的wp_anime_lists :
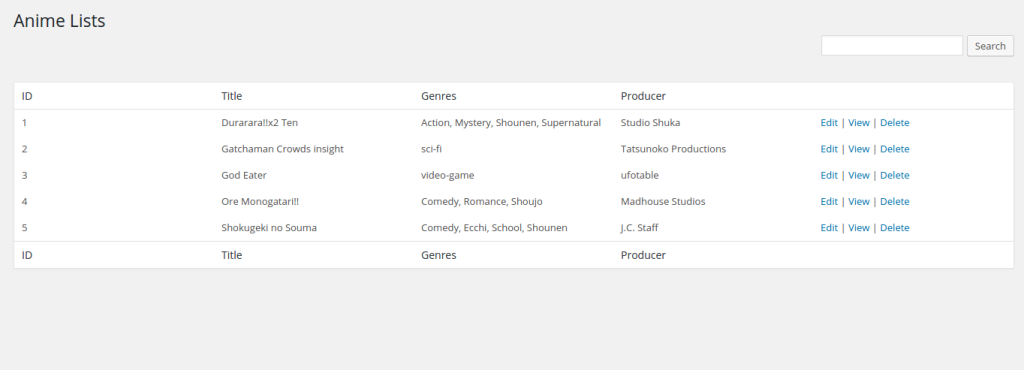
var $default_columns = array('id', 'title', 'genres', 'producer');Once you’ve updated the file, the result should now look like this:
更新文件后,结果应如下所示:
Now we can proceed with the public facing side of the website.
现在,我们可以着眼于网站的面向公众的一面。
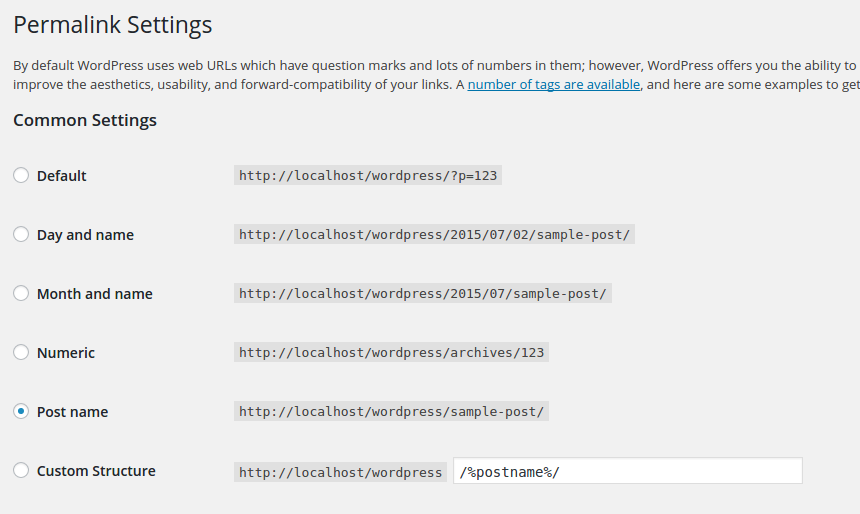
Before we move on, it’s important to know that every time we use the command line to generate models, controllers and views. WP MVC also assigns a new page for that model. So for the AnimeLists model, it creates the anime_lists page. Don’t forget to enable mod_rewrite in your Apache configuration, add the WordPress .htaccess file, and set the permalinks settings to use post name.
在继续之前,重要的是要知道,每次使用命令行生成模型,控制器和视图时,这一点很重要。 WP MVC还为该模型分配了一个新页面。 因此,对于AnimeLists模型,它将创建anime_lists页面。 不要忘记在Apache配置中启用mod_rewrite ,添加WordPress .htaccess文件,并设置永久链接设置以使用帖子名称。
For your convenience, here’s the .htaccess file that I’m using:
为了您的方便,这是我正在使用的.htaccess文件:
# BEGIN WordPress
<IfModule mod_rewrite.c>
RewriteEngine On
RewriteBase /WordPress/
RewriteRule ^index\.php$ - [L]
RewriteCond %{REQUEST_FILENAME} !-f
RewriteCond %{REQUEST_FILENAME} !-d
RewriteRule . /WordPress/index.php [L]
</IfModule>

# END WordPress
Once you’re done with that, you can now check if you can access the page. By default, you wouldn’t see anything in there. That’s what were going to work on.
完成此操作后,现在可以检查是否可以访问该页面。 默认情况下,您将看不到任何内容。 那就是要进行的工作。
http://localhost/WordPress/anime_lists/First, open the app/controllers/anime_lists_controller.php file. This is the controller for the anime_lists page. By default, it should contain the following code:
首先,打开app/controllers/anime_lists_controller.php文件。 这是anime_lists页面的控制器。 默认情况下,它应包含以下代码:
<?php

class AnimeListsController extends MvcPublicController {

}

?>
This is fine if you want to stick with the defaults that are added from the base public controller (MvcPublicController). But if you want to customize things a little bit, you have to override the index method with the following:
如果您要坚持使用从基本公共控制器( MvcPublicController )添加的默认值, MvcPublicController 。 但是,如果要自定义一些内容,则必须使用以下方法覆盖index方法:
public function index() {

    $params = $this->params;
    $params['per_page'] = 6;
    $collection = $this->model->paginate($params);
    $this->set('objects', $collection['objects']);
    $this->set_pagination($collection);

}
What we’re doing above is to get the default parameters supplied in the base controller by using $this->params. We then assign it to a variable so that we can override the default values. By default, the controller selects 10 items from the database per page. If I only want to select 6, I can do that by setting the per_page parameter to 6:
上面我们要做的是使用$this->params获取基本控制器中提供的默认参数。 然后,我们将其分配给变量,以便我们可以覆盖默认值。 默认情况下,控制器每页从数据库中选择10个项目。 如果我只想选择6,则可以通过将per_page参数设置为6来实现:
$params['per_page'] = 6;That’s really all we need to customize. The rest of the code just creates a collection using the paginate method in the model. This collection is then used to pass the ‘objects’ (anime shows), and then set the pagination into the view.
这实际上是我们需要自定义的全部。 其余代码仅使用模型中的paginate方法创建一个集合。 然后,此集合用于传递“对象”(动画显示),然后将分页设置为视图。
$collection = $this->model->paginate($params);
$this->set('objects', $collection['objects']);
$this->set_pagination($collection);
Now open up the view that’s responsible for rendering the anime_lists page. It’s at app/views/anime_lists/index.php. Once opened, add the following code:
现在打开负责渲染anime_lists页面的视图。 它在app/views/anime_lists/index.php 。 打开后,添加以下代码:
<h2>Anime Lists</h2>

<div id="anime-shows">
    <?php foreach ($objects as $object): ?>

        <?php
        $this->render_view('_item', array('locals' => array('object' => $object)));
        ?>

    <?php endforeach; ?>
</div>

<div id="pagination">
    <?php echo $this->pagination(); ?>
</div>
This loops through all the objects that we have passed earlier from the controller. Inside the loop, we render the view which displays the details for each object. The render_view method takes up the name of the view as its first argument, and the data that we want to pass in as the second.
这将遍历我们之前从控制器传递的所有对象。 在循环内部,我们渲染视图,该视图显示每个对象的详细信息。 render_view方法将视图名称作为其第一个参数,将要传递的数据作为第二个参数。
<?php
$this->render_view('_item', array('locals' => array('object' => $object)));
?>
Finally, we output the pagination.
最后,我们输出分页。
<?php echo $this->pagination(); ?>Next, open up the _item.php file on the same directory and then add the following code:
接下来,在同一目录中打开_item.php文件,然后添加以下代码:
<div class="anime-show">
    <div class="anime-poster-container">
        <a href="<?php echo mvc_public_url(array('controller' => 'anime_lists', 'id' => $object->id)); ?>">
            <img src="<?php echo $object->poster; ?>" class="anime-poster">
        </a>
    </div>
    <div>
        <strong><?php echo $object->title; ?></strong>
    </div>
    <div>
        <?php echo $object->producer; ?>
    </div>
    <div class="genre">
        <small><?php echo $object->genres; ?></small>
    </div>
</div>
This shows the details for each object. As you can see from the above code, we can directly access each of the fields from the $object variable. We’re also using a helper function called the mvc_public_url to generate a URL which points to the individual pages for each object. This method takes up an array which contains the name of the controller and the ID of the object.
这显示了每个对象的详细信息。 从上面的代码中可以看到,我们可以直接从$object变量访问每个字段。 我们还使用了一个名为mvc_public_url的帮助器函数来生成一个URL,该URL指向每个对象的各个页面。 此方法占用一个数组,其中包含控制器的名称和对象的ID。
<?php
echo mvc_public_url(array('controller' => 'anime_lists', 'id' => $object->id));
?>
This generates a URL similar to the following:
这将生成类似于以下内容的URL:
http://localhost/WordPress/anime_lists/2/Next, we also have to update the individual object page. To do that, open up the show.php file. Still on the same directory.
接下来,我们还必须更新单个对象页面。 为此,请打开show.php文件。 仍在同一目录中。
<p>
<?php
echo $this->html->link('← All Anime Lists', array('controller' => 'anime_lists'));
?>
</p>
<div id="anime-show">
<div class="anime-poster-container">
<img src="<?php echo $object->poster; ?>" class="anime-poster">
</div>
<div>
<strong><?php echo $object->title; ?></strong>
</div>
<div>
<?php echo $object->producer; ?>
</div>
<div class="genre">
<small><?php echo $object->genres; ?></small>
</div>
<div class="plot">
    <small><?php echo $object->plot; ?></small>
</div>
</div>Not much difference here. It’s basically the same as the output in the previous view. Only this time we also output the plot.
这里没有太大的区别。 它与上一个视图中的输出基本相同。 仅这次,我们还输出绘图。
<div class="plot">
<small><?php echo $object->plot; ?></small>
</div>We are also adding a link to the main anime_lists page:
我们还将在anime_lists主页上添加一个链接:
<?php
echo $this->html->link('← All Anime Lists', array('controller' => 'anime_lists'));
?>To make things a little bit pleasing to the eye. Let’s add some css for the public facing side of the website. You can add stylesheets on the app/public/css directory. Just name the file anime-lists.css and add the following code:
使事情有点令人眼前一亮。 让我们为面向公众的网站添加一些CSS。 您可以在app/public/css目录中添加样式表。 只需将文件命名为anime-lists.css并添加以下代码即可:
#anime-shows {
    overflow: auto;
    padding: 20px;
}

.anime-show {
    float: left;
    width: 227px;
    margin: 10px;
    height: 470px;
    font-size: 15px;
}

.anime-poster-container {
    height: 332px;
    overflow: hidden;
}

#anime-show {
    padding: 20px;
    width: 500px;
}

.plot {
    margin-top: 10px;
    font-size: 16px;
}

.genre {
    color: gray;
}

#pagination {
    padding: 20px;
}

#pagination .page-numbers {
    padding: 0 10px;
}
In order to use the stylesheet that we’ve just created. Create a bootstrap.php file under the app/config directory of your plugin. Then we add the following code:
为了使用我们刚刚创建的样式表。 在插件的app/config目录下创建bootstrap.php文件。 然后我们添加以下代码:
<?php
add_action( 'wp_enqueue_scripts', 'animelists_enqueue_scripts' );

function animelists_enqueue_scripts($options) {
    wp_register_style('animelists_style', mvc_css_url('anime-list', 'anime-lists.css'));
    wp_enqueue_style('animelists_style');
}
The code above should look familiar. It’s how we usually add custom scripts and styles to WordPress. Only this time we’re using another helper function called mvc_css_url. This function takes up the machine-friendly name of the plugin (Hint: copy the folder name of your plugin) and the file name of the stylesheet.
上面的代码应该看起来很熟悉。 这就是我们通常向WordPress添加自定义脚本和样式的方式。 仅这次,我们使用另一个名为mvc_css_url帮助器函数。 该函数占用了插件的机器友好名称(提示:复制插件的文件夹名称)和样式表的文件名。
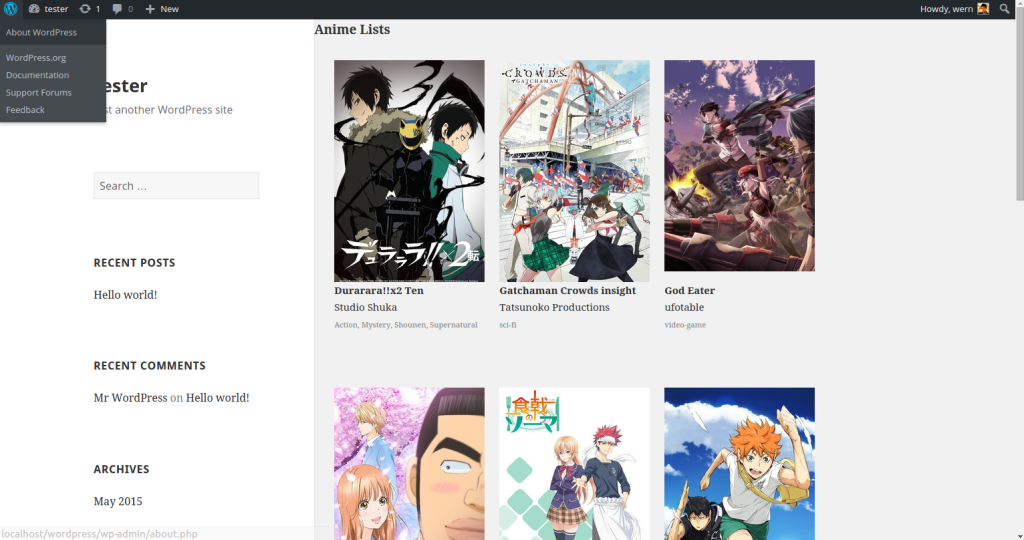
Once you’re done with that, and you’ve added some items in the admin side. The final output should look like this:
完成后,您已在管理端添加了一些项目。 最终输出应如下所示:
You can check out the code used in this plugin on this GitHub Repo.
您可以在此GitHub Repo上查看此插件中使用的代码。
结论 (Conclusion)
That’s it! In this tutorial you have learned about how to implement MVC in WordPress by creating a plugin which utilizes it. We have only scratched the surface in this tutorial. Be sure to check out the WP MVC documentation to learn more. How about you? Do you know or use any other MVC solutions for WordPress? Let us know in the comments.
而已! 在本教程中,您学习了如何通过创建一个利用WordPress的MVC来实现该功能。 在本教程中,我们仅涉及了初级内容。 请务必查看WP MVC文档以了解更多信息。 你呢? 您是否知道或使用其他任何WordPress MVC解决方案? 让我们在评论中知道。
翻译自: https://www.sitepoint.com/getting-started-with-wordpress-mvc/
wordpress入门主题


 648
648

 被折叠的 条评论
为什么被折叠?
被折叠的 条评论
为什么被折叠?
 到【灌水乐园】发言


