


wordpress响应慢
In this series, we’ve been building out the functionality needed to create amazing, real-time graphs. Up to this point we’ve done the following:
在本系列中,我们一直在构建创建惊人的实时图形所需的功能。 到目前为止,我们已经完成了以下工作:
第1部分 (Part 1)
- We loaded a base plugin that loads our graph libraries 我们加载了一个基础插件来加载我们的图形库
- We uploaded a blank PHP file via FTP 我们通过FTP上传了一个空白PHP文件
- We told WP how to find our custom PHP files 我们告诉WP如何找到我们的自定义PHP文件
- We familiarized ourselves with the admin functions for beginners 我们熟悉了初学者的管理功能
第2部分 (Part 2)
- We created a blank post with a placeholder shortcode 我们使用占位符短代码创建了一个空白帖子
- We told WordPress about your shortcode 我们告诉WordPress您的简码
- We created a database table for collecting data 我们创建了一个数据库表来收集数据
In this part of the series, will create a form to start collecting data. If you already have a lot of data in your database, you still may want to review this part simply to skip ahead to the next part of the series, where we query a database and format the data for our graph plugin.
在本系列的这一部分中,将创建一个表单以开始收集数据。 如果您的数据库中已经有很多数据,您可能仍想复习此部分,只是跳到本系列的下一部分,在该部分我们查询数据库并为图形插件格式化数据。
For beginners, this article will be an excellent resource for you as you start to pump data into your database. I’m sticking with a simple workout tracker for educational purposes, but this can be adapted to anything.
对于初学者来说,当您开始将数据泵入数据库时,本文将是您的绝妙资源。 我坚持使用简单的健身追踪器来进行教学,但这可以适应任何情况。
步骤1:为俯卧撑创建表格 (Step 1: Create a Form for Pushups)
Now, you might be a bit shaky after that last step if you’ve never worked with phpMyAdmin or any other database before. Well, it’s to be expected. But, you have to push yourself and keep learning! As of now, you’ve got nothing but a blank shortcode and an empty database table. But, you’re so close to having those real-time graphs and you don’t even know it! So, let’s knock out a simple form for creating a pushups workout record.
现在,如果您以前从未使用过phpMyAdmin或任何其他数据库,那么在完成最后一步后您可能会有些sha。 好吧,这是意料之中的。 但是,您必须不断努力,不断学习! 到目前为止,您什么都没有,只有空白的简码和空的数据库表。 但是,您非常接近拥有这些实时图表,并且您甚至都不知道! 因此,让我们敲打一个简单的表格来创建俯卧撑锻炼记录。
Open up that custom-workout.php in “Plugins” > “Editor.” We’re going to add some functionality to our pushups function. If you’ve been following along, right now we only have one statement within our pushups function. I want you to replace all the contents of the file with this code:
在“插件”>“编辑器”中打开该custom-workout.php。 我们将为俯卧撑功能添加一些功能。 如果您一直在遵循,那么现在我们的pushups函数中只有一条语句。 我希望您用以下代码替换文件的所有内容:
[sourcecode language=”php”]
[源代码语言=“ php”]
<?php
<?php
function pushups (){
功能俯卧撑(){
get_currentuserinfo(); $current_user = wp_get_current_user(); $wpuser = $current_user->user_login; $currentpage = $_SERVER[‘REQUEST_URI’];
get_currentuserinfo(); $ current_user = wp_get_current_user(); $ wpuser = $ current_user-> user_login; $ currentpage = $ _SERVER ['REQUEST_URI'];
echo ‘<a href="’. wp_login_url() . ‘">Login</a> to start adding pushups!’; echo ‘<p><a href="’ . home_url() . ‘/wp-register.php">Register</a> if you have not already.</p>’; echo ‘<form action="’ . plugins_url( $path ) . ‘/flot-for-wp/flot/add_pushups.php" method="get" id="add_pushups">’; echo ‘<label>Number of Pushups: </label><input type="text" name="pushups_count" /><br />’; echo ‘<label>Date of Workout: </label><input type="date" name="pushups_date" /><br />’; echo ‘<input type="hidden" value="’ . $wpuser . ‘" name="pushups_wpuser" />’; echo ‘<input type="hidden" value="’ . $currentpage . ‘" name="current_page" />’; echo ‘<input type="submit" value="Add Pushups" form="add_pushups" /></form><hr />’;
echo'<a href="'.wp_login_url()。'">登录</a>开始添加俯卧撑! 回声'<p> <ahref="'。home_url()。'/wp-register.php">注册</a>(如果尚未注册)。</ p>' 回声'<form action =“'。plugins_url($ path)。'/flot-for-wp/flot/add_pushups.php” method =“ get” id =“ add_pushups”>'; echo'<label>俯卧撑数:</ label> <input type =“ text” name =“ pushups_count” /> <br />'; echo'<label>锻炼日期:</ label> <input type =“ date” name =“ pushups_date” /> <br />'; echo'<input type =“ hidden” value =“'。$ wpuser。'” name =“ pushups_wpuser” />'; echo'<input type =“ hidden” value =“'。$ currentpage。'” name =“ current_page” />'; 回声'<input type =“ submit” value =“添加俯卧撑” form =“ add_pushups” /> </ form> <hr />';
// Our shortcode that you place in posts = [pushups_sc] add_shortcode( ‘pushups_sc’, ‘pushups’ );
//您在帖子中放置的我们的简码= [pushups_sc] add_shortcode('pushups_sc','pushups');
?>
?>
[/sourcecode]
[/源代码]
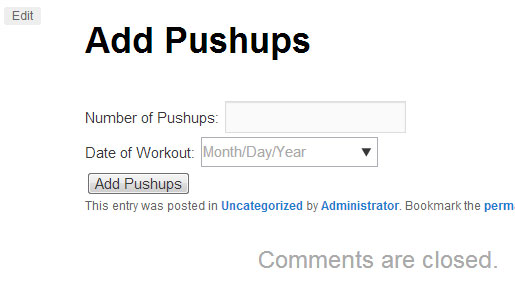
Because we’re working with PHP, I’m using echo to print the form HTML to the page. All we’ve done is add a form to the “Add Pushups” post that we created in the last part of this series, where the post only contains the shortcode [pushups_sc] in the body. Go to your WordPress site and navigate to your “Add Pushups” post. Here’s what mine looks like:
因为我们正在使用PHP,所以我使用echo将HTML表单打印到页面上。 我们要做的就是在本系列最后一部分中创建的“ Add Pushups”帖子中添加一个表单,该帖子中的正文中仅包含简码[pushups_sc]。 转到您的WordPress网站并导航至“添加俯卧撑”帖子。 这是我的样子:
Note: You may have to go to “Settings” > “WP-Cache,” delete the cache, and disable it to see any changes. No matter how much you refresh the dang page, if your WP-Cache is on, you won’t see changes for a very, very long time.
注意:您可能必须转到“设置”>“ WP-缓存”,删除缓存,然后禁用它以查看任何更改。 无论刷新页面多少,如果WP-Cache处于打开状态,都不会在很长一段时间内看到更改。
We now have a form! Go ahead and submit some information. It won’t work, but it’s useful to see how this form sends data to the next step of the process.
我们现在有一个表格! 继续并提交一些信息。 它不会起作用,但是查看此表单如何将数据发送到流程的下一步非常有用。
And, I know it’s not pretty yet. You can always go back and stylize the forms to your satisfaction. Right now, we’re learning the hard stuff, so let’s continue with the form processing.
而且,我知道还不是很漂亮。 您可以随时返回并样式化表格,以使您满意。 现在,我们正在学习困难的知识,因此让我们继续进行表单处理。
步骤2:为数据库信息创建脚本 (Step 2: Create a Script for Database Info)
One best practice that I like to incorporate into my plugins is to separate my database credentials from my scripts. For one, it makes it a lot faster if you have dozens of files that access your database. Normally, you might put your database credentials in every file. But, you can always use PHP’s include() function to access your database info.
我希望将其合并到插件中的一种最佳做法是将数据库凭据与脚本分开。 首先,它使得它,如果你有几十个访问数据库文件的速度快了很多 。 通常,您可以将数据库凭据放入每个文件中。 但是,您始终可以使用PHP的include()函数来访问数据库信息。
Create a new, blank file called connect_to_db.php. Paste this code and update what’s in the brackets to be your own database credentials. You may have to log into your domain hosting provider and get this information:
创建一个新的空白文件,名为connect_to_db.php。 粘贴此代码,并将括号中的内容更新为您自己的数据库凭据。 您可能必须登录到域名托管服务提供商并获取以下信息:
[sourcecode language=”php”]
[源代码语言=“ php”]
<?php
<?php
/* Put your db connect details right here so you don’t have to keep updating them all the time. This also makes it a lot faster if you want to use all your settings on a different site. */
/ *将您的数据库连接详细信息放在此处,因此您不必一直更新它们。 如果要在其他站点上使用所有设置,这也可以使其更快。 * /
function connect_to_db (){ $username="{username}"; $password="{password}"; $hostname ="{hostname}"; $dbname = "{database_name}";
函数connect_to_db(){$ username =“ {username}”; $ password =“ {password}”; $ hostname =“ {hostname}”; $ dbname =“ {数据库名称}”;
mysql_connect ($hostname,$username,$password) or die (mysql_error()); mysql_select_db ($dbname);
mysql_connect($ hostname,$ username,$ password)或die(mysql_error()); mysql_select_db($ dbname);
}
}
?>
?>
[/sourcecode]
[/源代码]
What we have here is a simple function that you can call at any time to create a database connection. We’ll need to do this to send data and retrieve data from that table we created earlier. Upload this file to the plugins/flot-for-wp/flot folder, and you’re set.
我们这里有一个简单的函数,您可以随时调用它来创建数据库连接。 我们需要执行此操作以发送数据并从我们先前创建的表中检索数据。 将此文件上传到plugins / flot-for-wp / flot文件夹,即可设置好。
步骤3:添加用于处理表单数据PHP文件 (Step 3: Add a PHP file for Processing the Form Data)
If you tried to submit your form, you probably got a 404 error, but in your browser bar, you had a bunch of extra information. That’s the information we’ll be using to update the pushups table that you created in your database in Step 1. To make these updates, we need a function for converting the data into something your database can digest.
如果您尝试提交表单,则可能会遇到404错误,但是在浏览器栏中,您有很多额外的信息。 这就是我们将用来更新在步骤1中在数据库中创建的pushup表的信息。要进行这些更新,我们需要一个函数来将数据转换为数据库可以消化的内容。
Create another new, blank PHP file. Paste the following code and name it add_pushups.php
创建另一个新的空白PHP文件。 粘贴以下代码并将其命名为add_pushups.php
[sourcecode language=”php”]
[源代码语言=“ php”]
<?php // Get the db connection include ("connect_to_db.php"); connect_to_db();
<?php //获取数据库连接包括(“ connect_to_db.php”); connect_to_db();
$pushups_count = $_GET[‘pushups_count’]; $pushups_date = strtotime($_GET[‘pushups_date’])*1000; //Converts to Unix Timestamp $pushups_wpuser = $_GET[‘pushups_wpuser’]; $currentpage = $_GET[‘current_page’];
$ pushups_count = $ _GET ['pushups_count']; $ pushups_date = strtotime($ _ GET ['pushups_date'])* 1000; //转换为Unix时间戳$ pushups_wpuser = $ _GET ['pushups_wpuser']; $ currentpage = $ _GET ['current_page'];
$query = "INSERT INTO pushups (pushups_count, pushups_date, pushups_wpuser, active) VALUES (‘$pushups_count’,’$pushups_date’,’$pushups_wpuser’,1)"; mysql_query($query);
$ query =“将俯卧撑(pushups_count,pushups_date,pushups_wpuser,活动)插入VALUES('$ pushups_count','$ pushups_date','$ pushups_wpuser',1)”; mysql_query($ query);
/* If you’re not getting the results you want, comment out header("Location:$currentpage" ); below and uncomment out the echo code below. This will display the data sent to the form. If all the fields have data, then you likely have a database connection issue.
/ *如果没有得到想要的结果,请注释掉header(“ Location:$ currentpage”); 并取消注释下面的回显代码。 这将显示发送到表单的数据。 如果所有字段都有数据,那么您可能有数据库连接问题。
echo ‘<p>Query: ‘ . $query . ‘</p>’; echo ‘<p>Pushups: ‘ . $pushups_count . ‘</p>’; echo ‘<p>Date: ‘ . $pushups_date . ‘</p>’; echo ‘<p>WP USer: ‘ . $pushups_wpuser . ‘</p>’; echo ‘<p>URL: ‘ . $current_page . ‘</p>’; */ header("Location:$currentpage" );
回声'<p>查询:'。 $ query。 '</ p>'; echo'<p> Pushups:'。 $ pushups_count。 '</ p>'; 回声'<p> Date:'。 $ pushups_date。 '</ p>'; 回声'<p> WP USer:'。 $ pushups_wpuser。 '</ p>'; 回声'<p> URL:'。 $ current_page。 '</ p>'; * / header(“ Location:$ currentpage”);
mysql_close(); ?>
mysql_close(); ?>
[/sourcecode]
[/源代码]
Okay, so there’s a lot going on here. If you’re brand new to MySQL, then this may be complete mumbo-jumbo, and that’s okay. You have to start somewhere.
好吧,所以这里有很多事情。 如果您是MySQL的新手,那么这可能是完整的Mumbo-jumbo,这没关系。 你必须从某个地方开始。
At the beginning of the file is where we use the connect_to_db.php file we created in step 3. Then, we GET all the information from our form. When users click “Submit,” the information in the form is “pasted” into the URL string. Using $_GET, we can then tell our add_pushups.php file what to do with this information.
在文件的开头,我们使用在步骤3中创建的connect_to_db.php文件。然后,从表单中获取所有信息。 当用户单击“提交”时,表单中的信息将“粘贴”到URL字符串中。 然后,使用$ _GET可以告诉我们的add_pushups.php文件如何处理此信息。
I also want to explain what’s going on with the $pushups_date. The graphing library that we will use in the next part of this tutorial requires that your time be in Unix timestamps. Don’t worry if you’re not familiar with these. I took care of the problem within the code.
我也想解释$ pushups_date发生了什么。 我们将在本教程的下一部分中使用的图形库要求您的时间在Unix时间戳中。 如果您不熟悉这些,请不要担心。 我处理了代码中的问题。
Upload this file using FTP to the plugins/flot-for-wp/flot folder. This is where we told your “Add Pushups” post to send the information.
使用FTP将该文件上传到plugins / flot-for-wp / flot文件夹。 在这里,我们告诉您的“添加俯卧撑”帖子发送信息。
检查工作 (Checking Your Work)
Go to your “Add Pushups” post on your site and enter some information. You should be automatically redirected to your “Add Pushups” page. If not, carefully comb through your code. I have some basic error checking code in place, but you will have to manually comment out the header line and uncomment the echo codes. You can’t keep both the header and the echo codes working at the same time or you’ll get a PHP error.
转到您网站上的“添加俯卧撑”帖子,然后输入一些信息。 您应该被自动重定向到“添加俯卧撑”页面。 如果不是,请仔细梳理您的代码。 我有一些基本的错误检查代码,但是您将不得不手动注释掉标题行并取消注释回显代码。 您不能同时使标头和回显代码同时工作,否则会出现PHP错误。
Most of your problems will be in either simple typos to the database connections section or your header location (at the bottom) syntax is off.
您的大多数问题都可能是在数据库连接部分出现简单的错字,或者是标题位置(在底部)语法已关闭。
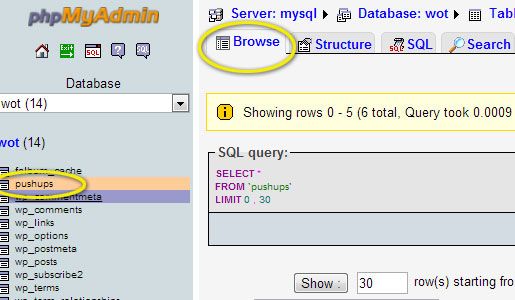
After you’ve successfully added some data to your site, log back into your phpMyAdmin account and cruise on over to the pushups table. Click the “Browse” tab and feast your eyes upon the data!
成功将一些数据添加到站点后,重新登录到phpMyAdmin帐户并浏览到俯卧撑表。 点击“浏览”标签,大饱眼福!
故障排除 (Troubleshooting)
No matter how methodically I code this, there are going to be plenty of folks that run into problems. Troubleshooting is a normal part of the process, and you just have to be patient as you work through errors. Frustration is to be expected; that’s how we learn.
无论我如何有条不紊地编写此代码,都会有很多人遇到问题。 故障排除是该过程的正常部分,您在处理错误时必须耐心等待。 预期会感到沮丧; 这就是我们学习的方式。
If you do run into errors, there are dozens of amazing sites you can reference from StackOverflow.com to just typing the error into Google. Don’t be afraid to ask questions in the comments below, as there are many talented developers here that can help, as well as myself.
如果您确实遇到错误,则可以从StackOverflow.com引用许多很棒的站点,只需将错误键入Google。 不要害怕在下面的评论中提问,因为这里有很多有才华的开发人员都可以提供帮助。
回顾 (Recap)
So, let’s take a look at what we’ve accomplished in this part of the tutorial. We’ve done a lot together! In fact, I think I’m getting to know you a bit too well. But hang in there — we’re about to get to the fun stuff.
因此,让我们来看看在本教程的这一部分中我们已经完成了什么。 我们在一起做得很多! 实际上,我想我对您了解得太好了。 但是请挂在那儿-我们将要去玩有趣的东西。
- We created a form using PHP to our Add Pushups post on our site. 我们使用PHP在我们网站上的Add Pushups帖子中创建了一个表单。
- Next, we created a script for connecting to our database. 接下来,我们创建了一个用于连接数据库的脚本。
- Then, we uploaded a PHP document that took the data from our form and inserted it into our database. 然后,我们上传了一个PHP文档,该文档从表单中获取数据并将其插入数据库中。
- Finally, we checked our results to see that our data is being collected in our database. 最后,我们检查了结果以查看我们的数据正在数据库中收集。
In the next part of this series, we will use a library of code already built to create a responsive graph tool that automagically extracts our pushup data into a big, beautiful graph. You’re getting so close, so hang in there with me!
在本系列的下一部分中,我们将使用已经建立的代码库来创建一个响应式图形工具,该工具自动将我们的下推数据提取到一个大而漂亮的图形中。 你离我很近,所以和我一起挂在那里!
翻译自: https://www.sitepoint.com/responsive-real-time-graphs-in-wordpress-form-processing/
wordpress响应慢


 731
731


 被折叠的 条评论
为什么被折叠?
被折叠的 条评论
为什么被折叠?
 到【灌水乐园】发言


