


photo: listentoreason
照片:listentoreason
An icon system can often become central design element in your web project. You can find many free or commercial icon sets on the web, and they are often included in major CSS frameworks (Bootstrap 3 Glyphicons is a perfect example).
图标系统通常可以成为Web项目中的核心设计元素。 您可以在网上找到许多免费的或商业的图标集,它们通常包含在主要CSS框架中( Bootstrap 3 Glyphicons是一个完美的示例)。
On some occasions, however, you may need more specific glyphs not included in a generic set. Or you may just want to better coordinate the design of your icons with the other design elements of your project. In these cases you’ll want to draw a new icon set from scratch.
但是,在某些情况下,您可能需要通用集合中未包含的更多特定字形 。 或者,您可能只想更好地协调图标的设计与项目的其他设计元素。 在这些情况下,您需要从头开始绘制一个新的图标集。
There are two widely-used methods to add a set of icons to your projects:
有两种广泛使用的方法可以向项目中添加图标集:
- Web font 网络字体
- SVG SVG
Today I’m going to cover web fonts. We’ll cover the use of SVG in another article.
今天,我将介绍网络字体。 我们将在另一篇文章中介绍SVG的用法。
Traditionally font creation had been known as a difficult and demanding task, but thankfully building icon font sets, has become considerably easier thanks to easy online tools such as IcoMoon, Fontastic, or Fontello. Each allows you to build a font by either ‘cherry-picking’ pre-built icons from public libraries, or by uploading and compiling SVG files you’ve prepared yourself.
传统上,字体创建被认为是一项艰巨而艰巨的任务,但幸运的是, 借助 IcoMoon , Fontastic或Fontello等简单的在线工具,构建图标字体集已变得相当容易。 每一种都允许您通过从公共库中“挑选”预先构建的图标来构建字体,或者通过上载和编译自己准备的SVG文件来构建字体。
自带的图标 (BYO Icons)
To build your own icon font, the first step is to design icons – we will use Illustrator for this task – and then save them as SVGs.
要构建自己的图标字体,第一步是设计图标-我们将使用Illustrator来完成此任务-然后将它们另存为SVG。
找到你的设计风格 (Find your design style)
Before you start drawing, you need to define style properties for your glyphs such as stroke sizes, grid proportions and so on.
在开始绘制之前,您需要为字形定义样式属性,例如笔触大小,网格比例等。
Begin by doing some readability test at different sizes and build a template you will use to draw all your glyphs. It’s no use designing finely-detailed icons that don’t work at lower resolutions.
首先进行一些不同大小的可读性测试,然后构建一个模板来绘制所有字形。 设计无法在较低分辨率下工作的精细图标是没有用的。
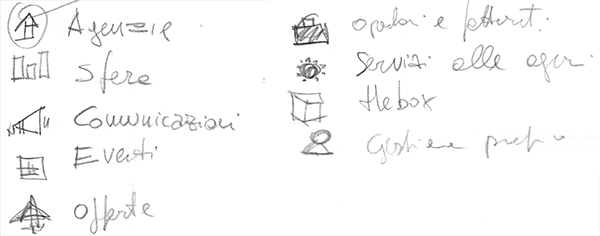
It’s also very useful to sketch your font before drawing, also a very rough sketch (like the one below) will help you to find ideas for all the symbols you need.
在绘制字体之前先绘制字体也是非常有用的,而且非常粗糙的草图(如下面的草图)将帮助您找到所需的所有符号的想法。
You can then to decide on a grid size for your glyphs. My tip is to not draw directly at your target size (for example 16x16px) or at very big sizes either. Instead I’ve found that a grid of 60-80px side is often good for me. Scaling up or down from this size is generally successful.
然后,您可以确定字形的网格大小。 我的提示是不要直接以您的目标尺寸(例如16x16px)或非常大的尺寸绘制。 取而代之的是,我发现60-80像素边的网格通常对我有利。 通常,从此大小扩展或缩小都是成功的。
Of course, this is not a ‘set-in-stone’ type rule: project needs and experience may change on a case by case basis.
当然,这不是“一成不变的”类型规则:项目的需求和经验可能会因案例而异。
For this article, I chose to draw my icons with a stroke of 8px, without fill and set inside a grid of 64x64px.
在本文中,我选择以8px的笔触绘制图标,而无需填充,并在64x64px的网格内进行设置。
开始绘图 (Starting drawing)
Illustrator artboards are very useful for this job: you can draw each glyph in a different artboard, keeping each in a single file. The artboards can be rearranged, renamed and can be exported as standalone SVG files (which is precisely what we need for IcoMoon).
Illustrator画板对于此工作非常有用:您可以在不同的画板上绘制每个字形,并将每个字形保存在单个文件中。 这些画板可以重新排列,重命名,并可以作为独立的SVG文件导出(这正是IcoMoon所需要的)。
Each artboard can also have independent axis coordinates, that will be very valuable for objects alignment, as we will see later.
每个画板还可以具有独立的轴坐标,这对于对象对齐非常有用,我们将在后面看到。
We can now start creating a new 64x64px Illustrator document:
现在,我们可以开始创建一个新的64x64px Illustrator文档:
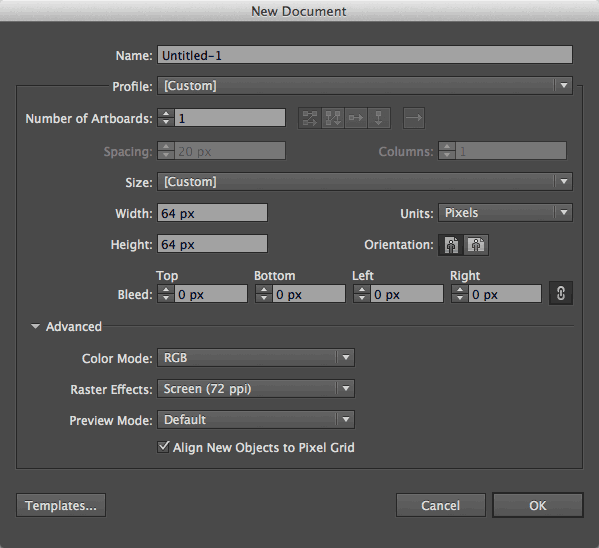
Note that you can start create all the artboards you need using the Number of Artboards option: I prefer to add artboards as I need them, but there is no reason why you can’t create all your artboards first.
请注意,您可以使用“ 画板数量”选项开始创建所需的所有画板 :我更喜欢根据需要添加画板,但是没有理由您不能首先创建所有画板。
Now we can set up the grid. We want it to start from each artboard origin (the top-left corner) and to divide the artboard into a 8×8 checkerboard. Before doing that, let’s take a quick look at the way the Illustrator coordinates system works.
现在我们可以建立网格了。 我们希望它从每个画板原点(左上角)开始,并将画板划分为8×8棋盘格。 在此之前,让我们快速看一下Illustrator坐标系的工作方式。
Illustrator工作区 (Illustrator workspace)
Illustrator workspace is composed of a canvas that contains one or more artboards.
Illustrator工作区由包含一个或多个画板的画布组成。
Artboards are placed on the canvas starting from a point called the Global ruler origin. In addition every artboard has its own origin point and rulers as well.
将画板从称为“ 全局标尺原点”的点开始放置在画布上。 此外,每个画板都有自己的起点和标尺。
When you’re positioning new artboards using the Artboard tool, you will always use the global ruler. In almost all other cases, you will use the artboard ruler according to View → Rulers → Change to Artboard (or Global) Ruler option.
使用Artboard工具定位新的Artboard时 ,将始终使用全局标尺。 在几乎所有其他情况下,您将根据视图 → 标尺 → 更改为画板(或全局)标尺选项来使用画板标尺 。
If you are using the Global ruler, every object you draw on any artboard is drawn in relation to that single origin point (i.e. the Global ruler origin). Otherwise coordinates refer to the origins of the artboard which contains it.
如果使用全局标尺,则在任何画板上绘制的每个对象都是相对于该单个原点(即全局标尺origin )绘制的。 否则,坐标是指包含它的画板的原点。
In short, using the Artboard ruler system:
简而言之,使用Artboard标尺系统:
Artboards are placed in the canvas according to the Global ruler origin
根据全局标尺的原点将画板放置在画布中
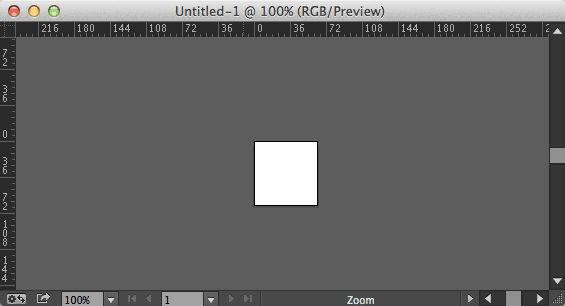
The objects we draw are placed in an artboard according to the Artboard ruler origin (in the screenshot below, you can see that the two squares have the same coordinates values even if they are placed in two different artboards).
我们绘制的对象根据Artboard标尺的原点放置在画板上 (在下面的屏幕快照中,即使将两个正方形放置在两个不同的画板上,您也可以看到两个正方形具有相同的坐标值)。
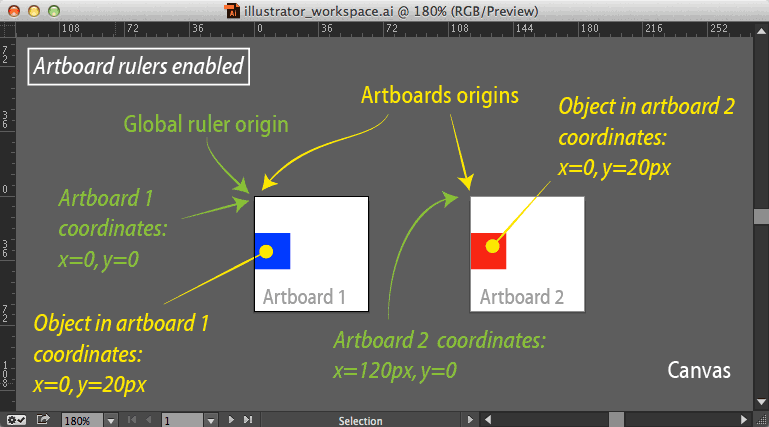
For this job, we will use the Artboard ruler, since it is more suitable for glyphs alignment.
对于这项工作,我们将使用Artboard标尺,因为它更适合字形对齐。
设置网格 (Setting up the grid)
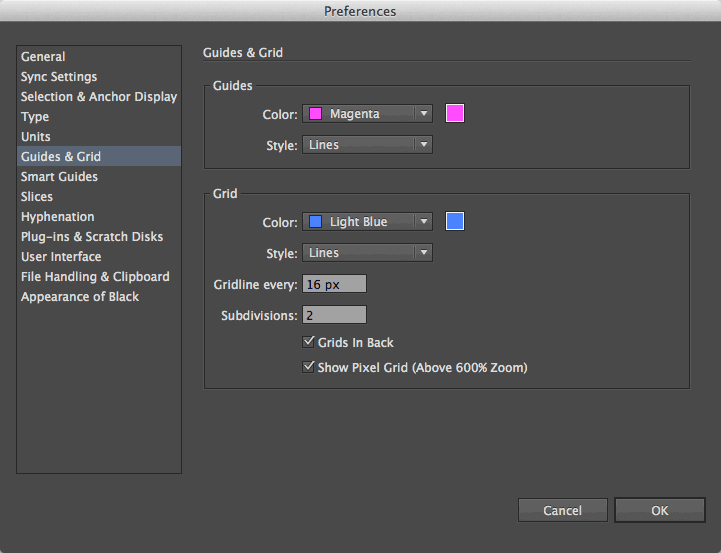
Illustrator’s grid is placed on the workspace starting from global ruler origin. You can set its properties choosing Preferences → Guides & Grid. Since we want our 64x64px canvas to be divided into 8 parts each side, we will set a main gridline every 16px (this will cause our artboards to be divided in 4×4 parts) with two subdivision:
Illustrator的网格从全局标尺原点开始放置在工作区上。 您可以选择“首选项” →“ 参考线和网格 ”来设置其属性。 由于我们希望将64x64px的画布每侧分成8个部分,因此我们将每16px设置一条主网格线(这将使画板分成4×4的部分),并分为两个细分部分:
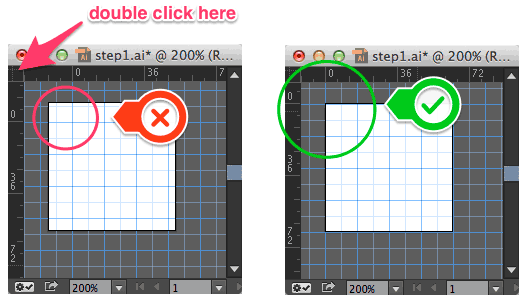
Now we have to ensure that our grid matches exactly our artboard. By default, the first artboard is placed at global ruler origin, but, since artboards can be moved and reset: to do this simply double-click the ruler origin with the artboard tool.
现在,我们必须确保网格与画板完全匹配。 默认情况下,第一个画板位于全局标尺的原点,但是,由于可以移动和重置画板:只需使用画板工具双击标尺的原点即可。
Our grid should now perfectly align with our artboards:
现在,网格将与画板完美对齐:
第一个字形 (The first glyph)
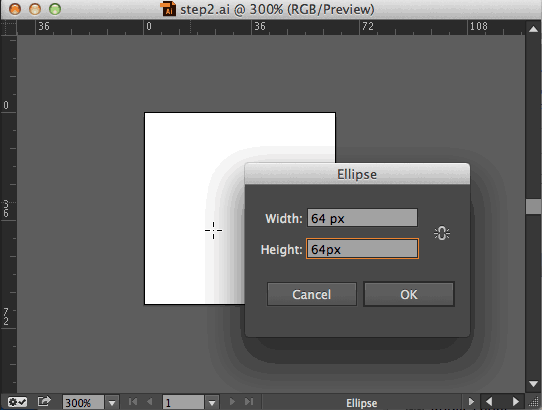
Let’s start our first glyph, a simple check-sign inside a circle:
让我们开始第一个字形,一个圆圈内的简单检查符号 :

To draw the circle, we have to select the Ellipse tool, click in a point inside the artboard and input the ellipse width and height:
要绘制圆,我们必须选择“ 椭圆”工具 ,在画板内的一点上单击并输入椭圆的宽度和高度:
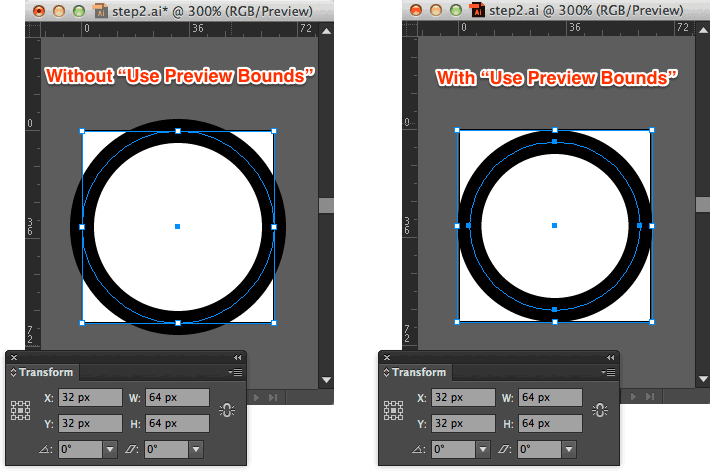
Next, we have to remove any fill and to set a black stroke of 8px size. At this point we can align the circle to the artboard (make sure the align to artboard option is selected):
接下来,我们必须删除所有填充并设置8px大小的黑色笔触。 此时,我们可以将圆与画板对齐 (确保已选中“ 与画板对齐”选项):
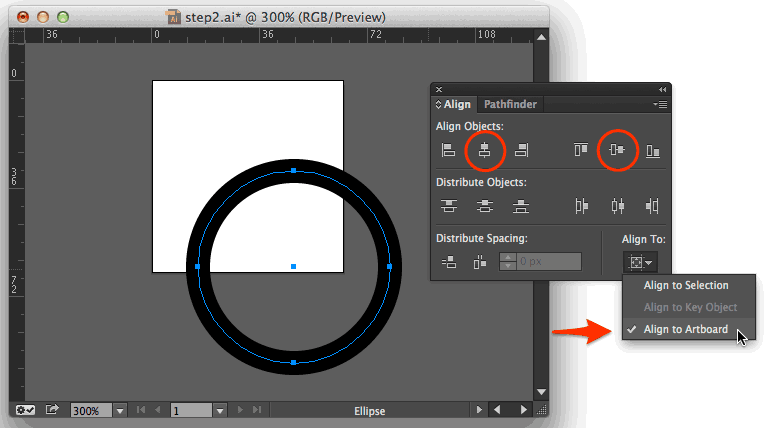
But the result isn’t quite what we expected: Illustrator aligned the path without computing the stroke width. Thankfully, this can be easily resolved, setting the Use Preview Bounds option in the Preference Panel. Now Illustrator will compute stroke widths inside the artboard regardless of aligning and resizing, and this makes drawing quicker and more accurate.
但是结果并不完全符合我们的预期:Illustrator在不计算笔划宽度的情况下对齐了路径 。 幸运的是,可以通过在“首选项面板”中设置“ 使用预览边界”选项来轻松解决此问题。 现在,Illustrator将计算画板内部的笔触宽度,而无需进行对齐和调整大小,这将使绘图更快,更准确。
完成字形图 (Completing the glyphs drawing)
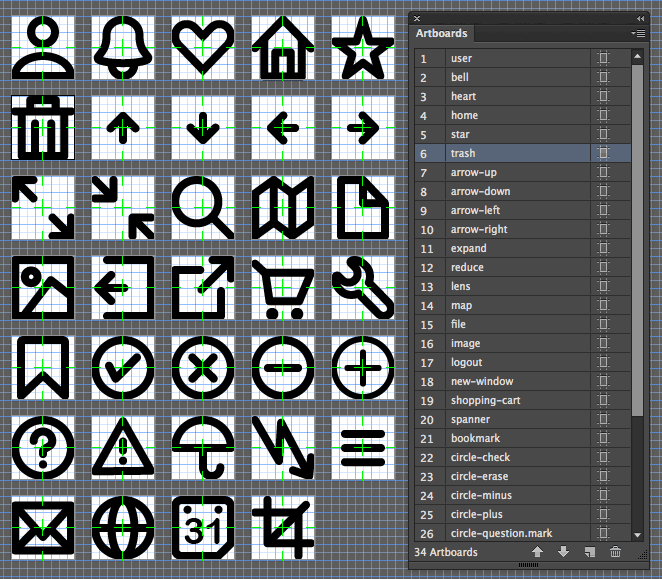
We now have to draw each glyph, adding a fresh artboard each time. You can add an Artboard using the Artboard tool and option/alt dragging an existing one or clicking the New Artboard icon in the Artboards Panel.
现在,我们必须绘制每个字形,每次都添加一个新的画板。 您可以使用Artboard工具添加Artboard,然后选择/ alt拖动现有的Artboard或单击Artboards Panel中的New Artboard图标。
Artboards can then be easily rearranged by choosing Object → Artboards → Rearrange (or the Rearrange Artboards command in the Artboards Panel menu) following the order in the Artboards Panel.
然后,按照“画板”面板中的顺序,选择“ 对象” →“ 画板” →“ 重新排列” (或“画板面板”菜单中的“ 重新排列画板”命令)即可轻松地重新排列画板 。
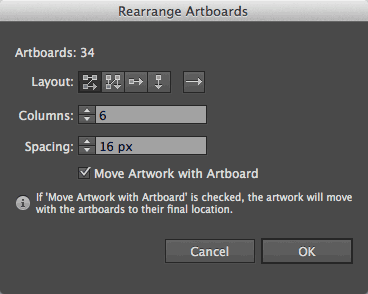
Note that glyphs are always uploaded in alphabetical order, so keep this in mind if you want the artboard order in Illustrator to match the glyphs order in the font.
请注意,字形始终按字母顺序上载,因此,如果您希望Illustrator中的画板顺序与字体中的字形顺序匹配,请记住这一点。
Give to each Artboard a name (no spaces): this will become the name of the glyph and also the class names of the generated CSS, so it’s very important to use meaningful words for them.
给每个Artboard命名(不带空格):这将成为字形的名称,也将成为生成CSS的类名,因此对它们使用有意义的单词非常重要。
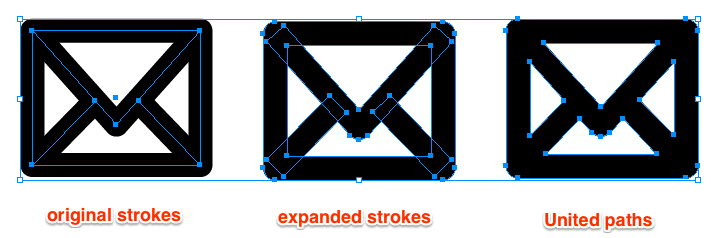
Although we often use strokes to draw our symbols, font creation has some special needs. We have to remember that:
尽管我们经常使用笔触来绘制符号,但是字体创建仍有一些特殊需求。 我们必须记住:
- Each stroke must be converted to fills 每个笔划都必须转换为填充
- Fills must be combined creating compound paths if necessary (no overlapping shapes) 填充必须合并,必要时创建复合路径(无重叠形状)
- Any color will be ignored: glyphs will always be interpreted as black. You also can’t use white for backgrounds: you can have only transparent ones 任何颜色都将被忽略:字形将始终被解释为黑色。 您也不能使用白色作为背景:只能使用透明的背景
- Any embedded image in your SVG will be ignored SVG中的任何嵌入式图像都将被忽略
You can use the Expand command to convert paths to filled shapes, and the Pathfinder panel to quickly combine overlapping shapes into single elements.
您可以使用Expand命令将路径转换为填充的形状,并使用Pathfinder面板将重叠的形状快速组合为单个元素。
Once our glyphs are ready, we can save each one as a distinct SVG file by using the Use Artboards option in the Save as dialog.
字形准备好后,我们可以使用 “ 另存为”对话框中的“ 使用画板”选项将每个字形另存为不同的SVG文件。
Illustrator saves SVG files by prefixing their names with the .ai document name (icons_). Since IcoMoon uses files names for glyphs, I prefer to remove this prefix (there are a lot of small applications to easily rename all files) to reduce any confusion.
Illustrator通过使用.ai文档名称( icons_ )前缀来保存SVG文件。 由于IcoMoon使用字形的文件名,因此我更喜欢删除此前缀(有很多小型应用程序可以轻松地重命名所有文件),以减少混乱。
将文件上传到IcoMoon (Uploading files to IcoMoon)
The IcoMoon site provides an online app to build icon fonts. The app starts with an Untitled project with access to some free icon libraries from which you can choose symbols.
IcoMoon网站提供了一个在线应用程序来构建图标字体。 该应用程序从一个无标题项目开始,该项目可以访问一些免费的图标库,您可以从中选择符号。
Since we will upload our own glyphs, we can remove all preloaded libraries using the small menu at the right of each of them (note that this is not mandatory, since only selected symbols will be added to your font). It just keeps your project clean.
由于我们将上传自己的字形,因此可以使用每个字形右侧的小菜单删除所有预加载的库(请注意,这不是强制性的,因为只会将选定的符号添加到您的字体中)。 它只是保持您的项目清洁。
You can then save your project clicking the Manage projects icon on the right of the app menu bar. Note that with IcoMoon free accounts, your project will be stored locally in your browser, so, you won’t be able to access it elsewhere until you download the project data (a JSON file) or upgrade to Premium account (that allows you to store projects in the cloud).
然后,您可以单击应用程序菜单栏右侧的“ 管理项目”图标来保存您的项目。 请注意,使用IcoMoon免费帐户,您的项目将存储在本地浏览器中,因此,在下载项目数据(JSON文件)或升级到高级帐户(允许您执行以下操作)之前,您将无法在其他位置访问该项目将项目存储在云中)。
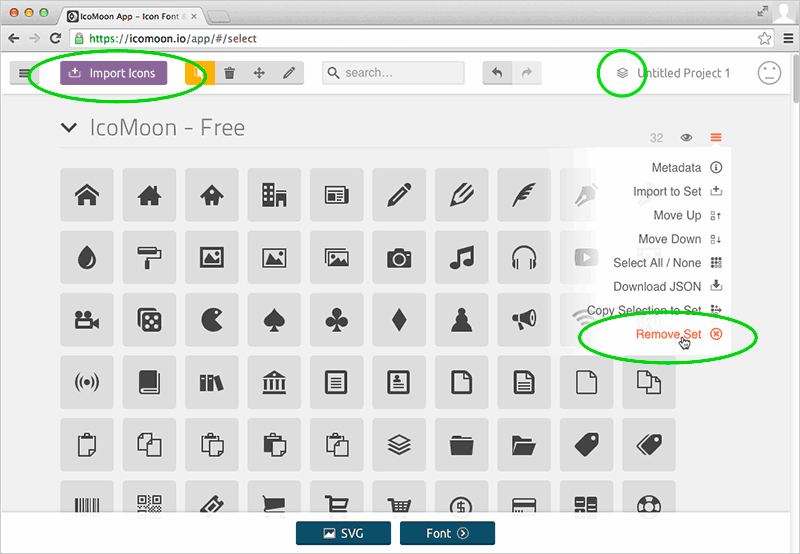
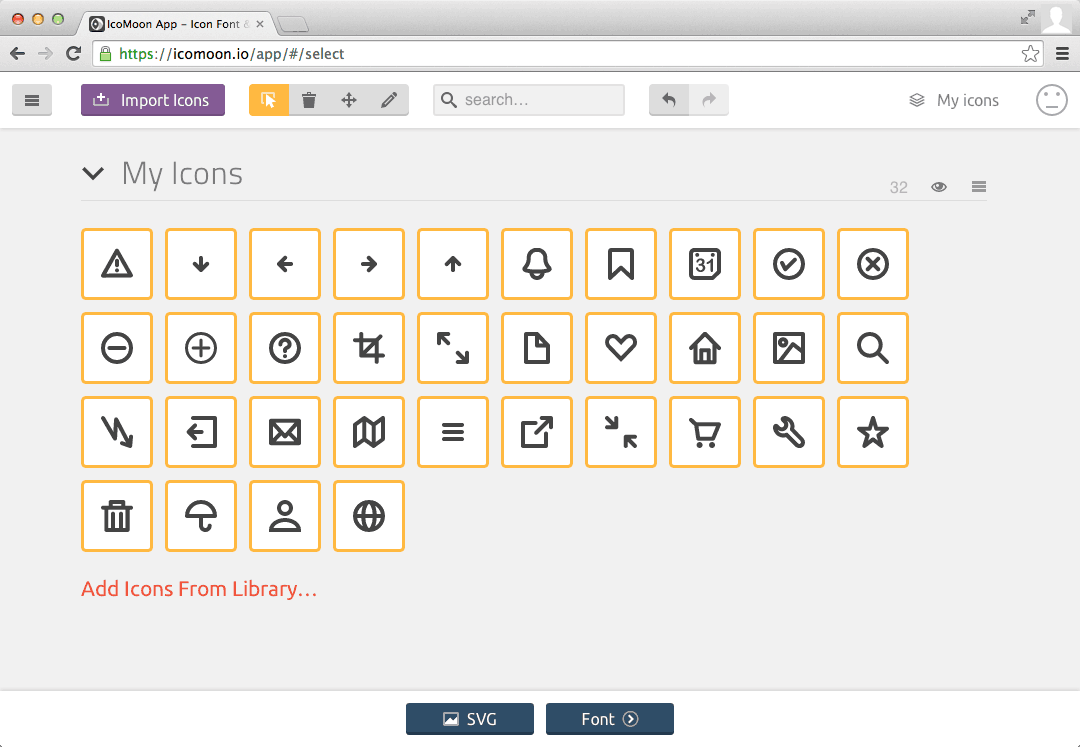
Now, you can upload your SVG files using the Import icons button: your glyphs will appear in the app as a Set. It’s easy to rearrange, delete them or edit each glyph using the tools provided by the app at this stage. You can also edit the set metadata (the name of the set and some author info) or perform other tasks using the small menu at the right of the set.
现在,您可以使用导入图标按钮上传SVG文件:您的字形将作为Set出现在应用程序中。 在此阶段,使用应用程序提供的工具很容易重新排列,删除它们或编辑每个字形。 您还可以使用集右侧的小菜单编辑集元数据(集名称和一些作者信息)或执行其他任务。
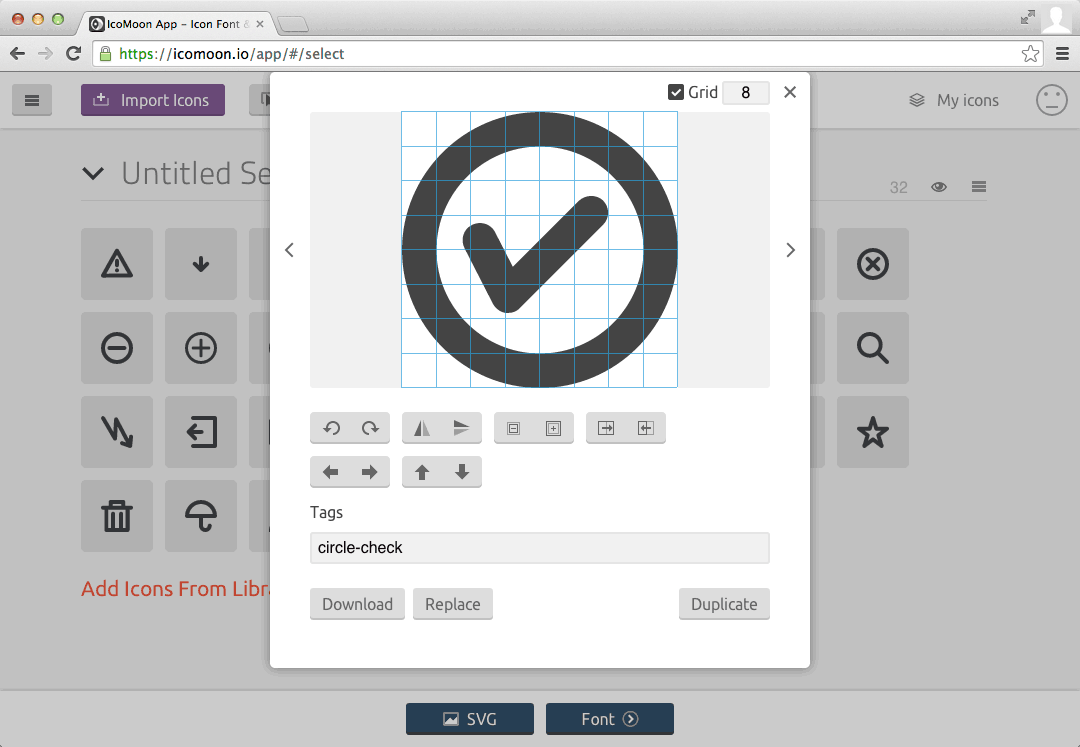
Icons can be edited in the app using the edit tool. You can’t alter vector data in this way, but it is possible to resize or move the glyph, download the SVG file or replace it.
可以使用编辑工具在应用程序中编辑图标。 您不能以这种方式更改矢量数据,但是可以调整字形的大小或移动它,下载SVG文件或替换它。
To build your font, you’ll first need to select all required icons using the select tool (or just Select All/None command in the Set menu if that suits). You’ll be able to identify selected glyphs by their yellow borders. Then you must click the Font button at the bottom of the page.
要构建字体,您首先需要使用选择工具选择所有必需的图标(或在合适的情况下仅在“ 设置”菜单中选择“全选/无”命令)。 您将能够通过黄色边框识别选定的字形。 然后,您必须单击页面底部的字体按钮。
The app will load a secondary window with all selected symbols, displaying for each of them the glyph, the name, and the Unicode point that IcoMoon assigned to it in the PUA range. The use of the PUA range is considered the safest unicode sector to host your icons, although IcoMoon lets you use the standard Basic Latin range, if you like, by clicking the Codes button in the top bar.
该应用程序将加载一个包含所有选定符号的辅助窗口,并为每个符号显示IcoMoon在PUA范围内为其分配的字形,名称和Unicode点 。 尽管IcoMoon允许您通过单击顶部栏中的“ 代码”按钮来使用标准的基本拉丁语范围,但使用PUA范围被认为是承载图标的最安全的unicode扇区。
You can also assign different range codes to each character by manually inserting a new code or a character:
您还可以通过手动插入新代码或字符来为每个字符分配不同的范围代码:

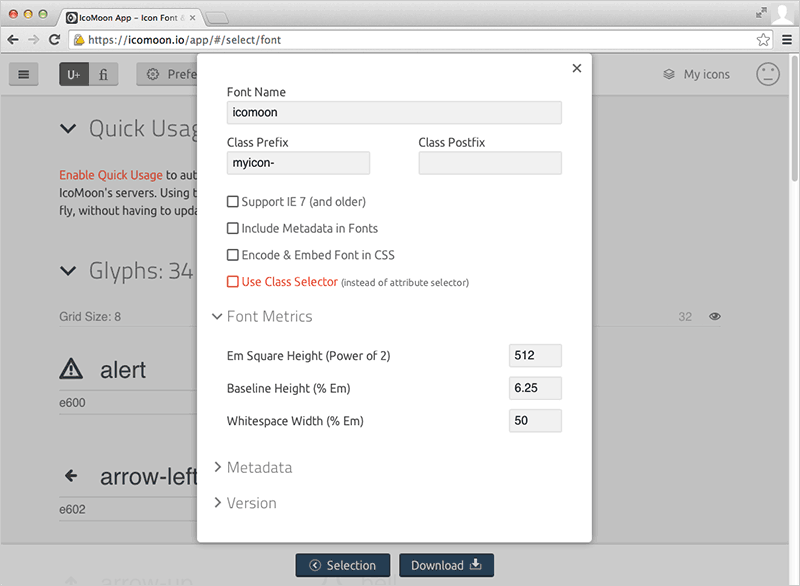
Before downloading your font, add a font name (this will be used in the @font-face rule), and Class Prefix and/or Postfix (that will be used as selectors in the generated CSS).
在下载字体之前,添加字体名称 (将在@font-face规则中使用), 类前缀和/或后缀 (将在生成CSS中用作选择器)。
There are many other parameters you can set: from Metadata info to Metrics values, I recommend to read carefully the short and well explained documentation to set properly all of them.
您还可以设置许多其他参数:从Metadata info到Metrics值 ,我建议您仔细阅读简短说明的文档以正确设置所有这些参数。
Your icon set is done! Download your font (or, if you have a premium account, simply link to the CSS) and add it to your project.
您的图标集已完成! 下载字体(或者,如果您有高级帐户,只需链接到CSS)并将其添加到您的项目中。
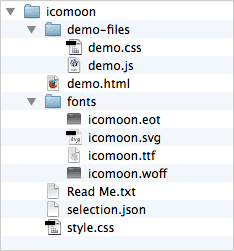
The downloaded .zip file contains the font in various formats, a demo file you can use as a reference, a .json file that can be re-uploaded to restore your project (to view it into another computer, for example), and, of course, a .css file encoding your icons.
下载的.zip文件包含各种格式的字体,可以用作参考的演示文件,可以重新上传以恢复您的项目(例如,将其查看到另一台计算机上)的.json文件,以及当然,是一个.css文件编码您的图标。
The CSS (you can see an example below) contains the @font-face rule and all your symbols selectors.
CSS(您可以在下面看到一个示例)包含@font-face规则和所有符号选择器。
@font-face {
    font-family: 'icomoon';
    src:url('fonts/icomoon.eot?-88cxph');
    src:url('fonts/icomoon.eot?#iefix-88cxph') format('embedded-opentype'),
        url('fonts/icomoon.woff?-88cxph') format('woff'),
        url('fonts/icomoon.ttf?-88cxph') format('truetype'),
        url('fonts/icomoon.svg?-88cxph#icomoon') format('svg');
    font-weight: normal;
    font-style: normal;
}

[class^="myicon-"], [class*=" myicon-"] {
    font-family: 'icomoon';
    speak: none;
    font-style: normal;
    font-weight: normal;
    font-variant: normal;
    text-transform: none;
    line-height: 1;

    /* Better Font Rendering =========== */
    -webkit-font-smoothing: antialiased;
    -moz-osx-font-smoothing: grayscale;
}

.myicon-alert:before {
    content: "\e600";
}
.myicon-arrow-down:before {
    content: "\61";
}

/* etc */
试试吧! (Have a go!)
I’ve found this is a very quick way to build an icons font, but it certainly takes time to find the perfect workflow, and to test all options that both Illustrator and IcoMoon can offer.
我发现这是一种构建图标字体的非常快速的方法,但是找到完美的工作流程并测试Illustrator和IcoMoon都可以提供的所有选项当然需要花费时间。
Have fun
玩得开心
翻译自: https://www.sitepoint.com/create-an-icon-font-illustrator-icomoon/


 1936
1936


 被折叠的 条评论
为什么被折叠?
被折叠的 条评论
为什么被折叠?
 到【灌水乐园】发言


