


analytics db

This article was sponsored by RestDB. Thank you for supporting the partners who make SitePoint possible.
本文由RestDB赞助。 感谢您支持使SitePoint成为可能的合作伙伴。
Twitter Analytics is a useful tool — it allows you to keep an eye on what works and what doesn’t, and experiment your way into an enviable follower count.
Twitter Analytics是一个有用的工具-它使您可以随时注意哪些有效,哪些无效,并尝试以令人羡慕的关注者数量来衡量。
But what if you want to use data from your own account to perform some analysis that’s more specific to your particular needs? It’s not particularly easy — but it is possible. We’ll be using RestDB to help us fetch and store data, and take a look at what’s going on with our followers.
但是,如果您想使用自己帐户中的数据来执行一些更符合您特定需求的分析,该怎么办? 这不是特别容易,但是有可能。 我们将使用RestDB帮助我们获取和存储数据,并了解我们的追随者的最新情况。
Do you often wonder why some accounts seem to follow you only to unfollow you moments (or days) later? It’s probably not something you said — they’re just follower farming.
您是否经常想知道为什么有些帐户似乎只跟随您,以便您稍后(或几天)不关注您? 你可能不是在说什么-他们只是追随者 。
Follower farming is a known social media hack taking advantage of people who “#followback” as soon as someone follows them. The big brands, celebs, and wannabe celebs take advantage of this, as it keeps their followers count high but following count low, in turn making them look popular.
追随者耕种是一种已知的社交媒体黑客,利用有人跟踪他们后立即“ #followback”的人。 大品牌,名流和想成为名流的人都利用了这一点,因为它使追随者的人数高但追随者的人数低,反过来使他们看起来很受欢迎。

In this post, we’ll build an app which lets you log in via Twitter, grabs your followers, and compares the last fetched follower list with a refreshed list in order to identify the new unfollowers and calculate the duration of their follow, potentially auto-identifying the farmers.
在本文中,我们将构建一个应用程序,使您可以通过Twitter登录,获取关注者,并将上次获取的关注者列表与刷新的列表进行比较,以识别新的取消关注者并计算关注者的持续时间(可能自动识别农民。
自举 (Bootstrapping)
As usual, we’ll be using Homestead Improved for a high quality local environment setup. Feel free to use your own setup instead if you’ve got one you feel comfortable in.
像往常一样,我们将使用Homestead Improvement进行高质量的本地环境设置。 如果您有自己的设置,请随意使用自己的设置。
git clone https://github.com/swader/homestead_improved hi_followfarmers
cd hi_followfarmers
bin/folderfix.sh
vagrant up; vagrant ssh
Once the VM has been provisioned and we find ourselves inside it, let’s bootstrap a Laravel app.
调配VM之后,我们就发现自己在其中,让我们引导一个Laravel应用程序。
composer create-project --prefer-dist laravel/laravel Code/Project
cd Code/Project
使用Twitter登录 (Logging in with Twitter)
To make logging in with Twitter possible, we’ll use the Socialite package.
为了使使用Twitter登录成为可能,我们将使用Socialite软件包。
composer require laravel/socialiteAs per instructions, we should also register it in config/app.php:
按照说明,我们还应该在config/app.php注册它:
'providers' => [
    // Other service providers...

    Laravel\Socialite\SocialiteServiceProvider::class,
],
'Socialite' => Laravel\Socialite\Facades\Socialite::class,Finally, we need to register a new Twitter app at http://apps.twitter.com/app/new…
最后,我们需要在http://apps.twitter.com/app/new上注册一个新的Twitter应用程序。
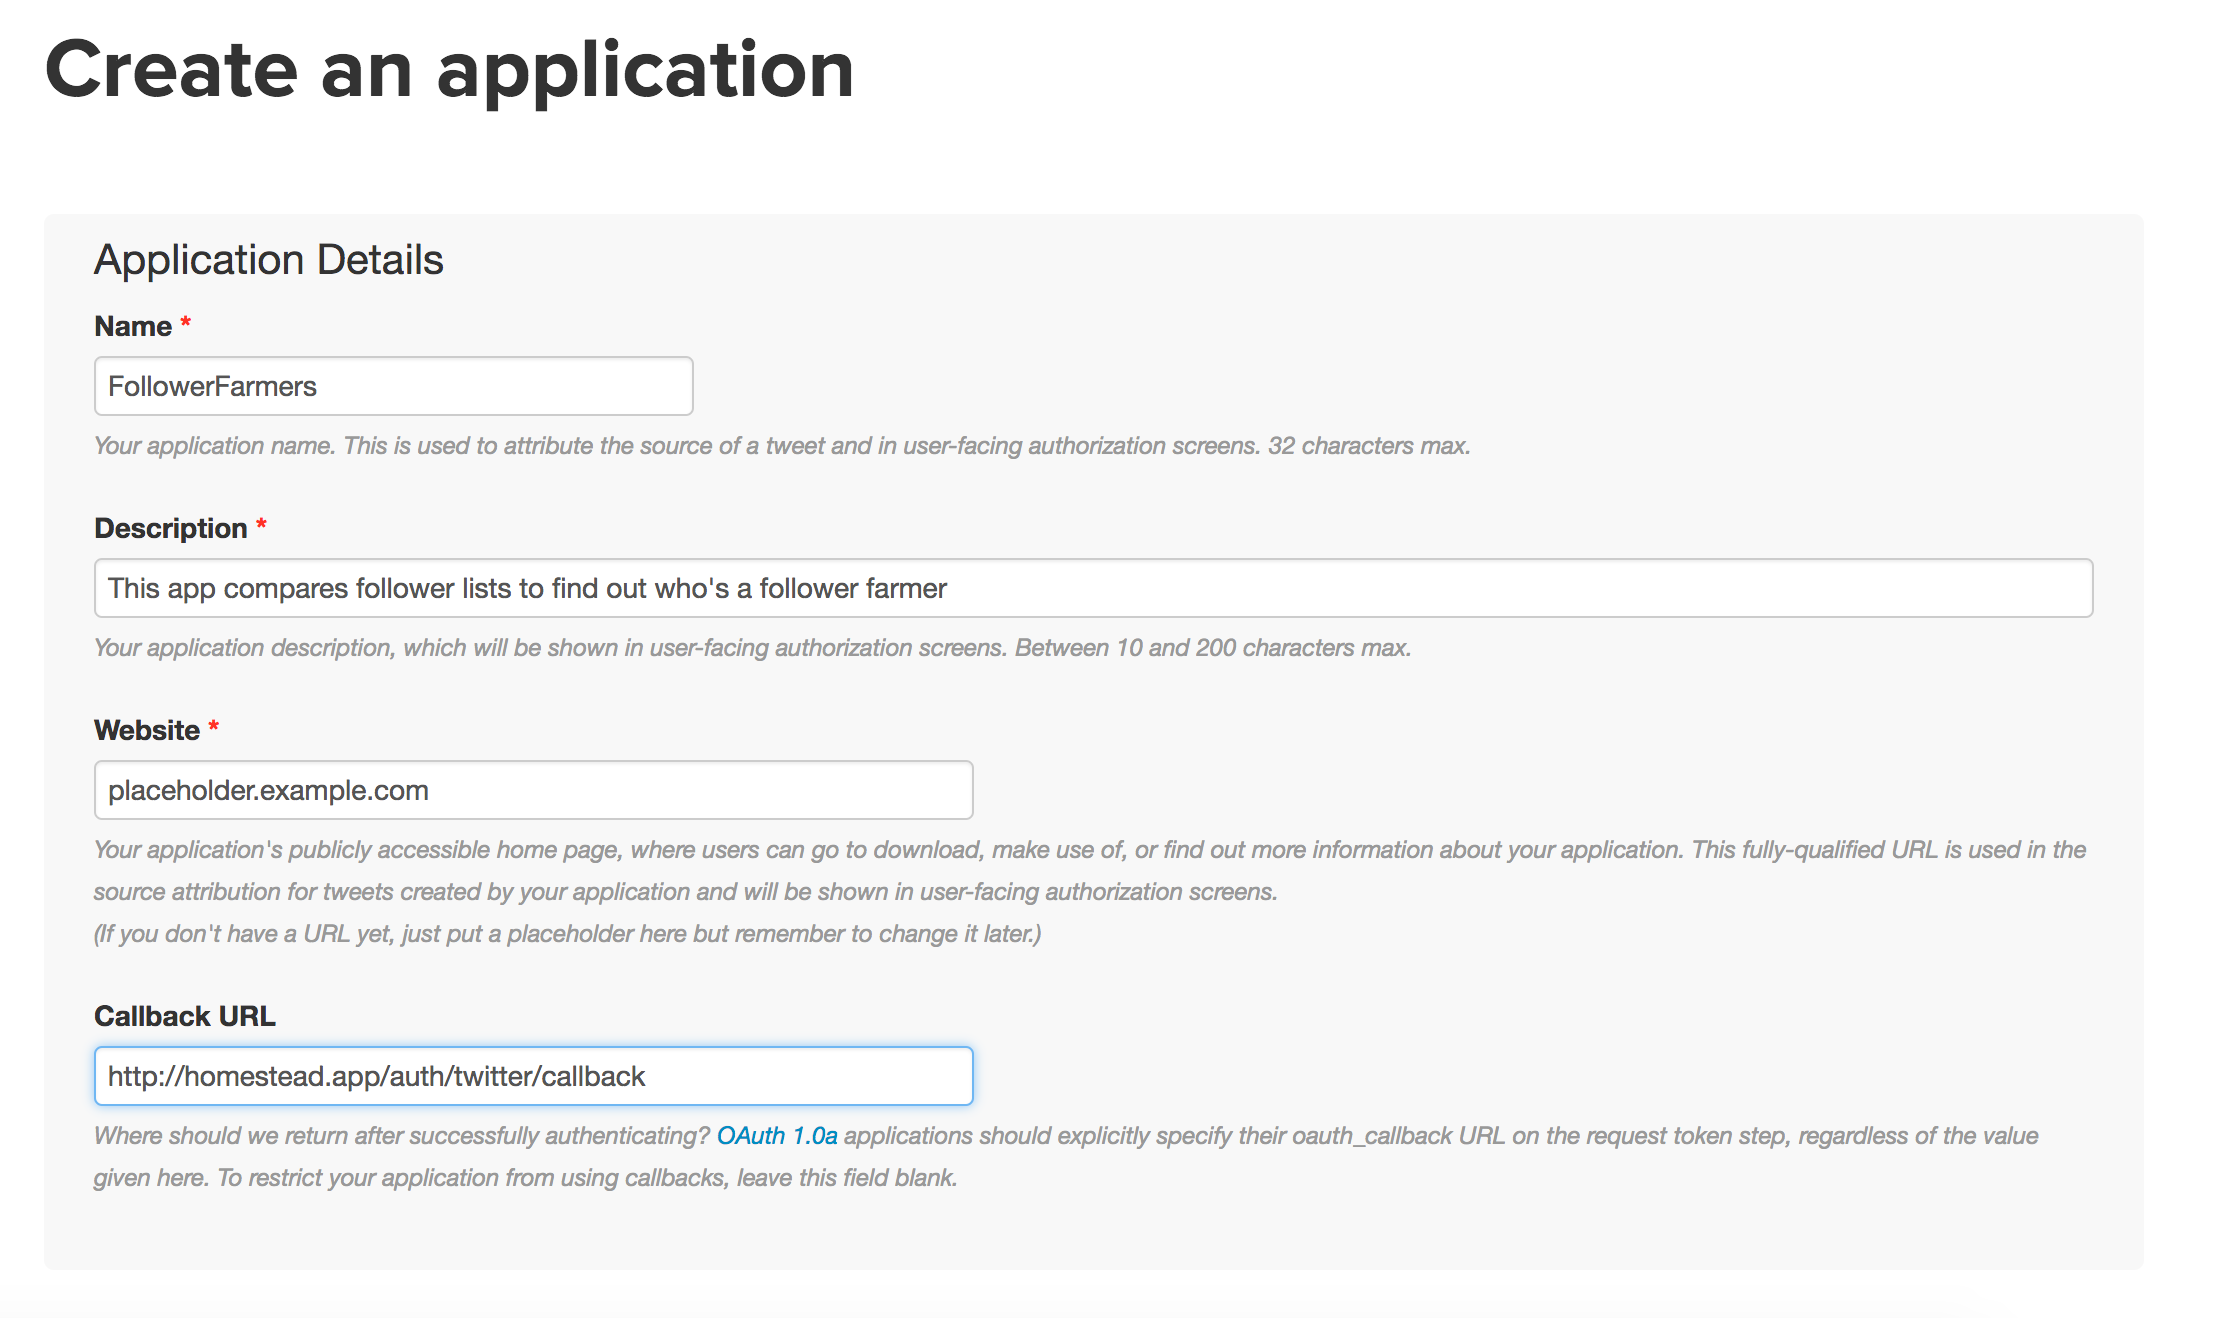
… and add the secret credentials into config/services.php:
…并将秘密凭证添加到config/services.php :
'twitter' => [
        'client_id' => env('TWITTER_CLIENT_ID'),
        'client_secret' => env('TWITTER_CLIENT_SECRET'),
        'redirect' => env('TWITTER_CALLBACK_URL'),
    ],
Naturally, we need to add these environment variables into the .env file in the root of the project:
自然地,我们需要将这些环境变量添加到项目根目录的.env文件中:
TWITTER_CLIENT_ID=keykeykeykeykeykeykeykeykey
TWITTER_CLIENT_SECRET=secretsecretsecret
TWITTER_CALLBACK_URL=http://homestead.app/auth/twitter/callback
We need to add some Login routes into routes/web.php next:
接下来,我们需要将一些登录路由添加到routes/web.php :
Route::get('auth/twitter', 'Auth\LoginController@redirectToProvider');
Route::get('auth/twitter/callback', 'Auth\LoginController@handleProviderCallback');
Finally, let’s add the methods these routes refer to into the LoginController class inside app/Http/Controllers/Auth:
最后,让我们将这些路由引用的方法添加到app/Http/Controllers/Auth内的LoginController类中:
/**
* Redirect the user to the GitHub authentication page.
*
* @return Response
*/
public function redirectToProvider()
{
return Socialite::driver('twitter')->redirect();
}
/**
* Obtain the user information from GitHub.
*
* @return Response
*/
public function handleProviderCallback()
{
$user = Socialite::driver('twitter')->user();
dd($user);
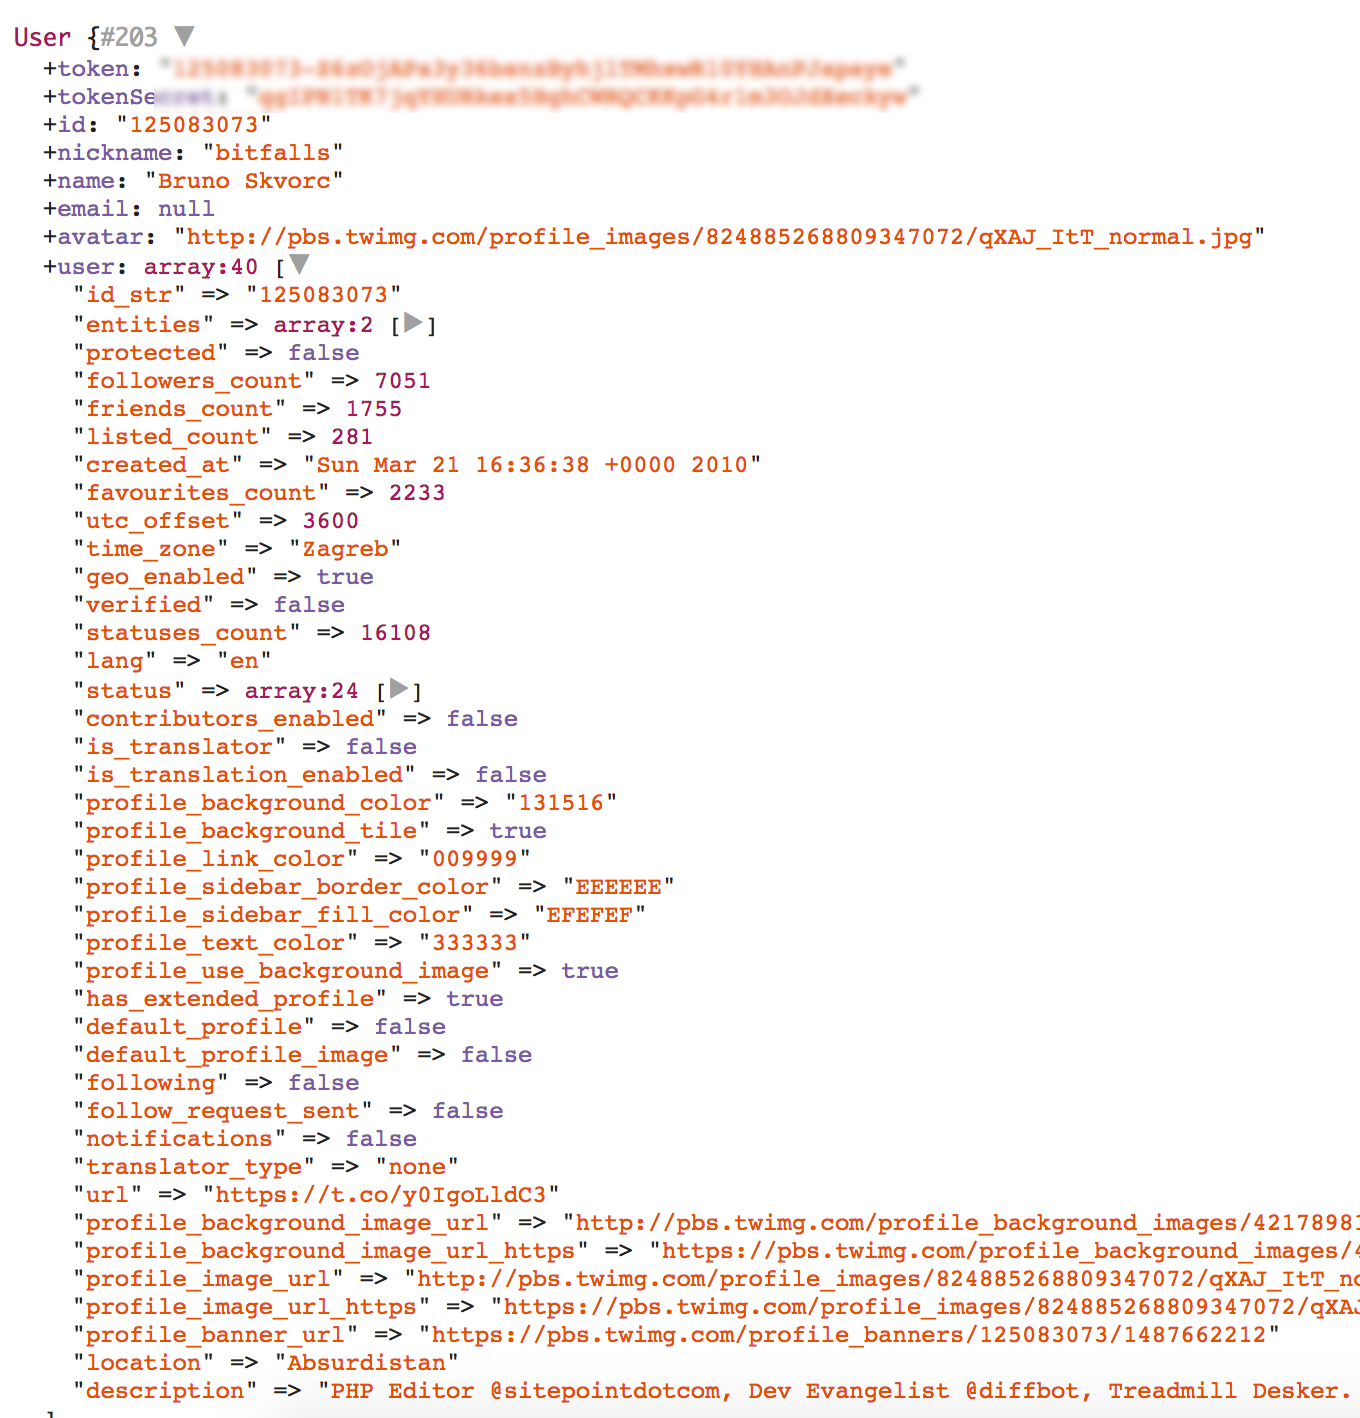
}The dd($user); is there to easily test if the authentication went well, and sure enough, if you visit /auth/twitter, you should be able to authorize the app and see the basic information about your account on screen:
dd($user); 是否可以轻松地测试身份验证是否通过,并且可以肯定的是,如果您访问/auth/twitter ,则应该能够授权该应用并在屏幕上查看有关您帐户的基本信息:
追随者名单 (Follower Lists)
There are many ways of getting an account’s follower list, and none of them pleasant.
获取帐户关注者列表的方法有很多,但都不是一件容易的事。
Twitter仍然讨厌开发人员 (Twitter Still Hates Developers)
Ever since Twitter’s Great War on Developers (spoiler: very little has changed since that article came out), it’s been an outright nightmare to fetch full lists of people’s followers. In fact, the API rate limits are so low that people have resorted to third party data aggregators for actually buying that data, or even scraping the followers page. We’ll go the “white hat” route and suffer through their API, but if you have other means of getting followers, feel free to use that instead of the method outlined below.
自从Twitter的“开发人员大战” (剧透:自从这篇文章发表以来,变化不大 )以来,获取人们的关注者的完整名单就是一场噩梦。 实际上,API速率限制是如此之低,以至于人们不得不借助第三方数据聚合器来实际购买该数据,甚至抓取关注者页面。 我们将采用“白帽子”路线,并通过其API苦苦挣扎,但是如果您有其他吸引关注者的方法,请随时使用它代替下面概述的方法。
The Twitter API offers the /followers/list endpoint, but as that one only returns 20 followers per call at most, and only allows 15 requests per 15 minutes, we would be able to, at most, extract 1200 followers per hour – unacceptable. Instead, we’ll use the followers/ids endpoint to fetch 5000 IDs at a time. This is subject to the same limit of 15 calls per 15 minutes, but gives us much more breathing room.
Twitter API提供了/followers/list端点,但是每个调用最多只能返回20个关注者,并且每15分钟仅允许15个请求,因此我们最多每小时可以提取1200个关注者,这是不可接受的。 相反,我们将使用followers/ids端点一次获取5000个ID。 相同的限制是每15分钟15次通话,但为我们提供了更多的呼吸空间。
It’s important to keep in mind that ID != Twitter handle. IDs are numeric values representing a unique account across time, even across different handles. So for each unfollower’s ID, we’ll have to make an additional API call to find out who they were (the Users Lookup Bulk API will come in handy).
请务必记住ID!= Twitter句柄。 ID是代表跨时间(甚至跨不同句柄)的唯一帐户的数值。 因此,对于每个取消关注者的ID,我们都必须进行一次额外的API调用以找出他们是谁( 用户查找批量API会派上用场)。
基本API通讯 (Basic API Communication)
Socialite is only useful for logging in. Actually communicating with the API is less straightforward. Given that Laravel comes with Guzzle pre-installed, installing Guzzle’s Oauth Subscriber (which lets us use Guzzle with the Oauth1 protocol) is the simplest solution:
社交名流仅对登录有用。实际上,与API进行通信并不那么简单。 鉴于Laravel预先安装了Guzzle,最简单的解决方案是安装Guzzle的Oauth订阅服务器(这使我们可以将Guzzle与Oauth1协议一起使用):
composer require guzzlehttp/oauth-subscriberOnce that’s in there, we can update our LoginController::handleProviderCallback method to test things out:
进入该目录后,我们可以更新LoginController::handleProviderCallback方法以进行测试:
public function handleProviderCallback()
    {
        $user = Socialite::driver('twitter')->user();

        $stack = HandlerStack::create();

        $middleware = new Oauth1([
            'consumer_key' => getenv('TWITTER_CLIENT_ID'),
            'consumer_secret' => getenv('TWITTER_CLIENT_SECRET'),
            'token' => $user->token,
            'token_secret' => $user->tokenSecret
        ]);

        $stack->push($middleware);

        $client = new Client([
            'base_uri' => 'https://api.twitter.com/1.1/',
            'handler' => $stack,
            'auth' => 'oauth'
        ]);

        $response = $client->get('followers/ids.json', [
            'query' => [
                'cursor' => '-1',
                'screen_name' => $user->nickname,
                'count' => 5000
            ]
        ]);

        dd($response->getBody()->getContents());
    }
In the above code, we first create a middleware stack which will chew through the request, pull it through all the middlewares, and output the final version. We can push other middlewares into this stack, but for now, we only need the Oauth1 one.
在上面的代码中,我们首先创建一个中间件堆栈,该堆栈将检查请求,将其拉入所有中间件,然后输出最终版本。 我们可以将其他中间件推送到该堆栈中,但是目前,我们只需要一个Oauth1。
Next, we create the Oauth1 middleware and pass in the required parameters. The first two we’ve already got – they’re the keys we defined in .env previously. The last two we got from the authenticated Twitter user instance.
接下来,我们创建Oauth1中间件并传递所需的参数。 我们已经获得了前两个-它们是我们之前在.env定义的键。 我们从经过身份验证的Twitter用户实例中获得了最后两个。
We then push the middleware into the stack, and attach the stack onto the Guzzle client. In layman’s terms, this means “when this client does requests, pull the requests through all the middlewares in the stack before sending them to their final destination”. We also tell the client to always authenticate with oauth.
然后,我们将中间件推入堆栈,并将堆栈附加到Guzzle客户端上。 用外行的话来说,这意味着“当该客户端发出请求时,将请求通过堆栈中的所有中间件拉出,然后再将其发送到最终目的地”。 我们还告诉客户端始终使用oauth进行身份验证。
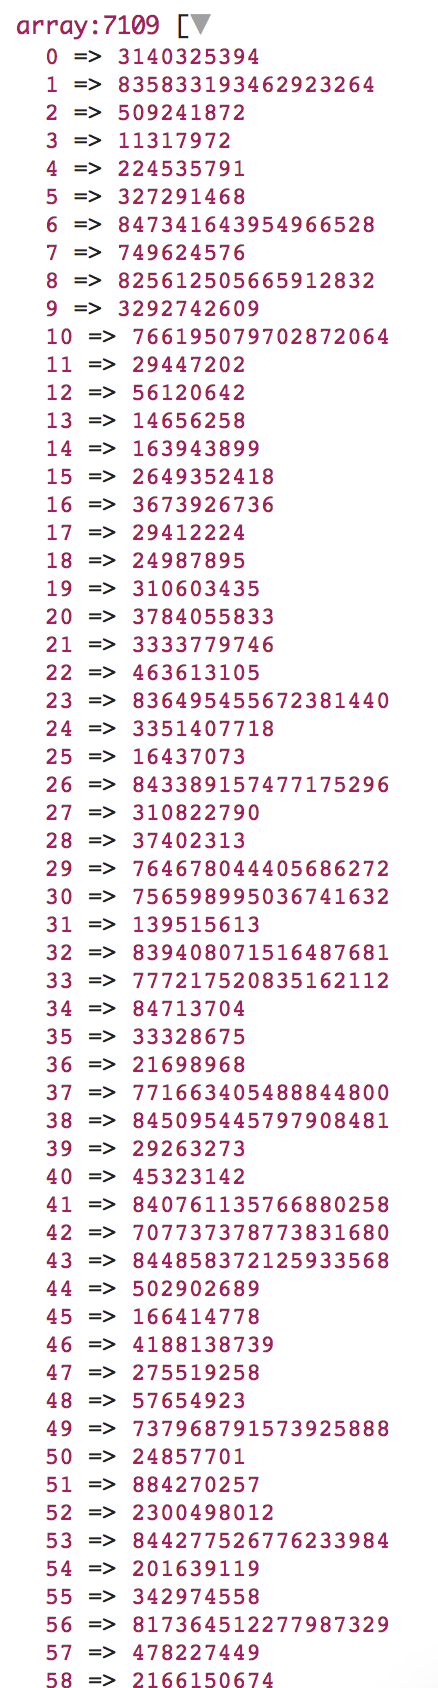
Finally, we make the GET call to the API endpoint with the required query params: the page to start on (-1 is the first page), the user for whom to pull followers, and how many followers to pull. In the end, we die this output onto the screen to see if we’re getting what we need. Sure enough, here’s 5000 of the most recent followers for my account:
最后,我们使用所需的查询参数对API端点进行GET调用:要开始的页面(-1是第一页),要拉动关注者的用户以及要拉动多少个关注者。 最后,我们将输出消亡到屏幕上,看看是否能获得所需的东西。 果然,这是我帐户中的5000个最新关注者:

Now that we know our API calls are passing and we can talk to Twitter, it’s time for some loops to get the full list for the current user.
现在我们知道我们的API调用正在传递,我们可以与Twitter进行对话,是时候进行一些循环来获取当前用户的完整列表了。
PHP方面–获得所有关注者 (The PHP Side – Getting All Followers)
Since there are 15 calls per 15 minutes allowed via the API, let’s limit the account size to 70k followers for now for simplicity.
由于该API每15分钟允许15次调用,因此为简单起见,我们现在将帐户大小限制为7万名关注者。
$user = Socialite::driver('twitter')->user();

        if ($user->user['followers_count'] > 70000) {
            return view(
                'home.index',
                ['message' => 'Sorry, we currently only support accounts with up to 70k followers']
            );
        }
Note: home.index is an arbitrary view file I made just for this example, containing a single directive: {{ $message }}.
注意: home.index是我为该示例home.index的任意视图文件,其中包含一个指令: {{ $message }} 。
Then, let’s iterate through the next_cursor_string value returned by the API, and paginate through other IDs.
然后,让我们遍历API返回的next_cursor_string值,并遍历其他ID。
Much numbers, very follow, wow.
很多数字,非常关注,哇。
With some luck, this should execute very quickly – depending on Twitter’s API responsiveness.
幸运的是,这应该很快执行-取决于Twitter的API响应能力。
Everyone with up to 70k followers can now get a full list of followers generated upon authorization.
现在,拥有多达7万关注者的每个人都可以获取授权后生成的关注者的完整列表。
If we needed to support bigger accounts, it would be relatively simple to make it repeat the process every 15 minutes (after the API limit resets) for every 75k followers, and stitch the results together. Of course, someone is almost guaranteed to follow/unfollow in that window given the number of followers, so it would be very hard to stay accurate. In those cases, it’s easier to focus on the last 75k followers and only analyze those (the API auto-orders by last-followed), or to find another method of reliably fetching followers, bypassing the API.
如果我们需要支持更大的帐户,那么相对简单的做法是让每75,000个关注者每15分钟(重置API限制后)重复一次此过程,并将结果拼接在一起。 当然,考虑到关注者的数量,几乎可以肯定有人会在该窗口中关注/取消关注,因此很难保持准确性。 在这种情况下,只关注最后的75,000个关注者并仅分析那些关注者(最后关注的API自动排序),或者找到绕过API来可靠地获取关注者的另一种方法,会更容易。
打扫干净 (Cleaning Up)
It’s a bit awkward to have this logic in the LoginController, so let’s move this into a separate service. I created app/Services/Followers/Followers.php for this example, with the following contents:
在LoginController中包含此逻辑有点尴尬,因此让我们将其移至单独的服务中。 我为此示例创建了app/Services/Followers/Followers.php ,其内容如下:
<?php


namespace App\Services\Followers;

use GuzzleHttp\Client;
use GuzzleHttp\HandlerStack;
use GuzzleHttp\Subscriber\Oauth\Oauth1;

class Followers
{

    /** @var string */
    protected $token;

    /** @var string */
    protected $tokenSecret;

    /** @var string */
    protected $nickname;

    /** @var Client */
    protected $client;

    public function __construct(string $token, string $tokenSecret, string $nickname)
    {
        $this->token = $token;
        $this->tokenSecret = $tokenSecret;
        $this->nickname = $nickname;

        $stack = HandlerStack::create();

        $middleware = new Oauth1(
            [
                'consumer_key' => getenv('TWITTER_CLIENT_ID'),
                'consumer_secret' => getenv('TWITTER_CLIENT_SECRET'),
                'token' => $this->token,
                'token_secret' => $this->tokenSecret,
            ]
        );

        $stack->push($middleware);

        $this->client = new Client(
            [
                'base_uri' => 'https://api.twitter.com/1.1/',
                'handler' => $stack,
                'auth' => 'oauth',
            ]
        );
    }

    public function getClient()
    {
        return $this->client;
    }

    /**
     * Returns an array of follower IDs for a given optional nickname.
     *
     * If no custom nickname is provided, the one used during the construction
     * of this service is used, usually defaulting to the same user authing
     * the application.
     *
     * @param string|null $nickname
     * @return array
     */
    public function getFollowerIds(string $nickname = null)
    {
        $nickname = $nickname ?? $this->nickname;

        $response = $this->client->get(
            'followers/ids.json', [
                'query' => [
                    'cursor' => '-1',
                    'screen_name' => $nickname,
                    'count' => 5000,
                ],
            ]
        );

        $data = json_decode($response->getBody()->getContents());
        $ids = $data->ids;

        while ($data->next_cursor_str !== "0") {

            $response = $this->client->get(
                'followers/ids.json', [
                    'query' => [
                        'cursor' => $data->next_cursor_str,
                        'screen_name' => $nickname,
                        'count' => 5000,
                    ],
                ]
            );
            $data = json_decode($response->getBody()->getContents());
            $ids = array_merge($ids, $data->ids);
        }

        return $ids;
    }

}
We can then clean up the LoginController’s handleProviderCallback method:
然后,我们可以清理LoginController的handleProviderCallback方法:
public function handleProviderCallback()
    {
        $user = Socialite::driver('twitter')->user();

        if ($user->user['followers_count'] > 70000) {
            return view(
                'home.index',
                ['message' => 'Sorry, we currently only support accounts with up to 70k followers']
            );
        }

        $flwrs = new Followers(
            $user->token, $user->tokenSecret, $user->nickname
        );
        dd($flwrs->getFollowerIds());
    }
It’s still the wrong method to be doing this, so let’s further improve things. To keep a user logged in, let’s save the token, secret, and nickname into the session.
这样做仍然是错误的方法,因此让我们进一步改进。 为了使用户保持登录状态,我们将令牌,密码和昵称保存到会话中。
/**
     * Get and store token data for authorized user.
     *
     * @param Request $request
     * @return Response
     */
    public function handleProviderCallback(Request $request)
    {
        $user = Socialite::driver('twitter')->user();

        if ($user->user['followers_count'] > 70000) {
            return view(
                'home.index',
                ['message' => 'Sorry, we currently only support accounts with up to 70k followers']
            );
        }

        $request->session()->put('twitter_token', $user->token);
        $request->session()->put('twitter_secret', $user->tokenSecret);
        $request->session()->put('twitter_nickname', $user->nickname);
        $request->session()->put('twitter_id', $user->id);

        return redirect('/');
    }
We save all the information into the session, making the user effectively logged in to our application, and then we redirect to the home page.
我们将所有信息保存到会话中,使用户有效地登录到我们的应用程序,然后重定向到主页。
Let’s create a new controller now, and give it a simple method to use:
现在让我们创建一个新的控制器,并为其提供一种简单的使用方法:
artisan make:controller HomeController<?php
namespace App\Http\Controllers;
use Illuminate\Http\Request;
class HomeController extends Controller
{
public function index(Request $request)
{
$nick = $request->session()->get('twitter_nickname');
if (!$nick) {
return view('home.loggedout');
}
return view('home.index', $request->session()->all());
}
}Simple, right? The views are simple, too:
简单吧? 视图也很简单:
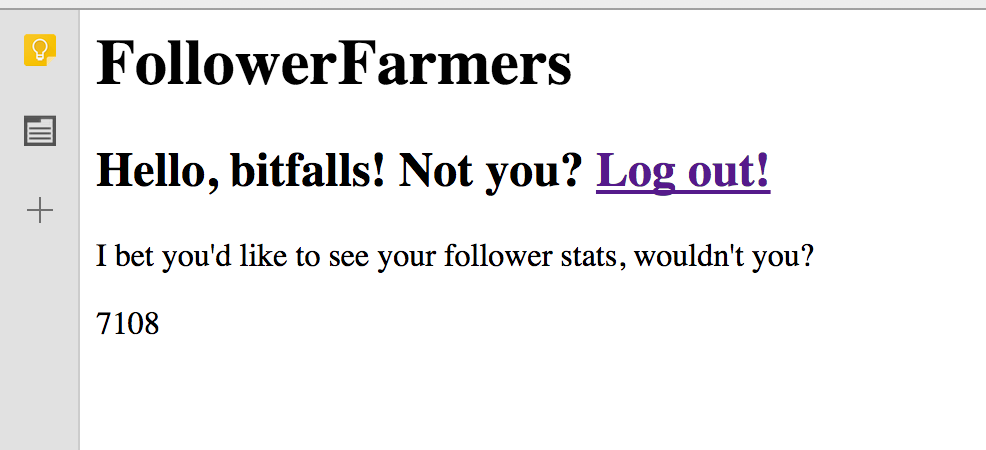
{{--index.blade.php--}}
<h1>FollowerFarmers</h1>

<h2>Hello, {{ $twitter_nickname }}! Not you? <a href="/logout">Log out!</a></h2>

<p>I bet you'd like to see your follower stats, wouldn't you?</p>{{--loggedout.blade.php--}}
<h1>FollowerFarmers</h1>
<h2>Hello, stranger!</h2>
<p>You're currently logged out. How about you <a href="/auth/twitter">log in with Twitter </a> to get started?</p>We’ll need to add some routes to routes/web.php, too:
我们也需要向routes/web.php添加一些路由:
Route::get('/', 'HomeController@index');
Route::get('/logout', 'Auth\LoginController@logout');
With this, we can check if we’re logged in, and we can easily log out.
这样,我们可以检查是否已登录,并且可以轻松注销。
Note that for security, the logout route should only accept POST requests with CSRF tokens – for simplicity during development, we’re taking the GET approach and revamping it later.
请注意,出于安全性考虑,注销路由应仅接受带有CSRF令牌的POST请求-为了简化开发过程,我们采用GET方法并在以后进行改进。
Admittedly, it’s not the prettiest thing to look at, but we’re building a demo here – the real thing can get visually polished once the logic is done.
诚然,这不是最漂亮的东西,但是我们在这里构建一个演示–逻辑完成后,可以在视觉上修饰真实的事物。
注册服务提供商 (Registering a Service Provider)
It’s common practice to register a service provider for easier access later on, so let’s do that. Our service can’t be instantiated without the token and secret (i.e. before the user logs in with Twitter) so we’ll need to make it deferred – in other words, it’ll only get created when needed, and we’ll make sure we don’t need it until we have those values.
注册服务提供商以方便日后访问是一种常见的做法,所以让我们这样做。 没有令牌和秘密就无法实例化我们的服务(即,在用户使用Twitter登录之前),因此我们需要将其推迟 -换句话说,只有在需要时才创建它,并且确保在拥有这些值之前我们不需要它。
artisan make:provider FollowerServiceProvider<?php
namespace App\Providers;
use App\Services\Followers\Followers;
use Illuminate\Support\ServiceProvider;
class FollowerServiceProvider extends ServiceProvider
{
protected $defer = true;
public function register()
{
$this->app->singleton(
Followers::class, function ($app) {
return new Followers(
session('twitter_token'), session('twitter_secret'),
session('twitter_nickname')
);
}
);
}
public function provides()
{
return [Followers::class];
}
}If we put a simple count echo into our logged in view:
如果我们在登录视图中放置一个简单的计数回显:
{{ count($ids) }}… and modify the HomeController to now use this ServiceProvider:
…并修改HomeController以现在使用此ServiceProvider:
...

        return view(
            'home.index', array_merge(
                $request->session()->all(),
                ['ids'=> resolve(Followers::class)->getFollowerIds()]
            )
        );
… and then we test, sure enough, it works.
……然后我们进行测试,当然可以,它可以正常工作。
数据库 (Database)
Now that we have a neat service to extract follower lists with, we should probably save them somewhere. We could save this into a local MySQL database, or even a flat file, but for performance and portability, I went with something different this time: RestDB.
现在我们有了一个精巧的服务来提取关注者列表,我们应该将它们保存在某个地方。 我们可以将其保存到本地MySQL数据库,甚至是平面文件中,但是出于性能和可移植性的考虑,这次我使用了其他方法: RestDB 。
RestDB is a plug and play hosted database service that’s easy to configure and use, freeing up your choices of hosting platform. By not needing a database that writes to a local filesystem, you can easily push an app like the one we’re building to Google Cloud Engine or Heroku. With the help of its templates, you can instantly set up a blog, a landing page, a web form, a log analyzer, even a mailing system – heck, the service even supports MarkDown for inline field editing, letting you practically have a MarkDown-based blog right there on their service.
RestDB是一个即插即用的托管数据库服务,易于配置和使用,从而解放了您对托管平台的选择。 通过不需要写入本地文件系统的数据库,您可以轻松地将像我们正在构建的应用程序推送到Google Cloud Engine或Heroku。 借助其模板 ,您可以立即设置博客,登录页面,Web表单,日志分析器,甚至是邮件系统–哎呀,该服务甚至支持MarkDown进行内联字段编辑,从而使您实际上拥有MarkDown基于博客的服务。
RestDB has a free tier, and the first month is virtually limitless so you can thoroughly test it. The database I’m developing this on is on a Basic plan (courtesy of the RestDB team).
RestDB有免费层,第一个月实际上是无限的,因此您可以对其进行全面测试。 我正在开发的数据库是基于基本计划的(由RestDB团队提供)。
设置RestDB (Setting up RestDB)
Unlike with other database services, with RestDB it’s important to consider record number limits. The Basic plan offers 10000 records, which would be quickly exhausted if we saved the follower of each logged in user as a separate entry, or even a list of followers for each user as a separate entry per 15 minute timeframe. That’s why I chose the following plan:
与其他数据库服务不同,RestDB必须考虑记录数限制。 基本计划提供10000条记录,如果我们将每一个登录用户的关注者保存为单独的条目,或者甚至每15分钟将每个用户的关注者列表保存为单独的条目,这些记录将很快耗尽。 这就是为什么我选择以下计划:
each new user will be a record in the
accountscollection.每个新用户将成为
accounts集合中的一条记录。each new follower list will be a record in the
follower-listscollection and will be a child record ofaccounts.- at a maximum rate of every 15 minutes (or more if user takes longer to come back and log into the app), a new list will be generated, compared to the last one, and a new list along with a diff towards the last one will be saved. 以每15分钟的最大速率(如果用户需要更长的时间才能重新登录并登录到应用程序,则可以增加速率),将生成一个与上一个列表相比的新列表,并生成一个新列表以及与上一个列表的差异将被保存。
- every user will be able to keep at most 100 histories 每个用户最多可以保留100个历史记录
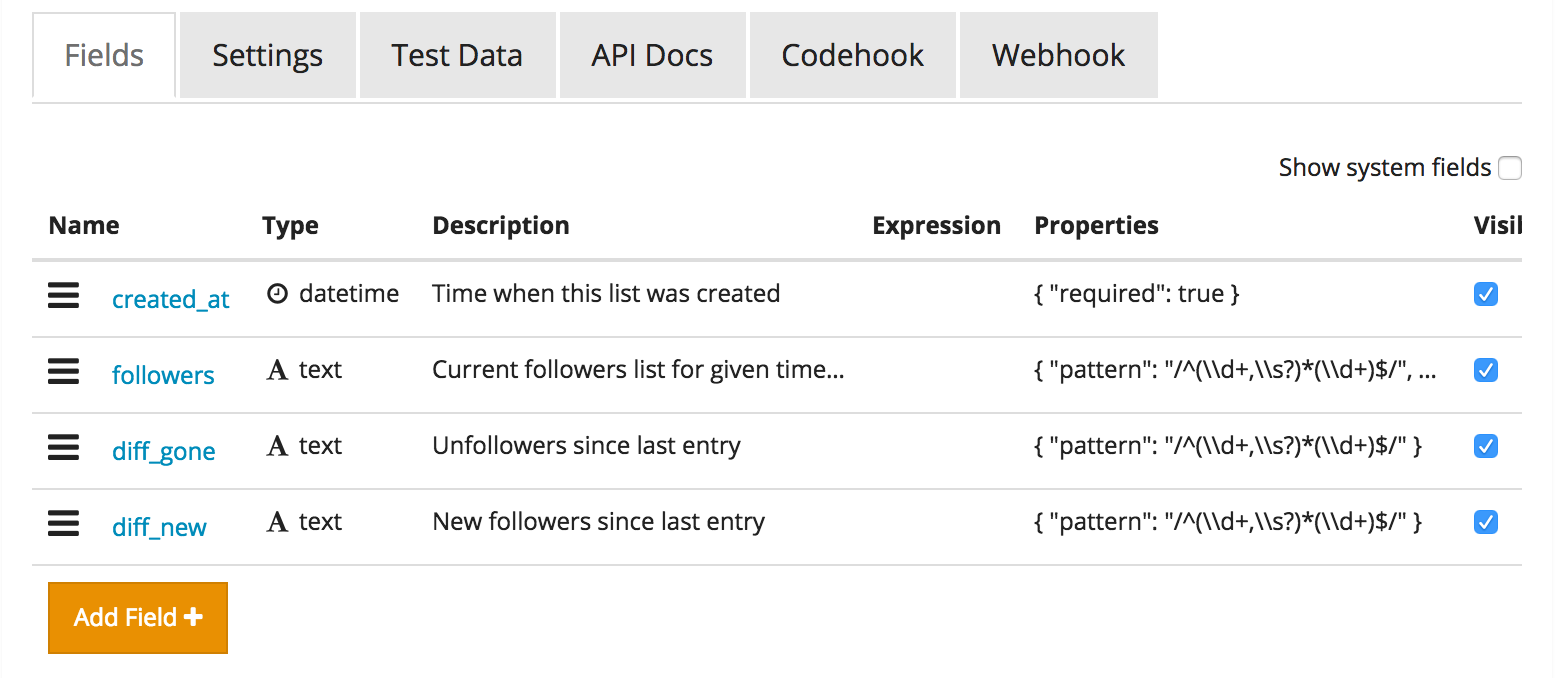
That said, let’s create the new follower-lists collection as per the quick-start docs. Once the collection has been created, let’s add some fields:
也就是说,让我们根据快速入门docs创建新的follower-lists集合。 创建集合后,让我们添加一些字段:
a required
followerstext field. The text field supports regular expression validations, and since we’re going to use a comma separated list to store the follower IDs, we can apply a regex like this one to make sure the data is always valid:^(\d+,\s?)*(\d+)$. This will match only lines with comma separated digits, but without a trailing comma. You can see it in action here.必填的
followers文本字段。 文本字段支持正则表达式验证,并且由于我们将使用逗号分隔的列表来存储关注者ID,因此我们可以应用这样的正则表达式来确保数据始终有效:^(\d+,\s?)*(\d+)$。 这将仅匹配用逗号分隔的数字,但没有尾随逗号的行。 您可以在这里看到它的实际效果。a
diff_newfield of text type, which will contain a list of new followers since the last entry. The same regex restriction as forfollowerswill apply, only updated to be optional, becausge sometimes there will be no difference compared to the last entry:(^(\d+,\s?)*(\d+)$)?.文本类型的
diff_new字段,其中将包含自上一个条目以来的新关注者列表。 将应用与followers相同的正则表达式限制,仅将其更新为可选,因为有时与最后一个条目相比没有什么不同:(^(\d+,\s?)*(\d+)$)?。a
diff_gonefield of text type, which will contain a list of unfollowers since the last entry. The same regex restriction as fordiff_newwill apply.文本类型的
diff_gone字段,其中将包含自上一个条目以来取消关注者的列表。 与diff_new相同的regex限制将适用。
Our collection should look like this:
我们的集合应如下所示:
Now let’s create the parent collection: accounts.
现在让我们创建父集合: accounts 。
Note: you may be wondering why we don’t just use the built-in users collection. This is because that collection is only meant for authenticating Auth0 users. The fields that are in there would be useful for us, but as per the docs, we have no write access to that database, and we need it. So why not just go with Auth0 for logins and RestDB for data? Feel free take that approach – I personally feel like depending on one third party service for a crucial part of my app is enough, two would be too much for me.
注意:您可能想知道为什么我们不仅仅使用内置的users集合。 这是因为该集合仅用于验证Auth0用户 。 其中的字段对我们很有用,但是根据文档,我们对该数据库没有写访问权,因此我们需要它。 那么,为什么不只使用Auth0进行登录并使用RestDB进行数据处理呢? 随意采用这种方法–我个人觉得依靠第三方服务来满足我的应用程序的关键部分就足够了,而对于我来说,两个就足够了。
The fields we need are:
我们需要的字段是:
twitter_id, the Twitter account ID of the user. Required number.twitter_id,用户的Twitter帐户ID。 必填号码 。settings, a required JSON field. This will hold all the user’s account-specific settings, like refresh interval, emailing frequency, etc.settings,一个必需的JSON字段。 这将保留所有用户特定于帐户的设置,例如刷新间隔,电子邮件发送频率等。
After adding these, let’s add a new follower_lists field, and define it as a child relation to our follower-lists collection. Under Properties, we should pick “child of…”. The naming is a little confusing – despite the option saying “child of follower-lists”, it is follower-lists who is the child.
添加这些之后,让我们添加一个新的follower_lists字段,并将其定义为我们的follower-lists集合的子关系。 在“ 属性 ”下,我们应该选择“ ...的孩子”。 命名有点混乱-尽管选项说“跟随者列表的孩子”,但follower-lists才是孩子。
You may have noticed we haven’t used timestamp fields anywhere, like created_at. That’s because RestDB automatically creates them for every collection, along with some other fields. To inspect those System fields, click the “Show System Fields” option in the top right corner of each collection’s Settings table:
您可能已经注意到我们在任何地方都没有使用过时间戳字段,例如created_at 。 这是因为RestDB会自动为每个集合以及其他一些字段创建它们。 要检查这些系统字段 ,请单击每个集合的“设置”表右上角的“显示系统字段”选项:
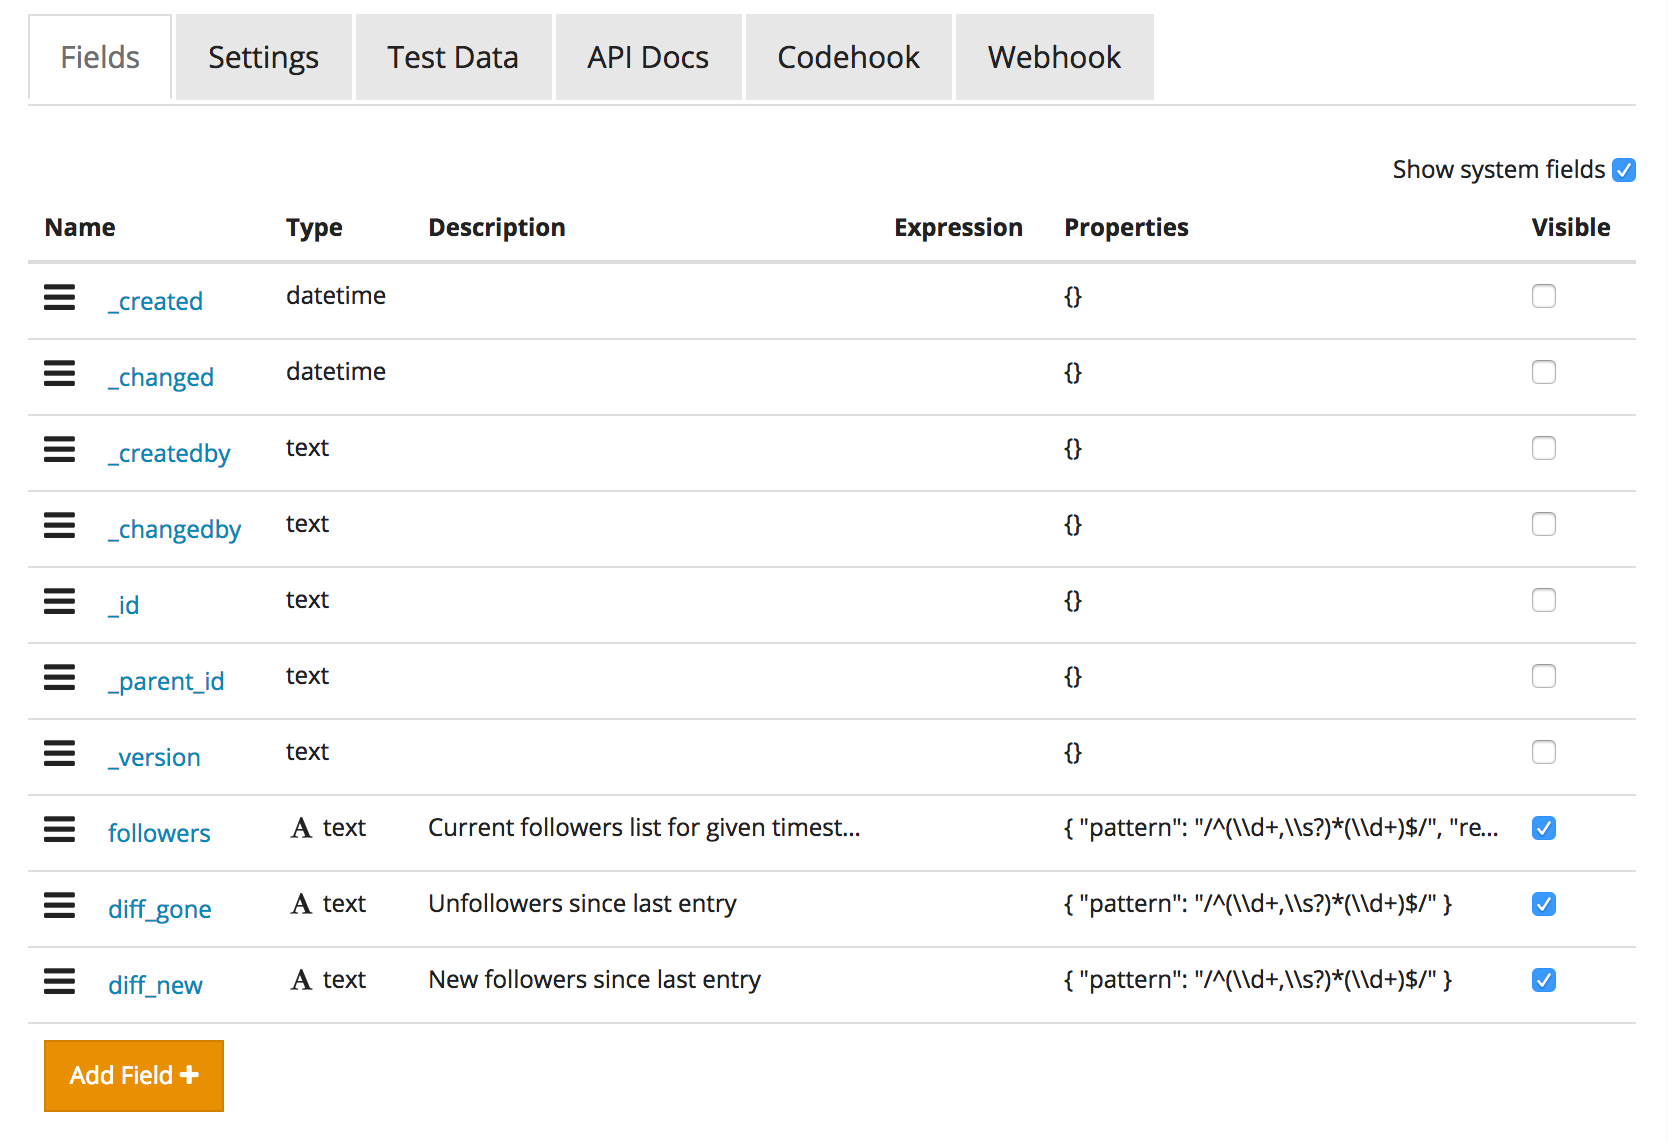
Getting these fields in a payload when querying the database requires us to use the ?metafields=true param in the API URLs.
查询数据库时,要在有效负载中获取这些字段,需要我们在API URL中使用?metafields=true参数。
We are now ready to start combining the PHP and RestDB side.
现在,我们准备开始结合PHP和RestDB方面。
保存到RestDB并从中读取 (Saving to and Reading from RestDB)
To be able to interact with RestDB, we need an API key. We can get it by following instructions here. All options should be left at the default value, with all REST methods enabled. The key should then be saved into .env:
为了能够与RestDB进行交互,我们需要一个API密钥。 我们可以按照此处的说明进行操作。 所有选项都应保留为默认值,并启用所有REST方法。 然后将密钥保存到.env :
RESTDB_KEY=keykeykeyThe idea for accounts is as follows:
accounts的概念如下:
when the user first authorizes Twitter, the app will read the accounts collection for the Twitter ID provided, and if it doesn’t exist, it will write a new entry.
当用户首次授权Twitter时,该应用将读取提供的Twitter ID的帐户集合,如果该ID不存在,它将编写一个新条目。
the user is then redirected to the welcome screen, which will contain a message confirming account creation if one was created, and offer to redirect to the
/dashboard.然后,用户将被重定向到欢迎屏幕,该屏幕将包含一条消息,确认创建帐户(如果已创建),并提供重定向到
/dashboard。
Let’s first make a RestDB service for talking to the database.
首先让我们提供一个RestDB服务来与数据库对话。
<?php
// Services/Followers/RestDB.php

namespace App\Services\Followers;

use GuzzleHttp\Client;
use GuzzleHttp\ClientInterface;
use Psr\Http\Message\ResponseInterface;

class RestDB
{
    /** @var ClientInterface */
    protected $client;

    /**
     * Sets the Guzzle client to be used
     *
     * @param ClientInterface $client
     * @return $this
     */
    public function setClient(ClientInterface $client)
    {
        $this->client = $client;
        return $this;
    }

    /**
     * @return ClientInterface
     */
    public function getClient()
    {
        return $this->client;
    }

    /**
     * Configures a default Guzzle client so it doesn't need to be injected
     * @return $this
     */
    public function setDefaultClient()
    {
        $client = new Client([
            'base_uri' => 'https://followerfarmers-00df.restdb.io/rest/',
            'headers' => [
                'x-apikey' => getenv('RESTDB_KEY'),
                'content-type' => 'application/json'
            ]
        ]);
        $this->client = $client;
        return $this;
    }

    /**
     * Returns user's account entry if it exists. Caches result for 5 minutes
     * unless told to be `$fresh`.
     *
     * @param int $twitter_id
     * @param bool $fresh
     * @return bool|\stdClass
     */
    public function userAccount(int $twitter_id, bool $fresh = false)
    {
        /** @var ResponseInterface $request */
        $response = $this->client->get(
            'accounts', [
                'body' => '{"twitter_id": ' . $twitter_id . ', "max": 1}',
                'query' => ['metafields' => true],
                'headers' => ['cache-control' => $fresh ? 'no-cache' : 'max-age:300'],
            ]
        );

        $bodyString = json_decode($response->getBody()->getContents());

        if (empty($bodyString)) {
            return false;
        }

        return $bodyString[0];
    }


    /**
     * Creates a new account in RestDB.
     *
     * @param array $user
     * @return bool
     */
    public function createUserAccount(array $user)
    {
        /** @var ResponseInterface $request */
        $response = $this->client->post('accounts', [
            'body' => json_encode([
                'twitter_id' => $user['id'],
                'settings' => array_except($user, 'id')
            ]),
            'headers' => ['cache-control' => 'no-cache']
        ]);

        return $response->getStatusCode() === 201;

    }
}
In this service, we define ways to set the Guzzle client to be used, along with a shortcut method to define a default one. This default one also includes the default authorization header, and sets content type as JSON which is what we’re communicating with. We also demonstrate basic reading and writing from and to RestDB.
在此服务中,我们定义了设置要使用的Guzzle客户端的方法,以及定义默认客户端的快捷方式。 此默认值还包括默认的授权标头,并将内容类型设置为JSON(我们正在与之通信)。 我们还将演示与RestDB之间的基本读写。
The userAccount method directly searches for a Twitter ID in the accountsrecords, and returns a record if found, or false if not. Note the use of the metafields query param – this lets us fetch the _created and other system fields. Notice also that we cache the result for 5 minutes unless the $fresh param is passed in, because the user info will rarely change and we might need it multiple times during a session. The createUserAccount method takes an array of user data (the most important of which is the id key) and creates the account. Note that we’re looking for status 201 which means CREATED.
userAccount方法直接在accounts记录中搜索Twitter ID,如果找到则返回记录,否则返回false。 注意元metafields查询参数的使用–这使我们能够获取_created和其他系统字段 。 还要注意,除非传入$fresh参数,否则我们将结果缓存5分钟,因为用户信息很少更改,并且在会话期间可能需要多次。 createUserAccount方法采用用户数据数组(其中最重要的是id键)并创建帐户。 请注意,我们正在寻找状态201 ,表示CREATED 。
Let’s also make a ServiceProvider and register the service as a singleton.
我们还创建一个ServiceProvider并将服务注册为单例。
artisan make:provider RestdbServiceProvider<?php
namespace App\Providers;
use App\Services\Followers\RestDB;
use Illuminate\Support\ServiceProvider;
class RestdbServiceProvider extends ServiceProvider
{
/**
* Register the application services.
*
* @return void
*/
public function register()
{
$this->app->singleton(
'restdb', function ($app) {
$r = new RestDB();
$r->setDefaultClient();
return $r;
}
);
}
}Finally, let’s update our LoginController.
最后,让我们更新LoginController。
// ...
        $request->session()->put('twitter_id', $user->id);

        $rest = resolve('restdb');
        if (!$rest->userAccount($user->id)) {
            if ($rest->createUserAccount(
                [
                    'token' => $user->token,
                    'secret' => $user->tokenSecret,
                    'nickname' => $user->nickname,
                    'id' => $user->id,
                ]
            )) {
                $request->session()->flash(
                    'info', 'Your account has been created! Welcome!'
                );
            } else {
                $request->session()->flash(
                    'error', 'Failed to create your account :('
                );
            }

        }

        // ...

        return redirect('/');
In the LoginController‘s handleProviderCallback method, we first grab (resolve) the service, use it to check if the user has an account, create it if not, and flash the message to session if either successful or not.
在LoginController的handleProviderCallback方法中,我们首先获取(解析)该服务,使用它检查用户是否拥有帐户,如果没有,则创建该帐户,如果成功或失败,则将消息刷新到会话。
Let’s put these flash messages into the view:
让我们将这些即时消息放入视图中:
{{--index.blade.php--}}
@isset($info)
    <p>{{ $info }}</p>
@endisset

@isset($error)
    <p>{{ $error }}</p>
@endisset
...
If we test this out, sure enough, our new record is created:
如果我们对此进行测试,那么肯定会创建新记录:
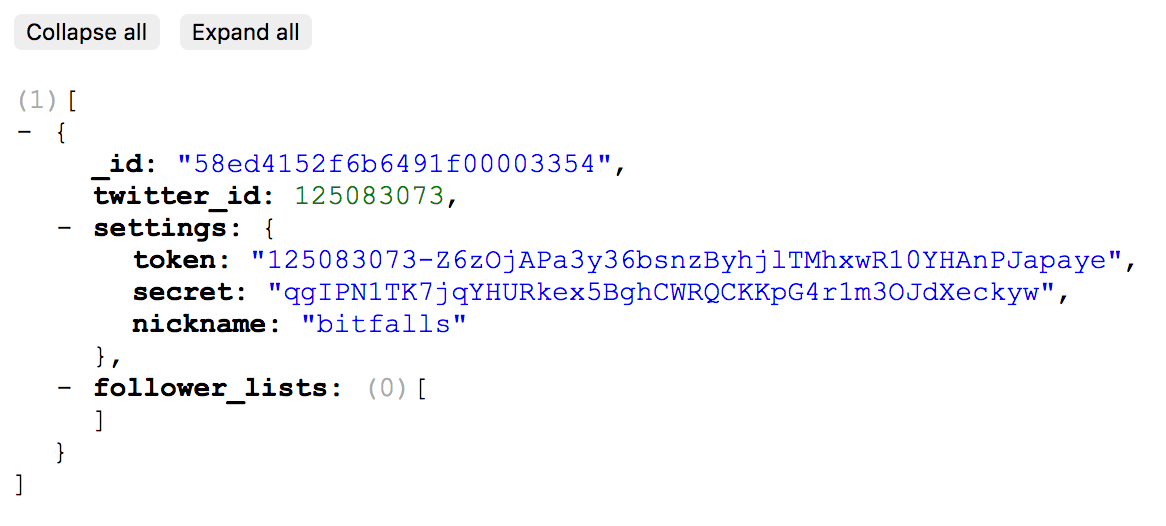
Now let’s offer a /dashboard. The idea is:
现在让我们提供一个/dashboard 。 这个想法是:
- when a user logs in, they’ll be presented with a “Dashboard” link. 当用户登录时,系统将为他们显示“仪表盘”链接。
clicking this link will, in order:
单击此链接将按以下顺序进行:
grab their latest
follower-listsentry from RestDB从RestDB获取其最新的
follower-lists条目- if more than 15 minutes have elapsed since the last entry was created, or the user doesn’t have an entry at all, a new list of followers will be fetched. The new list will be saved. If it wasn’t the first entry, a diff is generated for new followers and unfollowers. 如果自创建最后一个条目以来已超过15分钟,或者用户根本没有任何条目,则将获取新的关注者列表。 新列表将被保存。 如果不是第一个条目,则会为新的关注者和取消关注者生成差异。
- if the user has refreshed in the last 15 minutes, they will simply be redirected to the dashboard 如果用户在最近15分钟内刷新过,他们将被简单地重定向到仪表板
- when the user accesses this dashboard, all their follower-lists RestDB entries are fetched 当用户访问此仪表板时,将提取其所有关注者列表RestDB条目
- the applications goes through all the diff entries in the records, and generates reports for unfollowers, displaying information on how long they had been following the user before leaving. 应用程序将遍历记录中的所有差异条目,并为取消关注者生成报告,显示有关他们在离开之前已经关注用户多长时间的信息。
once these IDs for the report have been fetched, their information is fetched via the
/users/lookupendpoint to grab their avatars and Twitter handles.一旦获取了报告的这些ID,便会通过
/users/lookup端点获取其信息,以获取其化身和Twitter句柄。- if an account had been following for a day or less, it is flagged with a red color, meaning a high certainty of follower farming. 1 – 5 days is orange, 5 – 10 days is yellow, and others are neutral. 如果某个帐户被追踪了一天或更短的时间,则该帐户会标记为红色,这表示追随者耕种的可能性很高。 1 – 5天为橙色,5 – 10天为黄色,其他则为中性。
Let’s update the index view first, and add a new route.
让我们先更新索引视图,然后添加新路线。
// routes/web.php
Route::get('/dashboard', 'HomeController@dashboard');{{--index.blade.php--}}
...
<p>I bet you'd like to see your follower stats, wouldn't you?</p>
Go to <a href="/dashboard">dashboard</a>.We need a way to fetch the last follower_lists entry of a user. Thus, in the RestDB service, we can add the following method:
我们需要一种方法来获取用户的最后一个follower_lists条目。 因此,在RestDB服务中,我们可以添加以下方法:
/**
     * Get the last follower_lists entry of the user in question, or false if
     * none exists.
     *
     * @param int $twitter_id
     * @return bool|\stdClass
     */
    public function getUsersLastEntry(int $twitter_id)
    {
        $id = $this->userAccount($twitter_id)->_id;
        /** @var ResponseInterface $request */
        $response = $this->client->get(
            'accounts/' . $id . '/follower_lists', [
                'query' => [
                    'metafields' => true,
                    'sort' => '_id',
                    'dir' => -1,
                    'max' => 1,
                ],
                'headers' => ['cache-control' => 'no-cache'],
            ]
        );

        $bodyString = json_decode($response->getBody()->getContents());

        return !empty($bodyString) ? $bodyString[0] : false;

    }
We either return false, or the last entry. Notice that we’re sorting by the _id metafield, from newest to oldest (dir=-1), and fetching a maximum of 1 entry. These params are all explained here.
我们返回false或最后一个条目。 请注意,我们正在按_id字段从最新到最旧( dir=-1 )进行排序,并最多提取1个条目。 这些参数都在这里说明。
Now let’s turn our attention to the dashboardmethod in HomeController:
现在,我们将注意力转向HomeController的dashboard方法:
public function dashboard(Request $request)
    {
        $twitter_id = $request->session()->get('twitter_id', 0);
        if (!$twitter_id) {
            return redirect('/');
        }

        /** @var RestDB $rest */
        $rest = resolve('restdb');
        $lastEntry = $rest->getUsersLastEntry($twitter_id);

        if ($lastEntry) {
            $created = Carbon::createFromTimestamp(
                strtotime($lastEntry->_created)
            );
            $diff = $created->diffInMinutes(Carbon::now());
        }

        if ((isset($diff) && $diff > 14) || !$lastEntry) {
            $followerIds = resolve(Followers::class)->getFollowerIds();         $rest->addFollowerList($followerIds, $lastEntry, $twitter_id);
        }

        dd("Let's show all previous lists");

    }
Ok, so what’s going on here? First, we do a primitive check if the user is still logged in – the twitter_id has to be in the session. If not, we redirect to homepage. Then, we fetch the Rest service, get the account’s last follower-lists entry (which is either an object or false) and then if it exists, we calculate how old it is. If it’s more than 14 minutes, or if the entry doesn’t exist at all (meaning it’s the very first one for that account), we fetch a new list of followers and save it. How do we save it? By adding a new addFollowerList method to the Rest service.
好的,这是怎么回事? 首先,我们进行原始检查,检查用户是否仍在登录– twitter_id必须在会话中。 如果没有,我们将重定向到主页。 然后,我们获取Rest服务,获取该帐户的最后一个关注者列表条目(它是object或false ),然后如果存在该条目,我们将计算其寿命。 如果超过14分钟,或者根本不存在该条目(这是该帐户的第一个条目),我们将获取新的关注者列表并保存。 我们如何保存它? 通过向Rest服务添加新的addFollowerList方法。
/**
     * Adds a new follower_lists entry to an account entry
     *
     * @param array $followerIds
     * @param \stdClass|bool $lastEntry
     * @param int $twitter_id
     * @return bool
     * @internal param array $newEntry
     */
    public function addFollowerList(
        array $followerIds,
        $lastEntry,
        int $twitter_id
    ) {
        $account = $this->userAccount($twitter_id);

        $newEntry = ['followers' => implode(', ', $followerIds)];

        if ($lastEntry !== false) {
            $lastFollowers = array_map(
                function ($el) {
                    return (int)trim($el);
                }, explode(',', $lastEntry->followers)
            );

            sort($lastFollowers);
            sort($followerIds);

            $newEntry['diff_gone'] = implode(
                ', ', array_diff($lastFollowers, $followerIds)
            );
            $newEntry['diff_new'] = implode(
                ', ', array_diff($followerIds, $lastFollowers)
            );

        }

        try {
            /** @var ResponseInterface $request */
            $response = $this->client->post(
                'accounts/' . $account->_id . '/follower_lists', [
                    'body' => json_encode($newEntry),
                    'headers' => ['cache-control' => 'no-cache'],
                ]
            );
        } catch (ClientException $e) {
            // Log the exception message or something
        }

        return $response->getStatusCode() === 201;
    }
This one first grabs the user account to find the ID of the account record in RestDB. Then, it initiates the $newEntry variable with a properly formatted (imploded) string of current follower IDs. Next, if there was a last entry, we:
首先,该用户抓取用户帐户以在RestDB中找到帐户记录的ID。 然后,它使用正确的格式( $newEntry )当前关注者ID字符串初始化$newEntry变量。 接下来,如果有最后一个条目,我们:
- get those IDs into a proper array by exploding the string and cleaning whitespace. 通过分解字符串并清理空格将这些ID放入适当的数组中。
- sort both current and past follower arrays for more effective diffing. 对当前和过去的跟随者数组进行排序,以实现更有效的区分。
get the differences and add them to
$newEntry.得到差异并将它们添加到
$newEntry。
We then save the entry, by targeting the specific account entry with the previously fetched ID, and continuing on into the sub-collection of follower_lists.
然后,通过使用先前获取的ID定位特定的帐户条目,然后继续进入follower_lists的子集合,来保存条目。
To test this, we can fake some data. Let’s alter the $followerIds part of HomeController::dashboard to this:
为了测试这一点,我们可以伪造一些数据。 让我们将HomeController::dashboard的$followerIds部分更改为:
$count = rand(50, 75);
            $followerIds = [];
            while ($count--) {
                $flw = rand(1, 100);
                if (in_array($flw, $followerIds)) $count++; else
                $followerIds[] = $flw;
            }
This will generate 50-75 random numbers ranging from 1 to 100. Good enough for us to get some diffs. If we hit the url /dashboard while logged in now, we should get our initial entry.
这将生成50-75个随机数,范围从1到100。足以让我们获得一些差异。 如果现在登录时按url /dashboard ,我们应该得到我们的初始输入。
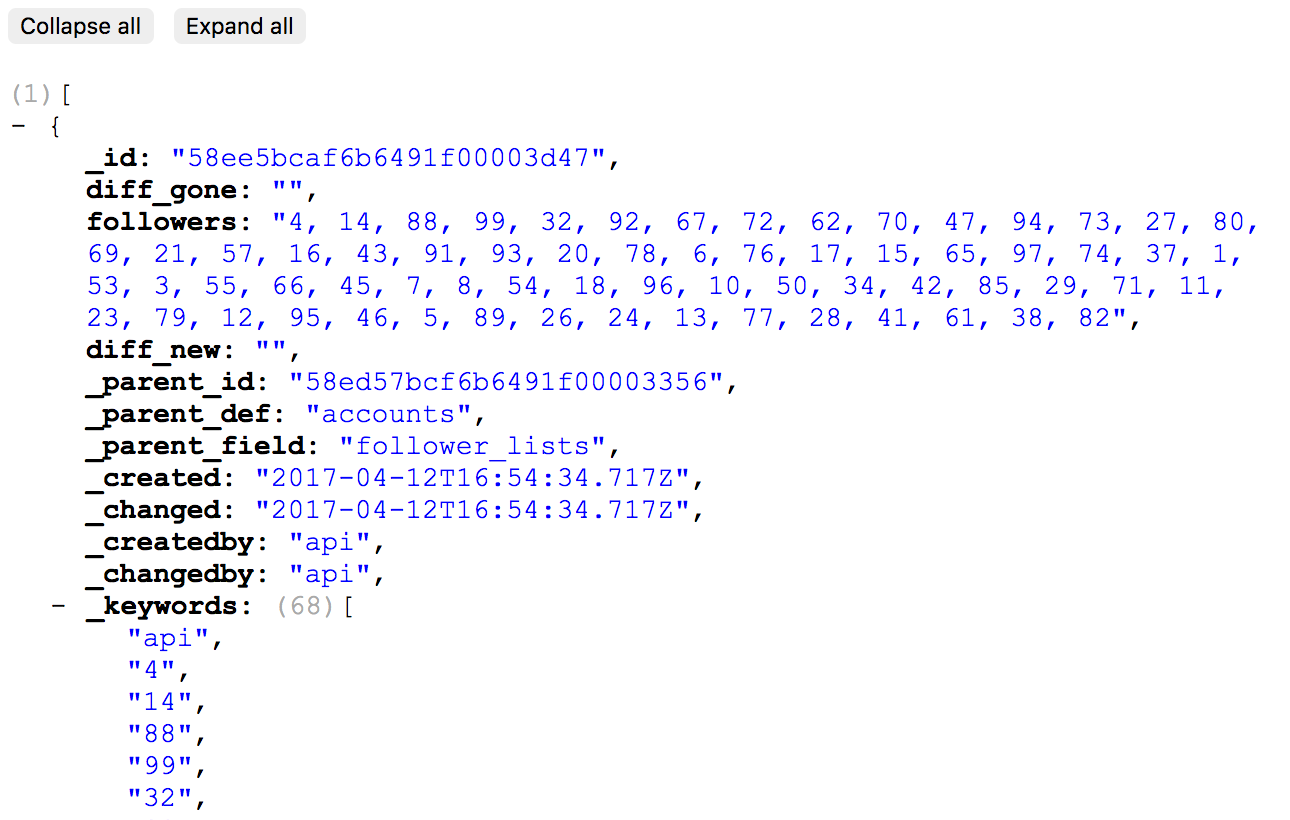
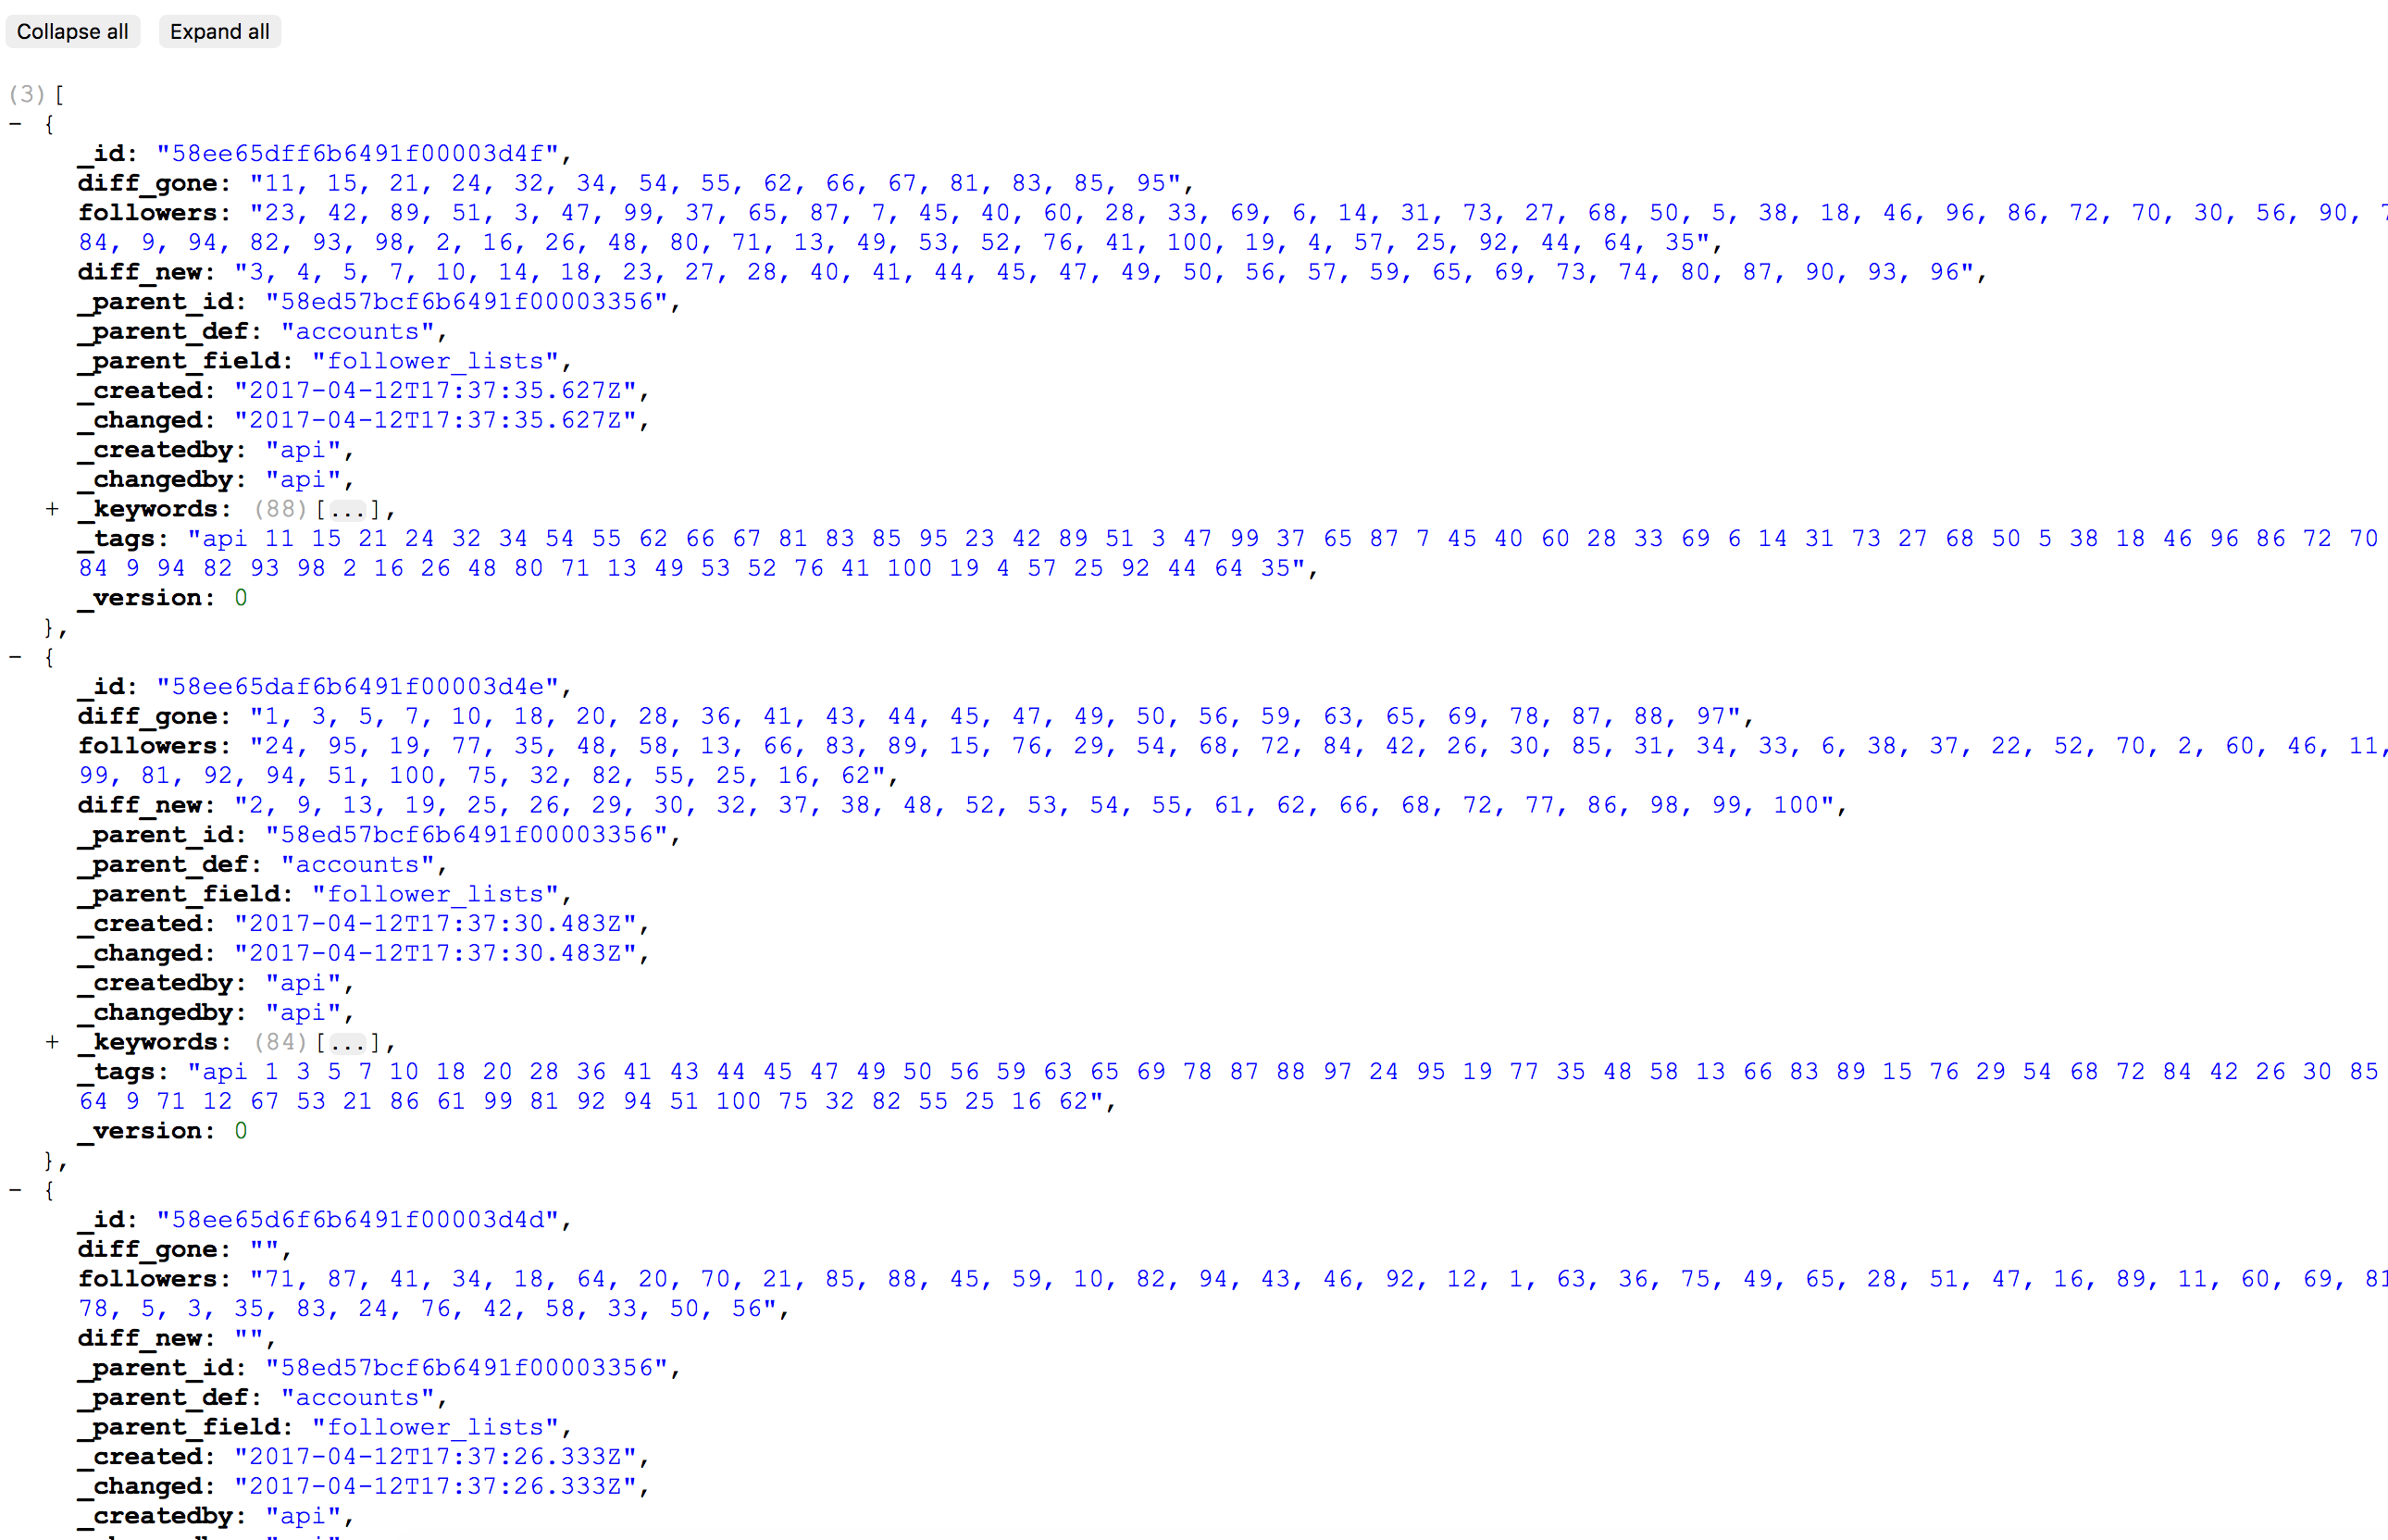
If we remove the 15 minute limit from the if block and refresh two more times, we’ve generated 3 entries total, with good looking diffs:
如果我们从if块中删除15分钟的限制并再次刷新两次,则我们总共生成了3个条目,它们之间的差异非常好:
It’s time for the final feature. Let’s analyze the entries, and identify some follower farmers.
现在是时候进行最后的功能了。 让我们分析条目,并确定一些追随者。
最终拉伸 (Final Stretch)
Because it contextually makes sense, we’ll put this logic into the Followers service. Let’s create an analyzeUnfollowers method. It will accept an arbitrary number of entries, and do its logic in a loop on all of them. Then, if we later want to provide a quicker way of just checking the last bit of information since the last login session, we can simply pass the two last entries instead of all of them, and the logic remains the same.
因为从上下文上讲有意义,所以我们将此逻辑放入Followers服务。 让我们创建一个analyzeUnfollowers方法。 它将接受任意数量的条目,并对所有条目进行循环逻辑处理。 然后,如果以后我们希望提供一种更快速的方法来仅检查自上次登录会话以来的最后信息,则可以简单地传递最后两个条目,而不是全部传递,逻辑保持不变。
public function analyzeUnfollowers(array $entries)
    {
        ...
    }
To identify unfollowers, we look at the most recent diff_gone, for all who are gone since the last time we checked our follower list, and then find them in the diff_new arrays of previous entries. This then lets us find out how long they had been following us before leaving. While using the entries, we also need to turn the diff_gone and diff_new entries into arrays, for easy seeking.
为了确定取消关注者,我们查看最新的diff_gone ,其中是自上次检查关注者列表以来所有离开的人,然后在先前条目的diff_new数组中找到他们。 然后,我们可以了解他们离开前已经追踪我们多久了。 在使用条目时,我们还需要将diff_gone和diff_new条目转换为数组,以便于查找。
/**
     * Accepts an array of entries (stdObjects) ordered from newest to oldest.
     * The objects must have the properties: diff_gone, diff_new, and followers,
     * all of which are comma delimited strings of integers, or arrays of integers.
     * The property `_created` is also essential.
     *
     * @param array $entries
     * @return array
     */
    public function analyzeUnfollowers(array $entries)
    {
        $periods = [];
        $entries = array_map(
            function ($entry) {
                if (is_string($entry->diff_gone)) {
                    $entry->diff_gone = $this->intArray($entry->diff_gone);
                }
                if (is_string($entry->diff_new)) {
                    $entry->diff_new = $this->intArray($entry->diff_new);
                }

                return $entry;
            }, $entries
        );

        $latest = array_shift($entries);

        for ($i = 0; $i < count($entries); $i++) {
            $cur = $entries[$i];
            $curlast = array_last($entries) === $cur;
            if ($curlast) {
                $matches = $latest->diff_gone;
            } else {
                $matches = array_intersect(
                    $cur->diff_new, $latest->diff_gone
                );
            }
            if ($matches) {
                $periods[] = [
                    'matches' => array_values($matches),
                    'from' => (!$curlast) ? Carbon::createFromTimestamp(strtotime($cur->_created)) : 'forever',
                    'to' => Carbon::createFromTimestamp(strtotime($latest->_created))
                ];
            }
        }

        return $periods;
    }

    /**
     * Turns a string of comma separated values, spaces or no, into an array of integers
     *
     * @param string $string
     * @return array
     */
    protected function intArray(string $string): array
    {
        return array_map(
            function ($el) {
                return (int)trim($el);
            }, explode(',', $string)
        );
    }
Of course, we need a way to fetch all the follower list entries. We put the getUserEntries method into the Rest service:
当然,我们需要一种获取所有关注者列表条目的方法。 我们将getUserEntries方法放入Rest服务:
/**
     * Gets a twitter ID's full list of follower list entries
     *
     * @param int $twitter_id
     * @return array
     */
    public function getUserEntries(int $twitter_id): array
    {
        $id = $this->userAccount($twitter_id)->_id;
        /** @var ResponseInterface $request */
        $response = $this->client->get(
            'accounts/' . $id . '/follower_lists', [
                'query' => [
                    'metafields' => true,
                    'sort' => '_id',
                    'dir' => -1,
                    'max' => 100,
                ],
                'headers' => ['cache-control' => 'no-cache'],
            ]
        );

        $bodyString = json_decode($response->getBody()->getContents());

        return !empty($bodyString) ? $bodyString : [];

    }
It’s possible that the number of followers on some accounts will create big downloads, thus slowing the app down. Since we only really need the diff fields, we can target only those with the h param, as described at the bottom of this page.
某些帐户上的关注者数量可能会产生大量下载,从而减慢应用程序的运行速度。 由于我们只需要diff字段,因此我们只能针对具有h参数的字段,如本页底部所述。
Then, if we, for debugging purposes, modify the dashboard method…
然后,如果出于调试目的,请修改dashboard方法…
$entries = $rest->getUserEntries($twitter_id);
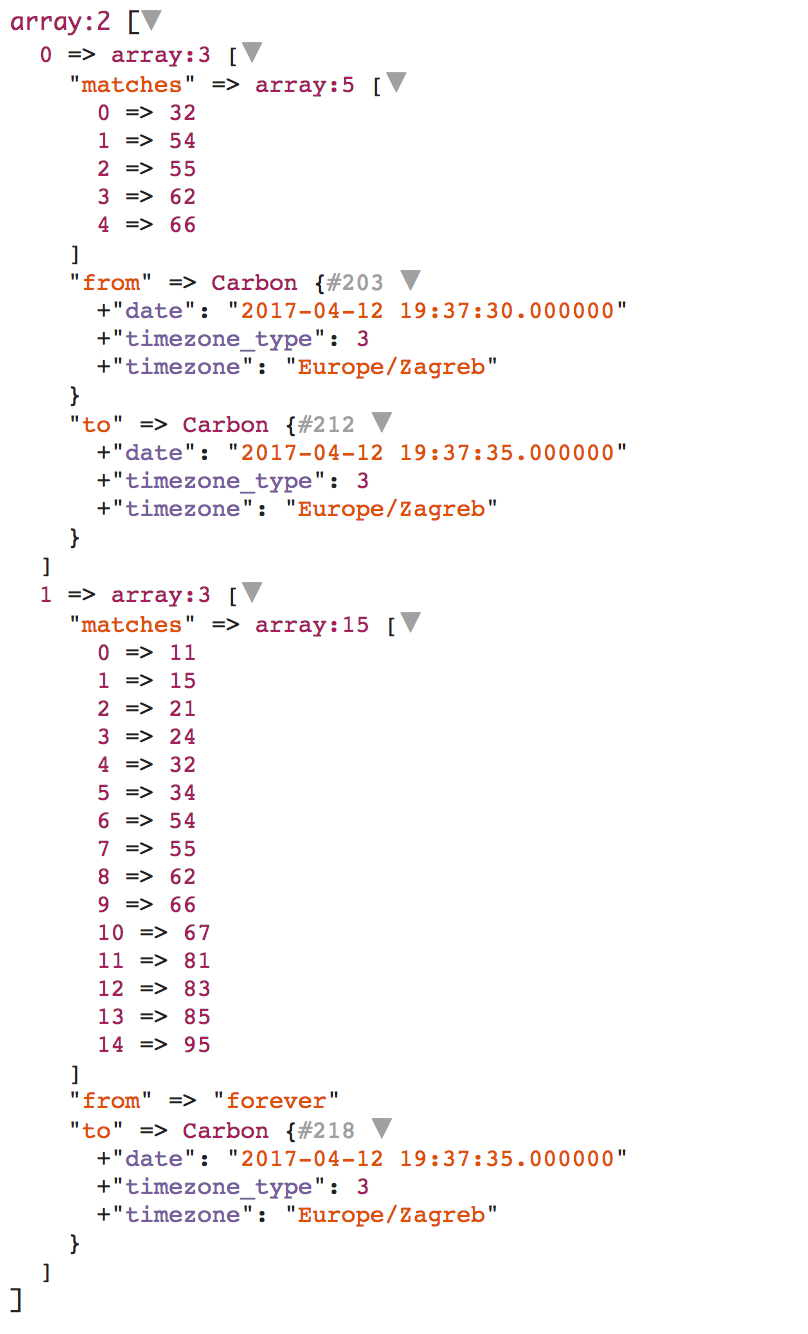
dd($followers->analyzeUnfollowers($entries));The output looks something like this. It’s obvious that 5 of our fake followers have only been following us for 5 seconds, while the rest of them have been following us since before we signed up for this service (i.e. forever).
输出看起来像这样。 显然,我们有5个虚假的关注者仅关注了我们5秒钟,而其他人则在我们注册此项服务之前一直关注我们(即forever )。
Finally, we can analyze the periods we got back – it’s easy to identify short ones, and color-code them as described at the beginning of this post. As this is already a post of considerable length, I’ll leave that part, and the part about using Twitter’s Users Lookup API to turn the IDs into user handles as homework. Protip: if you run out of query calls for that part, you can crawl their mini profile with the user_id param!
最后,我们可以分析返回的时期–可以很容易地识别出短暂的时期,并按照本文开头所述对它们进行颜色编码。 由于这已经是相当长的篇幅,因此我将保留该部分,以及有关使用Twitter的Users Lookup API将ID转换为家庭作业的用户句柄的部分。 提示:如果您对该部分的查询用尽了,可以使用user_id param来抓取它们的微型概要文件 !
结论 (Conclusion)
We went through the process of building a simple application for tracking the amount of time a given person has followed you, and flagging them down as a follower farmer, all without using a local database – RestDB provided us with extreme performance, scalability, and independence from local services.
我们经历了一个简单的应用程序的构建过程,该应用程序用于跟踪特定人员跟随您的时间,并将其标记为追随者,而无需使用本地数据库-RestDB为我们提供了卓越的性能,可伸缩性和独立性来自本地服务。
There are many upgrades we could apply to this app:
我们可以对此应用程序进行许多升级:
- a cronjob to auto-refresh the follower lists behind the scenes 自动刷新后台列表中的追随者的cronjob
- heavy caching to conserve API calls and increase speed 大量缓存以节省API调用并提高速度
- a premium account subscription which would let users keep more entries 高级帐户订阅,这将使用户保留更多条目
- a dashboard matching tweets with unfollows, showing you what may have prompted someone to leave your twittersphere 一个仪表板,将推文与后续消息进行匹配,向您显示可能促使某人离开您的Twittersphere的原因
- multi-account support 多帐户支持
- Instagram support Instagram支持
What other upgrades to this system can you think of? Feel free to contribute to the app on Github!
您还能想到该系统还有哪些其他升级? 随时为Github上的应用程序做出贡献!
analytics db


 919
919

 被折叠的 条评论
为什么被折叠?
被折叠的 条评论
为什么被折叠?
 到【灌水乐园】发言


