


envoy
This article was peer reviewed by Wern Ancheta and Viraj Khatavkar. Thanks to all of SitePoint’s peer reviewers for making SitePoint content the best it can be!
Wern Ancheta和Viraj Khatavkar对该文章进行了同行评审。 感谢所有SitePoint的同行评审人员使SitePoint内容达到最佳状态!
Test automation, continuous integration, and continuous delivery are quite widespread in the community now. This brought to life multiple services trying to make the process more enjoyable and less overwhelming for developers, so they can focus on delivering software instead of building/configuring tools to do that. One of those services is SemaphoreCI.
现在,测试自动化,持续集成和持续交付在社区中已相当普遍。 这使多种服务变得栩栩如生,这些服务试图使开发人员更轻松,更轻松地处理流程,因此他们可以专注于交付软件,而不是构建/配置工具来做到这一点。 这些服务之一是SemaphoreCI 。
In this article, we’re going to cover how to use our own deploy scripts and tools to continue the deployment process after a successful test.
在本文中,我们将介绍如何在成功测试后使用我们自己的部署脚本和工具来继续部署过程。
We will be using SemaphoreCI for continuous delivery and Deployer to push our code to the DigitalOcean production server. If you’re not familiar with Deployer, we recommend you check out this introduction.
我们将使用SemaphoreCI进行连续交付,并使用Deployer将代码推送到DigitalOcean生产服务器。 如果您不熟悉Deployer,建议您阅读此介绍 。

演示申请 (Demo Application)
We’ll be using a 500px application that loads photos from the marketplace. It was built using Laravel and you can read the full article about its building process here, and find the repo on GitHub.
我们将使用一个500px的应用程序从市场上加载照片。 它是使用Laravel构建的,您可以在此处阅读有关其构建过程的完整文章,并在GitHub上找到该仓库。
创建部署脚本 (Creating a Deployer Script)
The way Deployer works is by us defining servers, and then creating tasks that handle the process of deploying the application to those servers. Our deploy.php script looks like this:
Deployer的工作方式是我们定义服务器,然后创建任务来处理将应用程序部署到这些服务器的过程。 我们的deploy.php脚本如下所示:
<?php

require_once "recipe/common.php";

set('ssh_type', 'native');
set('default_stage', 'staging');
env('deploy_path', '/var/www');
env('composer_options', 'install --no-dev --prefer-dist --optimize-autoloader --no-progress --no-interaction');
set('copy_dirs', [
    'app/commands',
    'app/config',
    'app/controllers',
    'app/database',
    'app/lang',
    'app/models',
    'app/src',
    'app/start',
    'app/tests',
    'app/views',
    'app/filters.php',
    'app/routes.php',
    'bootstrap',
    'public',
    'composer.json',
    'composer.lock',
    'artisan',
    '.env',
]);

set('shared_dirs', [
    'app/storage/cache',
    'app/storage/logs',
    'app/storage/meta',
    'app/storage/sessions',
    'app/storage/views',
]);
set('writable_dirs', get('shared_dirs'));
set('http_user', 'www-data');

server('digitalocean', '174.138.78.215')
    ->identityFile()
    ->user('root')
    ->stage('staging');

task('deploy:upload', function() {
    $files = get('copy_dirs');
    $releasePath = env('release_path');

    foreach ($files as $file)
    {
        upload($file, "{$releasePath}/{$file}");
    }
});

task('deploy:staging', [
    'deploy:prepare',
    'deploy:release',
    'deploy:upload',
    'deploy:shared',
    'deploy:writable',
    'deploy:symlink',
    'deploy:vendors',
    'current',// print current release number
])->desc('Deploy application to staging.');

after('deploy:staging', 'success');
You should read the Deployer article if you’d like to learn more about what this specific script does. Our next step is to set up a SemaphoreCI project. Please read the crash course article if you’ve never tried SemaphoreCI before, and do that.
如果您想了解有关此特定脚本功能的更多信息,请阅读Deployer文章 。 我们的下一步是建立一个SemaphoreCI项目。 如果您以前从未尝试过SemaphoreCI,请阅读速成课程文章,然后执行此操作。
设置部署 (Setting up Deployment)
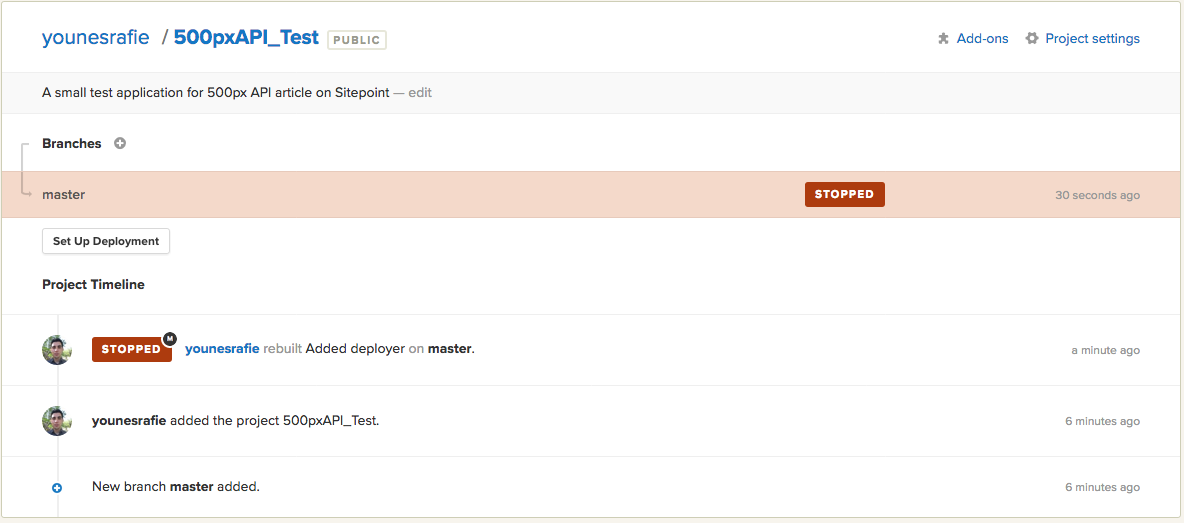
To configure the deployment strategy, we need to go to the project’s page and click Set Up Deployment.
要配置部署策略,我们需要转到项目页面并点击Set Up Deployment 。
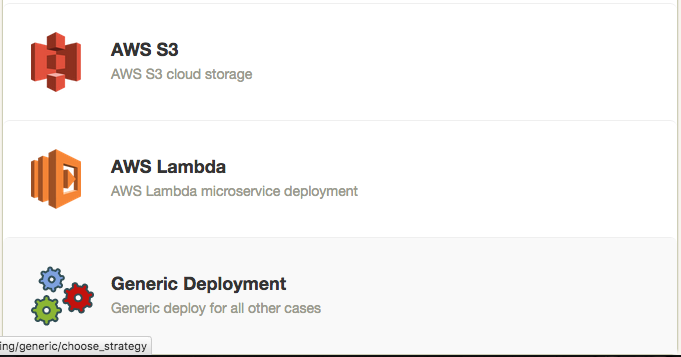
Next, we select the generic deployment option, so that SemaphoreCI gives us the freedom to add manual configuration.
接下来,我们选择常规部署选项,这样SemaphoreCI可以让我们自由地添加手动配置。
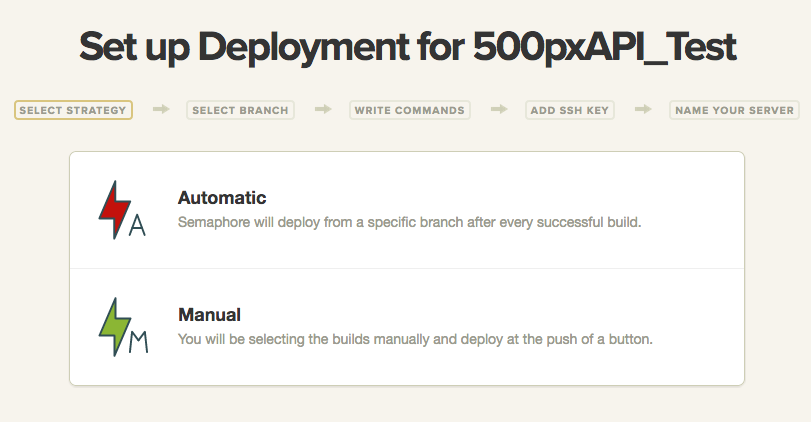
After selecting automatic deployment, SemaphoreCI will give us the ability to specify deployment commands. The difference between manual and automatic, is that automatic deployment is triggered after every successful test, while manual will let us deploy any successful commit.
选择自动部署后,SemaphoreCI将使我们能够指定部署命令。 手动和自动之间的区别在于,每次成功测试后都会触发自动部署,而手动将使我们能够部署任何成功的提交。
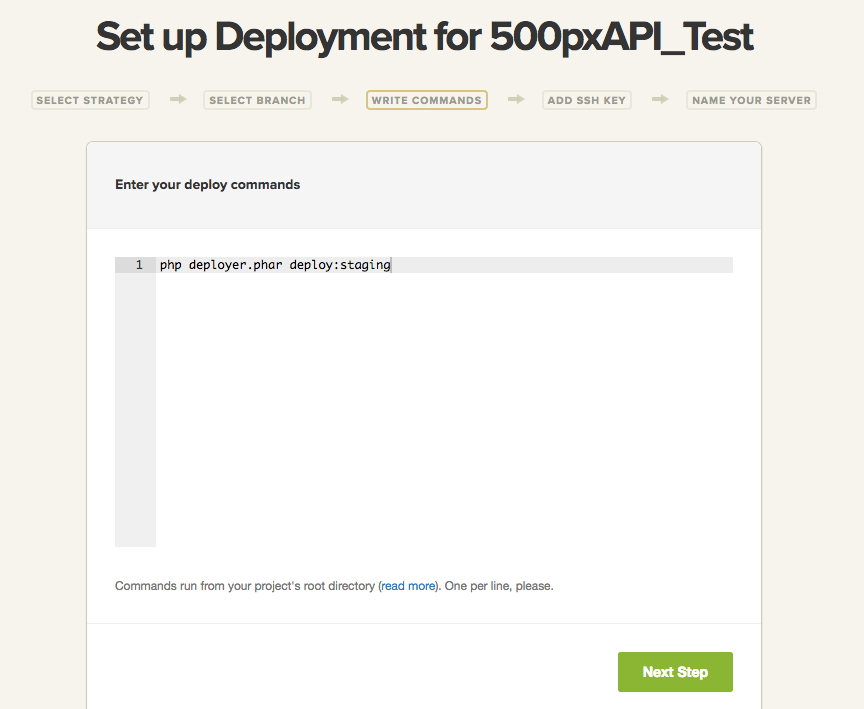
We can choose to include the deployer.phar in our repo as a PHAR file or require it using Composer. Either way, the commands will be similar.
我们可以选择将deployer.phar作为PHAR文件包含在我们的仓库中,也可以使用Composer要求它。 无论哪种方式,命令都将相似。
If we chose to deploy the application using SSH, SemaphoreCI gives us the ability to store our SSH private key on their servers and make it available in the deployment phase.
如果我们选择使用SSH部署应用程序,则SemaphoreCI使我们能够将SSH私钥存储在它们的服务器上,并使其在部署阶段可用。
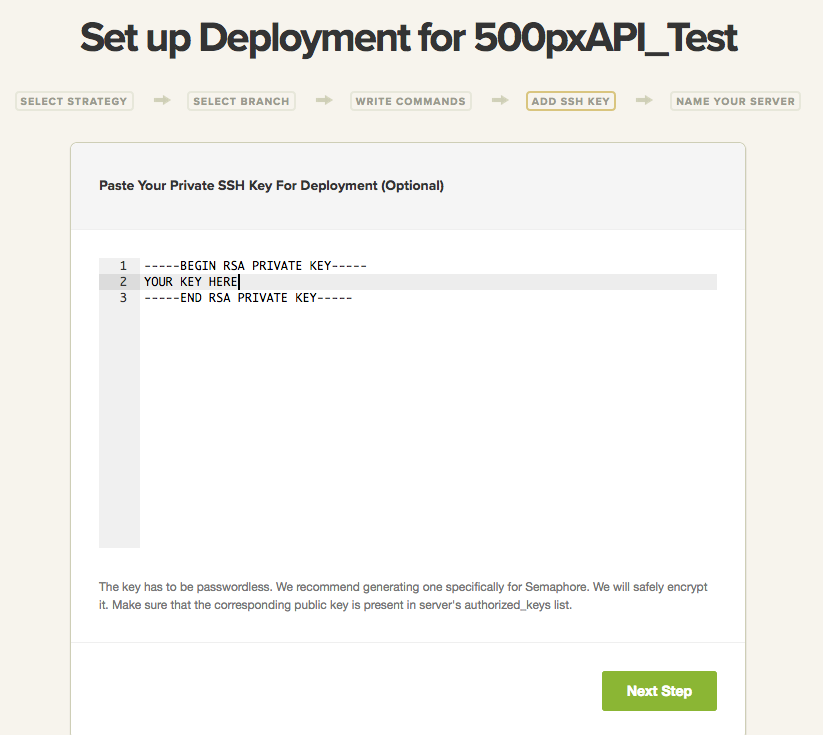
Note: SemaphoreCI recommends that we create a new SSH key specifically for the deployment process. In case someone stole our keys or something, we can easily revoke it. The key will also be encrypted before storing it on their end.
注意 :SemaphoreCI建议我们为部署过程创建一个新的SSH密钥。 万一有人偷了我们的钥匙或东西,我们可以轻松地将其撤销。 密钥也将被加密,然后再存储在其末端。
The key will be available under ~/.ssh/id_rsa, so the identityFile() can be left at the default.
该密钥将在~/.ssh/id_rsa下可用,因此identityFile()可以保留为默认值。
推动部署 (Push to Deploy)
Now that everything is set up, we need to commit some changes to the repository to trigger the integration and deployment process.
现在已经完成所有设置,我们需要对存储库进行一些更改以触发集成和部署过程。
// Edit something
git add .
git commit -am "Updated deploy"
git push origin master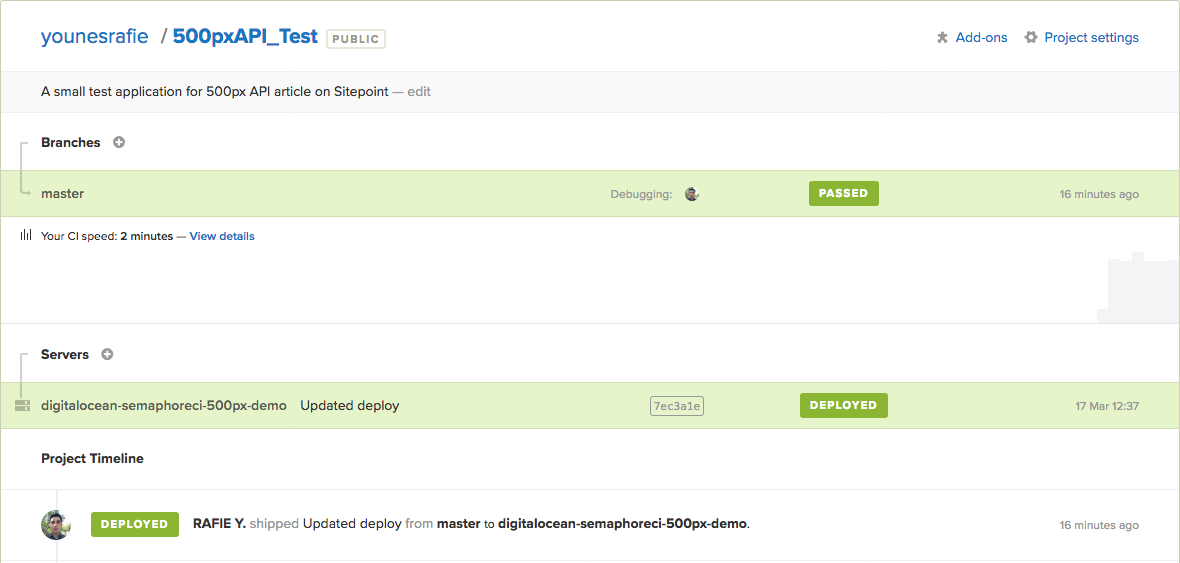
If something went wrong, we can click on the failed deploy process and see the logs to investigate the problem further.
如果出现问题,我们可以单击失败的部署过程,然后查看日志以进一步调查问题。
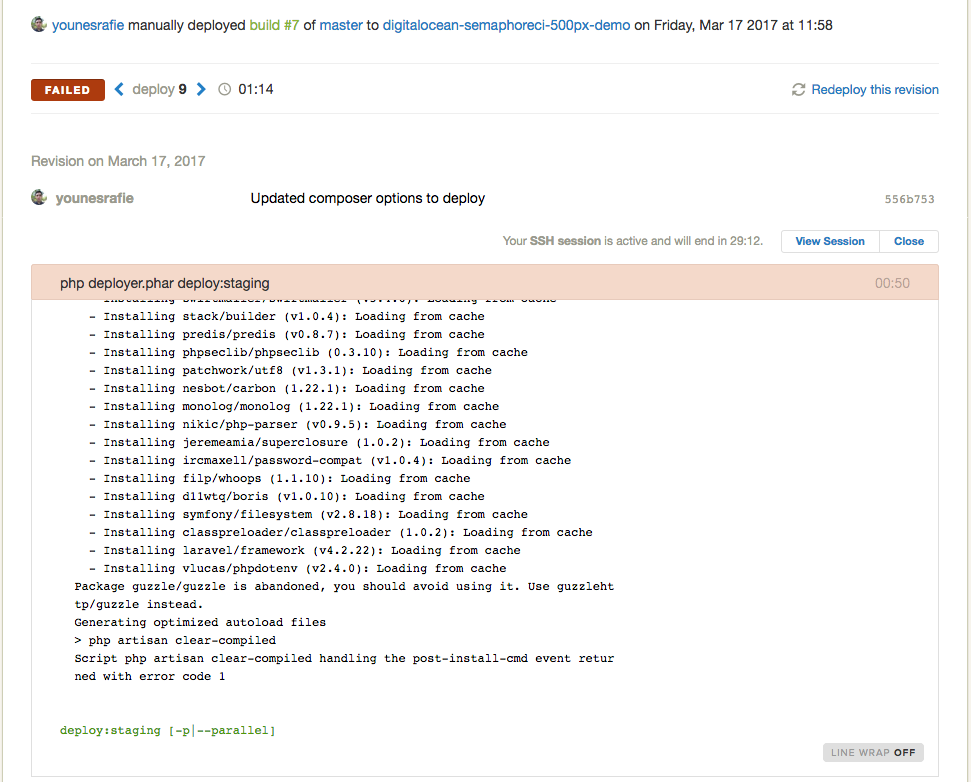
The above screenshot is a failed commit due to the php artisan clear-compiled command returning an error because the mcrypt extension wasn’t enabled.
由于未启用mcrypt扩展, php artisan clear-compiled命令返回错误,因此上面的屏幕截图是提交失败的原因。
Note: Another neat trick that SemaphoreCI provides is SSHing to the build server to see what went wrong.
注意 :SemaphoreCI提供的另一个巧妙技巧是SSH到构建服务器,以查看出了什么问题。

其他部署工具 (Other Deployment Tools)
The same process we used here may be applied to any other deployment tool. Laravel Envoy, for example, might be configured like this:
我们在这里使用的相同过程可以应用于任何其他部署工具。 例如,Laravel Envoy可能配置如下:
@servers(['web' => 'root@ip-address'])

@task('deploy', ['on' => 'web'])
cd /var/www

@if($new) {{-- If this is the first deployment --}}
git init
git remote add origin repo@github.git
@endif

git reset --hard
git pull origin master

composer update
composer dumpautoload -o

@if($new)
    chmod -R 755 storage
    php artisan storage:link
    php artisan key:generate
@endif

php artisan migrate --force

php artisan config:clear
php artisan route:clear

php artisan optimize
php artisan config:cache
php artisan route:cache
php artisan view:clear
@endtask
And in the deployment command step, we would install and run Envoy:
在部署命令步骤中,我们将安装并运行Envoy:
cd /var/www
composer global require "laravel/envoy=~1.0"
envoy run deploy
That’s it! Envoy will now authenticate with the key we’ve added and run the update command we specified.
而已! 现在,Envoy将使用我们添加的密钥进行身份验证,并运行我们指定的update命令。
结论 (Conclusion)
CI/CD tools are a great improvement to a developer’s workflow, and certainly help teams integrate new code into production systems. SemaphoreCI is a great choice that I recommend for its easy to use interface and its wonderful support. If you have any comments or questions, please post them below!
CI / CD工具极大地改善了开发人员的工作流程,并且无疑可以帮助团队将新代码集成到生产系统中。 我推荐SemaphoreCI是一个不错的选择,因为它易于使用的界面和出色的支持。 如果您有任何意见或疑问,请在下面发布!
翻译自: https://www.sitepoint.com/how-can-i-use-laravel-envoy-or-deployer-with-semaphoreci/
envoy


 275
275

 被折叠的 条评论
为什么被折叠?
被折叠的 条评论
为什么被折叠?
 到【灌水乐园】发言


