braintree
This article was peer reviewed by Younes Rafie and Wern Ancheta. Thanks to all of SitePoint’s peer reviewers for making SitePoint content the best it can be!
这篇文章由Younes Rafie和Wern Ancheta进行了同行评审。 感谢所有SitePoint的同行评审人员使SitePoint内容达到最佳状态!
Subscriptions to services online are something extremely common – from subscribing to music streaming services to tutorial sites to access premium content.
在线服务订阅非常普遍-从订阅到音乐流媒体服务再到教程站点,以访问高级内容 。
With Laravel 5, we saw the introduction of Laravel Cashier, an official Laravel package to help developers manage Stripe’s and Braintree’s subscription billing services without writing most of the boilerplate subscription billing code.
在Laravel 5中,我们看到了Laravel Cashier的引入, Laravel Cashier是官方的Laravel软件包,可帮助开发人员管理Stripe和Braintree的订阅计费服务,而无需编写大多数样板的订阅计费代码。
Stripe and Braintree are payment platforms that make it easy to accept payments in your app or website.
Stripe和Braintree是付款平台,可轻松在您的应用程序或网站中接受付款。
In this tutorial, we will be building a dummy Courses site with Braintree subscriptions. In the process, we will learn how to use the various methods offered by Cashier.
在本教程中,我们将构建一个带有Braintree订阅的虚拟课程站点。 在此过程中,我们将学习如何使用Cashier提供的各种方法。

In the first part of this extensive two-part series, we are going to:
在这个由两部分组成的系列文章的第一部分中,我们将要:
- Set up Laravel Cashier 设置Laravel Cashier
- Sign up to the Braintree sandbox (For production apps we use the main Braintree service) 注册到Braintree沙箱(对于生产应用程序,我们使用主要的Braintree服务)
- Create plans on Braintree 在Braintree上创建计划
- Create an artisan command to sync the online plans with our database 创建一个工匠命令以将在线计划与我们的数据库同步
- Allow users to subscribe to a plan 允许用户订阅计划
In part two, we will:
在第二部分中,我们将:
- Add the ability to swap plans 添加交换计划的功能
- Create middleware to protect some routes based on the subscription status 创建中间件以根据订阅状态保护某些路由
- Protect premium courses from users with basic subscription 通过基本订阅保护高级用户免受高级课程的侵害
- Learn how to cancel and resume subscriptions 了解如何取消和恢复订阅
- Add Braintree notifications to a variety of the application’s events via webhooks 通过webhooks将Braintree通知添加到各种应用程序事件中
The complete code for part one can be found here.
第一部分的完整代码可以在这里找到。
创建应用程序 (Creating the Application)
We will start with a fresh Laravel installation.
我们将从全新的Laravel安装开始。
composer create-project laravel/laravel lara-billable准备数据库 (Preparing the Database)
Next, we have to set up the database before running any migrations. Let’s use MySQL – it’s easy to use, easy to configure, and included in a well-built development environment like Homestead Improved. After setting up the database, I have my .env file looking like this:
接下来,我们必须在运行任何迁移之前设置数据库。 让我们使用MySQL –它易于使用,易于配置,并包含在精心构建的开发环境(如Homestead Improvement)中 。 设置数据库后,我的.env文件如下所示:
DB_HOST=localhost
DB_DATABASE=homestead
DB_USERNAME=homestead
DB_PASSWORD=secret
脚手架认证 (Scaffolding Auth)
The next step is adding authentication to our application.
下一步是向我们的应用程序添加身份验证。
Laravel introduced a built in Authentication module in version 5.2 which made this extremely easy.
Laravel在5.2版中引入了内置的身份验证模块,这使得这一操作变得非常容易。
php artisan make:authBy running the command, everything related to authentication will be generated for us i.e. the views, controllers and the routes mapping to the controller actions.
通过运行该命令,将为我们生成与身份验证相关的所有信息,即视图,控制器和映射到控制器动作的路由。
To be able to sign up and log in, we need to have tables to hold the user data. If we look inside database/migrations, we’ll notice that the generated Laravel app came with migrations for creating the users and password_resets tables. Let’s run these migrations:
为了能够注册和登录,我们需要有一些表来保存用户数据。 如果我们查看database/migrations内部,我们会注意到生成的Laravel应用附带了用于创建users表和password_resets表的迁移。 让我们运行以下迁移:
php artisan migrateIf we navigate to /register, we can now sign up new users. Links for signing up and logging in are also present in the navbar.
如果导航到/register ,我们现在可以注册新用户。 导航栏中还提供了用于注册和登录的链接。
设置收银员 (Setting up Cashier)
With the users table in place, we can now add Cashier. Since we’ll be using Braintree for this tutorial, let’s require the braintree-cashier package:
有了users表之后,我们现在可以添加Cashier了。 由于我们将在本教程中使用Braintree,因此我们需要braintree-cashier软件包:
composer require laravel/cashier-braintreeThen, we register the Laravel\Cashier\CashierServiceProvider in our config/app.php:
然后,我们在config/app.php注册Laravel\Cashier\CashierServiceProvider :
'providers' => [
    // Other service providers...
    Laravel\Cashier\CashierServiceProvider::class,
],
Next, we have to pull in the Billable trait in the User model so as to be able to call the various cashier methods on a user:
接下来,我们必须在User模型中引入Billable特性,以便能够在用户上调用各种收银员方法:
[...]
use Laravel\Cashier\Billable;
[...]
class User extends Authenticatable
{
    use Billable;
    [...]
}
Then we add extra columns to the users table for billing purposes. We will also create a subscriptions table to handle all of our subscriptions:
然后,我们将额外的列添加到users表中以进行计费。 我们还将创建一个subscriptions表来处理所有订阅:
php artisan make:migration add_billable_columns_to_users_table --table=usersOpen the newly generated migration and change the up method to this:
打开新生成的迁移并将up方法更改为此:
public function up()
    {
        Schema::table('users', function (Blueprint $table) {
            $table->string('braintree_id')->nullable();
            $table->string('paypal_email')->nullable();
            $table->string('card_brand')->nullable();
            $table->string('card_last_four')->nullable();
            $table->timestamp('trial_ends_at')->nullable();
        });
    }
Let’s now create the subscription model and migration:
现在让我们创建subscription模型和迁移:
php artisan make:model Subscription -mOpen the migration and tweak the up method to this:
打开迁移并调整up方法:
public function up()
{
    Schema::table('subscriptions', function (Blueprint $table) {
        $table->increments('id');
        $table->integer('user_id'); // A subscription belongs to a user
        $table->string('name');  // The name of the subscription
        $table->string('braintree_id'); //id for the subscription
        $table->string('braintree_plan'); // The name of the plan
        $table->integer('quantity');
        $table->timestamp('trial_ends_at')->nullable();
        $table->timestamp('ends_at')->nullable();
        $table->timestamps();
  });
}
With this set up, run the migrate Artisan command to create the subscriptions table and add the extra columns to the users table:
通过此设置,运行migrate Artisan命令来创建subscriptions表,并将额外的列添加到users表:
php artisan migrateAt this point, we have our Laravel side set up. Time to wire things up on the Braintree end. We will be using the Braintree Sandbox since this is not a production app. For those who don’t have a Sandbox account, sign up here, then log in.
至此,我们已经建立了Laravel方面。 是时候在Braintree端进行连接了。 我们将使用Braintree Sandbox,因为它不是生产应用程序。 对于没有沙盒帐户的用户,请在此处注册,然后登录。
Once inside the dashboard, generate a new API key in order to be able to use Braintree’s API in our app:
一旦进入仪表板,请生成一个新的API密钥,以便能够在我们的应用程序中使用Braintree的API:

After generating the key, we also get the Public Key, Environment Key and Merchant ID. With these in place, we need to set up configuration in our Laravel App so we can communicate with the Braintree API. Open your .env file and set the keys alongside their corresponding values. I have my .env file looking like this:
生成密钥后,我们还获得了Public Key , Environment Key和Merchant ID 。 有了这些之后,我们需要在Laravel应用中设置配置,以便我们可以与Braintree API进行通信。 打开您的.env文件,并在键的相应值旁边进行设置。 我的.env文件如下所示:
BRAINTREE_ENV=sandbox
BRAINTREE_MERCHANT_ID=xxxxxxxxxxxxxx
BRAINTREE_PUBLIC_KEY=xxxxxxxxxxxxxx
BRAINTREE_PRIVATE_KEY=xxxxxxxxxxxxxx
Then we add the Braintree configuration to our config/services.php file:
然后,将Braintree配置添加到我们的config/services.php文件中:
'braintree' => [
        'model' => App\User::class, //model used to processs subscriptions
        'environment' => env('BRAINTREE_ENV'),
        'merchant_id' => env('BRAINTREE_MERCHANT_ID'),
        'public_key' => env('BRAINTREE_PUBLIC_KEY'),
        'private_key' => env('BRAINTREE_PRIVATE_KEY'),
],
As the final step before communicating with Braintree’s API, let’s add the following Braintree SDK calls to our AppServiceProvider service provider’s boot method. We will use the env helper to pull in the values we set in our .env file. Note that we also have to import the Braintree_Configuration class into our AppServiceProvider, else we won’t be able to call the various methods from the Braintree_Configuration class:
作为与Braintree的API通信之前的最后一步,让我们将以下Braintree SDK调用添加到AppServiceProvider服务提供商的boot方法中。 我们将使用env帮助器提取在.env文件中设置的值。 请注意,我们还必须将Braintree_Configuration类导入到AppServiceProvider ,否则我们将无法从Braintree_Configuration类中调用各种方法:
[...]
use Braintree_Configuration;
[...]
public function boot()
{
    Braintree_Configuration::environment(env('BRAINTREE_ENV'));
    Braintree_Configuration::merchantId(env('BRAINTREE_MERCHANT_ID'));
    Braintree_Configuration::publicKey(env('BRAINTREE_PUBLIC_KEY'));
    Braintree_Configuration::privateKey(env('BRAINTREE_PRIVATE_KEY'));
    // Cashier::useCurrency('eur', '€');
}
The default Cashier currency is United States Dollars (USD). We can change the default currency by calling the Cashier::useCurrency method from within the boot method of one of the service providers. The useCurrency method accepts two string parameters: the currency and the currency’s symbol. In this tutorial, we will just stick to USD. I have a commented out line of code illustrating how to change to Euros for example.
默认的收银员货币为美元(USD)。 我们可以通过从服务提供商之一的boot方法中调用Cashier::useCurrency方法来更改默认货币。 useCurrency方法接受两个字符串参数:currency和货币的符号。 在本教程中,我们将坚持使用美元。 我有一条注释掉的代码行,举例说明了如何更改为欧元。
I must admit that setting up Cashier took a while but once done with this, we find ourselves in a position to start processing payments and manage subscriptions.
我必须承认,成立Cashier花费了一段时间,但是一旦完成,我们发现自己可以开始处理付款和管理订阅。
创建计划并将其同步到我们的数据库 (Creating Plans and Syncing Them to Our Database)
Our next step is creating the plans. For this tutorial, we will be creating two: a Basic and a Premium plan. Let’s head over to the Braintree dashboard and do that. Note the trial period is optional but I set mine to 14 days:
我们的下一步是创建计划。 对于本教程,我们将创建两个:基本计划和高级计划。 让我们转到Braintree仪表板并执行此操作。 请注意,试用期是可选的,但我将其设置为14天:

Continuation:
延续:

Repeat the same process to create a premium plan but set the amount to 20 USD for a subscription.
重复相同的过程以创建高级计划,但将订阅金额设置为20 USD。
When done creating the plans on Braintree, we can then create a plans table to store the plans locally. Let’s generate a Plan model and a migration:
在Braintree上创建计划后,我们可以创建计划表以将计划存储在本地。 让我们生成一个Plan模型和一个迁移:
php artisan make:model Plan -mUpdate the up method in your migration to this:
将您的迁移中的up方法更新为:
[...]
public function up()
    {
        Schema::create('plans', function (Blueprint $table) {
            $table->increments('id');
            $table->string('name');
            $table->string('slug')->unique(); //name used to identify plan in the URL
            $table->string('braintree_plan');
            $table->float('cost');
            $table->text('description')->nullable();
            $table->timestamps();
        });
    }
[...]
Create the plans table by running the migration:
通过运行迁移来创建plans表:
php artisan migrate同步计划 (Syncing Plans)
Next, we want to populate the Plans table with the data we set on Braintree. Hard coding the plans into our table is allowed but I find it a bit tedious, especially when the plan information online keeps changing. To simplify the process, we will create an artisan command to sync with the plans online and update our database:
接下来,我们要使用在Braintree上设置的数据填充“ Plans表。 允许将计划硬编码到我们的表中,但是我发现这有点乏味,尤其是当在线计划信息不断变化时。 为了简化过程,我们将创建一个artisan命令以与计划在线同步并更新我们的数据库:
php artisan make:command SyncPlansFor those not on Laravel 5.3+ run:
对于那些不在Laravel 5.3+上的用户,请运行:
php artisan make:console SyncPlansIn app/Console/Commands/SyncPlans.php, we need to change the signature value and also add a description for the command:
在app/Console/Commands/SyncPlans.php ,我们需要更改签名值并添加命令说明:
[...]
protected $signature = 'braintree:sync-plans';
protected $description = 'Sync with online plans on Braintree';
[...]
We then register the command to the kernel so as to be able to run it from the terminal:
然后,我们将命令注册到内核,以便能够从终端运行它:
class Kernel extends ConsoleKernel
{
    [...]
    protected $commands = [
        Commands\SyncPlans::class,
    ];
    [...]
}
If we now run php artisan, the plan-syncing command will be visible from the list of available commands:
如果现在运行php artisan ,则可从可用命令列表中看到plan-syncing命令:

Then the big question, what should happen after running this command? The command is supposed to clear the data in the plans table, then populate the table with the Plan data available online. This logic should be placed in the handle method inside app/Console/Commands/SyncPlans.php:
然后是一个大问题,运行此命令后会发生什么? 该命令应该清除plans表中的数据,然后用在线可用的计划数据填充表。 此逻辑应放在app/Console/Commands/SyncPlans.php中的handle方法中:
[...]
use Braintree_Plan;
use App\Plan;
[...]
class SyncBraintreePlans extends Command
{
    [...]
    public function handle()
    {
        // Empty table
        Plan::truncate();

        // Get plans from Braintree
        $braintreePlans = Braintree_Plan::all();

        // uncomment the line below to dump the plans when running the command
        // var_dump($braintreePlans);

        // Iterate through the plans while populating our table with the plan data
        foreach ($braintreePlans as $braintreePlan) {
            Plan::create([
                'name' => $braintreePlan->name,
                'slug' => str_slug($braintreePlan->name),
                'braintree_plan' => $braintreePlan->id,
                'cost' => $braintreePlan->price,
                'description' => $braintreePlan->description,
            ]);
        }
    }
}
Note we have to pull in the Braintree_Plan and App\Plan namespaces so as to be able to call methods statically from these classes.
注意,我们必须引入Braintree_Plan和App\Plan命名空间,以便能够从这些类中静态调用方法。
We should then navigate to the Plan model and add the name, slug, braintree_plan, cost and description to the list of mass assignable attributes. If we don’t do this, we will get a MassAssignmentException when trying to update the attributes:
然后,我们应该导航到Plan模型,并将name , slug , braintree_plan , cost和description到可分配的属性列表中。 如果不这样做,则在尝试更新属性时会得到MassAssignmentException :
class Plan extends Model
{
    [...]
    protected $fillable = ['name', 'slug', 'braintree_plan', 'cost', 'description'];
    [...]
}
We can then run our command to see if everything is working as expected:
然后,我们可以运行命令以查看是否一切正常。
php artisan braintree:sync-plansFor those planning to push the app to production, it’s always a good idea to set the site to maintenance mode before syncing plans then bring the site up once the syncing process is over. In this case I would have done something like this:
对于计划将应用程序投入生产的用户,在同步计划之前将网站设置为维护模式始终是一个好主意,然后在同步过程结束后启动网站。 在这种情况下,我会做这样的事情:
php artisan down
php artisan braintree:sync-plans
php artisan up
显示计划 (Displaying Plans)
Let’s now display the plans on a page. We will start by creating a route:
现在让我们在页面上显示计划。 我们将从创建一条路线开始:
routes/web.php
路线/web.php
[...]
Route::get('/plans', 'PlansController@index');
Then, we create a PlansController and add an index action:
然后,我们创建一个PlansController并添加一个index操作:
php artisan make:controller PlansControllerThe index action should return a view listing all the plans:
index操作应返回一个列出所有计划的视图:
app/Http/Controllers/PlansController.php
app / Http / Controllers / PlansController.php
[...]
use App\Plan;
[...]
class PlansController extends Controller
{
    public function index()
    {
        return view('plans.index')->with(['plans' => Plan::get()]);
    }
}
Now let’s set up the view. Create a plans folder before creating the index view:
现在,我们来设置视图。 在创建index视图之前,创建一个计划文件夹:
mkdir resources/views/plans
touch resources/views/plans/index.blade.php
In the view, paste the following code:
在视图中,粘贴以下代码:
resources/views/plans/index.blade.php
资源/视图/计划/index.blade.php
@extends('layouts.app')

@section('content')
<div class="container">
    <div class="row">
        <div class="col-md-8 col-md-offset-2">
            <div class="panel panel-default">
                <div class="panel-heading">Choose your plan</div>

                <div class="panel-body">
                    <ul class="list-group">
                        @foreach ($plans as $plan)
                            <li class="list-group-item clearfix">
                                <div class="pull-left">
                                    <h4>{{ $plan->name }}</h4>
                                    <h4>${{ number_format($plan->cost, 2) }} monthly</h4>
                                    @if ($plan->description)
                                        <p>{{ $plan->description }}</p>
                                    @endif
                                </div>

                                <a href="#" class="btn btn-default pull-right">Choose Plan</a>

                            </li>
                        @endforeach
                    </ul>
                </div>
            </div>
        </div>
    </div>
</div>
@endsection
We’ve used the number_format helper to help us display the amount to two decimal places. As it stands, the Choose Plan button does not lead anywhere, but we’ll fix that in a moment. If we now visit /plans, all the plans will be displayed. Update the navbar to include a link pointing to the plans:
我们使用了number_format帮助器来将金额显示到两位小数。 按目前的情况,“ Choose Plan按钮不会指向任何地方,但我们会稍后修复。 如果我们现在访问/plans ,将显示所有计划。 更新导航栏以包括指向计划的链接:
resoursces/views/layouts/app.blade.php
资源/视图/布局/app.blade.php
[...]
<ul class="nav navbar-nav navbar-left">
    <li><a href="{{ url('/plans') }}">Plans</a></li>
</ul>
<div class="collapse navbar-collapse" id="app-navbar-collapse">
[...]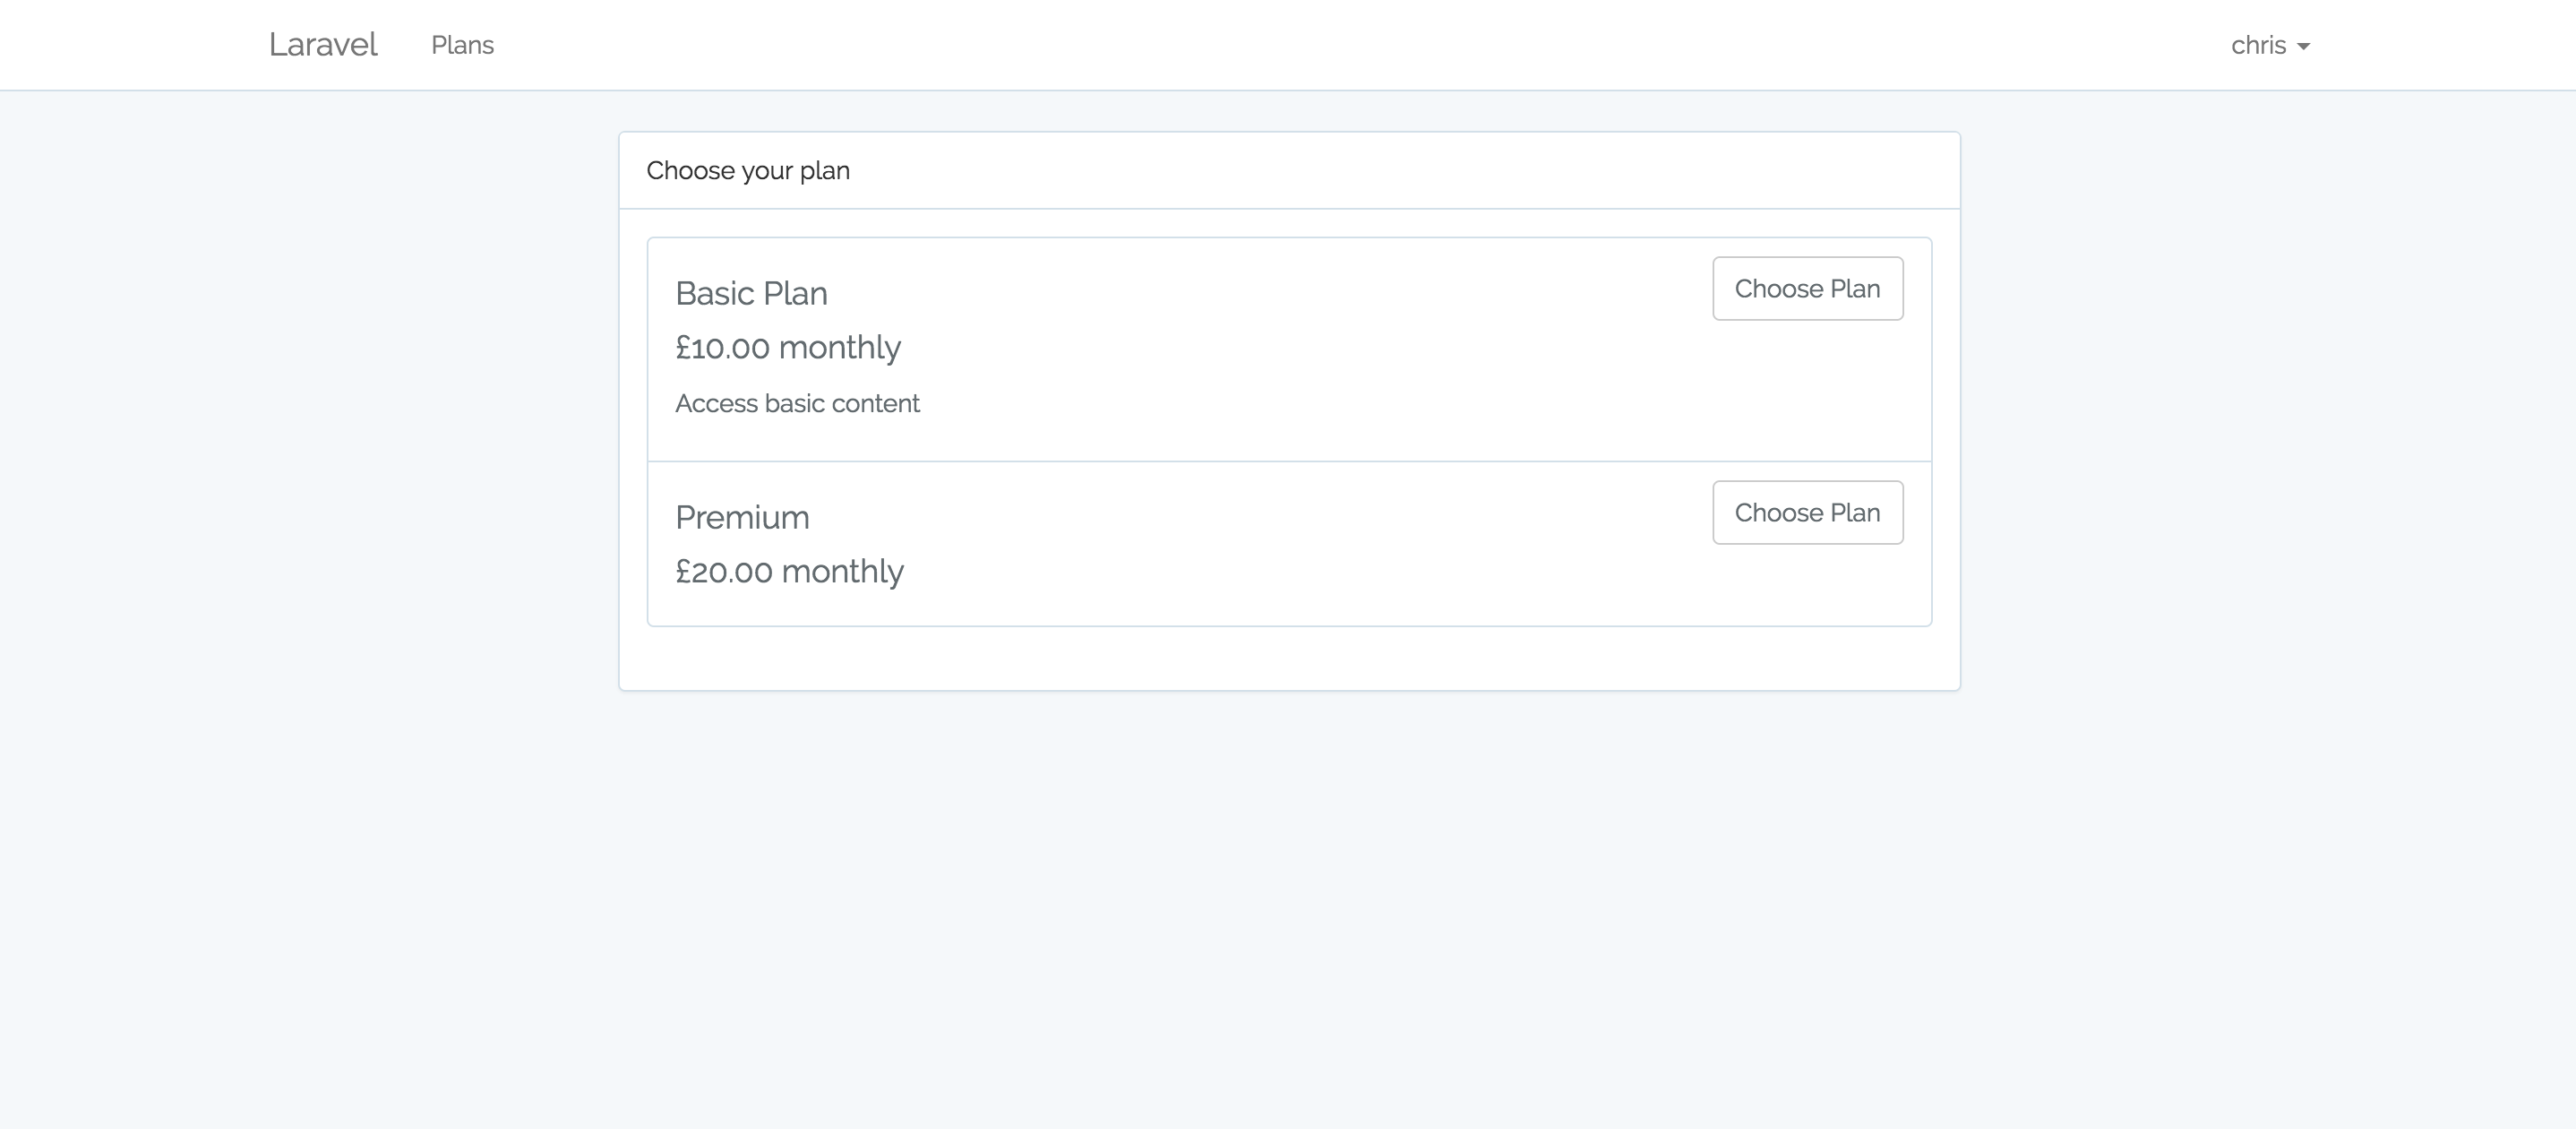
Your view should now look like this:
您的视图现在应如下所示:
Our next step is creating the payment form where users will fill in their credit card details before subscribing to a plan.
我们的下一步是创建付款表格,用户可以在其中订购计划之前填写其信用卡详细信息。
卡付款表格 (Card Payment Form)
We are going to use Braintree’s Drop-in UI for this. More documentation on how to customize the Drop-in UI can be found here.
我们将为此使用Braintree的Drop-in UI。 可以在此处找到有关如何自定义Drop-in UI的更多文档。
First things first, we create a route pointing to the view. We also want to make it such that only authenticated users can perform operations involving subscriptions. Let’s create a route group and add the auth middleware. It is in this group where all routes pointing to subscription related activities will fall:
首先,我们创建一个指向视图的路线。 我们还希望这样做,以便只有经过身份验证的用户才能执行涉及订阅的操作。 让我们创建一个路由组并添加auth中间件。 在此组中,指向订阅相关活动的所有路由都将落入:
routes/web.php
路线/web.php
[...]
Route::group(['middleware' => 'auth'], function () {
    Route::get('/plan/{plan}', 'PlansController@show');
});
Then create the show action inside our PlansController:
然后在我们的PlansController创建show动作:
class PlansController extends Controller
{
    [...]
    public function show(Plan $plan)
    {
        return view('plans.show')->with(['plan' => $plan]);
    }
}
Since we want to pass in the slug value in the URL instead of the Plan ID, we have to override the getRouteKeyName method on the Eloquent model. By default, when using Route Model Binding in Laravel, it’s the id that is returned. Let’s change that so we can have the slug value returned instead:
由于我们要在URL中传递slug值而不是Plan ID ,因此我们必须在Eloquent模型上重写getRouteKeyName方法。 默认情况下,在Laravel中使用路由模型绑定时,将返回id 。 让我们进行更改,以便我们可以返回slug值:
app/Plan.php
app / Plan.php
public function getRouteKeyName()
{
  return 'slug';
}
The “show” URL should now be in this format: /plan/{slug}. Time we created the view holding the payment form:
现在,“显示” URL应采用以下格式: /plan/{slug} 。 我们创建包含付款表格的视图的时间:
resources/views/plans/show.blade.php
资源/视图/计划/show.blade.php
@extends('layouts.app')

@section('content')
  <div class="container">
    <div class="row">
      <div class="col-md-8 col-md-offset-2">
        <div class="panel panel-default">
          <div class="panel-heading">{{ $plan->name }}</div>
          <div class="panel-body">
            ....
          </div>
        </div>
      </div>
    </div>
  </div>
@endsection
We can test things out by visiting /plan/premium or /plan/basic, depending on the plan name. Let’s also make the button in the plans index page point to the show view:
我们可以通过访问/plan/premium或/plan/basic ,具体取决于计划名称。 让我们还使计划索引页面中的按钮指向show视图:
resources/views/plans/index.blade.php
资源/视图/计划/index.blade.php
[...]
<a href="{{ url('/plan', $plan->slug) }}" class="btn btn-default pull-right">Choose Plan</a>
[...]
At this point, the view is very basic and does not allow customers to enter credit card details. To load Braintree’s Drop-in UI, let’s require braintree.js after the content section:
此时,该视图非常基本,不允许客户输入信用卡详细信息。 要加载Braintree的Drop-in UI,让我们在content部分之后要求braintree.js :
resources/views/plans/show.blade.php
资源/视图/计划/show.blade.php
@section('braintree')
    <script src="https://js.braintreegateway.com/js/braintree-2.30.0.min.js"></script>
@endsection
Then make sure the script is loaded in the app:
然后确保脚本已加载到应用程序中:
resources/views/plans/layouts/app.blade.php
资源/视图/计划/布局/app.blade.php
[...]
<!-- Scripts -->
<script src="/js/app.js"></script>
@yield('braintree')
[...]
Update the show view to include a form. The CLIENT-TOKEN-FROM-SERVER is required for this to work but we’ll handle that later:
更新显示视图以包括一个表单。 要使此功能正常运行,需要CLIENT-TOKEN-FROM-SERVER ,但稍后我们将进行处理:
resources/views/plans/show.blade.php
资源/视图/计划/show.blade.php
@extends('layouts.app')

@section('content')
  <div class="container">
    <div class="row">
      <div class="col-md-8 col-md-offset-2">
        <div class="panel panel-default">
          <div class="panel-heading">{{ $plan->name }}</div>
          <div class="panel-body">
            <form>
              <div id="dropin-container"></div>
              <hr>

              <button id="payment-button" class="btn btn-primary btn-flat" type="submit">Pay now</button>
            </form>
          </div>
        </div>
      </div>
    </div>
  </div>
@endsection

@section('braintree')
    <script src="https://js.braintreegateway.com/js/braintree-2.30.0.min.js"></script>

    <script>
  braintree.setup('CLIENT-TOKEN-FROM-SERVER', 'dropin', {
    container: 'dropin-container'
  });
    </script>
@endsection
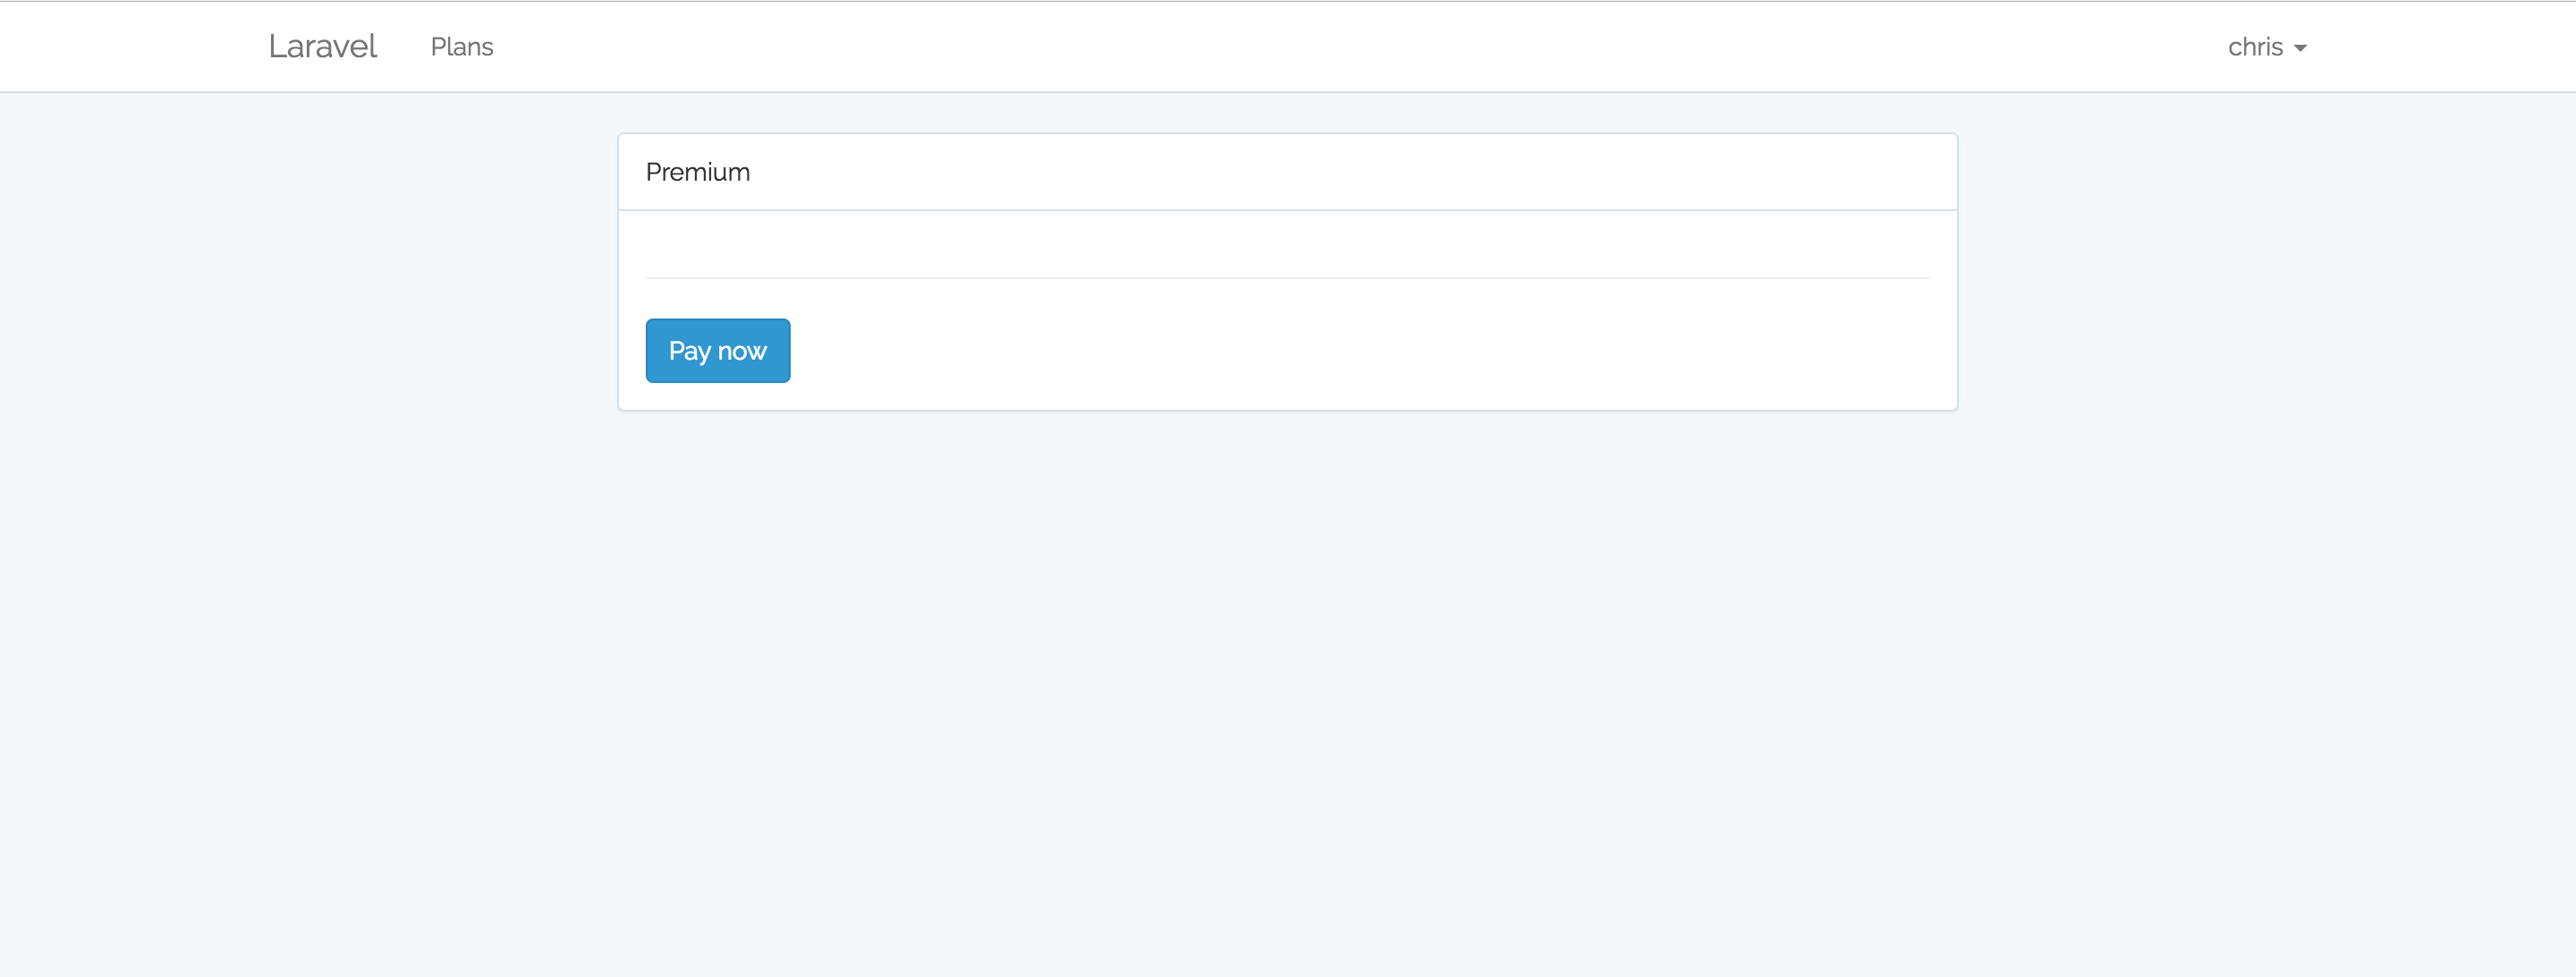
If we visit /plans/{slug-value} or click on the Choose Plan button in the plans listing page, we should be taken to a view that looks like this:
如果我们访问/plans/{slug-value}或单击计划列表页面中的“ Choose Plan按钮,则应转到类似以下的视图:
We don’t, however, want the Pay Now button to be present when the payment form has not yet loaded. To achieve this, we are going to add a hidden class to the button, then remove the hidden class once the payment form shows up:
但是,我们不希望在尚未加载付款表格时显示“ Pay Now按钮。 为此,我们将向按钮添加一个隐藏类,然后在显示付款表格后删除该隐藏类:
resources/views/plans/show.blade.php
资源/视图/计划/show.blade.php
<form>
     [...]
     <button id="payment-button" class="btn btn-primary btn-flat hidden" type="submit">Pay now</button>
     [...]
</form>
Let’s now create a new controller responsible for generating the token. We will then use ajax to set the generated token as the CLIENT-TOKEN-FROM-SERVER value. Note that braintree.js needs a client token generated by the Braintree server SDK for the payment form to be loaded:
现在让我们创建一个负责生成令牌的新控制器。 然后,我们将使用ajax将生成的令牌设置为CLIENT-TOKEN-FROM-SERVER值。 请注意, braintree.js需要Braintree服务器SDK生成的客户令牌才能加载付款表格:
php artisan make:controller BraintreeTokenControllerThen, inside the controller, we create a token action which returns a JSON response containing the token:
然后,在控制器内部,我们创建一个token动作,该动作返回包含令牌的JSON响应:
app/Http/Controllers/BraintreeTokenController.php
app / Http / Controllers / BraintreeTokenController.php
[...]
use Braintree_ClientToken;
[...]
class BraintreeTokenController extends Controller
{
    public function token()
    {
        return response()->json([
            'data' => [
                'token' => Braintree_ClientToken::generate(),
            ]
        ]);
    }
}
Don’t forget to pull the Braintree_ClientToken namespace into this controller; otherwise, the generate method responsible for creating the token will error.
不要忘记将Braintree_ClientToken命名空间放入此控制器中。 否则,负责创建令牌的generate方法将出错。
We then update our routes making it such that we can access a URL containing the JSON response from the token method:
然后,我们更新路由以使其能够访问包含来自token方法的JSON响应的URL:
routes/web.php
路线/web.php
Route::group(['middleware' => 'auth'], function () {
    Route::get('/plan/{plan}', 'PlansController@show');
    Route::get('/braintree/token', 'BraintreeTokenController@token');
});
Try visiting /braintree/token and a token value will be displayed on the page. Our next step is pulling in this token value using AJAX into the show view. Update the code in the braintree section:
尝试访问/braintree/token ,令牌值将显示在页面上。 我们的下一步是使用AJAX将这个令牌值提取到show视图中。 更新braintree部分中的代码:
resources/views/plans/show.blade.php
资源/视图/计划/show.blade.php
@section('braintree')
    <script src="https://js.braintreegateway.com/js/braintree-2.30.0.min.js"></script>

    <script>
        $.ajax({
            url: '{{ url('braintree/token') }}'
        }).done(function (response) {
            braintree.setup(response.data.token, 'dropin', {
                container: 'dropin-container',
                onReady: function () {
                    $('#payment-button').removeClass('hidden');
                }
            });
        });
    </script>
@endsection
In the code block above, we are making a request to the braintree/token URL in order to obtain a JSON response containing the token. This token is what we then set as the CLIENT-TOKEN-VALUE. Once the payment form loads, we remove the hidden class from our Pay Now button making it visible to our customers.
在上面的代码块中,我们向braintree/token URL发出请求,以获得包含令牌的JSON响应。 然后将这个令牌设置为CLIENT-TOKEN-VALUE 。 加载付款表格后,我们从“ Pay Now按钮中删除隐藏的类,使该类对我们的客户可见。
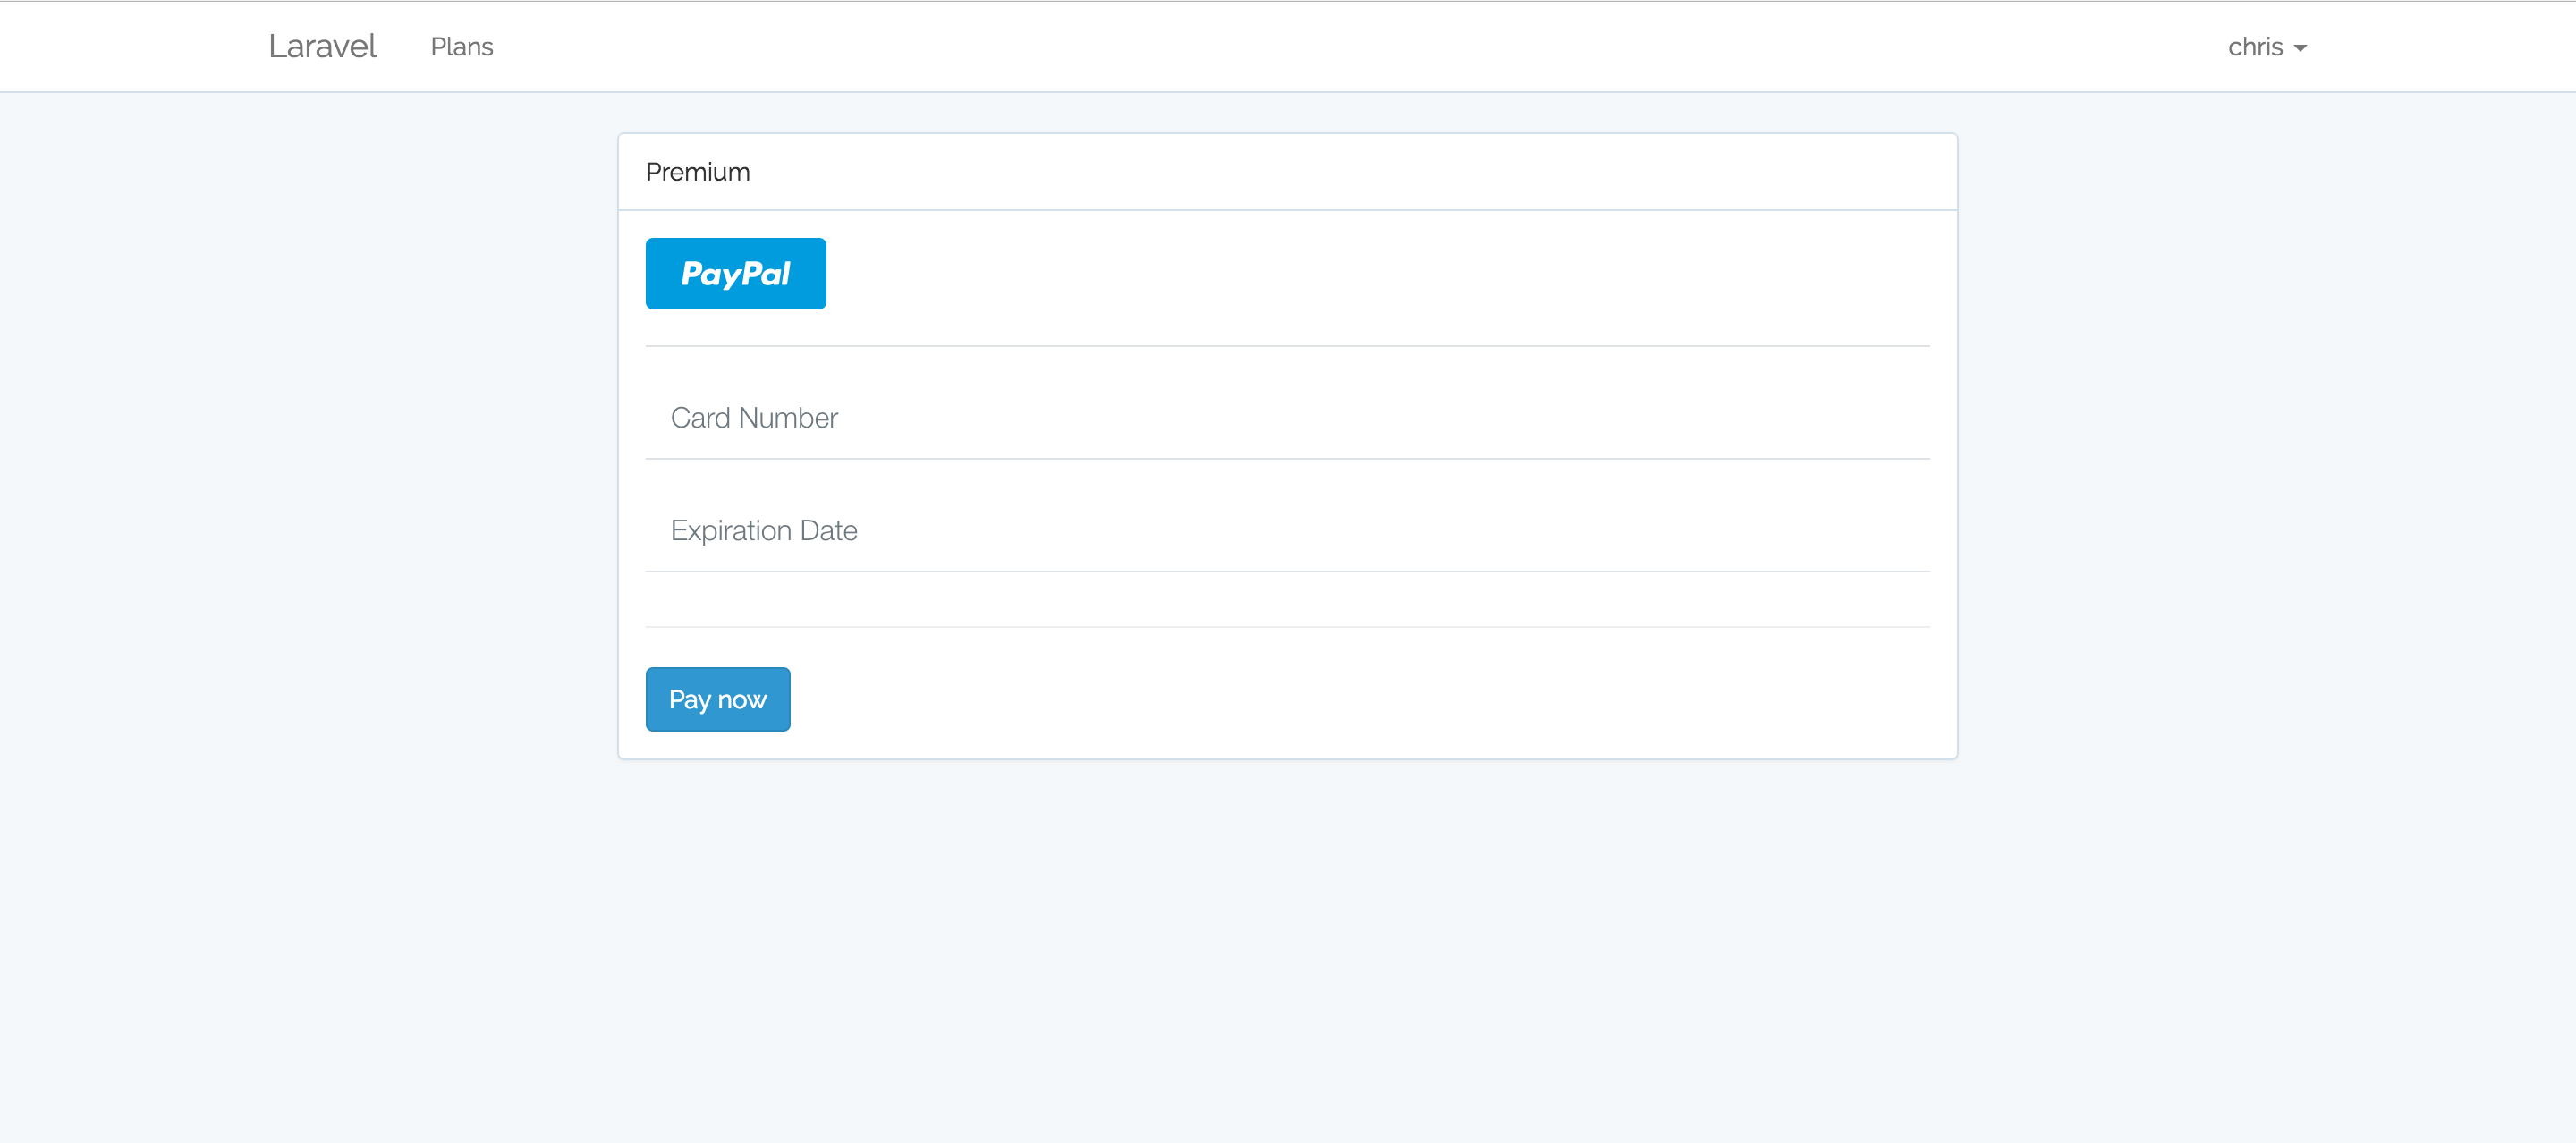
With this in place, we can try reloading the page and we should see a payment form that looks like this:
完成此操作后,我们可以尝试重新加载页面,并且应该看到如下所示的付款表格:
It’s time we made the form come to life so users can subscribe to a plan. Let’s update our form:
是时候让表格变得栩栩如生了,以便用户可以订阅计划。 让我们更新表格:
app/resources/views/plans/show.blade.php
应用程序/资源/视图/计划/show.blade.php
[...]
<form action="{{ url('/subscribe') }}" method="post">
  <div id="dropin-container"></div>
  <input type="hidden" name="plan" value="{{ $plan->id }}">
  {{ csrf_field() }}
  <hr>
  <button id="payment-button" class="btn btn-primary btn-flat hidden" type="submit">Pay now</button>
</form>
[...]
The form will make a POST request to the /subscribe URL – we are yet to create a route and a controller action to handle that. We also added a hidden input to our form. This will help the SubscriptionsController know the plan we are subscribing to. Then, to protect users against Cross-Site Request Forgery when submitting the form, we’ve used Laravel’s csrf_field helper to generate a CSRF token.
该表单将向/subscribe URL发出POST请求-我们尚未创建路由和控制器操作来处理该路由。 我们还向表单添加了隐藏的输入。 这将帮助SubscriptionsController知道我们要订阅的计划。 然后,为了保护用户在提交表单时避免跨站请求伪造 ,我们使用了Laravel的csrf_field帮助器来生成CSRF令牌。
Let’s create the route and controller responsible for subscribing users:
让我们创建负责订阅用户的路由和控制器:
Route::group(['middleware' => 'auth'], function () {
    [...]
    Route::post('/subscribe', 'SubscriptionsController@store');
});
php artisan make:controller SubscriptionsControllerInside the controller, add a store action. This is the action responsible for creating and adding new subscriptions to the database:
在控制器内部,添加store操作。 这是负责创建新订阅并将新订阅添加到数据库的操作:
app/Http/Controllers/SubscriptionsController.php
app / Http / Controllers / SubscriptionsController.php
[...]
use App\Plan;
[...]
class SubscriptionController extends Controller
{
    public function store(Request $request)
    {
          // get the plan after submitting the form
          $plan = Plan::findOrFail($request->plan);

          // subscribe the user
          $request->user()->newSubscription('main', $plan->braintree_plan)->create($request->payment_method_nonce);

          // redirect to home after a successful subscription
          return redirect('home');
    }
}
What we are doing inside the method is getting the plan from the value we passed in the hidden input. Once we get the plan, we call the newSubscription method on the currently logged in user. This method came with the Billable trait that we required in the User model. The first argument passed to the newSubscription method should be the name of the subscription. For this app, we only offer monthly subscriptions and thus called our subscription main. The second argument is the specific Braintree plan the user is subscribing to.
我们在方法内部所做的就是从我们在隐藏输入中传递的值中获取计划。 获得计划后,我们newSubscription当前登录的用户调用newSubscription方法。 此方法带有我们在User模型中需要的Billable特性。 传递给newSubscription方法的第一个参数应为订阅的名称。 对于此应用,我们仅提供每月订阅,因此称为“订阅main 。 第二个参数是用户订阅的特定Braintree计划。
The create method accepts the payment_method_nonce that we generate from Braintree as its argument. It’s the create method that will begin the subscription as well as update our database with the customer ID and other relevant billing information.
create方法接受我们从Braintree生成的payment_method_nonce作为其参数。 这是create方法,将开始订阅以及使用客户ID和其他相关账单信息更新我们的数据库。
After subscribing the user, we redirect them to the homepage. We will implement basic flash messaging for notifications later.
订阅用户后,我们将其重定向到主页。 稍后,我们将为通知实施基本的Flash消息传递。
We can now confirm that things are working by filling in the form with a test card, then navigating to the Braintree dashboard to see if the card was billed. For the card number, use 4242 4242 4242 4242 and set the date to a future date. Something like this:
现在,我们可以通过在表单中填写测试卡来确认一切正常,然后导航至Braintree仪表板以查看该卡是否已结算。 对于卡号,请使用4242 4242 4242 4242并将日期设置为将来的日期。 像这样:
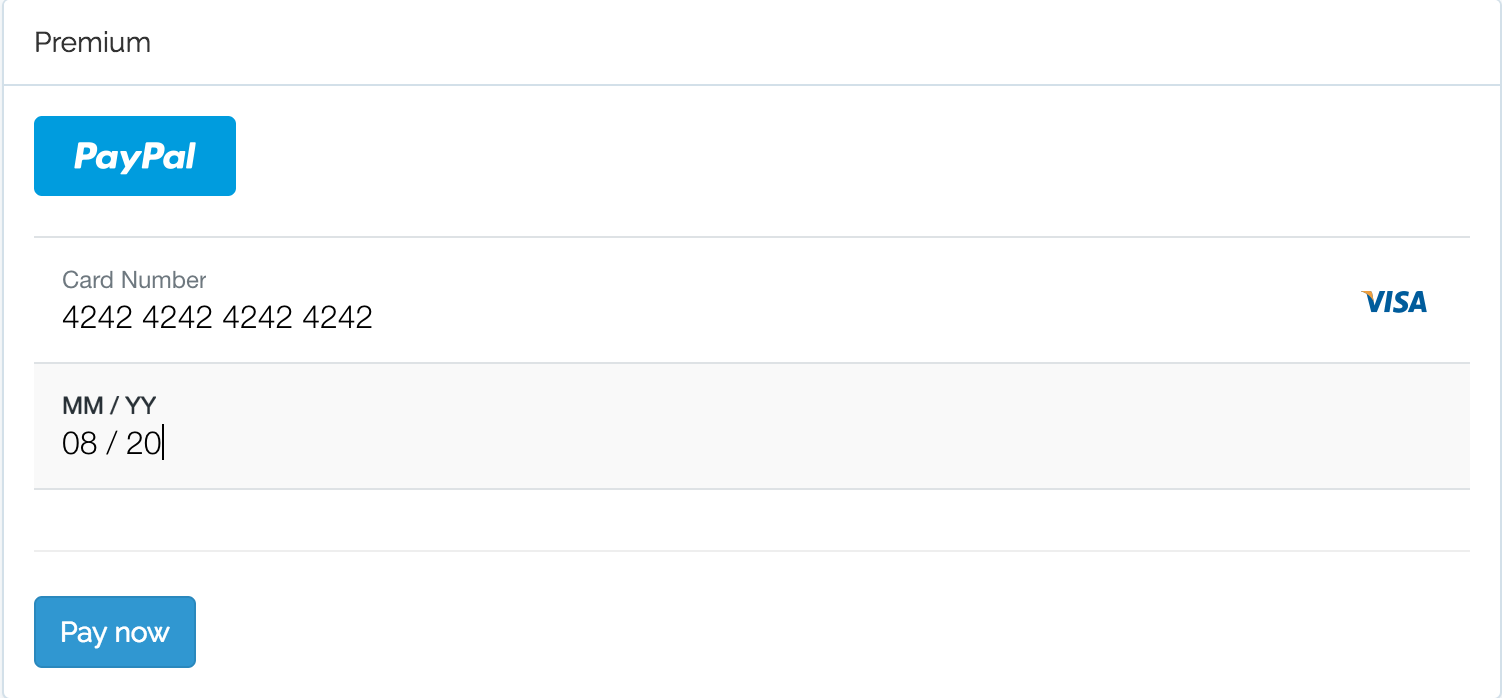
If everything went as expected, a new payment should be reflected in your braintree dashboard. A new record will also be added to the subscriptions table.
如果一切都按预期进行,那么新的付款应该会反映在您的Braintree仪表板上。 新记录也将添加到订阅表。
结论 (Conclusion)
We’ve come a long way to get to this point but users now have the ability to subscribe to a plan. We covered basic Braintree integration with Laravel, plan creation, building of commands for syncing and fetching the token, and more – everything you need to get started with Braintree subscriptions.
到目前为止,我们已经走了很长一段路,但是用户现在可以订阅计划。 我们介绍了Braintree与Laravel的基本集成,计划的创建,用于同步和获取令牌的命令的构建,以及其他– Braintree订阅入门所需的一切。
In the next part, we’ll prevent users from signing up to the same plan twice, amongst other things. Stay tuned.
在下一部分中,我们将防止用户两次注册同一计划。 敬请关注。
翻译自: https://www.sitepoint.com/laravel-and-braintree-sitting-in-a-tree/
braintree


 262
262

 被折叠的 条评论
为什么被折叠?


