


arduino 连接舵机

It’s IoT Week at SitePoint! All week we’re publishing articles focused on the intersection of the internet and the physical world, so keep checking the IoT tag for the latest updates.
这是SitePoint的IoT周! 我们整周都在发布有关互联网与物理世界交汇点的文章,因此请继续检查IoT标签以获取最新更新。
In the first part of this series, we learned a bit of Minecraft and the circuitry we can make inside it. We also made a circuit to alert us when the door to our mansion was opened.
在本系列的第一部分中,我们学习了一些Minecraft以及可以在其中制作的电路。 当通往大厦的门打开时,我们还进行了巡回提醒。
We then hooked this virtual alarm to a listening PHP script, so we can know when the door is opened in the context of a PHP script.
然后,我们将此虚拟警报挂接到了正在侦听PHP脚本上,因此我们可以知道何时在PHP脚本的上下文中打开门。
In this part, we’ll build a small Arduino-based alarm circuit. We’ll learn how to trigger the alarm, using the the official IDE and programming language, and then using something called Firmata.
在这一部分中,我们将构建一个基于Arduino的小型警报电路。 我们将使用官方的IDE和编程语言,然后使用称为Firmata的方法,学习如何触发警报。
We’ll round the series out by connecting the alarm circuit to the Minecraft circuit, so we hear a real alarm for Minecraft mansion.
我们通过将警报电路连接到Minecraft电路来完善该系列,因此我们会听到有关Minecraft大厦的真正警报。
You can find the code for this tutorial at https://github.com/sitepoint-editors/tutorial-php-arduino-and-minecraft/tree/connect-arduino
您可以在以下网址找到本教程的代码: https://github.com/sitepoint-editors/tutorial-php-arduino-and-minecraft/tree/connect-arduino
Arduino编程速成课程 (Crash Course in Arduino Programming)
Arduino is one of many types hobbyist circuit controllers. There are a few different designs, like the bigger Uno or the smaller Micro.
Arduino是许多类型的爱好者电路控制器之一。 有几种不同的设计,例如较大的Uno或较小的Micro 。
What’s common among them is that they have ports/pins for connecting to different components (e.g. buttons, sensors, and LEDs) and understand a common programming languages. The programming languages are C and C++, which is about the hardest thing to learn about Arduino.
它们之间的共同点是它们具有用于连接到不同组件(例如按钮,传感器和LED)的端口/引脚,并了解通用的编程语言。 编程语言是C和C ++,这是最难了解的Arduino。
You can think of Arduino boards as smaller, simpler computers, capable of abstracting the basics of circuitry and providing a programatic interface for them.
您可以将Arduino板视为更小,更简单的计算机,能够抽象化电路的基础并为其提供程序接口。
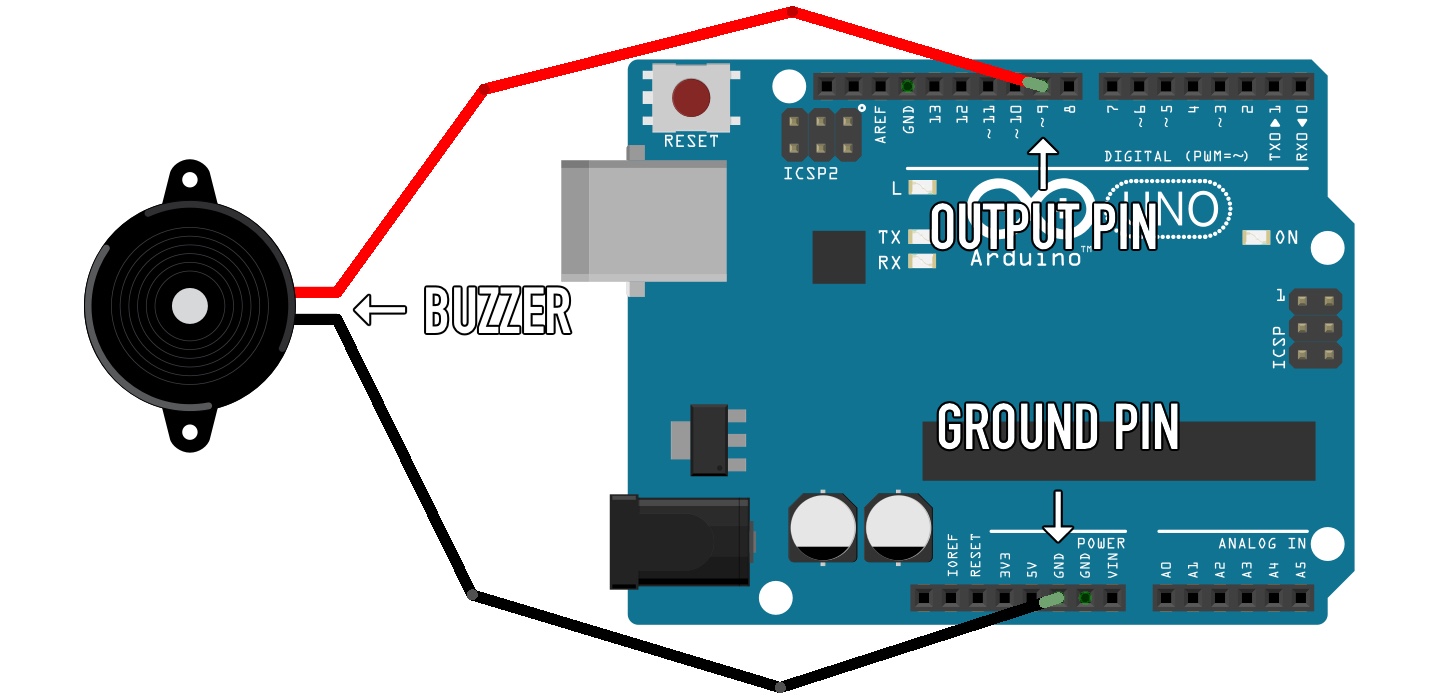
You’ll need to get an Arduino (or alternatives discussed later) and an alarm buzzer or LED.
您需要获得一个Arduino (或稍后讨论的替代产品)和一个警报蜂鸣器或LED 。
The buzzer and/or LED have two pins: one for ground (sometimes labelled “gnd” or “-“) and the other which needs to go to an Arduino port/pin:
蜂鸣器和/或LED有两个引脚:一个接地(有时标记为“ gnd”或“-”),另一个需要连接至Arduino端口/引脚:
I modelled this in Fritzing. It’s fantastic, and you should give it a try!
我在Fritzing中对此建模。 太棒了,您应该尝试一下!
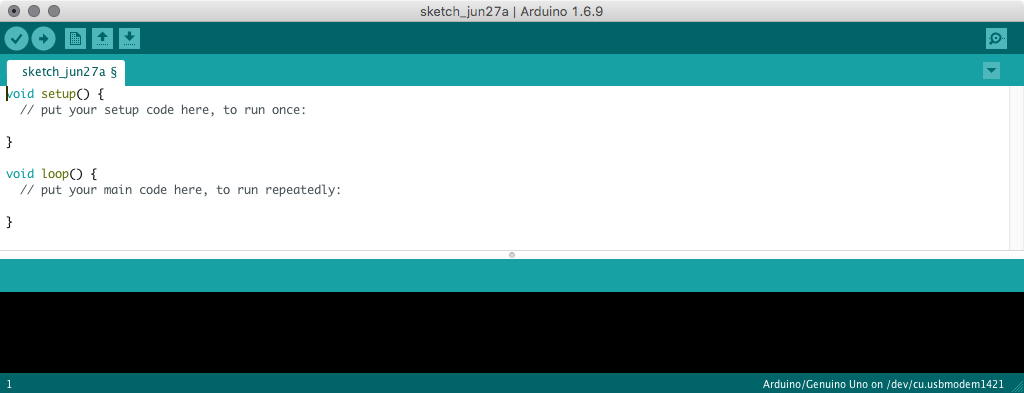
Next, we need to download the official IDE. Head over to https://www.arduino.cc/en/Main/Software and download the version appropriate for your operating system. Load it up and you should see something like this:
接下来,我们需要下载官方IDE。 转到https://www.arduino.cc/en/Main/Software并下载适合您的操作系统的版本。 加载它,您应该看到类似以下的内容:
The primary Arduino programming languages are C and C++. Functions look similar to PHP 7 functions, where the return type takes the place of the function keyword. So we see a couple of methods that should return void (meaning they shouldn’t return anything).
Arduino的主要编程语言是C和C ++。 函数看起来类似于PHP 7函数,其中返回类型代替function关键字。 因此,我们看到了一些应该返回void的方法(这意味着它们不应返回任何内容)。
The setup function is called as the Arduino starts up. As the name suggests, we can use it to do initial setup of the board. You see those numbers next to each pin/port on the Arduino? Those can be used for input or output (digital and analog). In fact, it’s generally a good idea to define the function of each pin before it’s used.
Arduino启动时会调用setup功能。 顾名思义,我们可以使用它来进行电路板的初始设置。 您在Arduino的每个引脚/端口旁边看到那些数字吗? 这些可用于输入或输出(数字和模拟)。 实际上,在使用每个引脚之前先定义其功能通常是一个好主意。
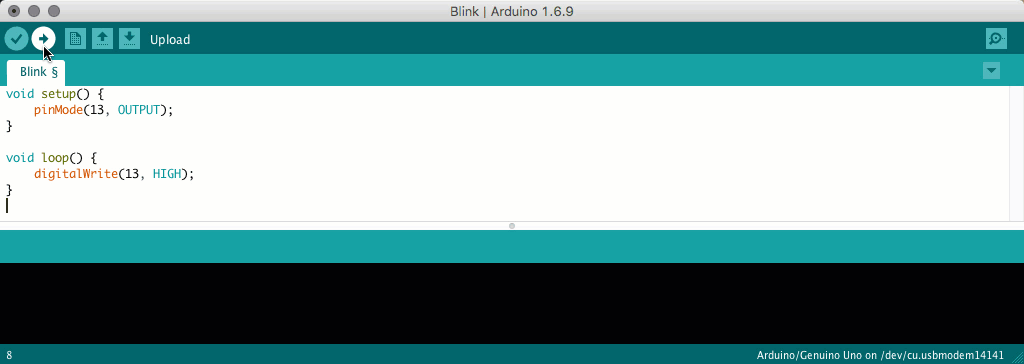
Many Arduino boards come with pin 13 already connected to an LED on the board. We can switch this on using the following code:
许多Arduino开发板附带的引脚13已经连接到板上的LED。 我们可以使用以下代码将其打开:
void setup() {
    pinMode(13, OUTPUT);
}

void loop() {
    digitalWrite(13, HIGH);
}
Before we can upload this code to the Arduino, we need to find where it is. Open up a terminal window and try the following command:
在将这段代码上传到Arduino之前,我们需要找到它的位置。 打开一个终端窗口,然后尝试以下命令:
ls /dev | grep usbmodemThis command lists everything in /dev (which on OSX and most Linux systems is where we can find the device names of USB devices plugged into our system). It then takes this list and pipes it through the Grep command, to filter out all item that contain the word usbmodem.
此命令列出/dev中的所有内容(在OSX和大多数Linux系统上,可以在其中找到插入系统的USB设备的设备名称)。 然后,它将获取此列表,并将其通过Grep命令传递给管道,以过滤掉包含单词usbmodem所有项。
Take note of the items returned. If you don’t see any, something may be wrong with your Arduino or it may just not be plugged in properly. Let us know, in the comments, if you can’t get past this step…
记下返回的项目。 如果您看不到任何东西,则说明您的Arduino可能出了点问题,或者只是未正确插入。 让我们知道,如果您无法通过此步骤,请在评论中…
Go back to the Arduino IDE, and select the matching Arduino port, from the “Tools” → “Port” menu. It’s good to know the actual device name, even though you could have guessed it without the terminal commands, since we need the exact name later on.
返回Arduino IDE,然后从“工具”→“端口”菜单中选择匹配的Arduino端口。 知道实际的设备名称是一件好事,即使您不用终端命令也可以猜到它,因为稍后我们需要确切的名称。
Once you’ve set the correct port, and picked the applicable Arduino type (from the “Tools” → “Board” menu), you should be able to upload the example to the board.
一旦设置了正确的端口,并选择了适用的Arduino类型(从“工具”→“板”菜单),您就可以将示例上传到板上。
The Arduino IDE takes the C or C++ code and compiles it to bytecode the board can understand. This process of writing, compiling, and uploading code to the Arduino can be frustratingly slow for us PHP folk. We’ll use an easier approach soon.
Arduino IDE接受C或C ++代码并将其编译为开发板可以理解的字节码。 对于我们PHP人员来说,编写,编译和上载代码到Arduino的过程可能令人沮丧地缓慢。 我们将尽快使用一种更简单的方法。
You can find many example Arduino programs, via the “File” → “Examples” menu. I found these invaluable when getting to grips with the C syntax and board capabilities!
您可以通过“文件”→“示例”菜单找到许多示例Arduino程序。 当掌握C语法和开发板功能时,我发现这些都是无价的!
In fact, the easier way to check if an Arduino is working, and connected correctly, is to upload the “Blink” example:
实际上,检查Arduino是否正常工作并连接正确的更简单方法是上传“ Blink”示例:
If you’ve connected the buzzer or LED correctly, you can even alter the script to set the applicable port to HIGH/Low. But it’s a slow and frustrating process, to have to learn C and constantly re-upload code to the Arduino.
如果正确连接了蜂鸣器或LED,甚至可以更改脚本以将适用的端口设置为HIGH / Low 。 但这是一个缓慢而令人沮丧的过程,必须学习C并不断将代码重新上传到Arduino。
Sometimes figuring out how different components work is tricky. Here’s a guide to get you started!
有时弄清楚不同组件的工作方式很棘手。 这是指导您入门的指南!
熟悉PHP (Familiar PHP)
Let’s try something different. In the realm of Arduino there exists a universal language with which we can communicate. It’s a protocol called Firmata, and it enables us to use any language to make our tech whir.
让我们尝试一些不同的东西。 在Arduino领域中,存在着一种我们可以交流的通用语言。 这是一个名为Firmata的协议,它使我们能够使用任何语言来制造技术。
Go to the “Examples” → “Firmata” → “StandardFirmata” example, and upload it to your Arduino. It’s now able to communicate through a standard serial interface.
转到“示例”→“ Firmata”→“ StandardFirmata”示例,然后将其上传到您的Arduino。 现在,它可以通过标准串行接口进行通信。
If you’ve not yet downloaded the code from the last post, now is a good time to do so. We’re going to build on top of it…
如果您还没有下载上一篇文章中的代码, 那么现在是个不错的选择。 我们将在此基础上建立…
We need to add a new library to those we already have:
我们需要向已经拥有的库中添加一个新库:
composer require carica/firmataThis library acts as a client for the Standard Firmata code we just uploaded to our Arduino. In index.php we can add the following code, to connect to the Arduino:
该库充当我们刚刚上传到Arduino的标准Firmata代码的客户端。 在index.php我们可以添加以下代码以连接到Arduino:
use Carica\Io;
use Carica\Firmata;

$board = new Firmata\Board(
    Io\Stream\Serial\Factory::create(
        "/dev/cu.usbmodem14141", 57600
    )
);
You will definitely need to close the Arduino IDE before attempting to run this code. It opens connections to the Arduino which block subsequent connections from our PHP script. If you’re unable to connect to the Arduino at any point, simply disconnect and re-connect the Arduino to the same USB port. This will break any open connections which could be blocking things up.
在尝试运行此代码之前,您肯定需要关闭Arduino IDE。 它会打开与Arduino的连接,从而阻止来自我们PHP脚本的后续连接。 如果您无法随时连接到Arduino,只需断开Arduino并将其重新连接到相同的USB端口即可。 这将断开所有可能阻塞情况的打开的连接。
You’ll need to replace the cu.usbmodem14141 with the device name you got from the terminal command (or found in the IDE “Tools” → “Port” menu).
您需要用从终端命令(或在IDE“工具”→“端口”菜单中找到)的设备名称替换cu.usbmodem14141 。
Let’s add an event listener, for when the PHP script finally connects to the Arduino:
让我们添加一个事件侦听器,以了解何时PHP脚本最终连接到Arduino:
$board
    ->activate()
    ->done(
        function() use ($board, $loop, $watcher) {
            $pin = $board->pins[9];
            $pin->mode = Firmata\Pin::MODE_PWM;

            print "connected to Arduino";
        }
    );

$loop->run();
We can attach a callback to be run after the PHP script finally connects to the board. We have to set the mode of the Arduino pin/port, just like we did in the Arduino IDE C code. This time we’re setting pin 9 to PWM (Pulse-Width Modulation) mode.
我们可以附加一个回调,以便在PHP脚本最终连接到开发板之后运行。 就像我们在Arduino IDE C代码中所做的那样,我们必须设置Arduino引脚/端口的模式。 这次我们将引脚9设置为PWM(脉冲宽度调制)模式。
Most Arduino pins can be set to HIGH or LOW. Devices set to HIGH will switch on (an LED will light up), and set to LOW will switch off. PWM is an incremental mode, where values between 0 and 255 provide granular charge to connected devices. Technically PWM is more like rapidly switching between HIGH and LOW for x/255 of the time it would otherwise be set to HIGH, but the observable effects are the same.
大多数Arduino引脚可以设置为HIGH或LOW 。 设置为HIGH设备将打开(LED点亮),设置为LOW将关闭。 PWM是一种增量模式,其中0到255之间的值为连接的设备提供粒状电荷。 从技术上讲,PWM更像是在x / 255的时间HIGH和LOW之间快速切换,否则将其设置为HIGH ,但是可观察到的效果是相同的。
Notice we’ve brought the $watcher and $loop through? $loop is an instance of an event loop, which is not all that common in PHP applications. If you’ve unfamiliar with what event loops are, or how they work, check out the introduction we gave a while ago…
注意到我们已经带来了$watcher和$loop吗? $loop是事件循环的一个实例,在PHP应用程序中并不常见。 如果您不了解什么是事件循环,或者它们如何工作,请查看我们不久前的介绍 ...
We can use a concept similar to JavaScript’s setInterval function, by attaching a callback to the event loop we have here:
通过将回调附加到事件循环,我们可以使用类似于JavaScript的setInterval函数的概念:
print "connecting.";

$board
    ->activate()
    ->done(
        function() use ($board, $loop, $watcher) {
            print "connected.";

            $pin = $board->pins[9];
            $pin->mode = Firmata\Pin::MODE_PWM;

            $loop->setInterval(
                function() use ($pin, $watcher) {
                    // this is called about every second
                },
                1000
            );
        }
    );
So, instead of using an infinite loop to check for changes to log files, we can use an event loop timer. When combined with the rest of the script, we can set pin 9 to a value between 0 and 255:
因此,我们可以使用事件循环计时器来代替使用无限循环来检查日志文件的更改。 当结合脚本的其余部分时,我们可以将pin 9设置为0到255之间的值:
$loop->setInterval(
    function() use ($pin, $watcher) {
        print "check.";

        $watcher->findChanges();
        $changes = $watcher->getUpdatedResources();

        if (count($changes) > 0) {
            $first = $changes[0];

            $lines = file($first);

            for ($i = count($lines) - 1; $i > -1; $i--) {
                if (stristr($lines[$i], "CHAT")) {
                    if (stristr($lines[$i], "closed")) {
                        print "open.";

                        $pin->analog = 0; // 0/255
                    }

                    if (stristr($lines[$i], "open")) {
                        print "closed.";

                        $pin->analog = 0.5; // 127/255
                    }

                    break;
                }
            }
        }
    },
    1000
);
We’re using roughly the same code we made last time. This time, instead of writing open or closed to the terminal, we’re setting the analog value of pin 9. analog relates to the PWM setting we did earlier. If we wanted to use the simpler HIGH or LOW values, we could set the pin mode to digital:
我们使用的代码与上次大致相同。 这次,我们不是设置端子的open还是closed ,而是设置引脚9的analog值。 analog与我们之前所做的PWM设置有关。 如果要使用更简单的HIGH或LOW值,可以将引脚模式设置为数字:
$pin->mode = Pin::MODE_OUTPUT;…and set the digital value of the pin:
…并设置引脚的digital值:
if (stristr($lines[$i], "closed")) {
    $pin->digital = 0;
}

if (stristr($lines[$i], "open")) {
    $pin->digital = 1;
}
带来大猩猩 (Bring In The Gorilla)
While working through this, I found the Arduino/Firmata/OSX link to be unstable at times. The Carica Firmata library uses a few different methods (depending on the availability of extensions), and the default is native socket streams. Unfortunately, the version of Arduino I have automatically resets after new connections are made, and Firmata requires a short delay before communicating with the Arduino.
在解决此问题时,我发现Arduino / Firmata / OSX链接有时不稳定。 Carica Firmata库使用几种不同的方法(取决于扩展的可用性),默认为本机套接字流。 不幸的是,在建立新连接后,我已经自动重置了Arduino版本,并且Firmata需要短暂的延迟才能与Arduino通信。
The native socket stream implementation (in Carica Firmata) communicates too quickly with the board, which interrupts the boot cycle. Trouble ensues.
本机套接字流实现(在Carica Firmata中)与板通信太快,这会中断启动周期。 随之而来的麻烦。
I was able to avoid this by installing the Gorilla extension, which is supported by Carica Firmata. You can find instructions on how to do this, over at Github. Build and enable the Gorilla extension, and you shouldn’t suffer the same stability issues I did…
通过安装由Carica Firmata支持的Gorilla扩展程序,我能够避免这种情况。 您可以在Github上找到有关如何执行此操作的说明。 构建并启用Gorilla扩展,您不会遭受与我相同的稳定性问题……
Even though there are many different micro controllers you could use for this project, I’m focussing on Arduino because that’s what I have. If you have something else (that’s compatible with Firmata) then the code in this part should work for you. You’ll have to figure out how to connect the buzzer or LED to your micro controller though…
即使您可以在该项目中使用许多不同的微控制器,但我还是专注于Arduino,因为这就是我所拥有的。 如果您还有其他(与Firmata兼容),那么本部分中的代码将为您工作。 不过,您必须弄清楚如何将蜂鸣器或LED连接到您的微处理器。
We’ve successfully implemented half a circuit inside Minecraft, and the other half on Arduino. In addition, we’ve discovered one way to connect them both through PHP. Think of the possibilities!
我们已经成功在Minecraft内部实现了一半电路,另一半在Arduino上实现了。 另外,我们发现了一种通过PHP连接它们的方法。 想想可能性!
翻译自: https://www.sitepoint.com/php-arduino-and-minecraft-connecting-an-arduino-to-php/
arduino 连接舵机


 752
752

 被折叠的 条评论
为什么被折叠?
被折叠的 条评论
为什么被折叠?
 到【灌水乐园】发言


