


wordpress媒体主题
With recent WordPress updates, its APIs have changed. Some functions and classes have been added, others have been deprecated.
随着WordPress的最新更新,其API已更改。 添加了一些功能和类,不推荐使用其他功能和类。
In this article, I will discuss the Theme Customizer Media Controls. In the previous versions, these controls were available, but only in the WP_Customize_Upload_Control class. Now we find a new class to manage media called WP_Customize_Media_Control.
在本文中,我将讨论主题定制器媒体控件。 在以前的版本中,这些控件可用,但仅在WP_Customize_Upload_Control类中可用。 现在,我们发现了一个用于管理媒体的新类WP_Customize_Media_Control 。
First, I’ll cover how to use this new class to manage media controls in the Theme Customizer. Then we will cover a concrete example of a class that extends WP_Customize_Media_Control to allow the control of cropped images.
首先,我将介绍如何使用此新类在主题定制器中管理媒体控件。 然后,我们将介绍一个类的具体示例,该类扩展了WP_Customize_Media_Control以允许控制裁剪的图像。
用于管理媒体控件的新基础类 (The New Base Class to Manage a Media Control)
为什么要引入新课程? (Why Introduce a New Class?)
Before version 4.3, WordPress provided us WP_Customize_Upload_Control, a class to manage the upload of a media file in the Theme Customizer. However, this class didn’t save the ID of the uploaded media but only its URL. As the ID is a more common way to retrieve information about a media file, the decision was taken to provide a new class, WP_Customize_Media_Control.
在4.3版之前,WordPress为我们提供了WP_Customize_Upload_Control ,该类用于在主题定制器中管理媒体文件的上载。 但是,此类不保存上载媒体的ID,而仅保存其URL。 由于ID是检索媒体文件信息的更常用的方式,因此决定提供一个新类WP_Customize_Media_Control 。
If you have the habit of using WP_Customize_Upload_Control, you can still use it without any problems, as it now extends the WP_Customize_Media_Control class so compatibility is ensured. However, it surely is a better idea to update your code and use WP_Customize_Media_Control.
如果您习惯使用WP_Customize_Upload_Control ,则仍然可以使用它而不会出现任何问题,因为它现在扩展了WP_Customize_Media_Control类,因此可以确保兼容性。 但是,更新代码并使用WP_Customize_Media_Control当然是一个更好的主意。
如何使用此媒体控件 (How To Use this Media Control)
This new Media Control can be used in the same way as its predecessor, except for the saved value. As it is not a URL anymore, it can’t be sanitized in the same way.
除了保存的值外,此新媒体控件的使用方式与其前身相同。 由于它不再是URL,因此无法以相同的方式进行清理。
To see how to use this control we will review a concrete example. We will see how to let the user choose an audio file that visitors will be able to listen to on all pages. You can write the code in your theme’s functions.php file or in a new plugin. Both are acceptable and the two options each have their own advantages.
要查看如何使用此控件,我们将回顾一个具体示例。 我们将看到如何让用户选择访客可以在所有页面上收听的音频文件。 您可以在主题的functions.php文件或新插件中编写代码。 两者都是可以接受的,并且这两种选择都有各自的优势。
Note that, as the Theme Customizer API is not the main focus of this article, I won’t describe here all the available options for the functions we’ll call.
请注意,由于主题定制器API并不是本文的重点,因此在此我将不介绍我们将调用的函数的所有可用选项。
基本用法 (Basic Usage)
First, we begin with a function that WordPress will call when the user wants to display the Theme Customizer. This function will add our custom elements to this customizer. To inform WordPress that we want it to call our function at the right moment we use the customize_register action.
首先,我们从一个函数开始,当用户想要显示主题定制器时,WordPress将调用该函数。 此函数会将我们的自定义元素添加到此定制器。 为了通知WordPress我们希望它在适当的时候调用我们的函数,我们使用了customize_register操作。
function add_my_media_controls($wp_customize) {
}
add_action('customize_register', 'add_my_media_controls');
The parameter, here named $wp_customize, is an object representing the Theme Customizer. It contains all the needed methods to add to our settings.
参数,这里名为$wp_customize ,是代表主题定制器的对象。 它包含所有需要添加到我们设置中的方法。
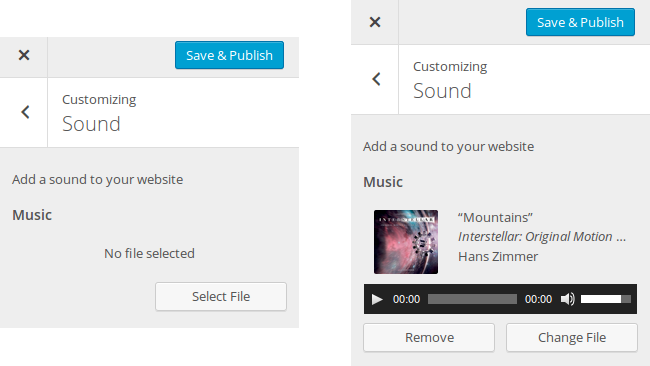
As none of the default sections are really a good place to add our custom sound, we will add our own, simply named “Sound”.
由于没有默认部分确实不是添加自定义声音的好地方,因此我们将添加我们自己的名称为“ Sound”的声音。
$wp_customize->add_section('sound', array(
    'title' => 'Sound',
    'description' => 'Add a sound to your website',
    'capability' => 'edit_theme_options'
));
As expected, this method creates a new section, named “Sound”. When the user opens it, they will see the description at the top. Thanks to the third option, only users who can already edit theme options will be able to see this section. Finally, note the first parameter before the array of options: it defines the ID of the section, which must be reused when we want to add a control in this section.
与预期的一样,此方法将创建一个名为“ Sound”的新部分。 当用户打开它时,他们将在顶部看到说明。 多亏了第三个选项,只有可以编辑主题选项的用户才能看到此部分。 最后,请注意选项数组之前的第一个参数:它定义了该部分的ID,当我们要在此部分中添加控件时必须重用该ID。
If you open the Theme Customizer now, you won’t see this section. It’s normal: WordPress doesn’t display empty sections so, to see it, we have to fill it with at least one control.
如果现在打开主题定制器,则不会看到此部分。 这是正常的:WordPress不会显示空白部分,因此,要查看它,我们必须至少填充一个控件。
The Theme Customizer API splits a control into two parts: the UI control which allows the user to choose or type the right data, and the setting which retrieves the current value and saves the new one. See the setting as the interface between the UI control and the database.
主题定制程序API将控件分为两部分:UI控件(允许用户选择或键入正确的数据)以及设置,用于检索当前值并保存新值。 将该设置视为UI控件和数据库之间的接口。
Before creating a control we need to create the setting.
在创建控件之前,我们需要创建设置。
$wp_customize->add_setting('music', array(
    'type' => 'theme_mod',
    'capability' => 'edit_theme_options',
    'sanitize_callback' => 'absint'
));
We indicate “music” as the ID for our setting. It is a theme modification, as indicated in the first option. The capability option is the same as for the add_section() method. Finally we indicate absint() as the sanitize callback function. This WordPress function is a shortcut for abs(intval()) and is here to ensure that the value is a positive integer. As we saw above, WP_Customize_Media_Control will store an ID so it is exactly the function we want for sanitizing the value.
我们将“音乐”作为我们设置的ID。 如第一个选项所示,这是主题修改。 capability选项与add_section()方法相同。 最后,我们将absint()指示为清理回调函数。 此WordPress函数是abs(intval())的快捷方式,用于确保该值是正整数。 正如我们在上面看到的, WP_Customize_Media_Control将存储一个ID,因此它正是我们要用于WP_Customize_Media_Control值的函数。
We’re now ready to add our UI control which can be seen by the user.
现在,我们准备添加用户可以看到的UI控件。
$wp_customize->add_control(new WP_Customize_Media_Control($wp_customize, 'music', array(
    'section' => 'sound',
    'label' => 'Music',
    'mime_type' => 'audio'
)));
To be built, the WP_Customize_Media_Control object needs three parameters: the current Theme Customizer instance, the ID of the corresponding setting (which we just created above) and an array of options.
要构建, WP_Customize_Media_Control对象需要三个参数:当前的主题定制程序实例,相应设置的ID(我们刚刚在上面创建)和一个选项数组。
The section option is here to indicate the section in which we want to place our control. We use here the section we created especially for this use. Then we indicate the label of the field. You can put here any value you want.
section选项在这里指示我们要放置控件的部分。 我们在这里使用我们专门为此创建的部分。 然后,我们指示字段的标签。 您可以在此处输入任何所需的值。
Finally, here we will provide the user a way to select a media file. As we want them to be able to only select audio files, we indicate audio as the wanted MIME type. That way, WordPress won’t allow the selection of other types of files.
最后,在这里我们将为用户提供选择媒体文件的方法。 因为我们希望它们只能选择音频文件,所以将audio表示为所需的MIME类型。 这样,WordPress将不允许选择其他类型的文件。
And that’s all for the creation of our control. Now you can open the Theme Customizer: you should see our section and our control.
这就是创建控件的全部。 现在您可以打开主题定制器:您应该看到我们的部分和控件。
更多的选择 (More Options)
Note that the array of options we provided as the third parameter of the WP_Customize_Media_Control constructor can accept more options.
请注意,作为WP_Customize_Media_Control构造函数的第三个参数提供的选项数组可以接受更多选项。
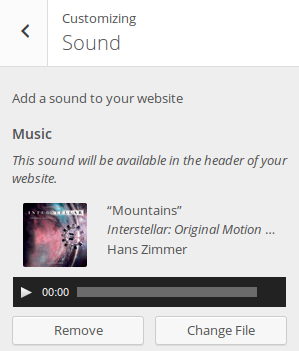
In addition to its label, you can display more information about your control thanks to a description. By giving a non empty string to the option description you can in fact display a description right below the label, for example, describe where will it be displayed.
除了其标签外,您还可以通过描述显示有关控件的更多信息。 通过为选项description提供非空字符串,您实际上可以在标签正下方显示说明,例如,描述将在何处显示。
You can set its priority thanks to the option priority. This number defines the order in which the object must be displayed. By default, the priority is set to 10 and objects are displayed in the order that they are created. But you can change that. For example, if you create two objects, you can set the priority of the first one to 10 and the priority of the second one to 0: that way, the second object will be displayed first. This option can be useful if your plugin or theme provides several controls that must be displayed in a given order.
您可以通过优先级选项设置优先priority 。 该数字定义了对象显示的顺序。 默认情况下,优先级设置为10并按照创建顺序显示对象。 但是你可以改变它。 例如,如果创建两个对象,则可以将第一个对象的优先级设置为10 ,将第二个对象的优先级设置为0 :这样,将首先显示第二个对象。 如果您的插件或主题提供了必须按给定顺序显示的多个控件,则此选项很有用。
检索保存的设置 (Retrieving the Saved Setting)
To retrieve the setting saved by the user we will create a new function, named echo_theme_sound(). This function will be called in the place you want in the theme, to display an audio tag corresponding to the selected media.
要检索用户保存的设置,我们将创建一个名为echo_theme_sound()的新函数。 将在主题中所需的位置调用此功能,以显示与所选媒体相对应的audio标签。
First, remember that our setting is a theme modification so, to retrieve its value, we must use the function get_theme_mod().
首先,请记住我们的设置是主题修改,因此,要检索其值,我们必须使用函数get_theme_mod() 。
function echo_theme_sound() {
    $id = get_theme_mod('music');
}
If the user already made a choice, this variable will contain the ID of the selected media. In other words, to check if a choice has been made, we just need to check if this ID is different than zero.
如果用户已经做出选择,则此变量将包含所选媒体的ID。 换句话说,要检查是否已做出选择,我们只需要检查此ID是否不为零即可。
if ($id != 0) {
    // Display the tag
}
To build an audio tag we will use wp_audio_shortcode() which excepts for one parameter: an array of options which will be in fact the attributes of the tag.
要构建音频标签,我们将使用wp_audio_shortcode() ,它除了一个参数:一个选项数组,实际上是标签的属性。
This array must contain an option named src which is the URL of the audio file. To retrieve this URL we can use wp_get_attachment_url() with the previously retrieved ID. If you want to play with the other attributes, you can, but it’s not mandatory. See the WordPress Codex for more information about the available attributes.
该数组必须包含一个名为src的选项,这是音频文件的URL。 要检索此URL,我们可以将wp_get_attachment_url()与先前检索的ID一起使用。 如果您想使用其他属性,则可以,但这不是强制性的。 有关可用属性的更多信息,请参见WordPress Codex 。
We are now ready to display our audio tag. I chose here to encapsulate it into a div, but you can choose another tag, and another style. You can even, for example, define two parameters $before and $after for your echo_theme_sound() function to let the user provide the text to display before and after the audio tag.
现在,我们准备显示音频标签。 我在这里选择将其封装到div ,但是您可以选择另一个标签和另一个样式。 例如,您甚至可以为echo_theme_sound()函数定义两个参数$before和$after ,以使用户提供要在音频标签之前和之后显示的文本。
$attr = array(
    'src' => wp_get_attachment_url($id)
);

echo '<div style="margin-top: 30px;">' . wp_audio_shortcode($attr) . '</div>';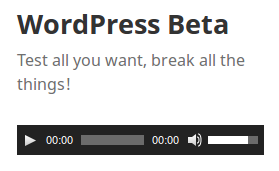
Now, just call the echo_theme_sound() function wherever you want, and enjoy the result! Note that, once you have used this function in one of your theme’s files you will be able to see the changes you do in the Theme Customizer directly after you have made them, without the need to refresh the page.
现在,只需在echo_theme_sound()调用echo_theme_sound()函数,即可享受效果! 请注意,一旦在主题文件之一中使用了此功能,您便可以在更改后直接在主题定制器中查看所做的更改,而无需刷新页面。
管理裁剪的图像 (Managing Cropped Images)
The WP_Customize_Media_Control can be extended to add more features. If you need a concrete example of what features could be added that way, you will find one in WordPress Core itself with the WP_Customize_Cropped_Image_Control class.
可以扩展WP_Customize_Media_Control以添加更多功能。 如果您需要有关可以通过哪种方式添加功能的具体示例,可以在WordPress Core中使用WP_Customize_Cropped_Image_Control类找到一个功能。
As you may guess it by reading its name, this class is useful when you want to provide your users a way to select and crop an image before using it.
您可能会通过阅读其名称来猜测它,当您想为用户提供在使用前选择和裁剪图像的方式时,此类非常有用。
Here we will use it to add a little header image to the current default WordPress theme (Twenty Fifteen). I chose to display this image on the top of the header, right above the website’s title but, once again, you’re free to place it wherever you want: the goal of this article is just to see concrete examples of the new API.
在这里,我们将使用它为当前的默认WordPress主题(二十十五岁)添加一个小标题图片。 我选择将该图像显示在标题的顶部,即网站标题的正上方,但是,再次,您可以将其随意放置在所需的位置:本文的目的只是为了查看新API的具体示例。
First, we create our setting. As we’ll store a media ID, this setting is essentially the same as for the audio tag previously added.
首先,我们创建设置。 由于我们将存储媒体ID,因此此设置与先前添加的音频标签基本相同。
$wp_customize->add_setting('little_header', array(
    'type' => 'theme_mod',
    'capability' => 'edit_theme_options',
    'sanitize_callback' => 'absint'
));
Then, the interesting part: the control itself. As WP_Customize_Media_Control’s one, the WP_Customize_Cropped_Image_Control’s constructor excepts for three parameters which are exactly the same: the Theme Customizer instance, the setting’s ID and an array of options.
然后,有趣的部分:控件本身。 与WP_Customize_Media_Control的构造函数一样, WP_Customize_Cropped_Image_Control的构造函数WP_Customize_Cropped_Image_Control ,三个参数完全相同:主题定制程序实例,设置的ID和选项数组。
$wp_customize->add_control(new WP_Customize_Cropped_Image_Control($wp_customize, 'little_header', array(
    'section' => 'header_image',
    'label' => 'Little Header',
    'width' => 355,
    'height' => 200
)));
Here, I didn’t create a new section: we reused the one already used by WordPress to provide the control allowing the user to choose a background image header. The label option is an already known one, and you’ll be more interested by the two other options: width and height.
在这里,我没有创建新的部分:我们重用了WordPress已经使用的部分,以提供允许用户选择背景图像标题的控件。 label选项是一个已知的选项,另外两个选项会让您更加感兴趣: width和height 。
These options are here to control the size of the final image. The user selects the image they want and, then, a graphic tool allows them to crop this image where they want. WordPress will crop the image following this choice and resize the cropped image to the size you chose with these options.
这些选项可以控制最终图像的尺寸。 用户选择所需的图像,然后使用图形工具将其裁剪到所需的位置。 WordPress将按照此选择裁剪图像,并将裁剪后的图像调整为使用这些选项选择的尺寸。
When the user crops the image, the constraint of the image ratio is here and they can’t select a part of the image with another ratio. But this can be changed.
当用户裁剪图像时,图像比例的约束就在这里,他们无法选择具有其他比例的图像的一部分。 但这可以改变。
In fact, this class provides two more options: flex_width and flex_height. By default these two options are set to false and the aspect ratio given by the dimensions you indicated is a constraint: the user must select an area with the same ratio.
实际上,此类提供了另外两个选项: flex_width和flex_height 。 默认情况下,这两个选项设置为false并且由您指定的尺寸给出的纵横比是一个约束:用户必须选择具有相同比例的区域。
However, if you set one of these options to true, then this constraint will be removed and the user will be able to choose a part of the image with any ratio. Note that WordPress will still resize the result to the size you asked so a deformation can then happen.
但是,如果将这些选项之一设置为true ,则该约束将被删除,并且用户将能够以任意比例选择图像的一部分。 请注意,WordPress仍将结果调整为您要求的大小,以便随后发生变形。
When using flex_width and flex_height, the ratio is important. In fact, at the beginning, WordPress proposes to the user a default cropped zone. This zone corresponds to the maximum available area in the image with the asked ratio (for example the biggest possible square into a rectangle). This gives us what we will call here the default width and height.
当使用flex_width和flex_height ,该比率很重要。 实际上,在一开始,WordPress就向用户建议了一个默认的裁剪区域。 该区域对应于具有要求比率的图像中的最大可用区域(例如,最大可能的正方形变成矩形)。 这给了我们默认的宽度和高度。
If flex_width is set to false, then the user won’t be able to select an area larger than the default width. This constraint is canceled if you set this option to true. The same can be said for flex_height.
如果flex_width设置为false ,则用户将无法选择大于默认宽度的区域。 如果将此选项设置为true则取消此约束。 flex_height也可以这样说。
Finally, if flex_width and flex_height are set to false (their default values) and if the user selects an image in the exact size you indicated in the width and height options, then the crop step will be skipped.
最后,如果将flex_width和flex_height设置为false (它们的默认值),并且如果用户选择的width与您在width和height选项中指定的大小完全相同的图像,则将跳过裁剪步骤。
Note that cropping an image won’t alter the original: a new child media is created, with the cropped image, and the original file remains the same. That way, your users won’t have to upload the same image multiple times if they need to use it in several places.
请注意,裁剪图像不会更改原始图像:创建新的子媒体,并裁剪图像,并且原始文件保持不变。 这样,如果用户需要在多个地方使用同一张图片,则无需多次上传。
The way to retrieve the cropped image is similar to the one we used to retrieve our sound in the previous part: we get the image ID with get_theme_mod() and its URL with wp_get_attachment_url(). Then we display it in the way we want. Here I chose the simplest way, by echoing an image.
检索裁剪图像的方式是类似于我们用来获取我们的声音在前面的部分之一:我们得到与图像ID get_theme_mod()及其与URL wp_get_attachment_url() 。 然后,我们以所需的方式显示它。 在这里,我通过回显图像选择了最简单的方法。
function echo_little_header() {
    $id = get_theme_mod('little_header');

    if ($id != 0) {
        $url = wp_get_attachment_url($id);

        echo '<div style="margin-bottom: 30px;">';
        echo '<img src="' . $url . '" alt="" />';
        echo '</div>';
    }
}
结论 (In Conclusion)
With these new controls the Theme Customizer becomes more and more interesting, as it allows developers to do more things, easier. Now, if you need a media control in this customizer, you can add your own and retrieve the most useful value: the media ID.
有了这些新控件,主题定制器变得越来越有趣,因为它允许开发人员更轻松地执行更多操作。 现在,如果您需要此定制程序中的媒体控件,则可以添加自己的媒体控件并检索最有用的值:媒体ID。
The base class we saw in this article can be extended if you need more specific controls. This is done in several places in WordPress core: the Cropped Images control extends WP_Customize_Media_Control and this class is itself extended by the control used by the new Site Icon API. These are just examples of what you can do with this API.
如果您需要更多特定的控件,则可以扩展本文中看到的基类。 这是在WordPress核心中的多个地方完成的:“裁剪图像”控件扩展了WP_Customize_Media_Control而此类本身由新的Site Icon API使用的控件扩展。 这些只是您可以使用此API进行操作的示例。
You can play with the Theme Customizer with a theme or a plugin. However, as it is more practical for me to provide you a little plugin, you can find one by following this link. It combines the examples seen in this article.
您可以使用带有主题或插件的主题定制器。 但是,由于对我来说为您提供一个小插件比较实用,您可以通过以下链接找到一个。 它结合了本文中看到的示例。
翻译自: https://www.sitepoint.com/using-the-wordpress-customizer-media-controls/
wordpress媒体主题


 275
275

 被折叠的 条评论
为什么被折叠?
被折叠的 条评论
为什么被折叠?
 到【灌水乐园】发言


