


socket.io开发
Writing WordPress themes and plugins to be publicly distributed requires meeting minimum system requirements, specifically PHP 5.2.4. Since WordPress supports PHP 5.2.4 so must your public plugins and themes. PHP has changed immensely between PHP 5.2 and now PHP 7 RC.
编写要公开分发的WordPress主题和插件需要满足最低系统要求,尤其是PHP 5.2.4。 由于WordPress支持PHP 5.2.4,因此您的公共插件和主题也必须如此。 在PHP 5.2和现在PHP 7 RC之间,PHP发生了巨大的变化。
To ensure your software is compatible with all of the WordPress community it’s important to test your software in a few major PHP versions, i.e. 5.2.4, 5.6, and 7.0 RC. We could of course test more versions, but picking three major ones is a safe bet.
为了确保您的软件与所有WordPress社区兼容,在几个主要PHP版本(即5.2.4、5.6和7.0 RC)中测试软件非常重要。 我们当然可以测试更多版本,但是选择三个主要版本是安全的选择。
How do we test our plugin or theme in three major versions of PHP? Generally, our system can only run one version of PHP at a time. We could spin up different virtual machines with different PHP versions, however this is pretty difficult. The answer is containers with Docker.
我们如何在PHP的三个主要版本中测试我们的插件或主题? 通常,我们的系统一次只能运行一个版本PHP。 我们可以使用不同PHP版本启动不同的虚拟机,但这非常困难。 答案是使用Docker的容器。
Dockunit is a utility for running containerized software tests. Let’s setup Dockunit to be used with a plugin or theme (this guide assumes you are working on some sort of Unix system such as OS X or Ubuntu):
Dockunit是用于运行容器化软件测试的实用程序。 让我们将Dockunit设置为与插件或主题一起使用(本指南假定您正在使用某种类型的Unix系统,例如OS X或Ubuntu):
坞站设置 (Dockunit Setup)
1.下载并安装Dockunit及其依赖项。 (1. Download and install Dockunit and it’s dependencies.)
First, install Docker via their simple installation instructions. Next, we need Node.js and npm (which should be included in your Node.js install).
首先, 按照其简单的安装说明安装Docker。 接下来,我们需要Node.js和npm (它们应包含在您的Node.js安装中)。
Finally, install Dockunit:
最后,安装Dockunit:
npm install -g dockunit2.为Dockunit设置项目。 (2. Setup your project for Dockunit.)
Dockunit reads Dockunit.json files within your project. Dockunit.json describes the containers you want to use and how you want to run test commands. Our Dockunit.json file will define containers for PHP 5.2, 5.6, and 7.0 RC 1 since we are most concerned about those PHP version. Dockunit has no limitations; we could define containers for different MySQL versions, different WordPress versions, Apache vs. nginx, our completely different programming languages unrelated to WordPress. One of the big advantages of Dockunit over something like Travis CI is that we can create the containers we use ourselves, and we can run tests in the containers locally.
Dockunit读取项目中的Dockunit.json文件。 Dockunit.json描述了您要使用的容器以及如何运行测试命令。 我们的Dockunit.json文件将为PHP Dockunit.json和7.0 RC 1定义容器,因为我们最关心的是那些PHP版本。 Dockunit没有限制; 我们可以为不同MySQL版本,不同的WordPress版本,Apache vs. nginx(我们与WordPress完全不同的编程语言)定义容器。 与Travis CI之类的产品相比,Dockunit的一大优点是我们可以创建自己使用的容器,并且可以在容器中本地运行测试。
Create a file named Dockunit.json in the root of our plugin or theme.
在我们的插件或主题的根目录中创建一个名为Dockunit.json的文件。
If you are testing a plugin, paste this into Dockunit.json (make sure to change PLUGIN-NAME.php to the main plugin file in your plugin):
如果要测试插件, Dockunit.json粘贴到Dockunit.json (确保将PLUGIN-NAME.php更改为插件中的主插件文件):
{
        "containers": [
                {
                        "prettyName": "PHP-FPM 5.2",
                        "image": "dockunit/prebuilt-images:php-mysql-phpunit-wordpress-5.2-fpm",
                        "beforeScripts": [
                                "service mysql start",
                                "wp-install latest"
                        ],
                        "testCommand": "wp-activate-plugin PLUGIN-NAME.php"
                },
                {
                        "prettyName": "PHP-FPM 5.6",
                        "image": "dockunit/prebuilt-images:php-mysql-phpunit-wordpress-5.6-fpm",
                        "beforeScripts": [
                                "service mysql start",
                                "wp core download --path=/temp/wp --allow-root",
                                "wp core config --path=/temp/wp --dbname=test --dbuser=root --allow-root",
                                "wp core install --url=http://localhost --title=Test --admin_user=admin --admin_password=12345 --admin_email=test@test.com --path=/temp/wp --allow-root",
                                "mkdir /temp/wp/wp-content/plugins/test",
                                "cp -r . /temp/wp/wp-content/plugins/test"
                        ],
                        "testCommand": "wp plugin activate test --allow-root --path=/temp/wp"
                },
                {
                        "prettyName": "PHP-FPM 7.0",
                        "image": "dockunit/prebuilt-images:php-mysql-phpunit-wordpress-7.0-rc-1-fpm",
                        "beforeScripts": [
                                "service mysql start",
                                "wp core download --path=/temp/wp --allow-root",
                                "wp core config --path=/temp/wp --dbname=test --dbuser=root --allow-root",
                                "wp core install --url=http://localhost --title=Test --admin_user=admin --admin_password=12345 --admin_email=test@test.com --path=/temp/wp --allow-root",
                                "mkdir /temp/wp/wp-content/plugins/test",
                                "cp -r . /temp/wp/wp-content/plugins/test"
                        ],
                        "testCommand": "wp plugin activate test --allow-root --path=/temp/wp"
                }
        ]
}
If you are testing a theme, paste this into Dockunit.json:
如果要测试主题, Dockunit.json粘贴到Dockunit.json :
{
 "containers": [
   {
     "prettyName": "PHP-FPM 5.2 WordPress Latest",
     "image": "dockunit/prebuilt-images:php-mysql-phpunit-wordpress-5.2-fpm",
     "beforeScripts": [
       "service mysql start",
       "wp-install latest"
     ],
     "testCommand": "wp-activate-theme test"
   },
   {
     "prettyName": "PHP-FPM 5.6 WordPress Latest",
     "image": "dockunit/prebuilt-images:php-mysql-phpunit-wordpress-5.6-fpm",
     "beforeScripts": [
       "service mysql start",
       "wp core download --path=/temp/wp --allow-root",
       "wp core config --path=/temp/wp --dbname=test --dbuser=root --allow-root",
       "wp core install --url=http://localhost --title=Test --admin_user=admin --admin_password=12345 --admin_email=test@test.com --path=/temp/wp --allow-root",
       "mkdir /temp/wp/wp-content/themes/test",
       "cp -r . /temp/wp/wp-content/themes/test"
     ],
     "testCommand": "wp theme activate test --allow-root --path=/temp/wp"
   },
   {
     "prettyName": "PHP-FPM 7.0 WordPress Latest",
     "image": "dockunit/prebuilt-images:php-mysql-phpunit-wordpress-7.0-rc-1-fpm",
     "beforeScripts": [
       "service mysql start",
       "wp core download --path=/temp/wp --allow-root",
       "wp core config --path=/temp/wp --dbname=test --dbuser=root --allow-root",
       "wp core install --url=http://localhost --title=Test --admin_user=admin --admin_password=12345 --admin_email=test@test.com --path=/temp/wp --allow-root",
       "mkdir /temp/wp/wp-content/themes/test",
       "cp -r . /temp/wp/wp-content/themes/test"
     ],
     "testCommand": "wp theme activate test --allow-root --path=/temp/wp"
   }
 ]
}
(OPTIONAL: If you have written actual unit/integration tests for your WordPress plugin or theme, you should run those. Here are some example Dockunit.json files for running unit/integration tests)
(可选:如果您已经为WordPress插件或主题编写了实际的单元/集成测试,则应运行它们。 这是一些用于运行单元/集成测试的示例Dockunit.json文件 。)
Let’s run through what some of the things mean in Dockunit.json. The files are written in JSON which is JavaScript object notation. All Dockunit.json files contain a root level object with a property ‘containers’ which holds an array of objects that each describe a test to be run in a Docker container. The idea is for containers to be different real life simulations of your software so you can see how it performs in different scenarios. Here is an example container object:
让我们看一下Dockunit.json中的某些含义。 这些文件以JSON编写,这是JavaScript对象的表示法。 所有Dockunit.json文件都包含一个带有属性“容器”的根级对象,该对象包含一个对象数组,每个对象都描述了要在Docker容器中运行的测试。 想法是使容器成为您软件的不同真实生活模拟,以便您可以查看容器在不同情况下的性能。 这是一个示例容器对象:
{
   "prettyName": "My container pretty name",
   "image": "docker-image-ref",
   "beforeScripts": [
     "before-command-1",
     "before-command-2"
   ],
   "testCommand": "my-command"
}
prettyName is just an easy way for you to describe your container which will be useful in build output. image refers to a Docker Hub image. Dockunit comes with a bunch of predefined images that you can use, however you can always create your own. beforeScripts allows you to run commands in the Docker container before the test command is run. testCommand is the command whose exit code will be evaluated to determine whether your software “passes” or not.
prettyName只是描述容器的一种简单方法,这对构建输出很有用。 image是指Docker Hub映像。 Dockunit附带了一堆可以使用的预定义图像 ,但是您始终可以创建自己的图像。 beforeScripts允许您在运行test命令之前在Docker容器中运行命令。 testCommand是将评估其退出代码以确定您的软件是否“通过”的命令。
Now that we’ve setup our Dockunit.json file, let’s run our tests. From within the root of your project, run the command in your terminal:
现在我们已经设置了Dockunit.json文件,让我们运行测试。 在项目的根目录中,在终端中运行命令:
dockunitFor each container you’ve defined, it will run the test command and evaluate the exit codes. If all your containers exited without error, then your build passed! If not, there is a problem with your code or how you setup Dockunit. The output should tell you which container failed. You can provide the --du-verbose option to dockunit to get even more information.
对于您定义的每个容器,它将运行测试命令并评估退出代码。 如果您所有的容器都没有错误退出,那么您的构建就通过了! 如果不是,则您的代码或如何设置Dockunit都有问题。 输出应告诉您哪个容器失败。 您可以提供--du-verbose选项dockunit以获得更多信息。
Now that we’ve setup our Dockunit.json file and done a test run, push our repository with Dockunit.json to our remote (GitHub for the purposes of this tutorial).
现在,我们已经设置了Dockunit.json文件并进行了测试运行,将带有Dockunit.json的存储库推送到我们的远程Dockunit.json (本教程中为GitHub)。
与Dockunit.io的持续集成 (Continuous Integration with Dockunit.io)
Once we’ve setup Dockunit in a GitHub repository, we can set up continuous integration so Dockunit tests are run on each pull request and push to the repo. If Pull Request or Push fails, a failed status will be shown on GitHub so we can fix our software.
在GitHub存储库中设置Dockunit之后,就可以设置持续集成,以便在每个拉取请求上运行Dockunit测试并推送到存储库。 如果Pull Request或Push失败,则会在GitHub上显示失败状态,以便我们修复软件。
1. 在Dockunit.io上创建一个帐户 。 (1. Create an account on Dockunit.io.)
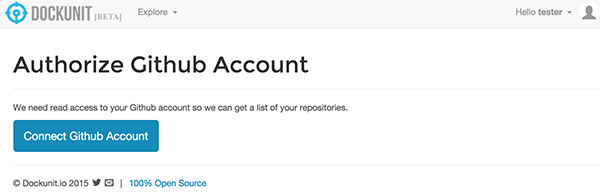
2.转到项目并将您的帐户与GitHub集成: (2. Go to projects and integrate your account with GitHub:)
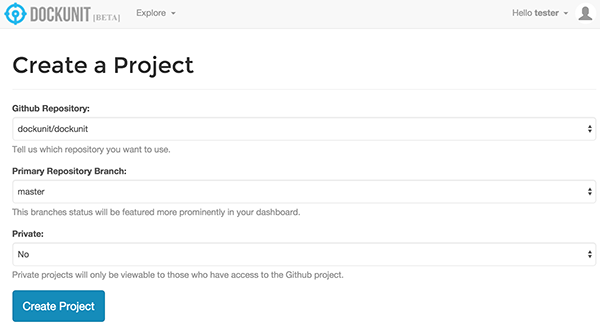
3.在Dockunit.io中,为您的GitHub存储库创建一个项目 : (3. Within Dockunit.io, create a project for your GitHub repository:)
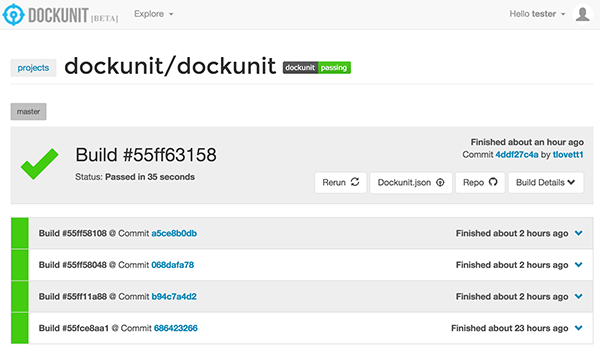
4.就这样! 现在,您可以查看项目的构建状态。 当您推送到GitHub时,它将自动更新: (4. That’s it! You can now see the build status of your project. It will update automatically when you push to GitHub:)
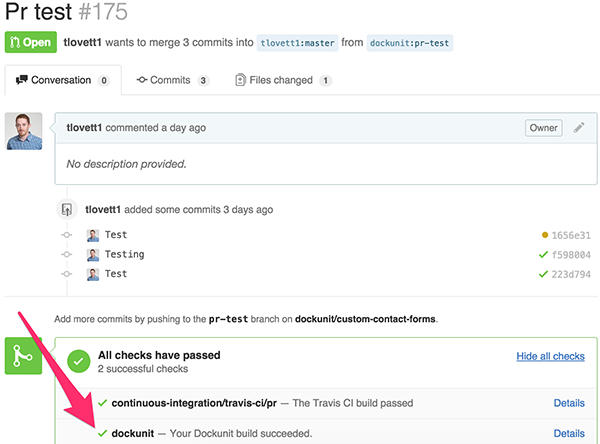
5.在GitHub中,您可以在每个Pull Request中看到Dockunit构建状态: (5. Within GitHub, you can see the Dockunit build status within each Pull Request:)
6.不要忘记将Dockunit.io徽章添加到您的README.md以向人们展示您正在彻底测试软件: (6. Don’t forget to add the Dockunit.io badge to your README.md to show people you are thoroughly testing your software:)
结论 (Conclusion)
Dockunit testing in combination with Dockunit.io continuous integration is a very powerful tool for ensuring your software works well cross-platform.
Dockunit测试与Dockunit.io的持续集成相结合,是一个非常强大的工具,可确保您的软件跨平台运行良好。
The versatility of Dockunit is endless since it relies on Docker – literally you can test any programming language against any platform; not just WordPress. Using Dockunit also makes testing easy for distributed teams since rather than relying on each developer to set up their local environment properly, you are relying on fixed Docker containers.
Dockunit的多功能性无穷无尽,因为它依赖于Docker –实际上,您可以针对任何平台测试任何编程语言。 不只是WordPress。 使用Dockunit还使分布式团队的测试变得容易,因为您不是依赖每个开发人员来正确设置本地环境,而是依赖固定的Docker容器。
翻译自: https://www.sitepoint.com/wordpress-development-with-dockunit-io/
socket.io开发


 998
998

 被折叠的 条评论
为什么被折叠?
被折叠的 条评论
为什么被折叠?
 到【灌水乐园】发言


