


axure灯箱效果
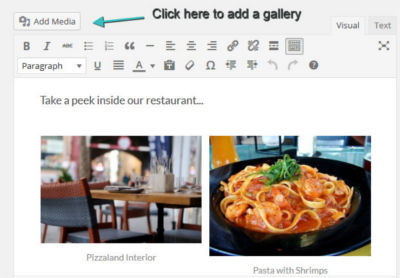
WordPress comes with built-in gallery functionality. Adding a gallery to a post or page involves performing a few simple steps:
WordPress内置了画廊功能。 将画廊添加到帖子或页面中需要执行一些简单的步骤:
Click the Add Media button
点击添加媒体按钮
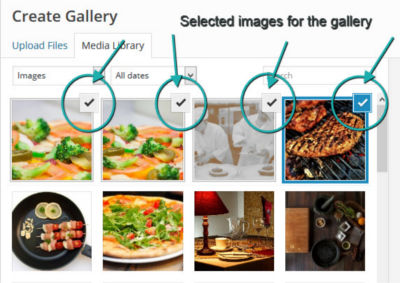
Click the Create Gallery link
点击创建画廊链接

- Select your images by clicking on them 通过单击选择图像
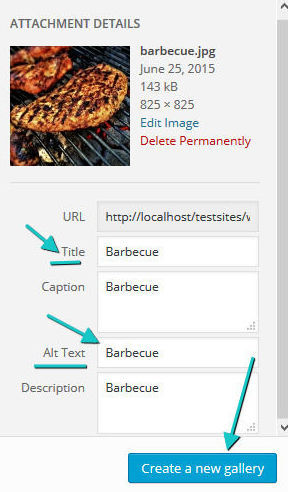
Enter at least the Title and Alt text into the appropriate textbox and click the Create a new gallery button
在相应的文本框中至少输入标题和替代文本,然后单击创建新画廊按钮
What WordPress doesn’t offer out of the box is the ability to zoom in on each gallery image with a cool lightbox effect.
WordPress没有提供开箱即用的功能,即可以使用酷炫的灯箱效果放大每个画廊图像。
In fact, you can adjust the gallery settings so that images link to a dedicated page (i.e., attachment page), to the image file itself, or to nothing at all.
实际上,您可以调整图库设置,以使图像链接到专用页面(即附件页面),图像文件本身或根本不链接。

In this post, I’m going to show how to integrate the popular jQuery Colorbox plugin by Jack Moore into the native WordPress gallery.
在本文中,我将展示如何将Jack Moore流行的jQuery Colorbox插件集成到本地WordPress画廊中。
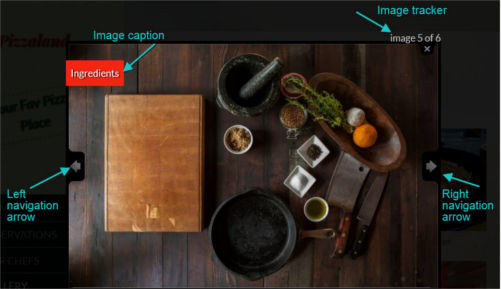
As a result, clicking an image will cause it to pop up with a smooth animation effect. Visitors will be able to read image captions and navigate through the images without leaving the gallery page.
结果,单击图像将使其以平滑的动画效果弹出。 访客无需离开图库页面即可阅读图像标题并浏览图像。
The finished product will be something looking like this.
成品将看起来像这样。
为什么不使用WordPress插件? (Why Not Use a WordPress Plugin?)
At this point, I can hear you say: “There are plenty of WordPress plugins that make it a snap to add galleries and lightbox functionality to a WordPress site. jQuery Colorbox itself has a number of implementations as a WordPress plugin. Why should I bother coding this functionality myself?”
在这一点上,我可以听到您说:“有很多WordPress插件,可以很轻松地向WordPress网站添加图库和灯箱功能。 jQuery Colorbox本身有许多作为WordPress插件的实现。 我为什么要麻烦自己编写此功能?”
For one thing, here we’re considering a very specific piece of functionality, i.e., adding lightbox effect just to the WordPress gallery. Most plugins have a lot more to offer, and with it also comes a quantity of extra code. If you’re looking for high flexibility like adding lightbox effects to images in posts and pages, to custom links, or to other kinds of content, adjusting plugin’s settings from the admin panel, etc., then go ahead and take the WP plugin route. However, if your goal is to accomplish a very focused task, as it’s the case right now, running a WP plugin is probably an overkill.
一方面,这里我们考虑的是非常具体的功能,即仅向WordPress画廊添加灯箱效果。 大多数插件提供了更多功能,并且附带了许多额外的代码。 如果您正在寻找更高的灵活性,例如向帖子和页面中的图像,自定义链接或其他类型的内容中添加灯箱效果,从管理面板中调整插件的设置等,请继续执行WP插件路线。 但是,如果您的目标是完成一个非常集中的任务(如现在这样),则运行WP插件可能是一个过大的杀伤力。
Another reason could simply be personal preference. For myself, I’d rather use WP plugins for back-end tasks like sending a contact form, managing a shopping cart, adding membership or forum functionality, etc. For most tasks related to front-end development, e.g. styling site elements, creating animations, implementing jQuery sliders and lightbox, I opt for the do-it-yourself approach.
另一个原因可能仅仅是个人喜好。 就我自己而言,我宁愿将WP插件用于后端任务,例如发送联系人表格,管理购物车,添加成员资格或论坛功能等。对于大多数与前端开发相关的任务,例如,对网站元素进行样式设置,创建动画,实现jQuery滑块和灯箱,我选择自己动手做。
Finally, coding is fun, educational (there’s always something new to learn along the way), and in this case it won’t take a lot of your time.
最后,编码是有趣的,有教育意义的(一路上总是要学习一些新知识),在这种情况下,它不会花费很多时间。
您需要什么 (What You’ll Need)
To follow along, you’ll need a WordPress installation, preferably on a local server, and a theme that provides CSS styles for the native WordPress gallery. For the purposes of this tutorial, a child theme of any of the themes bundled with WordPress will be fine.
要进行后续操作,您需要安装WordPress(最好在本地服务器上),以及一个主题,该主题为本机WordPress画廊提供CSS样式。 就本教程而言,与WordPress捆绑在一起的任何主题的子主题都可以。
It’s time to dive in!
现在该潜入了!
将jQuery Colorbox放入主题的文件中 (Getting jQuery Colorbox Into Your Theme’s Files)
First things first: download a copy of jQuery Colorbox and unzip the compressed file somewhere in your hard drive.
首先,首先要下载jQuery Colorbox,然后将压缩文件解压缩到硬盘驱动器中的某个位置。
The files you need to make jQuery Colorbox work are the following:
使jQuery Colorbox工作所需的文件如下:
jquery.colorbox-min.js;jquery.colorbox-min.js;colorbox.cssand theimagesfolder from one of the five Colorbox skins. These can be found in the folders calledexample1,example2, etc, through toexample5. Try each skin out in your browser and pick the one you like best. For this tutorial, I chose the skin contained in theexample3folder.colorbox.css和五个Colorbox外观之一中的images文件夹。 这些可以在名为example1,example2等的文件夹中找到,直到example5。 在浏览器中尝试每种皮肤,然后选择最喜欢的皮肤。 在本教程中,我选择了example3文件夹中包含的皮肤。
Next, to keep the project well organized, add a folder to your theme’s files and call it colorbox. Drop the files listed above inside this folder.
接下来, colorbox项目井井有条,请在主题文件中添加一个文件夹,并将其colorbox 。 将上面列出的文件拖放到此文件夹中。
jQuery Colorbox comes with its text strings already translated into an impressive number of languages. The translations are located inside the i18n folder. There’s no need for you to copy this folder into your project, but it’s important to be aware of it. It’s a great resource if you intend to provide translations for your theme.
jQuery Colorbox附带的文本字符串已被翻译成多种语言。 翻译位于i18n文件夹中。 您无需将此文件夹复制到您的项目中,但是要意识到这一点很重要。 如果您打算为您的主题提供翻译,那么这是一个很好的资源。
将jQuery Colorbox集成到您的主题中 (Integrating jQuery Colorbox Into Your Theme)
Integrating Colorbox into your theme involves a series of steps. Some of these steps deal with the jQuery code necessary to make Colorbox do its job. Another series of steps handles the task of making WordPress ‘aware’ of Colorbox and involves writing PHP code.
将Colorbox集成到主题中涉及一系列步骤。 其中一些步骤处理了使Colorbox发挥作用所必需的jQuery代码。 另一系列步骤处理使WordPress对Colorbox产生“感知”的任务,并涉及编写PHP代码。
Let’s get to work!
让我们开始工作吧!
创建主JavaScript文件 (Creating the Main JavaScript File)
Colorbox is a jQuery plugin, therefore you need to create a JavaScript file that will contain the necessary initialization and configuration code.
Colorbox是一个jQuery插件,因此您需要创建一个JavaScript文件,其中将包含必要的初始化和配置代码。
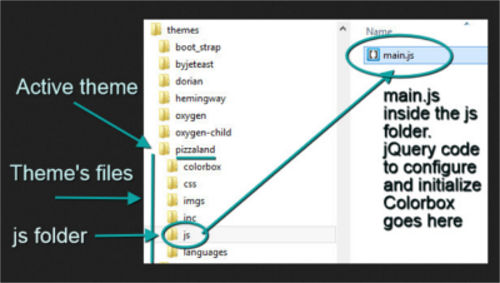
Add a new folder to the root of your theme and call it js. Next, inside the js folder, create a new file and call it main.js (or any other name you prefer for your theme’s main JavaScript file).
在主题的根目录下添加一个新文件夹,并将其命名为js 。 接下来,在js文件夹中,创建一个新文件,并将其main.js (或您的主题主JavaScript文件喜欢的其他任何名称)。
Open main.js and enter a jQuery no conflict wrapper to make sure the jQuery $ sign doesn’t conflict with other scripts using the same alias symbol:
打开main.js并输入jQuery无冲突包装器 ,以确保jQuery $符号不会与使用相同别名符号的其他脚本发生冲突:
(function($) {

        //All your code goes inside this wrapper

    })(jQuery);
Now your jQuery document has been set up. Let’s keep going!
现在,您的jQuery文档已经设置好了。 我们继续吧!
编写jQuery脚本 (Writing the jQuery Script)
Initializing jQuery Colorbox is as easy as writing the following line of code:
初始化jQuery Colorbox就像编写以下代码行一样容易:
selector.colorbox();selector stands for the HTML anchor element on which you want to apply the lightbox effect.
选择器代表您要在其上应用灯箱效果HTML锚元素。
But, with such a highly configurable plugin, you can do a bit more. There are plenty of settings you can adjust to make Colorbox do what you want. Let’s start by tweaking some of them. Inside the jQuery no conflict wrapper, write the following code snippet:
但是,有了这样一个高度可配置的插件,您可以做更多的事情。 您可以调整许多设置,使Colorbox发挥您的作用。 让我们从调整其中的一些开始。 在jQuery无冲突包装器内,编写以下代码段:
//Settings for lightbox
    var cbSettings = {
      rel: 'cboxElement',
      width: '95%',
      height: 'auto',
      maxWidth: '660',
      maxHeight: 'auto',
      title: function() {
        return $(this).find('img').attr('alt');
      }
    }
The code above stores a bunch of settings inside a JavaScript object literal called cbSettings:
上面的代码在一个名为cbSettings的JavaScript对象文字中存储了一堆设置:
rel is used to group photos together. Setting this attribute enables the navigation arrows in the lightbox so that users can move from one photo to the previous or next photo in the group. cboxElement is a class that Colorbox automatically adds to the anchor links where lightbox functionality is attached, but you’re free to group photos by a different name.
rel用于将照片分组在一起。 设置此属性将启用灯箱中的导航箭头,以便用户可以从一张照片移动到组中的上一张或下一张照片。 cboxElement是一个类,Colorbox会自动将其添加到附加了Lightbox功能的锚点链接中,但是您可以随意使用其他名称对照片进行分组。
width and height refer to the lightbox dimensions. A percentage value for the width helps to keep the component fluid and responsive. maxWidth and maxHeight refer to the maximum width and maximum height of the content loaded in the lightbox, which in this case is the gallery photo.
宽度和高度是指灯箱尺寸。 宽度的百分比值有助于保持组件的流畅性和响应性。 maxWidth和maxHeight是指灯箱中加载的内容的最大宽度和最大高度,在这种情况下为图库照片。
title can be used to display a caption for the photo in the lightbox. Here it’s set to a short function that tells Colorbox to extract the value of the image’s alt attribute and use it as image caption.
标题可用于在灯箱中显示照片的标题。 在这里,它被设置为一个短函数,该函数告诉Colorbox提取图像的alt属性的值并将其用作图像标题。
You can find a list of all the available settings on the jQuery Colorbox website.
您可以在jQuery Colorbox网站上找到所有可用设置的列表。
Once the settings are configured, initialize Colorbox:
配置设置完成后,初始化Colorbox:
//Initialize jQuery Colorbox
    $('.gallery a[href$=".jpg"],
    .gallery a[href$=".jpeg"],
    .gallery a[href$=".png"],
    .gallery a[href$=".gif"]').colorbox(cbSettings);
The snippet above selects all the anchor tags inside the element with a class of gallery. Further, the selected anchor tags must have a href value that ends in .jpg, .jpeg, .png, or .gif (the most common image file formats). Finally, Colorbox is called on this selection passing in the cbSettings object as an argument.
上面的代码段选择了带有gallery类的元素内的所有锚标签。 此外,所选锚标记必须具有以.jpg , .jpeg , .png或.gif (最常见的图像文件格式)结尾的href值。 最后,在此选择上调用Colorbox,并将cbSettings对象作为参数传递。
Contemporary web design is responsive web design, therefore it’s important for us that the lightbox should adapt to all screen sizes. In view of this, add the following snippet that takes care of this crucial aspect:
现代网页设计是响应式网页设计,因此对于我们来说,灯箱应适合所有屏幕尺寸至关重要。 鉴于此,请添加以下片段来处理这一关键方面:
//Keep lightbox responsive on screen resize
    $(window).on('resize', function() {
        $.colorbox.resize({
        width: window.innerWidth > parseInt(cbSettings.maxWidth) ? cbSettings.maxWidth : cbSettings.width
      });
    });
On browser resize, the $.colorbox.resize() method is triggered. Inside this method, the code above sets the width value to a JavaScript conditional ternary operator statement. This statement does the following:
在浏览器调整大小时,将触发$.colorbox.resize()方法。 在此方法内部,上面的代码将width值设置为JavaScript条件三元运算符语句。 该语句执行以下操作:
it retrieves the screen’s
width;它检索屏幕的
width;it compares this
widthwith themaxWidthvalue from the plugin’s settings, which in our case it’s660px;它将此
width与插件设置中的maxWidth值进行比较,在我们的示例中为660px;if the screen’s
widthis bigger than660px, it adjusts the lightboxwidthto the value of660px. However, if the screen’s size is smaller than660px, the lightboxwidthis resized to thewidthstated in the settings, which in this case is95%.如果屏幕的
width大于660px,则会将灯箱width调整为660px的值。 但是,如果屏幕尺寸小于660px,则灯箱width将调整为设置中指定的width,在这种情况下为95%。
More on this solution is available on the Colorbox GitHub page.
有关此解决方案的更多信息,请参见Colorbox GitHub页面 。
That’s it for now on the JavaScript front, you’ll come back to it later to deal with WordPress internationalization. Let’s tackle the WordPress side of the project.
在JavaScript方面现在就这样,以后再处理WordPress国际化。 让我们解决项目的WordPress方面。
继续使用PHP (Moving on to PHP)
At this time, WordPress knows nothing of the presence of jQuery Colorbox in your theme. Neither the plugin’s files nor main.js are being loaded. The recommended practice for loading stylesheets and JavaScript files in WordPress is by using wp_enqueue_style() and wp_enqueue_script() respectively.
目前,WordPress对主题中是否存在jQuery Colorbox一无所知。 插件的文件和main.js均未加载。 在WordPress中加载样式表和JavaScript文件的建议做法是分别使用wp_enqueue_style()和wp_enqueue_script() 。
Find functions.php in your theme’s files and open it in a code editor. It’s likely your theme already has a function to enqueue style.css. If you can’t find it, adapt the function in the code snippet below to your theme.
在主题文件中找到functions.php ,然后在代码编辑器中将其打开。 您的主题可能已经具有使style.css入队的功能。 如果找不到它,请根据您的主题调整下面代码片段中的功能。
function themeslug_enqueue_styles_scripts() {

       //Colorbox stylesheet
       wp_enqueue_style( 'colorbox', get_template_directory_uri() .
       '/colorbox/colorbox.css' );

      //Your theme CSS
      wp_enqueue_style( 'themeslug-style', get_stylesheet_uri() );

      //Colorbox jQuery plugin js file
      wp_enqueue_script( 'colorbox', get_template_directory_uri() .
      '/colorbox/jquery.colorbox-min.js', array( 'jquery'   ), '', true );

      //Add main.js file
      wp_enqueue_script( 'themeslug-script', get_template_directory_uri() .
      '/js/main.js', array( 'colorbox' ), '', true );

    }

    //Hook the function above
    add_action( 'wp_enqueue_scripts', 'themeslug_enqueue_styles_scripts' );
Let’s explain what the code above does.
让我们解释一下上面的代码的作用。
It wraps all the calls to
wp_enqueue_style()andwp_enqueue_script()inside a function calledthemeslug_enqueue_styles_scripts().它将所有对
wp_enqueue_style()和wp_enqueue_script()的调用包装在一个名为themeslug_enqueue_styles_scripts()的函数中。Inside
themeslug_enqueue_styles_scripts(), the Colorbox CSS file is enqueued before the theme’s stylesheet.在
themeslug_enqueue_styles_scripts()内部,将Colorbox CSS文件排入主题样式表之前。The Colorbox JavaScript file is enqueued pointing to the jQuery library as a dependency, i.e.,
jquery.colorbox-min.jsloads only after the jQuery library file has already been loaded.使Colorbox JavaScript文件入队,并将其作为依赖项指向jQuery库,即,仅在jQuery库文件已加载
jquery.colorbox-min.js加载jquery.colorbox-min.js。The theme’s JavaScript file,
main.js, is enqueued next, indicatingjquery.colorbox-min.jsas a dependency.接下来将主题JavaScript文件
main.js入队,指示jquery.colorbox-min.js为依赖项。The argument
trueat the end ofwp_enqueue_script()ensures that the JavaScript files are loaded in the page’sfooterarea, before the closing</body>tag.wp_enqueue_script()末尾的true参数确保将JavaScript文件在结束</body>标记之前加载到页面的footer区域中。Finally, the
themeslug_enqueue_styles_scripts()function is hooked into thewp_enqueue_scripts()action. This ensures that stylesheet and script files are loaded at the right time.最后,
themeslug_enqueue_styles_scripts()函数被挂接到wp_enqueue_scripts()操作中。 这样可以确保在正确的时间加载样式表和脚本文件。
If you’re using a child theme, make sure you replace all instances of get_template_directory_uri() with get_stylesheet_directory_uri().
如果您使用的是子主题,请确保将get_template_directory_uri()所有实例替换为get_stylesheet_directory_uri() 。
Also, don’t forget to replace all instances of themeslug with your actual theme’s slug.
另外,不要忘记用实际主题的themeslug替换所有themeslug实例。
At this point, your lightbox should be fully functional. However, we’re working with WordPress, and the job is not properly done until the Colorbox plugin’s text strings are translation-ready. Let’s handle this last task.
此时,您的灯箱应该可以正常使用了。 但是,我们正在使用WordPress,在Colorbox插件的文本字符串可翻译之前,该工作无法正确完成。 让我们处理最后一个任务。
国际化JQuery Colorbox文本字符串 (Internationalizing the JQuery Colorbox Text Strings)
It’s recommended that all text strings in a WordPress theme or plugin should be internationalized. Internationalization
建议将WordPress主题或插件中的所有文本字符串都进行国际化。 国际化
… is the process of developing your theme, so it can easily be translated into other languages. Internationalization is often abbreviated as i18n (because there are 18 letters between the i and the n).
…是开发主题的过程,因此可以轻松将其翻译成其他语言。 国际化通常缩写为i18n(因为i和n之间有18个字母)。
WordPress uses the gettext libraries for this task. If you’ve worked with WordPress themes or plugins, you’re likely to have come across some of the gettext functions, like __() and _e().
WordPress将gettext库用于此任务。 如果您使用过WordPress主题或插件,则可能会遇到一些gettext函数,例如__()和_e() 。
These and other translation functions usually include the text string to be translated as one of their arguments, together with the theme’s or plugin’s textdomain. This is a unique identifier enabling WordPress to distinguish among all the different translations.
这些和其他翻译功能通常包括要翻译的文本字符串作为其参数之一,以及主题或插件的textdomain 。 这是使WordPress能够区分所有不同翻译的唯一标识符。
jQuery Colorbox has its own text strings. You can find them by opening any of the files in the i18n folder. We need to make sure these strings are somehow sent to WordPress so that they can be internationalized together with your theme’s text strings. The problem is: how do I transfer data from JavaScript code to WordPress?
jQuery Colorbox有其自己的文本字符串。 您可以通过打开i18n文件夹中的任何文件来找到它们。 我们需要确保将这些字符串以某种方式发送到WordPress,以便它们可以与您主题的文本字符串一起国际化。 问题是: 如何将数据从JavaScript代码传输到WordPress?
The answer lies with a great WordPress function called wp_localize_script() .
答案在于一个名为wp_localize_script()的强大WordPress函数。
wp_localize_script() takes three required parameters:
wp_localize_script()具有三个必需的参数:
$handle. This is the handle or identifier for the script where the text strings are located. The data for this parameter is the first argument in thewp_enqueue_script()function used to enqueue the Colorbox JavaScript file. In this case it’s ‘colorbox‘;$handle。 这是文本字符串所在的脚本的句柄或标识符 。 此参数的数据是wp_enqueue_script()函数中用于使Colorbox JavaScript文件入队的第一个参数。 在这种情况下,它是“colorbox”;$object_name. This is an object created by thewp_localize_script()function, which will be accessible from the JavaScript code inmain.js;$object_name。 这是由wp_localize_script()函数创建的对象,可以从main.jsJavaScript代码访问该main.js;$l10n. This parameter represents the actual data to be communicated from the JavaScript code to WordPress as an array of key/value pairs.$l10n。 此参数表示要从JavaScript代码传递到WordPress的实际数据,是键/值对的数组。
Let’s see wp_localize_script() in action. Locate the themeslug_enqueue_styles_scripts() function you wrote previously in functions.php. Just below the line of code to enqueue the Colorbox JavaScript file …
让我们看看wp_localize_script()的作用。 找到您先前在functions.php编写的themeslug_enqueue_styles_scripts() functions.php 。 在将Colorbox JavaScript文件加入队列的代码行的下面……
wp_enqueue_script( 'colorbox', get_template_directory_uri() .
      '/colorbox/jquery.colorbox-min.js', array( 'jquery'   ), '', true );
… add the following code:
…添加以下代码:
//Make the Colorbox text translation-ready
    $current = 'current';
    $total = 'total';
    wp_localize_script( 'colorbox', 'themeslug_script_vars', array(
        'current'   => sprintf(__( 'image {%1$s} of {%2$s}', 'themeslug'), $current, $total ),
        'previous'  =>  __( 'previous', 'themeslug' ),
        'next'      =>  __( 'next', 'themeslug' ),
        'close'     =>  __( 'close', 'themeslug' ),
        'xhrError'  =>  __( 'This content failed to load.', 'themeslug' ),
        'imgError'  =>  __( 'This image failed to load.', 'themeslug' )
      )
    );
Regular strings in the code above are internationalized using __('string', 'textdomain') function. However, current and total are not being used as simple text strings. In fact, Colorbox uses them as placeholders to workout the number of the current photo and of the total number of photos respectively. To preserve this functionality, the code above uses the PHP sprintf() function with appropriate placeholders.
上面代码中的常规字符串使用__('string', 'textdomain')函数进行国际化。 但是, current和total不能用作简单的文本字符串。 实际上,Colorbox使用它们作为占位符来分别锻炼当前照片的数量和照片总数。 为了保留此功能,上面的代码使用带有适当占位符PHP sprintf()函数。
Next, go back to the Colorbox configuration script in main.js and add this code inside the cbSettings JavaScript object, after title:
接下来,回到彩盒配置脚本在main.js并添加该代码里面cbSettings JavaScript对象,之后title :
current: themeslug_script_vars.current,
        previous: themeslug_script_vars.previous,
        next: themeslug_script_vars.next,
        close: themeslug_script_vars.close,
        xhrError: themeslug_script_vars.xhrError,
        imgError: themeslug_script_vars.imgError
Now the Colorbox configuration settings code looks like this:
现在,Colorbox配置设置代码如下所示:
//Settings for lightbox
    var cbSettings = {
      rel: 'cboxElement',
      width: '95%',
      height: 'auto',
      maxWidth: '660',
      maxHeight: 'auto',
      title: function() {
    	return $(this).find('img').attr('alt');
      },
      current: themeslug_script_vars.current,
      previous: themeslug_script_vars.previous,
      next: themeslug_script_vars.next,
      close: themeslug_script_vars.close,
      xhrError: themeslug_script_vars.xhrError,
      imgError: themeslug_script_vars.imgError
    }
Awesome, you’ve just configured the internationalization settings.
太好了,您已经配置了国际化设置。
Values in each key/value pair use the themeslug_script_vars object from the wp_localize_script() function you created earlier. It’s this object that makes the JavaScript variable accessible to PHP.
每个键/值对中的值都使用您先前创建的wp_localize_script()函数中的themeslug_script_vars对象。 正是这个对象使JavaScript变量可被PHP访问。
结论 (Conclusion)
That’s all, the task of adding lightbox functionality to the native WordPress gallery using jQuery Colorbox has been accomplished.
就是这样,使用jQuery Colorbox向本地WordPress画廊添加灯箱功能的任务已经完成。
To check the result, add a gallery to a post or page and select the Media File option from the Link to Gallery Settings. Now access the gallery from the front-end and click on an image. You should be able to see the image pop up with a sleek lightbox effect.
要检查结果,请将画廊添加到帖子或页面,然后从“ 链接到画廊设置”中选择“ 媒体文件”选项。 现在,从前端访问图库,然后单击图像。 您应该能够看到带有光滑灯箱效果的图像。
If you’re not happy with the lightbox’ appearance, you can change the CSS code you find in the Colorbox stylesheet using your theme’s style.css file.
如果您对灯箱的外观不满意,则可以使用主题的style.css文件更改在Colorbox样式表中找到CSS代码。
Would you rather have used a WordPress Colorbox plugin or did you enjoy coding up the functionality yourself?
您是愿意使用WordPress Colorbox插件还是喜欢自己编写功能?
Let me know what you think!
让我知道你的想法!
翻译自: https://www.sitepoint.com/adding-a-stylish-lightbox-effect-to-the-wordpress-gallery/
axure灯箱效果


 2225
2225


 被折叠的 条评论
为什么被折叠?
被折叠的 条评论
为什么被折叠?
 到【灌水乐园】发言


