


可视化指挥调度系统
This article was sponsored by Acuity Scheduling. Thank you for supporting the sponsors who make SitePoint possible.
本文由Acuity Scheduling赞助。 感谢您支持使SitePoint成为可能的赞助商。
Cards on the table: it has been quite a while since I learned to drive. I can’t quite remember how I found my instructor, but I’m pretty sure it wasn’t through a website. What I do know is that booking a lesson involved a phone call. With my instructor on the road all day, that call usually had to be out-of-hours. The appointments themselves were scheduled by hand in a good old-fashioned diary.
桌上的卡片:自从我学会开车以来已经有一段时间了。 我不太记得我是如何找到我的老师的,但是我很确定这不是通过网站进行的。 我所知道的是,预订课程涉及一个电话。 由于我的教练整天在路上,因此通话通常必须在非工作时间进行。 约会本身是由一本好的老式日记手工安排的。
I’m not sure that sort of approach would cut it now. I know that if I were looking, it would be through the web, and like most people I’ve started to take it for granted that I can book things online.
我不确定这种方法现在是否可以解决。 我知道,如果我正在寻找的话,那将是通过网络进行的,并且像大多数人一样,我开始认为可以在网上预订东西是理所当然的。
What about the other side of the coin? Managing lessons that way is an inefficient approach. I can only guess how many times my instructor turned up for a lesson to find that the student had left a cancellation message on their answering machine at home.
硬币的另一面呢? 以这种方式管理课程是一种低效的方法。 我只能猜测我的导师上了一次课,发现该学生已经在他们的答录机上留下了取消信息。
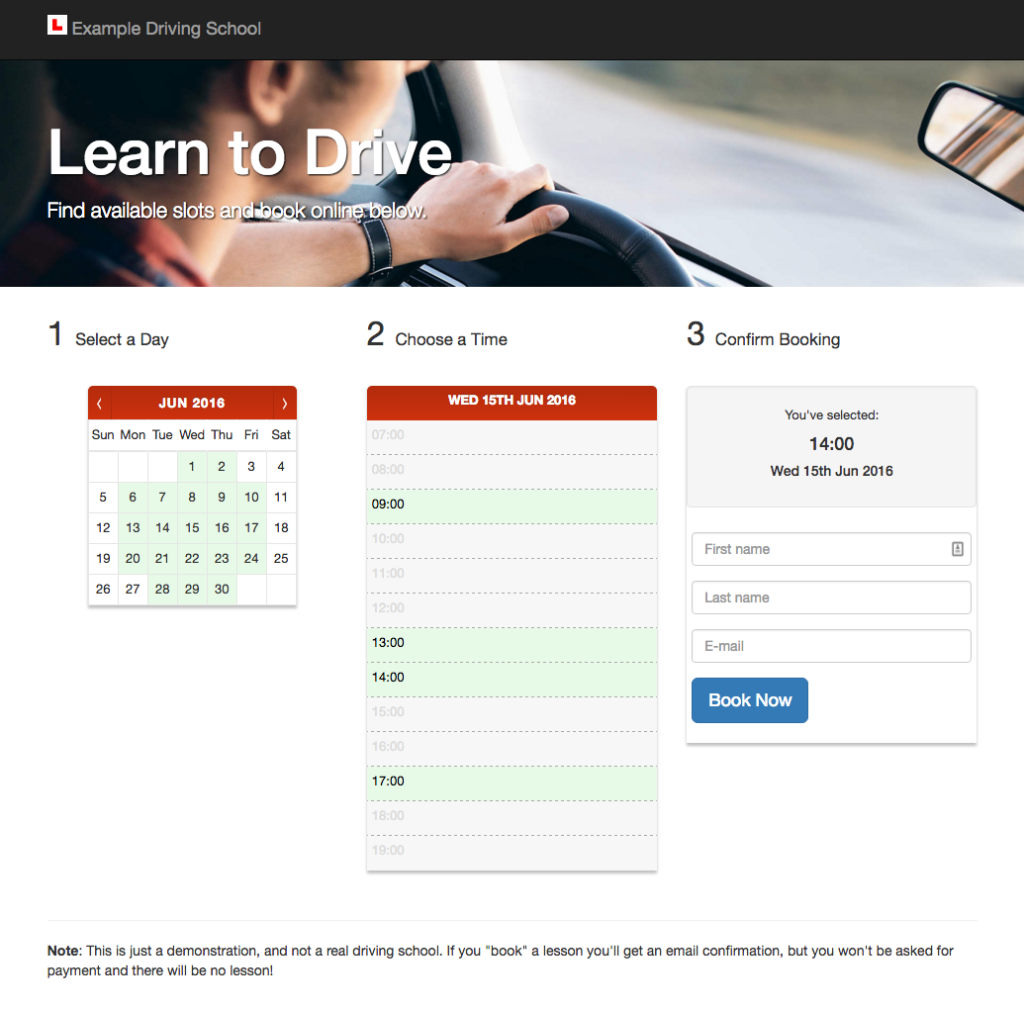
What we’re going to do in this tutorial, then, is drag our driving instructor into the 21st century by providing a web-based widget for viewing availability and scheduling lessons. Furthermore, we’ll take advantage of Acuity Scheduling to help them manage their diary without resorting to pen and paper.
然后,在本教程中,我们将通过提供一个基于Web的小部件来查看可用性和安排课程,将我们的驾驶教练拖入21世纪。 此外,我们将利用Acuity Scheduling来帮助他们管理日记,而无需使用笔和纸。
Before you continue, you might like to see what it is we’re going to build with the online demo or the screenshot below.
在继续之前,您可能想看看我们将使用在线演示或下面的屏幕快照来构建它。
The code for this tutorial is available on GitHub.
本教程的代码可在GitHub上获得 。
看业务 (Looking at the Business)
Before we delve into the implementation, let’s look a little closer at the business of operating as a driving instructor.
在深入研究实现之前,让我们进一步了解一下作为驾驶教练的业务。
A driving instructor, of course, has a number of “slots” available in a given day. Driving lessons are, by their very nature, one-to-one, which simplifies things for us a little.
当然,驾驶教练在给定的一天中有许多可用的“空位”。 从本质上讲,驾驶课程是一对一的,这对我们来说有点简化。
In order to keep things relatively simple, we’ll gloss over certain practicalities. For example, in the real world it would be impossible to begin a lesson at one side of a given city at 3pm, when another finished moments earlier on the other side of the city.
为了使事情相对简单,我们将介绍某些实用性。 例如,在现实世界中,不可能在下午3点在给定城市的一侧开始上一堂课,而另一端在城市另一侧早些时候结束。
Our availability widget will display a calendar for a given month — defaulting to the current one — which shows, at a glance, which days have some availability. If a user clicks on a specific day, it’ll drill down and display the time slots which are available for that day.
我们的可用性小部件将显示给定月份的日历(默认为当前日历),一目了然,显示哪些日期有一定的可用性。 如果用户点击了特定的日期,则将向下钻取并显示当天可用的时段。
We’ll do this using some of the latest front-end technologies, making our widget highly responsive.
我们将使用一些最新的前端技术来做到这一点,从而使我们的小部件具有高响应能力。
为什么要构建自定义小部件? (Why Build a Custom Widget?)
There are a number of possible reasons why you might decide to build a custom widget, for example:
有许多可能的原因决定您决定构建自定义窗口小部件的原因,例如:
- You can style it so that it matches the design of your site seamlessly 您可以对其进行样式设置,使其与您的网站设计无缝匹配
- You can use whatever front and back-end technologies you already have in place 您可以使用现有的任何前端和后端技术
- A custom widget might be the most appropriate solution if you’d prefer to take payments yourself 如果您希望自己付款,则自定义小部件可能是最合适的解决方案
- You can keep people on your site as they complete the scheduling process 您可以将人们留在您的网站上,直到他们完成调度过程
示例代码 (The Example Code)
The code which accompanies this tutorial is available on GitHub. For brevity, we won’t cover all of the code here, so you’ll need to grab a copy regardless of whether you code along, or simply read through as you go.
本教程随附的代码可在GitHub上获得 。 为简便起见,我们不会在这里介绍所有代码,因此无论您是进行编码还是随手阅读,您都需要获取一个副本。
The example includes a PHP back-end along with the booking widget; we’ll see in a moment why we need a server-side component.
该示例包括一个PHP后端以及预订小部件。 稍后我们将看到为什么需要服务器端组件。
The simplest way to run the example is to use PHP’s built-in web server.
运行该示例的最简单方法是使用PHP的内置Web服务器 。
Simply cd into the public directory and enter the following command, substituting the port number if required:
只需cd进入public目录,然后输入以下命令,并根据需要替换端口号:
php -S localhost:8000视力调度简介 (Introducing Acuity Scheduling)
Acuity Scheduling is an online service for managing and scheduling appointments. In the context of our driving instructor, an appointment is a driving lesson, but its applications are far broader.
Acuity Scheduling是用于管理和安排约会的在线服务。 在我们的驾驶教练的背景下,约会是一个驾驶课程,但是它的应用范围更广。
One of Acuity’s key features is the ability to provide real-time availability information. We can grab that information using the API, to embed into our driving instructor’s website, and then use that as the basis of our scheduling widget.
Acuity的关键功能之一是能够提供实时可用性信息。 我们可以使用API来获取该信息,将其嵌入到我们的驾驶教练的网站中,然后将其用作我们的调度小部件的基础。
Acuity offers a whole host of other features, including the ability to take online payments, to manage clients, send e-mail and text message reminders, and much more.
Acuity提供了一整套其他功能,包括进行在线支付,管理客户,发送电子邮件和短信提醒等功能。
敏锐度计划API (The Acuity Scheduling API)
We’re going to integrate with Acuity using their API. In particular, we’ll use three endpoints:
我们将使用其API与Acuity集成。 特别是,我们将使用三个端点:
GET /availability/dates gives us a list of dates belonging to a specified month which have one or more available time slots.
GET /availability/dates提供了属于指定月份的日期列表,这些日期具有一个或多个可用时隙。
GET /availability/times provides a list of available times for a specified day.
GET /availability/times提供指定日期的可用时间列表。
POST /appointments is used to actually create (in other words, book) an appointment.
POST /appointments用于实际创建(换句话说,预订)约会。
Together, the first two endpoints provide enough information for the end-user to see at a glance what’s available, so that they can choose a suitable slot. Once we have an available date and time, we can collect some information from the learner and make an appointment for them.
前两个端点共同为最终用户提供了足够的信息,使他们一眼就能看到可用的内容,以便他们可以选择合适的插槽。 一旦有了可用的日期和时间,我们就可以从学习者那里收集一些信息并预约他们。
认证方式 (Authentication)
The Acuity API provides two methods of authentication: OAuth2 and basic HTTP authentication. The former is only really applicable when you’re dealing with multiple Acuity users. For our purposes it’s probably overkill.
Acuity API提供两种身份验证方法:OAuth2和基本HTTP身份验证。 前者仅在与多个Acuity用户打交道时才真正适用。 就我们的目的而言,这可能太过分了。
To use basic HTTP authentication, however, we’re going to need to proxy the API calls through our back-end.
但是,要使用基本的HTTP身份验证,我们将需要通过后端代理API调用。
The reason for this is simple. Basic HTTP authentication requires a username and password that, were we to call the API directly from our JavaScript code, would be exposed. When using the Acuity API the username and password are your user ID and API key respectively, but the principle is exactly the same. This poses an obvious security risk.
这样做的原因是简单的。 基本的HTTP身份验证需要一个用户名和密码,如果我们直接从我们JavaScript代码中调用API,则该用户名和密码将被公开。 使用Acuity API时,用户名和密码分别是您的用户ID和API密钥,但是原理是完全相同的。 这带来了明显的安全风险。
The key part of the server-side code for determining availability, which you’ll find in the repository which accompanies this article, is the following:
确定可用性,你会在找到服务器端代码的关键部分伴随这篇文章库 ,如下:
$app->get( 'api/availability/{period}', function( Request $request, $period ) use ( $app ) {

    // Build the URL, incorporating the `appointmentTypeID`.
    $query = $request->query->all( ) + [ 'appointmentTypeID' => $app[ 'appointmentTypeID' ] ];
    $url = sprintf( '/availability/%s?%s', $period, http_build_query( $query ) );

    // Make the request...
    $response = $app[ 'client' ]->request( $url );

    // If there's an error, write it to the log
    if ( $response[ 'status_code' ] !== 200 ) {
        $app[ 'logger' ]->error( $response[ 'message' ] );
    }

    // ... and simply return it
    return json_encode( $response );

} )
->assert( 'period', 'dates|times');
The code uses the official PHP SDK. Check the repository to see how the client is constructed, or check out the SDK documentation and the developer documentation.
该代码使用官方PHP SDK 。 检查存储库以了解客户端的构造方式,或查看SDK文档和开发人员文档 。
Although this code is simplified somewhat, for the purposes of this demonstration it should do the trick. All it’s doing, effectively, is “proxying” calls to either /availability/dates or /availability/times — complete with query parameters — to the Acuity Scheduling API, and returning the results in JSON format. It’s also merging in the appointment type ID, which basically tells Acuity what it is we’re trying to find availability for.
尽管此代码已得到简化,但出于演示目的,它应该可以解决问题。 实际上,它所做的全部就是将对/availability/dates或/availability/times调用(带有查询参数)“代理”“代理”到Acuity Scheduling API中,并以JSON格式返回结果。 它还合并在约会类型ID中,该ID基本可以告诉Acuity我们正在寻找可用的内容。
This way, we can keep our API Key — which acts as a password — safely on the server, without exposing it in our client-side code.
这样,我们可以将API密钥(用作密码)安全地保存在服务器上,而无需在客户端代码中公开。
If you don’t want to use PHP, you don’t have to. There’s an official SDK for Node.js, or if you’re using something else then it ought to be straightforward to call the API from your programming language of choice. Refer to the documentation for more information.
如果您不想使用PHP,则不必这样做。 有一个官方的Node.js SDK ,或者,如果您使用的是其他工具,那么从您选择的编程语言中调用API应该很简单。 请参阅文档以获取更多信息。
Without further ado, let’s get started.
事不宜迟,让我们开始吧。
设定 (Getting Set Up)
In order to work through this tutorial, you’ll need an account with Acuity Scheduling. Head over to the website to sign up, which only takes a couple of minutes.
为了完成本教程,您需要具有Acuity Scheduling的帐户。 前往网站进行注册,只需几分钟。
The 14-day free trial will work just fine for the purposes of this tutorial, so it needn’t cost you a penny.
对于本教程而言,为期14天的免费试用就可以正常工作,因此无需花一分钱。
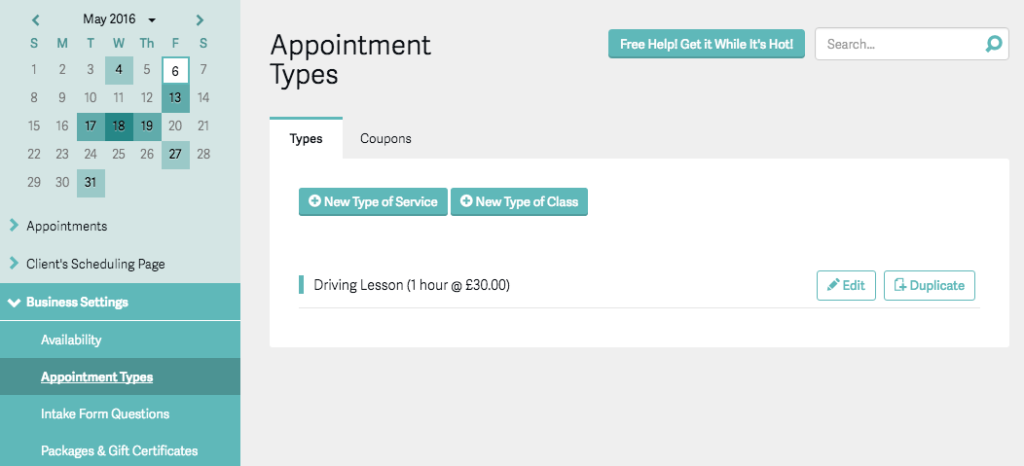
Once you have an account, you’ll need to set up a new appointment type. For the purposes of this tutorial that’s pretty straightforward — we’ve only got one type of appointment, and that’s a driving lesson.
拥有帐户后,您需要设置新的约会类型。 出于本教程的目的,这非常简单-我们只有一种约会类型,这是驾驶课程。
While logged into Acuity, go to Business Settings > Appointment Types and click New Type of Service, then fill out the required information. It’s probably simplest to keep the duration at one hour, which is probably what you’d expect for a driving lesson.
登录到Acuity后,转到业务设置>约会类型 ,然后单击新建服务类型 ,然后填写所需的信息。 将持续时间保持在一个小时可能是最简单的,这可能是您希望参加驾驶课程的时间。
There’s additional help if you need it.
如果您需要其他帮助 。
If you click on your new appointment type and take a look at the URL, you’ll see that it includes a unique ID. Make a note of this because you’ll need to add it to the configuration file in a moment.
如果单击新的约会类型并查看URL,您将看到它包含唯一的ID。 请注意这一点,因为您需要稍后将其添加到配置文件中。
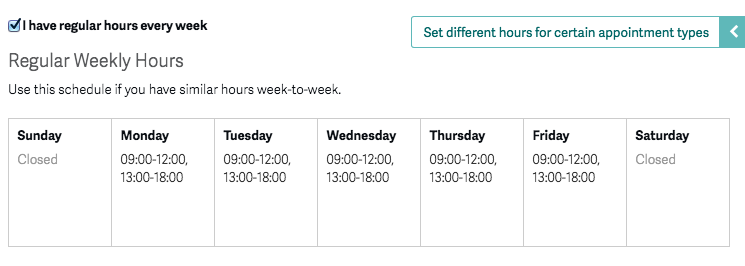
Your next step should be to set your availability. This is essentially where you define your working hours, whether a regular Monday to Friday 9–6, or something a little more irregular. You can do this by selecting Availability under Business Settings.
下一步应该是设置可用性。 从本质上讲,这是您定义工作时间的地方,无论是常规的周一至周五9-6,还是更不规则的时间。 您可以在“ 业务设置”下选择“ 可用性”来执行此操作。
For the purposes of the example widget we’re building, it’s probably easiest if you set your hours as 9–6, leaving a break for lunch.
就我们要构建的示例小部件而言,如果将您的工作时间设置为9–6,让午餐休息一下,这可能是最简单的。
The screenshot below shows an example of the working hours set to 9–6pm, with an hour for lunch at 12.
下面的屏幕截图显示了工作时间设置为晚上9点至下午6点的示例,其中一个小时的午餐时间为12点。
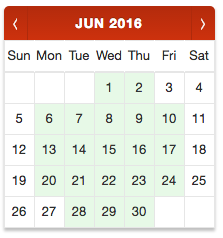
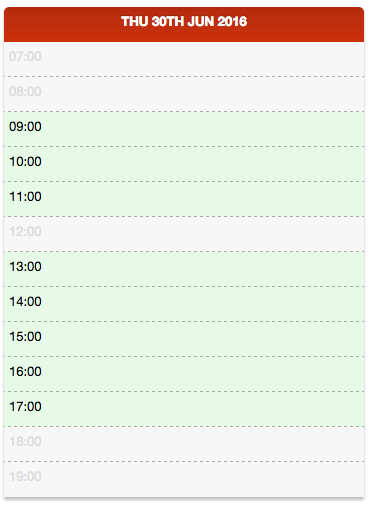
Acuity will ensure that appointments fit within the working hours, so if you specify those as 9am–6pm, the last available slot for a one-hour lesson will be at 5pm. For a day that has all slots available, our widget will look like the screenshot below.
Acuity将确保约会适合工作时间,因此,如果您将约会指定为上午9点至下午6点,则一小时课程的最后一个可用时段将是下午5点。 对于所有插槽都可用的一天,我们的小部件将如下图所示。

The next step is to find out your API credentials. Go to Business Settings → Integrations, scroll to the bottom of the page and click ”View your API credentials”.
下一步是找出您的API凭证。 转到业务设置→集成 ,滚动到页面底部,然后单击“查看您的API凭据” 。
Now that you have the three pieces of required information — your user ID, API key and a new Appointment Type ID — it’s time to get that into a configuration file.
现在,您已经拥有了三部分必需的信息-用户ID,API密钥和新的约会类型ID-现在是时候将其添加到配置文件中了。
In the repository you’ll find a file named config/__COPY_ME__.json. Take a copy of it, naming it config/dev.json.
在存储库中,您将找到一个名为config/__COPY_ME__.json 。 对其进行复制,将其命名为config/dev.json 。
The dev part indicates that we’re working in a development environment. In production you’d probably call it production.json or similar.
开发部分表明我们正在开发环境中工作。 在生产环境中,您可能会称其为production.json或类似名称。
Fill out this new configuration file, replacing the appropriate entries:
填写此新配置文件,替换相应的条目:
{
  "debug": true,
  "userId": "YOUR-USER-ID",
  "apiKey": "YOUR-API-KEY",
  "appointmentTypeID": "APPOINTMENT-TYPE-ID"
}
With this configured, our simple back-end will be able to communicate with the Acuity API to find availability and to schedule appointments.
通过此配置,我们简单的后端将能够与Acuity API进行通信以查找可用性并安排约会。
Note that the PHP code which accompanies this article includes very simple logging; if it gets an error response from the Acuity API then it will log the corresponding message in logs/error.log.
请注意,本文随附PHP代码包括非常简单的日志记录。 如果它从Acuity API得到错误响应,则它将相应消息logs/error.log在logs/error.log 。
从实施开始 (Starting with the Implementation)
We’re going to use Vue.js to build the widget itself. In many ways, it’s like a stripped-down version of Angular, specifically for building reactive components. If you’d rather use something else, like Angular for example, then the general principles shouldn’t be all that different.
我们将使用Vue.js来构建窗口小部件本身。 在许多方面,它就像Angular的简化版本,专门用于构建React式组件。 如果您愿意使用其他功能(例如Angular),那么一般原则应该不会有太大的不同。
We’ll also be using Moment.js to make working with dates and times much simpler, Vue Resource for communicating with our back-end and Vue Form for simple form validation. Install the dependencies:
我们还将使用Moment.js简化日期和时间的处理,使用Vue Resource与我们的后端进行通信,并使用Vue Form进行简单的表单验证。 安装依赖项:
bower install vue moment vue-resource vue-form --saveYou can use npm if you prefer. Just alter the paths accordingly.
如果愿意,可以使用npm。 只需相应地更改路径即可。
Now let’s build the basic page structure. The example uses Twig, and the HTML can be found in views/index.twig.html.
现在,让我们构建基本的页面结构。 该示例使用Twig,可以在views/index.twig.html找到HTML。
<!DOCTYPE html>
<html lang="en">
  <head>
    <meta charset="utf-8">
    <meta http-equiv="X-UA-Compatible" content="IE=edge">
    <meta name="viewport" content="width=device-width, initial-scale=1">

    <title>Book a Driving Lesson</title>

    <link rel="stylesheet" href="https://maxcdn.bootstrapcdn.com/bootstrap/3.3.6/css/bootstrap.min.css">
    <link rel="stylesheet" href="/assets/styles.css">

  </head>

  <body>

    <script src="/bower_components/moment/moment.js"></script>
    <script src="/bower_components/vue/dist/vue.js"></script>
    <script src="bower_components/vue-resource/dist/vue-resource.js"></script>
    <script src="/bower_components/vue-form/vue-form.js"></script>
    <script src="/assets/scripts.js"></script>

  </body>
</html>
The file public/assets/scripts.js will hold our widget definition, so let’s create the basic structure of that along with a couple of filters, which we’ll use to format dates and times.
文件public/assets/scripts.js将保存我们的小部件定义,因此让我们创建它的基本结构以及几个过滤器,我们将使用它们来格式化日期和时间。
Vue.http.options.root = '/api';

Vue.filter('time', function ( hour ) {
	if ( hour < 10 ) {
		return '0' + hour + ':00';
	}
	return hour + ':00';
});

Vue.filter('formatDateTime', function( day, format ) {
    if ( ! day ) {
        return '';
    }
    return day.format( format )
});

var widget = new Vue({
    el : '#availability-widget',
    data : {
    	// . . .
    },
    ready : function() {
      	// . . .
    },
    methods : {
      	// . . .
    }
});
We’ll fill in the following three parts of the widget as we go:
进行时,我们将填写窗口小部件的以下三个部分:
- The data property is used to initialize our data. Specifying the properties here ensures that Vue.js performs the getter/setter process during initialization. data属性用于初始化我们的数据。 在此处指定属性可确保Vue.js在初始化期间执行getter / setter过程。
The
ready()method will perform some initialisation.ready()方法将执行一些初始化。methodsis a hash of, as you might expect, methods; we’ll define a number of these to take the user from selecting a date to completing their booking.如您所料,方法是
methods的哈希; 我们将定义其中的一些选项,以使用户从选择日期到完成预订。You can grab a copy of the stylesheet from the repository, or build your own to match your website’s look and feel.
您可以从存储库中获取样式表的副本,也可以构建自己的样式表以匹配网站的外观。
一步一步来 (One Step at a Time)
Our widget will comprise three “stages”:
我们的小部件将包含三个“阶段”:
- The user selects a date with some availability on a mini-calendar. 用户在迷你日历上选择具有某种可用性的日期。
- Having selected a date, they select a “slot” from those that are available. 选择日期后,他们从可用的日期中选择一个“时间段”。
- Once a date and time have been selected, we’ll show that back to the user for confirmation and take some basic information. Once they’ve provided that information, we can call the API to actually schedule the lesson. 选择日期和时间后,我们会将其显示给用户进行确认并获取一些基本信息。 他们提供了这些信息后,我们可以调用API实际安排课程。
Let’s start by building the HTML for the three steps:
让我们开始为三个步骤构建HTML:
<div id="availability-widget">
    <ol class="steps">
        <li class="col-md-4 active">
            <header>Select a Day</header>
        </li>
        <li class="col-md-4" v-bind:class="{ 'active' : day }">
            <header>Choose a Time</header>
        </li>
        <li class="col-md-4" v-bind:class="{ 'active' : time }">
            <header>Confirm Booking</header>
        </li>
    </ol>
</div>
Notice we’ve wrapped the steps in a <div> with an ID of availability-widget. This matches the el property in our widget code, which means that Vue will bind itself to it in order to implement our widget.
注意,我们已经将步骤包装在ID为availability-widget的<div> 。 这与我们的小部件代码中的el属性匹配,这意味着Vue将自身绑定到它以实现我们的小部件。
We’ll add the markup for each steps shortly, but for now note that we’re using a class of active to indicate progress; using v-bind we can “activate” the second step when the user has selected a day, and the third step when they’ve selected a time.
我们将很快为每个步骤添加标记,但是现在请注意,我们正在使用active类来指示进度; 使用v-bind ,我们可以“激活”,当用户选择了第二步day ,第三步时,他们选择了一个time 。
初始化数据 (Initializing the Data)
We’re going to maintain three separate data properties to help keep track of the process of “drilling down” to a specific date and time:
我们将维护三个单独的数据属性,以帮助跟踪“追溯”到特定日期和时间的过程:
monthmonthdaydaytimetime
You might wonder why we’re maintaining three separate date properties, given that a Moment instance can encapsulate all three parts. We’re doing this so that we can keep track of what the user has specifically selected.
您可能想知道为什么我们要维护三个单独的日期属性,因为Moment实例可以封装所有三个部分。 我们这样做是为了跟踪用户特别选择的内容。
Let’s initialize our data:
让我们初始化数据:
data : {
    today : moment(),
    weekdays : moment.weekdaysShort(),
    calendar : [],
    month : moment(),
    day : null,
    time : null,
    hours : [],
    bookingForm : {},
    learner : {
        firstName : null,
        lastName : null,
        email : null
    },
    bookingStatus : 'pending'
}
By getting the names of the days of the week from Moment, we’re making it potentially even simpler to internationalize our widget.
通过从Moment获取星期几的名称,我们可以使小部件的国际化甚至更加简单。
Here we’re also initializing properties to hold the calendar definition, the working set of hours, the learner data, the booking form and the status of the booking part of the process.
在这里,我们还将初始化属性以保存日历定义,工时工作集,学习者数据,预订表单以及该过程的预订部分的状态。
寻找有空的一天 (Finding an Available Day)
The first part, then, is to call the Acuity API to find availability for a particular month and render a mini-calendar. When the component is initialised we’ll call it for the current month, but we’ll also need to allow users to navigate between months using the arrow in the calendar header. This is illustrated in the screenshot below.
然后,第一部分是调用Acuity API以查找特定月份的可用性并呈现一个迷你日历。 初始化组件后,我们将其称为当月,但我们还需要允许用户使用日历标题中的箭头在月份之间导航。 在下面的屏幕快照中对此进行了说明。
Let’s start with the HTML:
让我们从HTML开始:
<li class="col-md-4 active">
    <header>Select a Day</header>
    <div class="cal">
        <div class="header">
            <span class="left button" id="prev" v-on:click="previousMonth" v-if="!month.isSame(today, 'month')"> ⟨ </span>
            <span class="month-year" id="label"> {{ month | formatDateTime 'MMM YYYY' }} </span>
            <span class="right button" id="next" v-on:click="nextMonth"> ⟩ </span>
        </div>
        <table id="days">
            <tr>
                <td v-for="weekday in weekdays">{{ weekday }}</td>
            </tr>
        </table>
        <div class="cal-frame" v-if="calendar.length">
            <table class="curr">
                <tr v-for="row in calendar">
                    <td v-for="day in row" v-bind:class="{ 'nil' : !day.d, 'today' : day.today, 'past' : day.past, 'available' : day.available }" v-on:click="selectDay(day.d)">{{ day.d }}</td>
                </tr>
            </table>
        </div>
	    <div class="loading" v-if="!calendar.length">
			<p><img src="/assets/ajax-loader.gif"></p>
			<p>Loading dates...</p>
	    </div>
    </div>
</li>
There are a couple of things worth noting here.
这里有几件事值得注意。
The calendar header contains buttons for navigating between months. The back button’s visibility is dependent on whether or not the calendar is displaying the current month.
日历标题包含用于在月份之间导航的按钮。 后退按钮的可见性取决于日历是否显示当前月份。
Each cell (for example, day) on the calendar has one or more CSS classes assigned. The cells that make up the calendar can have one or more of the following “states”:
日历上的每个单元格(例如,日期)都分配了一个或多个CSS类。 构成日历的单元格可以具有以下一个或多个“状态”:
- An empty cell, used to pad it out into a tabular structure. 一个空单元格,用于将其填充为表格结构。
- A day in the past. 过去的一天。
- The current day. 当日
- A day with availability. 有空房的一天。
- A day with no availability. 一天没有空房。
Finally, note that we’re assigning a click handler to the day which will call the method selectDay(). We’ll implement that in the next section; but first, we need to populate and build the calendar.
最后,请注意,我们为当天分配了一个点击处理程序,它将调用方法selectDay() 。 我们将在下一节中实现它; 但首先,我们需要填充并构建日历。
So, we’ll need to get the availability for a given month. Here’s what the output from /availability/dates will look like:
因此,我们需要获取给定月份的可用性。 /availability/dates的输出如下所示:
[
  {
    "date": "2016-06-02"
  },
  {
    "date": "2016-06-06"
  },
  ...
}
With this in mind let’s create our first widget method, which is responsible for getting the availability for a given month. Remember that this goes in the methods part of the widget:
考虑到这一点,让我们创建第一个窗口小部件方法,该方法负责获取给定月份的可用性。 请记住,这是在小部件的methods部分中进行的:
methods : {

    /**
     * Fetch the availability data for a given month
     */
    getAvailabilityForMonth : function( ) {

        this.calendar = [];

        this.$http.get( 'availability/dates', { month : this.month.format( 'YYYY-MM' ) } ).then( function( response ) {

            this.days = [];

            var available = response.data.map( function( item ) {
                return moment( item.date ).date( );
            });

            var temp = moment( this.month ).date( 1 );
            var m = temp.month();
            var now = moment();

            do {
                this.days.push({
                    d : temp.date(),
                    past : temp.isBefore( now, 'day' ),
                    today : temp.isSame( now, 'day' ),
                    available : ( available.indexOf( temp.date() ) > -1 ),
                });
                temp.add( 1, 'day' );
            } while ( temp.month() == m );

            this.buildCalendar();

        });
    },

    // . . .
}
An array of days of the month isn’t quite enough to build a calendar. We need some optional padding at the beginning, depending on the day of the week that the first of the month falls on. Then we need to split it into rows, adding additional cells at the end to ensure each row has exactly seven cells.
一个月中的某几天不足以建立日历。 我们在开始时需要一些可选的填充,具体取决于月份的第一天是星期几。 然后,我们需要将其拆分为行,并在末尾添加其他单元格以确保每行恰好具有七个单元格。
The code for building the calendar table is a little long-winded to go into here in detail, but essentially what it does is split the days in a month into rows, then adds “padding” either side so that the first of the month is set to the appropriate day, and each row contains seven cells. The method in question is buildCalendar().
构建日历表的代码有些冗长,在此处进行详细介绍,但实际上它的工作是将一个月中的天分成几行,然后在每一侧都添加“ padding”,以使该月的第一天是设置为适当的日期,并且每一行包含七个单元格。 有问题的方法是buildCalendar() 。
Remember that we want to load the current month’s availability when the component is initialized. We can do this in the ready section:
请记住,在初始化组件时,我们要加载当月的可用性。 我们可以在ready部分中做到这一点:
var widget = new Vue({
    // . . .
    ready: function() {
      this.getAvailabilityForMonth();
    },
    // . . .
 });
Also in the methods section, we’ll need the following to implement the forward and back arrows on the mini-calendar:
同样在方法部分,我们将需要以下内容来实现迷你日历上的前进和后退箭头:
previousMonth : function() {
    var current = this.month;
    this.$set( 'month', null )
    this.$set( 'month', current.subtract( 1, 'months' ) );
    this.getAvailabilityForMonth();
},

nextMonth : function() {
    var current = this.month;
    this.$set( 'month', null )
    this.$set( 'month', current.add( 1, 'months' ) );
    this.getAvailabilityForMonth();
},
We’ve now got a mini-calendar that highlights days which have some availability, enabling users to drill down further, choosing a time for their lesson.
现在,我们有了一个迷你日历,可以突出显示具有一定可用性的日子,使用户可以进一步深入研究,选择上课的时间。
寻找可用时间 (Finding an Available Time)
At this point, we have a specific day which we know has at least one available slot. The next step, then, is to list those slots and allow the learner to choose one.
此时,我们有一个特定的日子,我们知道至少有一个可用的时段。 然后,下一步是列出这些插槽,并允许学习者选择一个。
A reminder of what this section of the widget will look like is shown in the screenshot below.
下面的屏幕快照显示了该小部件此部分的外观提醒。
You’ll recall that clicking a day on the calendar calls the selectDay() method, which will in turn find out the availability for that specific day.
您会记得,单击日历上的一天会调用selectDay()方法,该方法将反过来查找该特定日期的可用性。
Before we implement that, here’s what the output from /availability/times will look like:
在实现该功能之前,这是/availability/times的输出如下所示:
[
  {
    "time": "2016-06-02T13:00:00-0800"
  },
  {
    "time": "2016-06-04T14:00:00-0800"
  },
  ...
}
Let’s start by converting this into an array of available times, by extracting the hour:
首先,通过提取小时数将其转换为可用时间数组:
var available = response.data.map( function( item ) {
    return moment( item.time ).hour( );
});
Now we can create a loop which goes through the hours in a day, and set a flag to indicate whether that slot is available:
现在,我们可以创建一个遍历一天中各个小时的循环,并设置一个标志以指示该插槽是否可用:
for ( var h = 7; h  -1 )
    });
}
Here’s the selectDay() method in full:
这是完整的selectDay()方法:
selectDay : function( d ) {
    if ( d ) {
        // Create am instance
        var day = moment( this.month ).date ( d );

        // If it's in the past, exit
        if ( day.isBefore( moment(), 'day' ) ) {
            return;
        }

        this.day = day;
        this.hours = [];

        this.$http.get( 'availability/times', { date : this.day.format( 'YYYY-MM-DD' ) } ).then( function( response ) {

            var available = response.data.map( function( item ) {
                return moment( item.time ).hour( );
            });

            for ( var h = 7; h  -1 )
                });
            }

        });

        this.time = null;
    }
},
Now let’s turn our attention to the HTML:
现在让我们将注意力转向HTML:
<li class="col-md-4" v-bind:class="{ 'active' : day }">
	<header>Choose a Time</header>
	<ol class="times" v-if="day">
		<li class="header">
			{{ day | formatDateTime 'ddd Do MMM YYYY' }}
		</li>
		<li v-for="hour in hours" v-bind:class="{ 'available' : hour.available }" v-on:click="selectTime( hour )">
			<div class="hour">{{ hour.h | time }}</div>
		</li>
	</ol>
	<div class="loading" v-if="day && !hours.length">
		<p><img src="/assets/ajax-loader.gif"></p>
		<p>Loading times...</p>
	</div>
</li>
What we’re doing here is creating an ordered list of the hours in a day, setting the CSS class according to whether or not that slot is available. We’re attaching a click handler which calls the selectTime() method, which we’ll use to proceed to the booking stage.
我们在这里所做的是创建一天中时间的有序列表,并根据该时段是否可用来设置CSS类。 我们将附加一个单击处理程序,该处理程序将调用selectTime()方法,该方法将用于进入预订阶段。
Finally, we need to implement the selectTime() method, which is actually really straightforward:
最后,我们需要实现selectTime()方法,该方法实际上非常简单:
selectTime : function( hour ) {
    if ( hour.available ) {
        this.time = moment( this.day ).hours( hour.h ).minutes( 0 ).seconds( 0 );
    }
}
All we’re doing here is cloning the current day and setting the time. Setting that will “activate” the final step, showing the scheduling form.
我们在这里所做的就是克隆当前一天并设置时间。 设置将“激活”最后一步,显示计划表。
进行预订 (Making the Booking)
We’re now at the point where we have a specific time slot, so it’s time to implement the booking process.
我们现在有一个特定的时间点,现在该执行预订过程了。
The learner will be required to provide some personal information. By default the following three fields are required:
学习者将被要求提供一些个人信息。 默认情况下,以下三个字段是必需的:
- The learner’s first name 学习者的名字
- The learner’s last name 学习者的姓氏
- Their e-mail address 他们的电子邮件地址
Combined with the selected date and time, that’s going to be enough to schedule a lesson.
结合所选的日期和时间,足以安排一个课程。
You can also collect a telephone number if you wish, which you can set as “required” in the Acuity management panel.
您还可以根据需要收集电话号码,您可以在Acuity管理面板中将其设置为“ required”。
Acuity also provides the ability to create custom fields. For example you might want to create a field for collecting the pick-up or drop-off location for the lesson, to indicate whether it’s the customer’s first lesson, or to accept your terms and conditions. We won’t do that here in order to keep things relatively simple, but you can find out more in the relevant section of the documentation.
Acuity还提供创建自定义字段的功能。 例如,您可能想要创建一个字段来收集课程的上落地点,以表明这是客户的第一堂课,还是接受您的条款和条件。 为了使事情相对简单,我们在这里不会这样做,但是您可以在文档的相关部分中找到更多信息 。
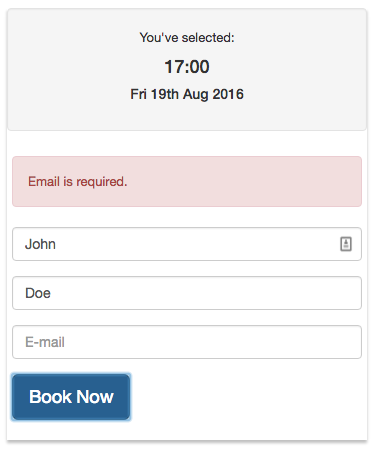
The screenshot below shows what the booking form will look like:
下面的屏幕快照显示了预订表单:
Let’s build the HTML:
让我们构建HTML:
<li class="col-md-4" v-bind:class="{ 'active' : time }">
	<header>Confirm Booking</header>
	<div v-if="time" class="book">
		<header class="well">
			<p>You've selected:</p>
			<h4>{{ time | formatDateTime 'HH:mm' }}</h4>
			<h5>{{ time | formatDateTime 'ddd Do MMM YYYY' }}</h5>
		</header>
		<form v-form name="bookingForm" v-on:submit.prevent="confirm" v-if="bookingStatus == 'pending'">
			<fieldset>
				<div class="alert alert-danger" v-if="bookingForm.$submitted && !bookingForm.$valid">
					<p v-if="bookingForm.firstName.$error.required">First name is required.</p>
					<p v-if="bookingForm.lastName.$error.required">Last name is required.</p>
					<p v-if="bookingForm.email.$error.required">Email is required.</p>
					<p v-if="bookingForm.email.$error.email">Email is not valid.</p>
				</div>
				<div class="form-group">
					<input type="text" name="firstName" placeholder="First name" class="form-control" v-model="learner.firstName" v-form-ctrl required>
				</div>
				<div class="form-group">
					<input type="text" name="lastName" placeholder="Last name" class="form-control" v-model="learner.lastName" v-form-ctrl required>
				</div>
				<div class="form-group">
					<input type="email" name="email" placeholder="E-mail" class="form-control" v-model="learner.email" v-form-ctrl required>
				</div>
				<div class="form-group">
					<button type="submit" class="btn btn-lg btn-primary">Book Now</button>
				</div>
			</fieldset>
		</form>
		<div class="loading" v-if="bookingStatus == 'sending'">
			<p><img src="/assets/ajax-loader.gif"></p>
			<p>Making booking...</p>
		</div>
		<div class="confirmed" v-if="bookingStatus == 'confirmed'">
			<p>Your booking is confirmed. Your reference is:</p>
			<h3>{{ booking.id }}</h3>
			<footer>
				<button class="btn btn-lg btn-primary" v-on:click="reset">Start Over</button>
			</footer>
		</div>
	</div>
</li>
This might look a little long-winded, but it’s relatively straightforward. Essentially it’s mapping the form controls to the corresponding properties of the learner property.
这看起来可能有点麻烦,但是相对简单。 本质上,它将表单控件映射到learner属性的相应属性。
A big chunk of the markup is responsible for validation. In the example, I’m using Vue Form to validate the form. I won’t cover the details of how that has been put together, but you may like to refer to the code or the documentation for more information.
标记的很大一部分负责验证。 在示例中,我使用Vue Form来验证表单。 我不会介绍如何将它们组合在一起的详细信息,但是您可能希望参考代码或文档以获取更多信息。
The <div> with the class confirmed will be displayed when a booking has been made, and will simply show the booking ID we get back from Acuity.
预订成功后,将显示带有confirmed类别的<div> ,并且仅显示我们从Acuity获得的预订ID。
Here is the code for making the booking:
这是进行预订的代码:
confirm : function() {
    if ( this.bookingForm.$valid ) {
        this.bookingStatus = 'sending';

        var data = this.learner;
        data.datetime = this.time.format();

        this.$http.post( 'appointments', data ).then( function( response ) {
            this.booking = response.data;
            this.bookingStatus = 'confirmed';
        });
    }
}
Pretty straightforward; we’re constructing a hash of data which combines our learner information with the selected date and time, then POSTing that to our back-end. We’re using the bookingStatus property so that the widget can keep the user informed as to what’s going on. When the booking property is set it’ll trigger the confirmation section to be displayed with the booking ID.
非常简单; 我们正在构建一个数据哈希,它将我们的学习者信息与所选的日期和时间结合起来,然后将其发布到我们的后端。 我们正在使用bookingStatus属性,以便该小部件可以使用户随时了解发生的情况。 设置预订属性后,它将触发显示带有预订ID的确认部分。
For reference, here is the PHP code for making the appointment:
供参考,这是进行约会PHP代码:
/**
 * Acts as a proxy to `/appointments`
 * We can use this to actually make an appointment
 */
$app->post( 'api/appointments', function( Request $request ) use ( $app ) {

    // Build the data by decoding the JSON and then injecting the `appointmentTypeID`.
    $data = json_decode( $request->getContent(), true ) + [ 'appointmentTypeID' => $app[ 'appointmentTypeID' ] ];

    // Make the request...
    $response = $app[ 'client' ]->request(
        '/appointments',
        [
            'method'    =>  'POST',
            'data'      =>  $data,
        ]
    );

    // If there's an error, write it to the log
    if ( $response[ 'status_code' ] !== 200 ) {
        $app[ 'logger' ]->error( $response[ 'message' ] );
    }

    // ...and return it
    return json_encode( $response );

});
As you can see, what we’re basically doing here is combining the data from our widget with the appointment type ID, and making an authenticated call to the Acuity API.
如您所见,我们在这里基本上要做的是将小部件中的数据与约会类型ID组合在一起,并对Acuity API进行身份验证调用。
To round up, here’s what the confirmation will look like:
总结一下,确认如下所示:
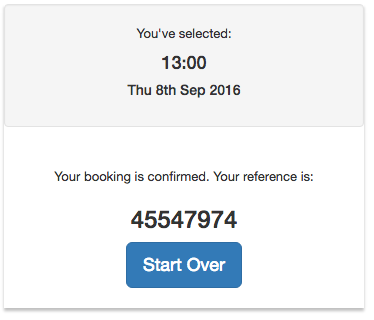
That’s it, we’re done!
就是这样,我们完成了!
下一步是什么? (What’s Next?)
Okay, so now you have a booking widget in place, using Acuity Scheduling to manage the bookings and scheduling. What else can you do with it? Let’s take a brief look at a couple of additional (and entirely optional) features that can enhance the experience for both learner and instructor even further.
好的,现在您已经有了一个预订小部件,可以使用Acuity Scheduling来管理预订和计划。 您还能做什么? 让我们简要介绍几个附加功能(这些功能是完全可选的),它们可以进一步提高学习者和讲师的体验。
接受付款 (Accepting Payments)
We’re allowing anyone to schedule a lesson on the assumption they’ll pay for it on the day, but Acuity also offer the ability to make the payment in advance online. Check out the documentation for more information.
我们允许任何人根据当天要付款的时间安排课程,但是Acuity还提供了在线提前付款的功能。 查看文档以获取更多信息。
第三方整合 (Third-party Integrations)
There are a number of options for integrating with other services, whether that be for accounting purposes (Quickbooks, Freshbooks), CRM (Salesforce, Zoho), or bulk e-mailing (AWeber, Mailchimp). It also integrates nicely with Zapier, opening up a huge range of possibilities. You can also work with your existing calendar solution (Google Calendar, Outlook) or simply import or export using the .ics file format.
有多种与其他服务集成的选项,无论是出于会计目的(Quickbooks,Freshbooks),CRM(Salesforce,Zoho)还是批量电子邮件(AWeber,Mailchimp)。 它还与Zapier很好地集成,从而开辟了无限的可能性。 您还可以使用现有的日历解决方案(Google日历,Outlook),或仅使用.ics文件格式导入或导出。
网络挂钩 (Webhooks)
Acuity also provides webhooks, so that you can create your own custom actions when appointments are scheduled, canceled or re-scheduled.
Acuity还提供了webhooks ,因此您可以在安排,取消或重新安排约会时创建自己的自定义操作。
围捕 (Rounding Up)
We’ve covered a lot of ground, but during the course of this tutorial we’ve not just modernized our driving instructor’s website, but potentially revolutionized the way they manage bookings. Everybody wins!
我们已经涵盖了很多基础,但是在本教程的过程中,我们不仅对驾驶教师的网站进行了现代化改造,而且还潜在地改变了他们管理预订的方式。 每个人都赢了!
Want to learn more? Find out how to build a cookery class booking system with Acuity Scheduling, PHP and Lumen.
想了解更多? 了解如何使用Acuity Scheduling,PHP和Lumen构建烹饪课程预订系统 。
可视化指挥调度系统


 3187
3187

 被折叠的 条评论
为什么被折叠?
被折叠的 条评论
为什么被折叠?
 到【灌水乐园】发言


